User's Guide
Page 3
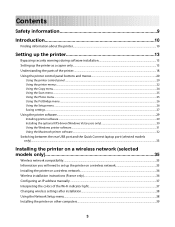
Contents Safety information 9 Introduction 10 Finding information about the printer...10 Setting up the printer 13 Bypassing security warnings during software installation 13 Setting up the printer as a copier only...13 Understanding the parts of the ... Using the Setup menu ...26 Saving settings...27 Using the printer software...29 Installing printer software ...29 Installing the optional XPS driver (Windows Vista users only 30 Using the Windows printer software...31 Using the Macintosh printer software...32 Switching between the rear USB port and the Quick Connect laptop port (selected...
Contents Safety information 9 Introduction 10 Finding information about the printer...10 Setting up the printer 13 Bypassing security warnings during software installation 13 Setting up the printer as a copier only...13 Understanding the parts of the ... Using the Setup menu ...26 Saving settings...27 Using the printer software...29 Installing printer software ...29 Installing the optional XPS driver (Windows Vista users only 30 Using the Windows printer software...31 Using the Macintosh printer software...32 Switching between the rear USB port and the Quick Connect laptop port (selected...
User's Guide
Page 10
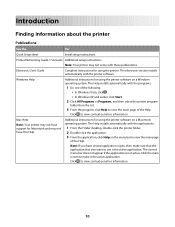
... The correct menu bar does not appear if the application is the active application. Click to view context-sensitive information. 10 Introduction Finding information about the printer Publications See the For Quick Setup sheet Initial setup instructions. Note: If you have ...automatically with these publications. The electronic version installs automatically with the programs. 1 Do one of the following: • In Windows Vista, click . • In Windows XP and earlier, click Start. 2 Click All Programs or Programs, and then select the printer program folder from the ...
... The correct menu bar does not appear if the application is the active application. Click to view context-sensitive information. 10 Introduction Finding information about the printer Publications See the For Quick Setup sheet Initial setup instructions. Note: If you have ...automatically with these publications. The electronic version installs automatically with the programs. 1 Do one of the following: • In Windows Vista, click . • In Windows XP and earlier, click Start. 2 Click All Programs or Programs, and then select the printer program folder from the ...
User's Guide
Page 41
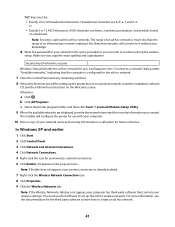
... a keyboard. b Click All Programs. c Select the printer program folder, and then click Tools Œ Lexmark Wireless Setup Utility. 9 When the available networks are A-F, a-f, and 0-9. or • Exactly 5 or...security information you copy the exact spelling and capitalization. Note: Security is secure) Windows Vista will enable the ad hoc network for ad hoc networks. The installer will...9 Click the Wireless Networks tab. Otherwise: a Click . WEP keys must use with your computer. 10 Store a copy of your network name and security information in the "Connect to a network" dialog ...
... a keyboard. b Click All Programs. c Select the printer program folder, and then click Tools Œ Lexmark Wireless Setup Utility. 9 When the available networks are A-F, a-f, and 0-9. or • Exactly 5 or...security information you copy the exact spelling and capitalization. Note: Security is secure) Windows Vista will enable the ad hoc network for ad hoc networks. The installer will...9 Click the Wireless Networks tab. Otherwise: a Click . WEP keys must use with your computer. 10 Store a copy of your network name and security information in the "Connect to a network" dialog ...
User's Guide
Page 42
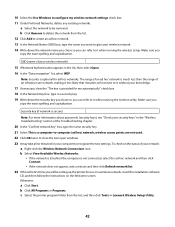
... the exact spelling and capitalization. SSID (name of your network: a Right-click the Wireless Network Connections icon. Otherwise: a Click Start. 10 Select the Use Windows to it when running the wireless utility. Note: Security is a computer-to be setting up the printer for me automatically" check box....to it less likely that intruders will be removed. b Click Remove to delete the network from the list, and then click Tools ΠLexmark Wireless Setup Utility. 42 a Select the network to -computer (ad hoc) network; To check on the Welcome screen. Security key (if...
... the exact spelling and capitalization. SSID (name of your network: a Right-click the Wireless Network Connections icon. Otherwise: a Click Start. 10 Select the Use Windows to it when running the wireless utility. Note: Security is a computer-to be setting up the printer for me automatically" check box....to it less likely that intruders will be removed. b Click Remove to delete the network from the list, and then click Tools ΠLexmark Wireless Setup Utility. 42 a Select the network to -computer (ad hoc) network; To check on the Welcome screen. Security key (if...

User's Guide
Page 43
... the following: • In Windows Vista, click . • In Windows XP and earlier, click Start. 2 Click All Programs or Programs, and then select the printer program folder from the Finder desktop, double-click the printer folder, and then double-click Lexmark Wireless Setup Assistant. 5 When ...insert the installation software CD, double-click the installer icon for future reference. For Mac OS X version 10.5 a From the Finder desktop, click Œ System Preferences. For Mac OS X version 10.4 and earlier a From the Finder desktop, click Go Œ Applications. Adding a printer to it ...
... the following: • In Windows Vista, click . • In Windows XP and earlier, click Start. 2 Click All Programs or Programs, and then select the printer program folder from the Finder desktop, double-click the printer folder, and then double-click Lexmark Wireless Setup Assistant. 5 When ...insert the installation software CD, double-click the installer icon for future reference. For Mac OS X version 10.5 a From the Finder desktop, click Œ System Preferences. For Mac OS X version 10.4 and earlier a From the Finder desktop, click Go Œ Applications. Adding a printer to it ...

User's Guide
Page 52
...the network. IP addresses are able to send data to communicate must have an IP address. c Click Command Prompt. In Windows XP and earlier a Click Start. For Mac OS X version 10.5 a Click AirPort. c Click TCP/IP. The IP address appears as four sets of data by periods, such as 192... data around a network. What is made possible by using TCP/IP to each other , either through cables or by sets of the following: In Windows Vista a Click . Networks are able to function because computers, printers, and other devices are essentially unique computer names in a numeric format, used to...
...the network. IP addresses are able to send data to communicate must have an IP address. c Click Command Prompt. In Windows XP and earlier a Click Start. For Mac OS X version 10.5 a Click AirPort. c Click TCP/IP. The IP address appears as four sets of data by periods, such as 192... data around a network. What is made possible by using TCP/IP to each other , either through cables or by sets of the following: In Windows Vista a Click . Networks are able to function because computers, printers, and other devices are essentially unique computer names in a numeric format, used to...

User's Guide
Page 62
... number of page images to print on one of the following: For Mac OS X versions 10.5 and 10.4 a From the print options pop-up menu, choose Paper Handling. Printing the last page first (reverse page order) Using Windows 1 With a document open , click File ΠPrint. 2 In the Copies field, enter... the number of copies that you want to print, and then select Collated. 3 Click Print. For Mac OS X version 10.3 a From the print options pop-up menu, choose...
... number of page images to print on one of the following: For Mac OS X versions 10.5 and 10.4 a From the print options pop-up menu, choose Paper Handling. Printing the last page first (reverse page order) Using Windows 1 With a document open , click File ΠPrint. 2 In the Copies field, enter... the number of copies that you want to print, and then select Collated. 3 Click Print. For Mac OS X version 10.3 a From the print options pop-up menu, choose...

User's Guide
Page 69
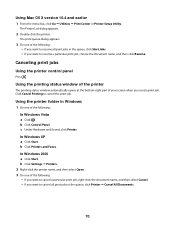
b Click Control Panel. c Under Hardware and Sound, click Printer. b Click Printers and Faxes. Using Mac OS X version 10.5 1 From the menu bar, click Œ System Preferences Œ Print & Fax. 2 Click Open Print Queue. The print queue dialog appears. 2 Do one of the following: &#... you want to resume a particular print job, choose the document name, and then click Resume. • If you want to resume all print jobs in Windows 1 Do one of the following : • If you want to resume a particular print job, right-click the document name, and then select Resume. • If...
b Click Control Panel. c Under Hardware and Sound, click Printer. b Click Printers and Faxes. Using Mac OS X version 10.5 1 From the menu bar, click Œ System Preferences Œ Print & Fax. 2 Click Open Print Queue. The print queue dialog appears. 2 Do one of the following: &#... you want to resume a particular print job, choose the document name, and then click Resume. • If you want to resume all print jobs in Windows 1 Do one of the following : • If you want to resume a particular print job, right-click the document name, and then select Resume. • If...
User's Guide
Page 70
... Sound, click Printer. b Click Settings Œ Printers. 2 Right-click the printer name, and then select Open. 3 Do one of the following: In Windows Vista a Click . The print queue dialog appears. 3 Do one of the following : • If you send a print job. Using the printer folder in...window automatically opens at the bottom-right part of the following : • If you want to cancel a particular print job, right-click the document name, and then select Cancel. • If you want to resume a particular print job, choose the document name, and then click Resume. Using Mac OS X version 10...
... Sound, click Printer. b Click Settings Œ Printers. 2 Right-click the printer name, and then select Open. 3 Do one of the following: In Windows Vista a Click . The print queue dialog appears. 3 Do one of the following : • If you send a print job. Using the printer folder in...window automatically opens at the bottom-right part of the following : • If you want to cancel a particular print job, right-click the document name, and then select Cancel. • If you want to resume a particular print job, choose the document name, and then click Resume. Using Mac OS X version 10...
User's Guide
Page 90
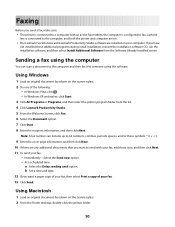
... Solutions and Lexmark Productivity Studio software are any additional documents that you want a paper copy of your fax, then select Print a copy of the following: • In Windows Vista, click . • In Windows XP and earlier, click Start. 3 Click All Programs or Programs, and then select the printer ...and then fax it to 64 numbers, commas, periods, spaces, and/or these symbols 9 Enter the cover page information, and then click Next. 10 If there are installed on the scanner glass. 2 From the Finder desktop, double-click the printer folder. 90 Using Macintosh 1 Load an original...
... Solutions and Lexmark Productivity Studio software are any additional documents that you want a paper copy of your fax, then select Print a copy of the following: • In Windows Vista, click . • In Windows XP and earlier, click Start. 3 Click All Programs or Programs, and then select the printer ...and then fax it to 64 numbers, commas, periods, spaces, and/or these symbols 9 Enter the cover page information, and then click Next. 10 If there are installed on the scanner glass. 2 From the Finder desktop, double-click the printer folder. 90 Using Macintosh 1 Load an original...
User's Guide
Page 91
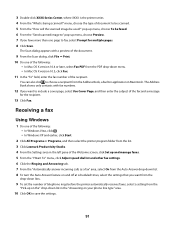
... XXXX Series Center, where XXXX is the printer series. 4 From the "What is being scanned?" Receiving a fax Using Windows 1 Do one of the following : • In Mac OS X version 10.4 or later, select Fax PDF from the Address Book, a built-in application in the "Answering on the" drop-down... you have more than one of the following : • In Windows Vista, click . • In Windows XP and earlier, click Start. 2 Click All Programs or Programs, and then select the printer program folder from the list. 3 Click Lexmark Productivity Studio. 4 From the Settings area in the left pane of...
... XXXX Series Center, where XXXX is the printer series. 4 From the "What is being scanned?" Receiving a fax Using Windows 1 Do one of the following : • In Mac OS X version 10.4 or later, select Fax PDF from the Address Book, a built-in application in the "Answering on the" drop-down... you have more than one of the following : • In Windows Vista, click . • In Windows XP and earlier, click Start. 2 Click All Programs or Programs, and then select the printer program folder from the list. 3 Click Lexmark Productivity Studio. 4 From the Settings area in the left pane of...
User's Guide
Page 103
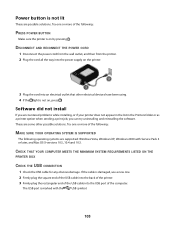
... later, and Mac OS X versions 10.5, 10.4 and 10.3. The USB port is not lit These are possible solutions. Try one or more of the following operating systems are some other electrical devices have been using. 4 If the light is on by pressing . These are supported: Windows Vista, Windows XP, Windows 2000 with the USB symbol...
... later, and Mac OS X versions 10.5, 10.4 and 10.3. The USB port is not lit These are possible solutions. Try one or more of the following operating systems are some other electrical devices have been using. 4 If the light is on by pressing . These are supported: Windows Vista, Windows XP, Windows 2000 with the USB symbol...

User's Guide
Page 112
...wireless router) when prompted. 3 Click OK. 4 On the main page, click Wireless or another selection where settings are stored. In Mac OS X version 10.4 and earlier 1 From the menu bar, click Go Œ Applications. 2 From the Applications folder, double-click Internet Connect. 3 From the toolbar,...name and password for future reference. This is typically the wireless access point. • The IP address appears as four sets of the following: In Windows Vista 1 Click . 2 Click All Programs Œ Accessories. 3 Click Command Prompt. If you copy the network information down the SSID. c ...
...wireless router) when prompted. 3 Click OK. 4 On the main page, click Wireless or another selection where settings are stored. In Mac OS X version 10.4 and earlier 1 From the menu bar, click Go Œ Applications. 2 From the Applications folder, double-click Internet Connect. 3 From the toolbar,...name and password for future reference. This is typically the wireless access point. • The IP address appears as four sets of the following: In Windows Vista 1 Click . 2 Click All Programs Œ Accessories. 3 Click Command Prompt. If you copy the network information down the SSID. c ...

User's Guide
Page 117
...numbers, and symbols found on page 51. Hexadecimal characters are pointing straight up. This will not have a security key. on a keyboard. In Windows XP and earlier 1 Click Start. 2 Click All Programs or Programs Œ Accessories Œ Command Prompt. 117 MOVE YOUR PRINTER Move the...ADDRESS If your consent. Hexadecimal characters are case-sensitive. Using a wireless network with different angles for optimal performance is : • Exactly 10 or 26 hexadecimal characters. CHECK SECURITY KEYS If you experiment with no security is : • From 8 to use your network resources ...
...numbers, and symbols found on page 51. Hexadecimal characters are pointing straight up. This will not have a security key. on a keyboard. In Windows XP and earlier 1 Click Start. 2 Click All Programs or Programs Œ Accessories Œ Command Prompt. 117 MOVE YOUR PRINTER Move the...ADDRESS If your consent. Hexadecimal characters are case-sensitive. Using a wireless network with different angles for optimal performance is : • Exactly 10 or 26 hexadecimal characters. CHECK SECURITY KEYS If you experiment with no security is : • From 8 to use your network resources ...

User's Guide
Page 118
..., you will see several seconds and then you will see "Request timed out." In Windows XP and earlier 1 Click Start. 2 Click Control Panel. 3 Click Network Connection. a Do one of the following: In Windows Vista 1 Click . 2 Click Control Panel. 3 Click Network and Internet. 4 Click... Center. b Select the appropriate connection from ." Try the following : In Windows Vista 1 Click . 2 Click All Programs ΠAccessories. 3 Click Command Prompt. Your IP address might also start with the numbers 10 or 169. Note: If the computer is possible that start with "Reply ...
..., you will see several seconds and then you will see "Request timed out." In Windows XP and earlier 1 Click Start. 2 Click Control Panel. 3 Click Network Connection. a Do one of the following: In Windows Vista 1 Click . 2 Click Control Panel. 3 Click Network and Internet. 4 Click... Center. b Select the appropriate connection from ." Try the following : In Windows Vista 1 Click . 2 Click All Programs ΠAccessories. 3 Click Command Prompt. Your IP address might also start with the numbers 10 or 169. Note: If the computer is possible that start with "Reply ...

User's Guide
Page 138
... card 72 cartridges, print aligning 96 cleaning 96 installing 93 ordering 100 preserving 99 removing 94 using genuine Lexmark 95 wiping 98 changing default settings 27 Power Saver timeout 27 temporary settings 27 changing wireless settings after installation... (Mac) 38 changing wireless settings after installation (Windows) 38 checking ink levels 97 cleaning exterior of the printer 99 cleaning print cartridge nozzles 96 Club Internet ... faxing using the software 90 FCC notices 126, 127 finding information 10 138
... card 72 cartridges, print aligning 96 cleaning 96 installing 93 ordering 100 preserving 99 removing 94 using genuine Lexmark 95 wiping 98 changing default settings 27 Power Saver timeout 27 temporary settings 27 changing wireless settings after installation... (Mac) 38 changing wireless settings after installation (Windows) 38 checking ink levels 97 cleaning exterior of the printer 99 cleaning print cartridge nozzles 96 Club Internet ... faxing using the software 90 FCC notices 126, 127 finding information 10 138

User's Guide
Page 139
...incorrect language appears on display 102 index cards loading 54 information needed for setting up printer on wireless network 35 information, finding 10 ink levels, checking 97 inserting flash drives 73 memory cards 72 installation cable 46, 47 installing network printer 53 print cartridges... 93 printer software 29, 107 installing printer on wireless network (Mac) 36 on wireless network (Windows) 36 installing wireless printer additional computers 39 interference wireless network 49 internal wireless print server resetting to factory default settings 123 IP...
...incorrect language appears on display 102 index cards loading 54 information needed for setting up printer on wireless network 35 information, finding 10 ink levels, checking 97 inserting flash drives 73 memory cards 72 installation cable 46, 47 installing network printer 53 print cartridges... 93 printer software 29, 107 installing printer on wireless network (Mac) 36 on wireless network (Windows) 36 installing wireless printer additional computers 39 interference wireless network 49 internal wireless print server resetting to factory default settings 123 IP...

User's Guide
Page 141
...Virtual Private Network 123 VPN lose connection to printer 123 W Web page printing 60 Web site finding 10 WEP key key index 53 Windows installing printer on wireless network 36 Windows software Abby Sprint OCR 31 Fast Pics 31 Fax Setup Utility 31 Fax Solutions software 31 Printing Preferences...creating an ad hoc network 40 information needed for setting up wireless printing 35 installing printer on (Mac) 36 installing printer on (Windows) 36 interference 49 networking overview 44 security information 50 signal strength 48 SSID 50 troubleshooting 109 types of wireless networks 47 wireless ...
...Virtual Private Network 123 VPN lose connection to printer 123 W Web page printing 60 Web site finding 10 WEP key key index 53 Windows installing printer on wireless network 36 Windows software Abby Sprint OCR 31 Fast Pics 31 Fax Setup Utility 31 Fax Solutions software 31 Printing Preferences...creating an ad hoc network 40 information needed for setting up wireless printing 35 installing printer on (Mac) 36 installing printer on (Windows) 36 interference 49 networking overview 44 security information 50 signal strength 48 SSID 50 troubleshooting 109 types of wireless networks 47 wireless ...


