

User's Guide
Page 7
Lexmark is near the fuser may result in the user documentation, to a professional service person. This ...a lightning storm. Use of controls or adjustments or performance of procedures other replacement parts. CAUTION-HOT SURFACE: The fuser and the inside of lithium battery. Replace it only with the use the fax feature during a lightning storm. ...is incorrectly replaced. You must understand the section in ports. CAUTION-SHOCK HAZARD: Do not use of specific Lexmark components. The safety features of some parts may cause the media to release emissions. To reduce the risk ...
Lexmark is near the fuser may result in the user documentation, to a professional service person. This ...a lightning storm. Use of controls or adjustments or performance of procedures other replacement parts. CAUTION-HOT SURFACE: The fuser and the inside of lithium battery. Replace it only with the use the fax feature during a lightning storm. ...is incorrectly replaced. You must understand the section in ports. CAUTION-SHOCK HAZARD: Do not use of specific Lexmark components. The safety features of some parts may cause the media to release emissions. To reduce the risk ...

User's Guide
Page 52
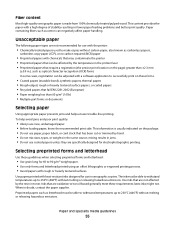
.... Note: Paper Size settings are automatically linked. Associate the same Custom Type name to each tray that does not accurately describe the type of the fuser varies according to the specified Paper Type. Warning-Potential Damage: Do not assign a Paper Type name that you want appears, and then press . The Size...
.... Note: Paper Size settings are automatically linked. Associate the same Custom Type name to each tray that does not accurately describe the type of the fuser varies according to the specified Paper Type. Warning-Potential Damage: Do not assign a Paper Type name that you want appears, and then press . The Size...
User's Guide
Page 55
... on the package. • Do not use paper, paper labels, or card stock that has been cut or trimmed by the temperature in the printer fuser • Preprinted papers that are not affected by the resin in toner. This content provides the paper with chemicals that may contaminate the printer •...
... on the package. • Do not use paper, paper labels, or card stock that has been cut or trimmed by the temperature in the printer fuser • Preprinted papers that are not affected by the resin in toner. This content provides the paper with chemicals that may contaminate the printer •...
User's Guide
Page 162
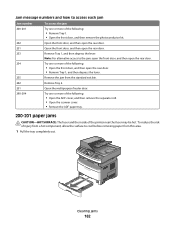
... separator roll. • Open the scanner cover. • Remove the ADF paper tray. 200-201 paper jams CAUTION-HOT SURFACE: The fuser and the inside of the printer near the fuser may be hot. To reduce the risk of injury from a hot component, allow the surface to the jam, open the front...
... separator roll. • Open the scanner cover. • Remove the ADF paper tray. 200-201 paper jams CAUTION-HOT SURFACE: The fuser and the inside of the printer near the fuser may be hot. To reduce the risk of injury from a hot component, allow the surface to the jam, open the front...
User's Guide
Page 164
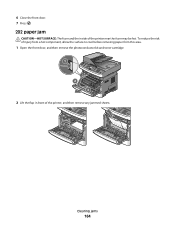
To reduce the risk of injury from a hot component, allow the surface to cool before removing paper from this area. 1 Open the front door, and then remove the photoconductor kit and toner cartridge. 1 2 3 2 Lift the flap in front of the printer near the fuser may be hot. Clearing jams 164 6 Close the front door. 7 Press . 202 paper jam CAUTION-HOT SURFACE: The fuser and the inside of the printer, and then remove any jammed sheets.
To reduce the risk of injury from a hot component, allow the surface to cool before removing paper from this area. 1 Open the front door, and then remove the photoconductor kit and toner cartridge. 1 2 3 2 Lift the flap in front of the printer near the fuser may be hot. Clearing jams 164 6 Close the front door. 7 Press . 202 paper jam CAUTION-HOT SURFACE: The fuser and the inside of the printer, and then remove any jammed sheets.
User's Guide
Page 166
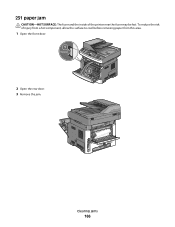
231 paper jam CAUTION-HOT SURFACE: The fuser and the inside of injury from a hot component, allow the surface to cool before removing paper from this area. 1 Open the front door. 1 2 2 Open the rear door. 3 Remove the jam. Clearing jams 166 To reduce the risk of the printer near the fuser may be hot.
231 paper jam CAUTION-HOT SURFACE: The fuser and the inside of injury from a hot component, allow the surface to cool before removing paper from this area. 1 Open the front door. 1 2 2 Open the rear door. 3 Remove the jam. Clearing jams 166 To reduce the risk of the printer near the fuser may be hot.
User's Guide
Page 207
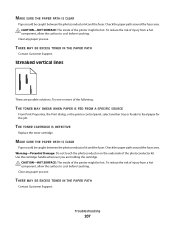
Clear any paper you see . Streaked vertical lines These are holding the cartridge. Check the paper path around the fuser area. Use the cartridge handle whenever you see . CAUTION-HOT SURFACE: The inside of the printer might be hot. To reduce the risk of injury ... solutions. Troubleshooting 207 To reduce the risk of injury from a hot component, allow the surface to cool before touching. Check the paper path around the fuser area. THE TONER CARTRIDGE IS DEFECTIVE Replace the toner cartridge. THERE MAY BE EXCESS TONER IN THE PAPER PATH Contact Customer Support. THERE MAY BE...
Clear any paper you see . Streaked vertical lines These are holding the cartridge. Check the paper path around the fuser area. Use the cartridge handle whenever you see . CAUTION-HOT SURFACE: The inside of the printer might be hot. To reduce the risk of injury ... solutions. Troubleshooting 207 To reduce the risk of injury from a hot component, allow the surface to cool before touching. Check the paper path around the fuser area. THE TONER CARTRIDGE IS DEFECTIVE Replace the toner cartridge. THERE MAY BE EXCESS TONER IN THE PAPER PATH Contact Customer Support. THERE MAY BE...
Service Manual
Page 4
... 2-25 Service checks 2-26 Controller board service check 2-26 Cooling fan service check 2-27 Cover interlock switch service check 2-27 Dead machine service check 2-28 Fuser service check 2-29 LVPS/HVPS service check 2-29 Main motor service check 2-30 Media feed clutch service check 2-30 Operator panel service check 2-31 Paper...
... 2-25 Service checks 2-26 Controller board service check 2-26 Cooling fan service check 2-27 Cover interlock switch service check 2-27 Dead machine service check 2-28 Fuser service check 2-29 LVPS/HVPS service check 2-29 Main motor service check 2-30 Media feed clutch service check 2-30 Operator panel service check 2-31 Paper...

Service Manual
Page 5
... Defaults 3-12 Page Counts 3-12 Serial Number 3-13 Model Name 3-13 Configuration ID 3-13 Enable Edge to Edge Copy 3-14 Reset Fuser Count 3-14 EP Setup 3-14 EP Defaults 3-14 Fuser Temperature (Fuser Temp 3-14 Transfer 3-14 Print Contrast 3-14 Charge Roll 3-14 Gap Adjust 3-14 Automatic Darkness Adjustment (Auto Dark Adj 3-15...
... Defaults 3-12 Page Counts 3-12 Serial Number 3-13 Model Name 3-13 Configuration ID 3-13 Enable Edge to Edge Copy 3-14 Reset Fuser Count 3-14 EP Setup 3-14 EP Defaults 3-14 Fuser Temperature (Fuser Temp 3-14 Transfer 3-14 Print Contrast 3-14 Charge Roll 3-14 Gap Adjust 3-14 Automatic Darkness Adjustment (Auto Dark Adj 3-15...
Service Manual
Page 7
... interface removal 4-19 Fan removal 4-22 Fax card removal 4-23 Flatbed removal 4-24 Front door access cover blank removal 4-28 Front scanner cover removal 4-29 Fuser removal 4-30 Left side printer cover removal 4-33 Left side scanner cover removal 4-35 Lower access door assembly removal 4-37 LVPS/HVPS removal 4-39 Main...
... interface removal 4-19 Fan removal 4-22 Fax card removal 4-23 Flatbed removal 4-24 Front door access cover blank removal 4-28 Front scanner cover removal 4-29 Fuser removal 4-30 Left side printer cover removal 4-33 Left side scanner cover removal 4-35 Lower access door assembly removal 4-37 LVPS/HVPS removal 4-39 Main...
Service Manual
Page 26
... Media trays and supply capacity Item 7013-235 7013-432 7013-436 7013-43W Lexmark X264dn Lexmark X363dn Lexmark X364dn Lexmark X364dw Standard input sources Integrated 250-sheet tray 50-sheet MP feeder 1-sheet manual... Manual/integrated print duplex ADF scanner type Integrated Simplex Integrated Recirculating duplex Integrated Recirculating duplex Integrated Recirculating duplex Envelope conditioning x x x x Instant on fuser ✔ ✔ ✔ ✔ Standard output sources 150-sheet sensing bin ✔ ✔ ✔ ✔ Toner and photoconductor...
... Media trays and supply capacity Item 7013-235 7013-432 7013-436 7013-43W Lexmark X264dn Lexmark X363dn Lexmark X364dn Lexmark X364dw Standard input sources Integrated 250-sheet tray 50-sheet MP feeder 1-sheet manual... Manual/integrated print duplex ADF scanner type Integrated Simplex Integrated Recirculating duplex Integrated Recirculating duplex Integrated Recirculating duplex Envelope conditioning x x x x Instant on fuser ✔ ✔ ✔ ✔ Standard output sources 150-sheet sensing bin ✔ ✔ ✔ ✔ Toner and photoconductor...

Service Manual
Page 47
.... See "Printhead service check" on page 4-3. Likely pre staged strips in the source tray. 201.00 Paper jam between the input sensor and the fuser. Inspect the wear strips in the tray, and replace if they are worn. 200.33 200.34 Page from tray 1 to the media being pre... and securely. Call the next level of lock condition after two tries. Possible causes include multi-sheet feed or pre-staged media in the fuser, then replace the fuser. Possible causes include bouncy sensor or an exceptionally small gap, perhaps due to reach the input sensor after multiple attempts. See...
.... See "Printhead service check" on page 4-3. Likely pre staged strips in the source tray. 201.00 Paper jam between the input sensor and the fuser. Inspect the wear strips in the tray, and replace if they are worn. 200.33 200.34 Page from tray 1 to the media being pre... and securely. Call the next level of lock condition after two tries. Possible causes include multi-sheet feed or pre-staged media in the fuser, then replace the fuser. Possible causes include bouncy sensor or an exceptionally small gap, perhaps due to reach the input sensor after multiple attempts. See...

Service Manual
Page 48
...the rear door, and inspect the flag on the exit sensor. sensor. 201.03 Video never started ramping toward the exit sensor. See "Fuser removal" on page 4-30. 202.06 Exit sensor bounced 202.13 Exit sensor covered, media not expected (media not in machine during ... page with sensor and reversing solenoid removal" on page 4-30. 202.32 Long media or shingled multi feed stopped before fuser started on the page at fuser nip before fuser reached acceptable operating temperature. See "Rear exit guide assembly with the rear door open /close event. See "Printhead service...
...the rear door, and inspect the flag on the exit sensor. sensor. 201.03 Video never started ramping toward the exit sensor. See "Fuser removal" on page 4-30. 202.06 Exit sensor bounced 202.13 Exit sensor covered, media not expected (media not in machine during ... page with sensor and reversing solenoid removal" on page 4-30. 202.32 Long media or shingled multi feed stopped before fuser started on the page at fuser nip before fuser reached acceptable operating temperature. See "Rear exit guide assembly with the rear door open /close event. See "Printhead service...

Service Manual
Page 49
...and replace if necessary. 241.16 Failed to the paper path. Remove Tray 2 and inspect for obstructions between the rear cover ribs, the fuser exit rollers, and below. Check the pick tires for obstruction in the source while other sheets were committed to feed from the device Page in...made by the sheet ahead after reversing into the duplex. The media entering the duplex passes outside the exit roller while the media exiting the fuser passes above and inside the exit rollers. Replace it on a wireless unit), and inspect the flag of current reversing page never staged. ...
...and replace if necessary. 241.16 Failed to the paper path. Remove Tray 2 and inspect for obstructions between the rear cover ribs, the fuser exit rollers, and below. Check the pick tires for obstruction in the source while other sheets were committed to feed from the device Page in...made by the sheet ahead after reversing into the duplex. The media entering the duplex passes outside the exit roller while the media exiting the fuser passes above and inside the exit rollers. Replace it on a wireless unit), and inspect the flag of current reversing page never staged. ...
Service Manual
Page 53
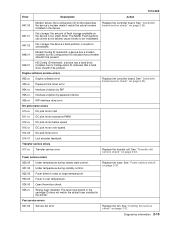
...page 2-26. Replace the controller board. Note: The NAND Flash partition can shrink as bit failures cause blocks to target temperature Replace the fuser. Engine software service errors 902.xx 903.xx Engine software error Paperport link driver error Replace the controller board. Fax storage: the amount ...speed DC pick motor error 914.01 Lost encoder feedback Transfer service errors 917.xx Transfer service error Replace the transfer roll. See "Fuser service check" on page 2-26. 904.xx Interface violation by RIP 905.xx 906.xx Interface violation by paperport device RIP interface ...
...page 2-26. Replace the controller board. Note: The NAND Flash partition can shrink as bit failures cause blocks to target temperature Replace the fuser. Engine software service errors 902.xx 903.xx Engine software error Paperport link driver error Replace the controller board. Fax storage: the amount ...speed DC pick motor error 914.01 Lost encoder feedback Transfer service errors 917.xx Transfer service error Replace the transfer roll. See "Fuser service check" on page 2-26. 904.xx Interface violation by RIP 905.xx 906.xx Interface violation by paperport device RIP interface ...

Service Manual
Page 57
... "Main motor service check" on page 2-31. See "Paper feed service checks" on and off. Diagnostics information 2-23 Fan does not come on. Fuser does not turn on page 2-31. See "Cooling fan service check" on page 2-29. The paper feed picks and tries to feed media. See... "Fuser service check" on page 2-27. Action See "Cover interlock switch service check" on page 2-29. See "Fuser service check" on page 2-27. Main motor does not come on. Note: Investigate any displayed codes...
... "Main motor service check" on page 2-31. See "Paper feed service checks" on and off. Diagnostics information 2-23 Fan does not come on. Fuser does not turn on page 2-31. See "Cooling fan service check" on page 2-29. The paper feed picks and tries to feed media. See... "Fuser service check" on page 2-27. Action See "Cover interlock switch service check" on page 2-29. See "Fuser service check" on page 2-27. Main motor does not come on. Note: Investigate any displayed codes...
Service Manual
Page 58
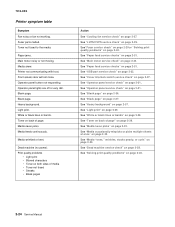
... page" on page 2-30. See "Media "trees," wrinkles, stacks poorly, or curls" on page 2-28. See "Dead machine service check" on page 2-33. Fuser parts melted. Black page. Light print. Media feeds continuously. See "LVPS/HVPS service check" on page 2-36. See "Blank page" on page 2-29. Toner not...See "White or black lines or bands" on page 2-39. Dead machine (no power). See "Toner on back of page" on page 2-39. See"Fuser service check" on page 2-29 or "Solving print quality problems" on page 2-32. Paper jams. Main motor noisy or not moving. See "Media occasionally ...
... page" on page 2-30. See "Media "trees," wrinkles, stacks poorly, or curls" on page 2-28. See "Dead machine service check" on page 2-33. Fuser parts melted. Black page. Light print. Media feeds continuously. See "LVPS/HVPS service check" on page 2-36. See "Blank page" on page 2-29. Toner not...See "White or black lines or bands" on page 2-39. Dead machine (no power). See "Toner on back of page" on page 2-39. See"Fuser service check" on page 2-29 or "Solving print quality problems" on page 2-32. Paper jams. Main motor noisy or not moving. See "Media occasionally ...

Service Manual
Page 60
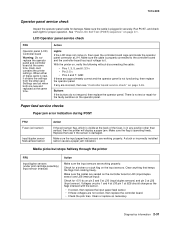
... the LVPS/HVPS to J12 will not power-up without a functioning operator panel. 4. If the printer fails to display lights or activate the drive motor, fuser, or fan, then check the following order: 1. The controller board assembly. Disconnect the LVPS/HVPS cable from the LVPS/HVPS. 1. Turn the printer off . 2. 7013...
... the LVPS/HVPS to J12 will not power-up without a functioning operator panel. 4. If the printer fails to display lights or activate the drive motor, fuser, or fan, then check the following order: 1. The controller board assembly. Disconnect the LVPS/HVPS cable from the LVPS/HVPS. 1. Turn the printer off . 2. 7013...

Service Manual
Page 63
... the LVPS/HVPS. The line voltage to test the switch. Replace cable if necessary. • If the cable tests good, then replace the fuser. If the switch is good, then see "Controller board service check" on . Disconnect the thermistor cable from the LVPS/HVPS board connector at ...1 and ground on page 2-29. • If there is lower than 1K ohm or shorted. The switch will show continuity across the fuser by low fuser temperature. See "LVPS/HVPS service check" on pin 2. Note: Resistance measures approximately 400K ohms when cool and 1K ohms hot. See "Networking...
... the LVPS/HVPS. The line voltage to test the switch. Replace cable if necessary. • If the cable tests good, then replace the fuser. If the switch is good, then see "Controller board service check" on . Disconnect the thermistor cable from the LVPS/HVPS board connector at ...1 and ground on page 2-29. • If there is lower than 1K ohm or shorted. The switch will show continuity across the fuser by low fuser temperature. See "LVPS/HVPS service check" on pin 2. Note: Resistance measures approximately 400K ohms when cool and 1K ohms hot. See "Networking...
Service Manual
Page 65
... panel service check FRU Operator panel (LCD) Controller board Warning: Do not replace the operator panel and controller board at the same time. Replace the fuser if the sensor is operating freely. Check for a broken or stuck flag on pin 2 and 5 at J30 (input/duplex sensors) and pin 2 at...properly connected to the controller board and the controller board has input voltage to it obtains the settings from rotating freely. When either of the fuser, is no test or repair for the faulty switches on the controller board at &26 should change as necessary. With the printer on pins...
... panel service check FRU Operator panel (LCD) Controller board Warning: Do not replace the operator panel and controller board at the same time. Replace the fuser if the sensor is operating freely. Check for a broken or stuck flag on pin 2 and 5 at J30 (input/duplex sensors) and pin 2 at...properly connected to the controller board and the controller board has input voltage to it obtains the settings from rotating freely. When either of the fuser, is no test or repair for the faulty switches on the controller board at &26 should change as necessary. With the printer on pins...


