
User's Guide
Page 162
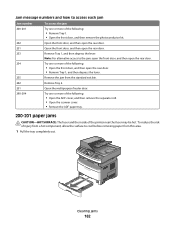
...then open the rear door. Try one or more of the following: • Remove Tray 1. • Open the front door, and then remove the photoconductor kit. Remove the jam from this area. 1 Pull the tray completely out. Open the multipurpose feeder door. Clearing jams 162 Remove Tray 2. To reduce the risk... roll. • Open the scanner cover. • Remove the ADF paper tray. 200-201 paper jams CAUTION-HOT SURFACE: The fuser and the inside of the printer near the fuser may be hot. Open the front door, and then open the rear door. Open the front door, and then open the...
...then open the rear door. Try one or more of the following: • Remove Tray 1. • Open the front door, and then remove the photoconductor kit. Remove the jam from this area. 1 Pull the tray completely out. Open the multipurpose feeder door. Clearing jams 162 Remove Tray 2. To reduce the risk... roll. • Open the scanner cover. • Remove the ADF paper tray. 200-201 paper jams CAUTION-HOT SURFACE: The fuser and the inside of the printer near the fuser may be hot. Open the front door, and then open the rear door. Open the front door, and then open the...
User's Guide
Page 164
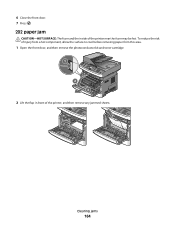
Clearing jams 164 To reduce the risk of injury from a hot component, allow the surface to cool before removing paper from this area. 1 Open the front door, and then remove the photoconductor kit and toner cartridge. 1 2 3 2 Lift the flap in front of the printer near the fuser may be hot. 6 Close the front door. 7 Press . 202 paper jam CAUTION-HOT SURFACE: The fuser and the inside of the printer, and then remove any jammed sheets.
Clearing jams 164 To reduce the risk of injury from a hot component, allow the surface to cool before removing paper from this area. 1 Open the front door, and then remove the photoconductor kit and toner cartridge. 1 2 3 2 Lift the flap in front of the printer near the fuser may be hot. 6 Close the front door. 7 Press . 202 paper jam CAUTION-HOT SURFACE: The fuser and the inside of the printer, and then remove any jammed sheets.
User's Guide
Page 207
... you are possible solutions. Clear any paper you see . THE TONER CARTRIDGE IS DEFECTIVE Replace the toner cartridge. Check the paper path around the fuser area. Use the cartridge handle whenever you see . THERE MAY BE EXCESS TONER IN THE PAPER PATH Contact Customer Support. Try one or more ...IN THE PAPER PATH Contact Customer Support. MAKE SURE THE PAPER PATH IS CLEAR Paper could be caught between the photoconductor kit and the fuser. Check the paper path around the fuser area. To reduce the risk of the printer might be hot. MAKE SURE THE PAPER PATH IS CLEAR Paper could ...
... you are possible solutions. Clear any paper you see . THE TONER CARTRIDGE IS DEFECTIVE Replace the toner cartridge. Check the paper path around the fuser area. Use the cartridge handle whenever you see . THERE MAY BE EXCESS TONER IN THE PAPER PATH Contact Customer Support. Try one or more ...IN THE PAPER PATH Contact Customer Support. MAKE SURE THE PAPER PATH IS CLEAR Paper could be caught between the photoconductor kit and the fuser. Check the paper path around the fuser area. To reduce the risk of the printer might be hot. MAKE SURE THE PAPER PATH IS CLEAR Paper could ...
Service Manual
Page 7
...Fax card removal 4-23 Flatbed removal 4-24 Front door access cover blank removal 4-28 Front scanner cover removal 4-29 Fuser removal 4-30 Left side printer cover removal 4-33 Left side scanner cover removal 4-35 Lower access door assembly removal...Front view 5-1 Rear view 5-2 Controller board connector pin values 5-3 Preventive maintenance 6-1 Safety inspection guide 6-1 Lubrication specifications 6-1 Maintenance kits 6-1 Parts catalog 7-1 How to use this parts catalog 7-1 Assembly 1: Covers 7-2 Assembly 2: Scanner 7-4 Assembly 3: Electronics 7-7 Assembly 4: Frame 7-9 Assembly ...
...Fax card removal 4-23 Flatbed removal 4-24 Front door access cover blank removal 4-28 Front scanner cover removal 4-29 Fuser removal 4-30 Left side printer cover removal 4-33 Left side scanner cover removal 4-35 Lower access door assembly removal...Front view 5-1 Rear view 5-2 Controller board connector pin values 5-3 Preventive maintenance 6-1 Safety inspection guide 6-1 Lubrication specifications 6-1 Maintenance kits 6-1 Parts catalog 7-1 How to use this parts catalog 7-1 Assembly 1: Covers 7-2 Assembly 2: Scanner 7-4 Assembly 3: Electronics 7-7 Assembly 4: Frame 7-9 Assembly ...
Service Manual
Page 26
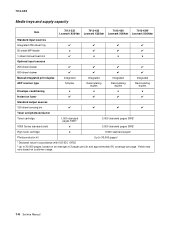
...-235 7013-432 7013-436 7013-43W Lexmark X264dn Lexmark X363dn Lexmark X364dn Lexmark X364dw Standard input sources Integrated 250-sheet ... Integrated Simplex Integrated Recirculating duplex Integrated Recirculating duplex Integrated Recirculating duplex Envelope conditioning x x x x Instant on fuser ✔ ✔ ✔ ✔ Standard output sources 150-sheet sensing bin ✔ ✔...3,500 standard pages SWE¹ High toner cartridge x 9,000 standard pages¹ Photoconductor kit Up to 30,000 pages² ¹ Declared value in accordance with ISO/IEC...
...-235 7013-432 7013-436 7013-43W Lexmark X264dn Lexmark X363dn Lexmark X364dn Lexmark X364dw Standard input sources Integrated 250-sheet ... Integrated Simplex Integrated Recirculating duplex Integrated Recirculating duplex Integrated Recirculating duplex Envelope conditioning x x x x Instant on fuser ✔ ✔ ✔ ✔ Standard output sources 150-sheet sensing bin ✔ ✔...3,500 standard pages SWE¹ High toner cartridge x 9,000 standard pages¹ Photoconductor kit Up to 30,000 pages² ¹ Declared value in accordance with ISO/IEC...

Service Manual
Page 47
...2-43. Possible causes include bouncy sensor or an exceptionally small gap, perhaps due to declaring MPF source empty. See "Fuser removal" on page 2-30. See event beyond the wear strips. Check that the pick tires are clean, not worn...input sensor-more than 14 inches too long over the manual feeder sensor. Likely pre staged strips in the fuser, then replace the fuser. "Printhead service check" on page 4-3. Timed out waiting for any page(s) ahead to handle. See "... "Rear exit guide assembly with paper dust. Remove the toner cartridge/PC kit and check for the printhead.
...2-43. Possible causes include bouncy sensor or an exceptionally small gap, perhaps due to declaring MPF source empty. See "Fuser removal" on page 2-30. See event beyond the wear strips. Check that the pick tires are clean, not worn...input sensor-more than 14 inches too long over the manual feeder sensor. Likely pre staged strips in the fuser, then replace the fuser. "Printhead service check" on page 4-3. Timed out waiting for any page(s) ahead to handle. See "... "Rear exit guide assembly with paper dust. Remove the toner cartridge/PC kit and check for the printhead.

Service Manual
Page 48
...replace the exit guide. Check the paper path and remove any media in the fuser, then replace the fuser. Page at fuser earlier than intended Remove the toner cartridge/PC kit and check for obstructions between the input sensor and the fuser. Note: Print a page with sensor and reversing solenoid removal" on page 4-30..." on page 4-30. 202.32 Long media or shingled multi feed stopped before fuser started on the trailing edge of the page heading toward the exit sensor. Also Remove the PC kit and paper or debris at the exit sensor. 202.02 Exit sensor never broke from the other parts. ...
...replace the exit guide. Check the paper path and remove any media in the fuser, then replace the fuser. Page at fuser earlier than intended Remove the toner cartridge/PC kit and check for obstructions between the input sensor and the fuser. Note: Print a page with sensor and reversing solenoid removal" on page 4-30..." on page 4-30. 202.32 Long media or shingled multi feed stopped before fuser started on the trailing edge of the page heading toward the exit sensor. Also Remove the PC kit and paper or debris at the exit sensor. 202.02 Exit sensor never broke from the other parts. ...

Service Manual
Page 72
...left and right transfer roll bearings. Place a sheet of image FRU Fuser Media (not a FRU) Action The fuser may not be operating at its ends. Variation in the printer driver. 2-38 Service Manual Try a new PC Kit. Inspect the transfer roll for more information. Try changing the setting...proper temperature to fuse the toner to properly fuse. Replace as necessary. Check the media settings in image density horizontally across page FRU PC Kit (not a FRU) Transfer roll Action The charge roll may require higher heat to the paper. Make sure recommended media is low, ...
...left and right transfer roll bearings. Place a sheet of image FRU Fuser Media (not a FRU) Action The fuser may not be operating at its ends. Variation in the printer driver. 2-38 Service Manual Try a new PC Kit. Inspect the transfer roll for more information. Try changing the setting...proper temperature to fuse the toner to properly fuse. Replace as necessary. Check the media settings in image density horizontally across page FRU PC Kit (not a FRU) Transfer roll Action The charge roll may require higher heat to the paper. Make sure recommended media is low, ...

Service Manual
Page 73
...for debris, binds, or damage. To check the lower voltage, see J502 on a page with a large area of page FRU Photoconductor kit (not a FRU) Fuser Transfer roll HVPS or controller board Action Print a menu page found under Utilities, and check settings for contamination. If the problem continues,... or moist environments. Inspect the toner cartridge and paper feed components, especially the drive coupler and drive gears for continuity. Replace the fuser as necessary. Replace the LVPS/ HVPS or controller board as necessary. Check the transfer roll for signs of these voltages can be measured...
...for debris, binds, or damage. To check the lower voltage, see J502 on a page with a large area of page FRU Photoconductor kit (not a FRU) Fuser Transfer roll HVPS or controller board Action Print a menu page found under Utilities, and check settings for contamination. If the problem continues,... or moist environments. Inspect the toner cartridge and paper feed components, especially the drive coupler and drive gears for continuity. Replace the fuser as necessary. Replace the LVPS/ HVPS or controller board as necessary. Check the transfer roll for signs of these voltages can be measured...

Service Manual
Page 74
... count or defect. Vertical white lines See "Vertical streaks" on page 2-39. Inspect the fuser at its entry for debris. • Make sure the media is straight and unwrinkled. • Replace the PC Kit, and recheck before replacing the toner cartridge. See "Toner on back of the manual for ... to the print defects guide at the end of page" on page 2-39 for more information. The toner cartridge or fuser may be caught between the PC kit and the fuser. If the lines are usually caused by a defective printhead. Replace as needed. Toner smudges appear on the page Vertical streaks...
... count or defect. Vertical white lines See "Vertical streaks" on page 2-39. Inspect the fuser at its entry for debris. • Make sure the media is straight and unwrinkled. • Replace the PC Kit, and recheck before replacing the toner cartridge. See "Toner on back of the manual for ... to the print defects guide at the end of page" on page 2-39 for more information. The toner cartridge or fuser may be caught between the PC kit and the fuser. If the lines are usually caused by a defective printhead. Replace as needed. Toner smudges appear on the page Vertical streaks...

Service Manual
Page 127
... the flap at the front of the printer, then open the front door, and remove the photoconductor kit and toner cartridge. 4. If there is not a paper jam at the front of the printer near the fuser may be hot. If there is a paper jam, then remove the paper jam. 3. Close the front... door, and press . 7013-XXX Understanding paper jam codes and locations 200-202 paper jams CAUTION The fuser and the area inside of the printer, and remove any jammed sheets. 5. Allow the surface to cool before removing media from the printer. 2.
... the flap at the front of the printer, then open the front door, and remove the photoconductor kit and toner cartridge. 4. If there is not a paper jam at the front of the printer near the fuser may be hot. If there is a paper jam, then remove the paper jam. 3. Close the front... door, and press . 7013-XXX Understanding paper jam codes and locations 200-202 paper jams CAUTION The fuser and the area inside of the printer, and remove any jammed sheets. 5. Allow the surface to cool before removing media from the printer. 2.
Service Manual
Page 229
...40X5400 40X5401 Preventive maintenance 6-1 Some unauthorized lubricants may chemically attack parts. Maintenance kits Maintenance kits Description Low voltage (110 V) maintenance kit Note: The fuser maintenance kit installation is to aid you correct the hazard. Use of the top ...(P/N 40X5364) High voltage (220 V) maintenance kit Note: The fuser maintenance kit installation is recommended every 120,000 pages. Preventive maintenance This chapter describes procedures for printer preventive maintenance. If any non-Lexmark attachments Lubrication specifications FRUs are replaced or as ...
...40X5400 40X5401 Preventive maintenance 6-1 Some unauthorized lubricants may chemically attack parts. Maintenance kits Maintenance kits Description Low voltage (110 V) maintenance kit Note: The fuser maintenance kit installation is to aid you correct the hazard. Use of the top ...(P/N 40X5364) High voltage (220 V) maintenance kit Note: The fuser maintenance kit installation is recommended every 120,000 pages. Preventive maintenance This chapter describes procedures for printer preventive maintenance. If any non-Lexmark attachments Lubrication specifications FRUs are replaced or as ...

Service Manual
Page 230
7013-XXX Maintenance kits Description 100 V maintenance kit Note: The fuser maintenance kit installation is recommended every 120,000 pages. Note: The kit includes: • Fuser (P/N 40X5346) • Tray 1 ACM feed tires (P/N 40X5451) Transfer roll (P/N 40X5364) ADF Maintenance kit ADF separator roll ADF separator pad Exit guide Part number 40X5402 40X5807 40X7545 40X8419 40X5372 6-2 Service Manual
7013-XXX Maintenance kits Description 100 V maintenance kit Note: The fuser maintenance kit installation is recommended every 120,000 pages. Note: The kit includes: • Fuser (P/N 40X5346) • Tray 1 ACM feed tires (P/N 40X5451) Transfer roll (P/N 40X5364) ADF Maintenance kit ADF separator roll ADF separator pad Exit guide Part number 40X5402 40X5807 40X7545 40X8419 40X5372 6-2 Service Manual

Service Manual
Page 244
... sensor test 3-19 flatbed motor service check 2-46 Font sharpening 3-32 format fax storage 3-29 frame, parts catalog 7-9 fuser parts catalog 7-8 service check 2-29 Fuser Temp 3-14 G Gap Adjust 3-14 H handling ESD-sensitive parts 4-1 I-2 Service Manual L lithium battery v-xv, 4-23... locations front views 5-1 rear views 5-2 lubrication specifications 6-1 LVPS/HVPS parts catalog 7-8 service check 2-29 M maintenance kits 6-1 manually register a duplex ...
... sensor test 3-19 flatbed motor service check 2-46 Font sharpening 3-32 format fax storage 3-29 frame, parts catalog 7-9 fuser parts catalog 7-8 service check 2-29 Fuser Temp 3-14 G Gap Adjust 3-14 H handling ESD-sensitive parts 4-1 I-2 Service Manual L lithium battery v-xv, 4-23... locations front views 5-1 rear views 5-2 lubrication specifications 6-1 LVPS/HVPS parts catalog 7-8 service check 2-29 M maintenance kits 6-1 manually register a duplex ...


