
User's Guide
Page 2
... software. 2 Safety information • Use only the power supply and power cord provided with diamond design are trademarks of express or implied warranties in the United States and/or other countries. © 2005 Lexmark International, Inc. Some states do not imply that could...and any accompanying documentation provided under this product or the manufacturer's authorized replacement power supply and power cord. • Connect the power supply cord to an electrical outlet that could cause you . Lexmark may be incorporated in the products or the programs described may not apply...
... software. 2 Safety information • Use only the power supply and power cord provided with diamond design are trademarks of express or implied warranties in the United States and/or other countries. © 2005 Lexmark International, Inc. Some states do not imply that could...and any accompanying documentation provided under this product or the manufacturer's authorized replacement power supply and power cord. • Connect the power supply cord to an electrical outlet that could cause you . Lexmark may be incorporated in the products or the programs described may not apply...

User's Guide
Page 8
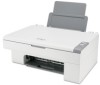
Opening the box These items are in the box with the All-In-One: Note: A USB cable may or may not be included. 5 1 2 43 1 Power supply cord 2 USB cable 3 Print cartridge 4 Setup sheet 5 Software CD 8 Unpacking the All-In-One To set up the All-In-One, follow the instructions on page 62. If problems occur, see "Setup troubleshooting" on the Lexmark 2300 Series Setup sheet.
Opening the box These items are in the box with the All-In-One: Note: A USB cable may or may not be included. 5 1 2 43 1 Power supply cord 2 USB cable 3 Print cartridge 4 Setup sheet 5 Software CD 8 Unpacking the All-In-One To set up the All-In-One, follow the instructions on page 62. If problems occur, see "Setup troubleshooting" on the Lexmark 2300 Series Setup sheet.
User's Guide
Page 10
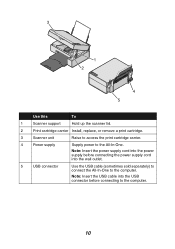
Note: Insert the power supply cord into the power supply before connecting the power supply cord into the USB connector before connecting to the computer. 10 Note: Insert the USB cable into the wall outlet. 5 USB connector Use the USB cable (sometimes sold separately) to connect the All-In-One to the All-In-One. 3 1 2 4 5 Use this To 1 Scanner support Hold up the scanner lid. 2 Print cartridge carrier Install, replace, or remove a print cartridge. 3 Scanner unit Raise to access the print cartridge carrier. 4 Power supply Supply power to the computer.
Note: Insert the power supply cord into the power supply before connecting the power supply cord into the USB connector before connecting to the computer. 10 Note: Insert the USB cable into the wall outlet. 5 USB connector Use the USB cable (sometimes sold separately) to connect the All-In-One to the All-In-One. 3 1 2 4 5 Use this To 1 Scanner support Hold up the scanner lid. 2 Print cartridge carrier Install, replace, or remove a print cartridge. 3 Scanner unit Raise to access the print cartridge carrier. 4 Power supply Supply power to the computer.
User's Guide
Page 62
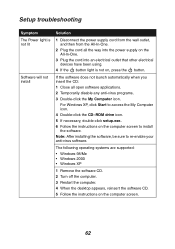
...virus software. If the software does not launch automatically when you insert the CD: 1 Close all the way into the power supply on the All-In-One. 3 Plug the cord into an electrical outlet that other electrical devices have been using. 4 If the button light is not lit Software will... not install Solution 1 Disconnect the power supply cord from the wall outlet, and then from the All-In-One. 2 Plug the cord all open software applications. 2 Temporarily disable any anti-virus programs. 3 Double-click the My Computer icon. Note...
...virus software. If the software does not launch automatically when you insert the CD: 1 Close all the way into the power supply on the All-In-One. 3 Plug the cord into an electrical outlet that other electrical devices have been using. 4 If the button light is not lit Software will... not install Solution 1 Disconnect the power supply cord from the wall outlet, and then from the All-In-One. 2 Plug the cord all open software applications. 2 Temporarily disable any anti-virus programs. 3 Double-click the My Computer icon. Note...
User's Guide
Page 67
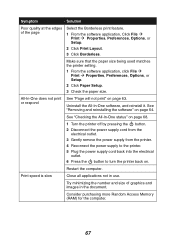
... status" on page 68. 1 Turn the printer off by pressing the button. 2 Disconnect the power supply cord from the electrical outlet. 3 Gently remove the power supply from the printer. 4 Reconnect the power supply to the printer. 5 Plug the power supply cord back into the electrical outlet. 6 Press the button to turn the printer back on. Make...
... status" on page 68. 1 Turn the printer off by pressing the button. 2 Disconnect the power supply cord from the electrical outlet. 3 Gently remove the power supply from the printer. 4 Reconnect the power supply to the printer. 5 Plug the power supply cord back into the electrical outlet. 6 Press the button to turn the printer back on. Make...

User's Guide
Page 76
Printer Status 26 Troubleshooting 26 Lexmark Web site 60 loading 4 x 6 cards 29 banner paper 29 documents on scanner glass 32 envelopes 31 glossy paper 28 greeting...21 using 20 photo paper 28 Photo Prints section 17 placing documents on the scanner glass 32 postcards 29 power light blinks twice 71 not lit 62 power supply cord 8 preserving print cartridges 59 Preview section 16 print cartridge aligning 56 cleaning 57 installing 54 ordering 60 preserving... glass cleaning 59 placing documents on 32 scanner unit 10 scanning 37 sending a fax 47 setup troubleshooting 61 software Lexmark All-In-One 76
Printer Status 26 Troubleshooting 26 Lexmark Web site 60 loading 4 x 6 cards 29 banner paper 29 documents on scanner glass 32 envelopes 31 glossy paper 28 greeting...21 using 20 photo paper 28 Photo Prints section 17 placing documents on the scanner glass 32 postcards 29 power light blinks twice 71 not lit 62 power supply cord 8 preserving print cartridges 59 Preview section 16 print cartridge aligning 56 cleaning 57 installing 54 ordering 60 preserving... glass cleaning 59 placing documents on 32 scanner unit 10 scanning 37 sending a fax 47 setup troubleshooting 61 software Lexmark All-In-One 76


