User's Guide
Page 4
Rear output slot 30 Chapter 4: Printing 31 Printing a document 31 Accessing Print Properties 32 Using your program 32 Using the Printers folder 32 Understanding the print settings 33 Saving favorite print settings 33 Changing the direction information is printed on a page 34 Changing the ...size 36 Using watermarks 36 Using overlays 38 Printing on both sides of the paper 40 Accessing the printer driver Help 41 Canceling a print job 41 Using the operator panel 41 Using the printer driver 41 Chapter 5: Copying 42 Using the scanning bed 42 Using the ADF 44 Customizing settings ...
Rear output slot 30 Chapter 4: Printing 31 Printing a document 31 Accessing Print Properties 32 Using your program 32 Using the Printers folder 32 Understanding the print settings 33 Saving favorite print settings 33 Changing the direction information is printed on a page 34 Changing the ...size 36 Using watermarks 36 Using overlays 38 Printing on both sides of the paper 40 Accessing the printer driver Help 41 Canceling a print job 41 Using the operator panel 41 Using the printer driver 41 Chapter 5: Copying 42 Using the scanning bed 42 Using the ADF 44 Customizing settings ...

User's Guide
Page 7
... not set it to set the machine close to remove the paper tray. Clearance space Front 482.6 mm (19 in .) - Getting started The Lexmark X215™ MFP is a multifunction printer. Back 100 mm (4 in.) - space for ventilation. space for ventilation. 1 Getting started 7 The area should be well-ventilated and away from direct sunlight...
... not set it to set the machine close to remove the paper tray. Clearance space Front 482.6 mm (19 in .) - Getting started The Lexmark X215™ MFP is a multifunction printer. Back 100 mm (4 in.) - space for ventilation. space for ventilation. 1 Getting started 7 The area should be well-ventilated and away from direct sunlight...
User's Guide
Page 13
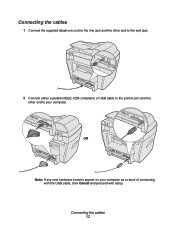
Connecting the cables 13 OR Note: If any new hardware screens appear on your computer. Connecting the cables 1 Connect the supplied telephone cord to the line jack and the other end to the wall jack. 2 Connect either a parallel (IEEE-1284 compliant) or USB cable to the printer port and the other end to your computer as a result of connecting with the USB cable, click Cancel and proceed with setup.
Connecting the cables 13 OR Note: If any new hardware screens appear on your computer. Connecting the cables 1 Connect the supplied telephone cord to the line jack and the other end to the wall jack. 2 Connect either a parallel (IEEE-1284 compliant) or USB cable to the printer port and the other end to your computer as a result of connecting with the USB cable, click Cancel and proceed with setup.

User's Guide
Page 20
... the drivers You should remove the drivers if you to confirm your computer after removing the drivers. 1 Click Start Programs Lexmark X215. 2 You can remove the software using the CD or the Windows unInstallShield. Removing the drivers 20 The selected driver, and...remove the scan driver, select TWAIN Driver Uninstall. • To remove the printer driver, select Printer Driver Uninstall. Note: Before removing, close all of its components, are upgrading the software or if your computer. When the Lexmark X215 Series Driver Maintenance window appears, check Remove, and then click Next. 3 ...
... the drivers You should remove the drivers if you to confirm your computer after removing the drivers. 1 Click Start Programs Lexmark X215. 2 You can remove the software using the CD or the Windows unInstallShield. Removing the drivers 20 The selected driver, and...remove the scan driver, select TWAIN Driver Uninstall. • To remove the printer driver, select Printer Driver Uninstall. Note: Before removing, close all of its components, are upgrading the software or if your computer. When the Lexmark X215 Series Driver Maintenance window appears, check Remove, and then click Next. 3 ...

User's Guide
Page 22
... specialty media, keep these guidelines in spotty printing. • To avoid smudging caused by fingerprints, handle transparencies and coated paper carefully. Avoid paper with laser printers. • To prevent specialty media, such as transparencies and label sheets, from sticking together, remove each sheet from the output tray as a plastic container or...
... specialty media, keep these guidelines in spotty printing. • To avoid smudging caused by fingerprints, handle transparencies and coated paper carefully. Avoid paper with laser printers. • To prevent specialty media, such as transparencies and label sheets, from sticking together, remove each sheet from the output tray as a plastic container or...

User's Guide
Page 23
... printing, which can cause paper jams. Exposed adhesive can tolerate a fusing temperature of 180o C (356o F) for 0.1 second. • Make sure there is designed for laser printers. • Verify that are separating from the backing sheet or are wrinkled, bubbled, or otherwise damaged. The relative humidity should be between 59o F and 86o...
... printing, which can cause paper jams. Exposed adhesive can tolerate a fusing temperature of 180o C (356o F) for 0.1 second. • Make sure there is designed for laser printers. • Verify that are separating from the backing sheet or are wrinkled, bubbled, or otherwise damaged. The relative humidity should be between 59o F and 86o...
User's Guide
Page 31
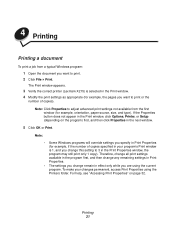
... Windows programs will override settings you want to adjust advanced print settings not available from a typical Windows program: 1 Open the document you are using the Printers folder. 4 Printing Printing a document To print a job from the first window (for example, if the number of copies). To make your program's...not appear in the Print Properties window, the program may still print only 1 copy). Printing 31 The Print window appears. 3 Verify the correct printer (Lexmark X215) is 1, and you change remain in effect only while you want to 3 in the Print window, click Options...
... Windows programs will override settings you want to adjust advanced print settings not available from a typical Windows program: 1 Open the document you are using the Printers folder. 4 Printing Printing a document To print a job from the first window (for example, if the number of copies). To make your program's...not appear in the Print Properties window, the program may still print only 1 copy). Printing 31 The Print window appears. 3 Verify the correct printer (Lexmark X215) is 1, and you change remain in effect only while you want to 3 in the Print window, click Options...

User's Guide
Page 32
...access Print Properties from your program or using the current program. 1 Click File Print. The Print window appears. 2 Verify the correct printer (Lexmark X215) is printed on a page. (See page 35.) • Fit to print on each tab as the text or images that ... NT 4.0 Windows 2000 Windows XP 1 Click Start Settings Printers. 2 Right-click the Lexmark X215 printer icon. 3 Click Properties. 4 Change the settings on each tab as appropriate and then click OK. 1 Click Start Settings Printers. 2 Right-click the Lexmark X215 printer icon. 3 Click Printing Preferences. 4 Change the settings ...
...access Print Properties from your program or using the current program. 1 Click File Print. The Print window appears. 2 Verify the correct printer (Lexmark X215) is printed on a page. (See page 35.) • Fit to print on each tab as the text or images that ... NT 4.0 Windows 2000 Windows XP 1 Click Start Settings Printers. 2 Right-click the Lexmark X215 printer icon. 3 Click Properties. 4 Change the settings on each tab as appropriate and then click OK. 1 Click Start Settings Printers. 2 Right-click the Lexmark X215 printer icon. 3 Click Printing Preferences. 4 Change the settings ...

User's Guide
Page 33
..., Paper tab, Graphics tab, and Extras tab. From this setting Half-scale). 4 Click Save. 5 Repeat steps 2 through 4 for each Properties tab of the printer driver. Copies - You have . Size - If the paper source is located on the printed page. Resolution - Source - Type - Select the size of the... To delete a saved setting, select it from the Favorites drop-down list. Accessing Print Properties 33 The Manual Feed source is set to Printer Default. Understanding the print settings All of the print settings are on the first tab (for example, under Layout Options you might set Type...
..., Paper tab, Graphics tab, and Extras tab. From this setting Half-scale). 4 Click Save. 5 Repeat steps 2 through 4 for each Properties tab of the printer driver. Copies - You have . Size - If the paper source is located on the printed page. Resolution - Source - Type - Select the size of the... To delete a saved setting, select it from the Favorites drop-down list. Accessing Print Properties 33 The Manual Feed source is set to Printer Default. Understanding the print settings All of the print settings are on the first tab (for example, under Layout Options you might set Type...
User's Guide
Page 34
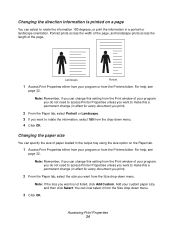
...using the size option on a page You can change this setting from the Print window of your program, you do not need to access Printer Properties unless you want to make this a permanent change (in effect for every document you print). 2 From the Paper tab, select the...help , see page 32. Changing the direction information is printed on the Paper tab. 1 Access Print Properties either from your program or from the Printers folder. Note: Remember, if you can select to rotate the information 180 degrees, or print the information in a portrait or landscape orientation. Landscape ...
...using the size option on a page You can change this setting from the Print window of your program, you do not need to access Printer Properties unless you want to make this a permanent change (in effect for every document you print). 2 From the Paper tab, select the...help , see page 32. Changing the direction information is printed on the Paper tab. 1 Access Print Properties either from your program or from the Printers folder. Note: Remember, if you can select to rotate the information 180 degrees, or print the information in a portrait or landscape orientation. Landscape ...

User's Guide
Page 35
...list. 3 Select the page order in size and arranged on a page. 1 Access Print Properties either from your program, you do not need to access Printer Properties unless you print). 2 From the Layout tab, select Scale in the Type drop-down list. 3 Enter a scaling rate in the Percentage box. 4... Click OK. Accessing Print Properties 35 Note: Remember, if you can print up to make this setting from the Printers folder. You can change this a permanent change the scale of paper. For help , see page 32. 2 From the Layout tab, choose either from...
...list. 3 Select the page order in size and arranged on a page. 1 Access Print Properties either from your program, you do not need to access Printer Properties unless you print). 2 From the Layout tab, select Scale in the Type drop-down list. 3 Enter a scaling rate in the Percentage box. 4... Click OK. Accessing Print Properties 35 Note: Remember, if you can print up to make this setting from the Printers folder. You can change this a permanent change the scale of paper. For help , see page 32. 2 From the Layout tab, choose either from...

User's Guide
Page 36
.... Accessing Print Properties 36 A 1 Access Print Properties either from your program or from the Print window of your program, you do not need to access Printer Properties unless you want to check fine details on a small document. Note: Remember, if you can change this a permanent change (in effect for every... an existing watermark 1 Access Print Properties either from your program or from the Target Paper drop-down list. 3 Select the correct size from the Printers folder. For help , see page 32. 2 From the Extras tab, select the watermark you want to make this setting from the...
.... Accessing Print Properties 36 A 1 Access Print Properties either from your program or from the Print window of your program, you do not need to access Printer Properties unless you want to check fine details on a small document. Note: Remember, if you can change this a permanent change (in effect for every... an existing watermark 1 Access Print Properties either from your program or from the Target Paper drop-down list. 3 Select the correct size from the Printers folder. For help , see page 32. 2 From the Extras tab, select the watermark you want to make this setting from the...
User's Guide
Page 37
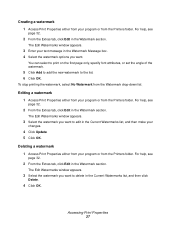
To stop printing the watermark, select No Watermark from the Printers folder. Editing a watermark 1 Access Print Properties either from your program or from the Printers folder. For help , see page 32. 2 From the Extras tab, click Edit in the Watermark section. Creating a watermark 1 Access ...Print Properties either from your program or from the Printers folder. The Edit Watermarks window appears. 3 Select the watermark you want to edit in the Watermark section. You can select to print on the...
To stop printing the watermark, select No Watermark from the Printers folder. Editing a watermark 1 Access Print Properties either from your program or from the Printers folder. For help , see page 32. 2 From the Extras tab, click Edit in the Watermark section. Creating a watermark 1 Access ...Print Properties either from your program or from the Printers folder. The Edit Watermarks window appears. 3 Select the watermark you want to edit in the Watermark section. You can select to print on the...

User's Guide
Page 38
... special paper in the File Name box. Specify where you want to save the file. 3 Access Print Properties either from your program or from the Printers folder. Instead of preprinted forms and letterhead. Then, to print a document with a watermark. It is text or images in a new page overlay. 2 Position the items...
... special paper in the File Name box. Specify where you want to save the file. 3 Access Print Properties either from your program or from the Printers folder. Instead of preprinted forms and letterhead. Then, to print a document with a watermark. It is text or images in a new page overlay. 2 Position the items...

User's Guide
Page 39
To print an overlay with your document. b Click Load Overlay. f Click OK. 4 If you want from the Printers folder. For help , see page 32. 2 From the Extras tab, click Edit in the Overlay section. 3 Select the overlay you want to print with a document: 1 ... Overlay List box. If this box is empty and an overlay has been selected, the overlay will be printed with your program or from the Printers folder. Note: The overlay document resolution must be printed with your program or from the Overlay drop-down list: a Click Edit. Deleting an overlay 1 Access...
To print an overlay with your document. b Click Load Overlay. f Click OK. 4 If you want from the Printers folder. For help , see page 32. 2 From the Extras tab, click Edit in the Overlay section. 3 Select the overlay you want to print with a document: 1 ... Overlay List box. If this box is empty and an overlay has been selected, the overlay will be printed with your program or from the Printers folder. Note: The overlay document resolution must be printed with your program or from the Overlay drop-down list: a Click Edit. Deleting an overlay 1 Access...

User's Guide
Page 40
The Print window appears. 9 Verify the correct printer (Lexmark X215) is selected in the next window. 11 From the Extras...output tray. 8 Click File Print. If you want to print. 2 Click File Print. 3 Verify the correct printer (Lexmark X215) is available in the Print window of your program, the setting there may override your selection here (in Print ...Properties) and create undesirable output. If the Properties button does not appear in the Print window, click Options, Printer, or Setup (depending on the program) first, and then click Properties in Print Properties) and create undesirable ...
The Print window appears. 9 Verify the correct printer (Lexmark X215) is selected in the next window. 11 From the Extras...output tray. 8 Click File Print. If you want to print. 2 Click File Print. 3 Verify the correct printer (Lexmark X215) is available in the Print window of your program, the setting there may override your selection here (in Print ...Properties) and create undesirable output. If the Properties button does not appear in the Print window, click Options, Printer, or Setup (depending on the program) first, and then click Properties in Print Properties) and create undesirable ...

User's Guide
Page 41
... Pressing Stop/Clear cancels only the current job. Using the operator panel To cancel a print job using the printer driver: 1 Click Start Settings Printers. 2 Double-click the Lexmark X215 printer icon. 3 From the Document menu, select Cancel Printing (Windows 98/Me) or Cancel (Windows NT 4.0, ... Print window. 4 Click Properties to open the Properties window. Accessing the printer driver Help 41 The Print window appears. 3 Verify the correct printer (Lexmark X215) is in the Print window, click Options, Printer, or Setup (depending on the program) first, and then click Properties on...
... Pressing Stop/Clear cancels only the current job. Using the operator panel To cancel a print job using the printer driver: 1 Click Start Settings Printers. 2 Double-click the Lexmark X215 printer icon. 3 From the Document menu, select Cancel Printing (Windows 98/Me) or Cancel (Windows NT 4.0, ... Print window. 4 Click Properties to open the Properties window. Accessing the printer driver Help 41 The Print window appears. 3 Verify the correct printer (Lexmark X215) is in the Print window, click Options, Printer, or Setup (depending on the program) first, and then click Properties on...

User's Guide
Page 54
... select the default fax receiving mode. • In Automatic mode, the machine answers an incoming call . This setting is expired. Settings selected using a dot-matrix printer. • Super Fine - To change appears, press Select. 5 Change the setting by pressing a scroll button or enter a value using the Resolution button remain in effect...
... select the default fax receiving mode. • In Automatic mode, the machine answers an incoming call . This setting is expired. Settings selected using a dot-matrix printer. • Super Fine - To change appears, press Select. 5 Change the setting by pressing a scroll button or enter a value using the Resolution button remain in effect...
User's Guide
Page 56
... you can hold 100 shortcuts or groups at one or more times until the correct letter is displayed (for quick dialing when sending a fax. Your printer can send the same fax to multiple numbers in the shortcut location, and then press Select. 5 Using the alphanumeric feature of frequently used numbers that...
... you can hold 100 shortcuts or groups at one or more times until the correct letter is displayed (for quick dialing when sending a fax. Your printer can send the same fax to multiple numbers in the shortcut location, and then press Select. 5 Using the alphanumeric feature of frequently used numbers that...

User's Guide
Page 80
.... See page 21. • There may cause some paper to feed Ensure that meets specifications. Transparencies stick together Use only transparencies specially designed for a laser printer. each transparency as it correctly. • There is not too much paper loaded. Paper feeding problems Symptom Possible cause and solution Paper jam. Envelopes skew...
.... See page 21. • There may cause some paper to feed Ensure that meets specifications. Transparencies stick together Use only transparencies specially designed for a laser printer. each transparency as it correctly. • There is not too much paper loaded. Paper feeding problems Symptom Possible cause and solution Paper jam. Envelopes skew...


