
Quick Reference
Page 2
Contents Loading paper and specialty media 3 Loading the paper tray...3 Clearing jams 7 200-201 paper jam...7 202 paper jam...10 241 paper jam...13 251 paper jam...14 Contents 2
Contents Loading paper and specialty media 3 Loading the paper tray...3 Clearing jams 7 200-201 paper jam...7 202 paper jam...10 241 paper jam...13 251 paper jam...14 Contents 2

Quick Reference
Page 3
The width guides move in unison. Loading paper and specialty media Loading the paper tray Do not load the paper tray while a job prints or while Busy appears on the right guide as shown, and slide the width guides to the sides of the tray. Loading paper and specialty media 3 Doing so may cause a paper jam. 1 Pull the paper tray completely out. 2 Squeeze the width guide tabs on the display.
The width guides move in unison. Loading paper and specialty media Loading the paper tray Do not load the paper tray while a job prints or while Busy appears on the right guide as shown, and slide the width guides to the sides of the tray. Loading paper and specialty media 3 Doing so may cause a paper jam. 1 Pull the paper tray completely out. 2 Squeeze the width guide tabs on the display.

Quick Reference
Page 7
Clearing jams 7 Clearing jams 200-201 paper jam 200 paper jam 1 Remove the tray from the printer.
Clearing jams 7 Clearing jams 200-201 paper jam 200 paper jam 1 Remove the tray from the printer.
Quick Reference
Page 8
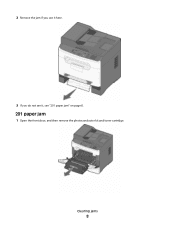
2 Remove the jam if you see it here. 3 If you do not see it, see "201 paper jam" on page 8. 201 paper jam 1 Open the front door, and then remove the photoconductor kit and toner cartridge. Clearing jams 8
2 Remove the jam if you see it here. 3 If you do not see it, see "201 paper jam" on page 8. 201 paper jam 1 Open the front door, and then remove the photoconductor kit and toner cartridge. Clearing jams 8
Quick Reference
Page 10
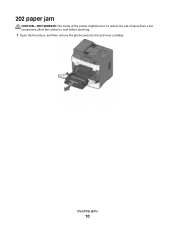
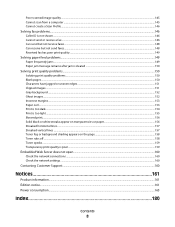
202 paper jam CAUTION-HOT SURFACE: The inside of injury from a hot component, allow the surface to cool before touching. 1 Open the front door, and then remove the photoconductor kit and toner cartridge. To reduce the risk of the printer might be hot. Clearing jams 10
202 paper jam CAUTION-HOT SURFACE: The inside of injury from a hot component, allow the surface to cool before touching. 1 Open the front door, and then remove the photoconductor kit and toner cartridge. To reduce the risk of the printer might be hot. Clearing jams 10

Quick Reference
Page 13
Clearing jams 13 241 paper jam 1 Remove the tray from the printer. 2 Remove the jam. 3 Insert the tray. 4 Press .
Clearing jams 13 241 paper jam 1 Remove the tray from the printer. 2 Remove the jam. 3 Insert the tray. 4 Press .

Quick Reference
Page 14
Part of the manual feeder. If the sheet is visible, then gently pull the jammed sheet from the manual feeder. If it may be still visible. Clearing jams 14 251 paper jam A sheet of paper or specialty media failed to feed completely from the front of it is not visible, then complete the following steps: 1 Remove the photoconductor kit and toner cartridge.
Part of the manual feeder. If the sheet is visible, then gently pull the jammed sheet from the manual feeder. If it may be still visible. Clearing jams 14 251 paper jam A sheet of paper or specialty media failed to feed completely from the front of it is not visible, then complete the following steps: 1 Remove the photoconductor kit and toner cartridge.

User's Guide
Page 7
...31.yy Replace defective or missing cartridge ...128 30 Invalid refill, change toner cartridge...128 32 Replace unsupported cartridge...128 34 Short paper ...128 37 Insufficient memory to collate job ...128 38 Memory full...128 39 Complex page, some data may not have printed...129... 88.yy Cartridge is low ...129 200-250 paper jam ...129 290-294 paper jams ...130 840.01 Scanner Disabled...132 840.02 Scanner Auto Disabled...132 Clearing jams...132 Avoiding jams ...132 200-201 paper jam ...134 202 paper jam ...136 241 paper jam ...138 251 paper jam ...139 Solving printing problems...140 Jobs do not ...
...31.yy Replace defective or missing cartridge ...128 30 Invalid refill, change toner cartridge...128 32 Replace unsupported cartridge...128 34 Short paper ...128 37 Insufficient memory to collate job ...128 38 Memory full...128 39 Complex page, some data may not have printed...129... 88.yy Cartridge is low ...129 200-250 paper jam ...129 290-294 paper jams ...130 840.01 Scanner Disabled...132 840.02 Scanner Auto Disabled...132 Clearing jams...132 Avoiding jams ...132 200-201 paper jam ...134 202 paper jam ...136 241 paper jam ...138 251 paper jam ...139 Solving printing problems...140 Jobs do not ...
User's Guide
Page 8
... send but not receive faxes...148 Can receive but not send faxes...148 Received fax has poor print quality...149 Solving paper feed problems...149 Paper frequently jams ...149 Paper jam message remains after jam is cleared ...150 Solving print quality problems...150 Isolating print quality problems...150 Blank pages...150 Characters have jagged or uneven...
... send but not receive faxes...148 Can receive but not send faxes...148 Received fax has poor print quality...149 Solving paper feed problems...149 Paper frequently jams ...149 Paper jam message remains after jam is cleared ...150 Solving print quality problems...150 Isolating print quality problems...150 Blank pages...150 Characters have jagged or uneven...

User's Guide
Page 25
... your first draft for accuracy. Avoid paper jams Carefully select and load paper to check its content and format for accuracy Before printing or making multiple copies of a document: • Use the Lexmark preview feature, which you can avoid making a paper output of a document or photograph by... copy of the document to avoid paper jams. For more information, see the Notices chapter. Use lower settings Use lower settings, such as a lower darkness setting from the Print dialog, the Lexmark Toolbar, or the printer display, to see "Avoiding jams" on page 58 Check your printer...
... your first draft for accuracy. Avoid paper jams Carefully select and load paper to check its content and format for accuracy Before printing or making multiple copies of a document: • Use the Lexmark preview feature, which you can avoid making a paper output of a document or photograph by... copy of the document to avoid paper jams. For more information, see the Notices chapter. Use lower settings Use lower settings, such as a lower darkness setting from the Print dialog, the Lexmark Toolbar, or the printer display, to see "Avoiding jams" on page 58 Check your printer...

User's Guide
Page 31
The width guides move in unison. 1 2 Loading paper and specialty media 31 Loading the paper tray Do not load the paper tray while a job prints or while Busy appears on the right guide as shown, and slide the width guides to the sides of the tray. Doing so may cause a paper jam. 1 Pull the paper tray completely out. 1@!. 4 GHI 2 ABC 5 JKL 3 DEF 7 PQRS 8 TUV 6 MNO * 9 WXYZ 0 # 2 Squeeze the width guide tabs on the display.
The width guides move in unison. 1 2 Loading paper and specialty media 31 Loading the paper tray Do not load the paper tray while a job prints or while Busy appears on the right guide as shown, and slide the width guides to the sides of the tray. Doing so may cause a paper jam. 1 Pull the paper tray completely out. 1@!. 4 GHI 2 ABC 5 JKL 3 DEF 7 PQRS 8 TUV 6 MNO * 9 WXYZ 0 # 2 Squeeze the width guide tabs on the display.

User's Guide
Page 129
... discards any data received through the USB port. Install a new photoconductor kit. 88.yy Cartridge is exhausted. For more information, see "Clearing jams" on to reset the printer. • Upgrade (flash) the network firmware in the printer or print server. Troubleshooting 129 to continue printing.... The photoconductor kit is low Replace the toner cartridge, and then press to clear the message and continue printing. 200-250 paper jam 1 Clear the paper path. to clear the message and continue printing. 54 Standard network software error Try one or more of the following: &#...
... discards any data received through the USB port. Install a new photoconductor kit. 88.yy Cartridge is exhausted. For more information, see "Clearing jams" on to reset the printer. • Upgrade (flash) the network firmware in the printer or print server. Troubleshooting 129 to continue printing.... The photoconductor kit is low Replace the toner cartridge, and then press to clear the message and continue printing. 200-250 paper jam 1 Clear the paper path. to clear the message and continue printing. 54 Standard network software error Try one or more of the following: &#...

User's Guide
Page 130
Troubleshooting 130 290-294 paper jams 1 Remove all original documents from the ADF. 2 Open the ADF cover. 3 Unlock the separator roll. 4 Remove the separator roll. 5 Remove the jammed paper.
Troubleshooting 130 290-294 paper jams 1 Remove all original documents from the ADF. 2 Open the ADF cover. 3 Unlock the separator roll. 4 Remove the separator roll. 5 Remove the jammed paper.

User's Guide
Page 134
Troubleshooting 134 200-201 paper jam 200 paper jam 1 Remove the tray from the printer. 1@!. 4 GHI 2 ABC 5 JKL 3 DEF 7 PQRS 8 TUV 6 MNO * 9 WXYZ 0 # 2 Remove the jam if you see it here. 1@!. 4 GHI 2 ABC 5 JKL 3 DEF 7 PQRS 8 TUV 6 MNO * 9 WXYZ 0 # 3 If you do not see it, see "201 paper jam" on page 135.
Troubleshooting 134 200-201 paper jam 200 paper jam 1 Remove the tray from the printer. 1@!. 4 GHI 2 ABC 5 JKL 3 DEF 7 PQRS 8 TUV 6 MNO * 9 WXYZ 0 # 2 Remove the jam if you see it here. 1@!. 4 GHI 2 ABC 5 JKL 3 DEF 7 PQRS 8 TUV 6 MNO * 9 WXYZ 0 # 3 If you do not see it, see "201 paper jam" on page 135.
User's Guide
Page 135
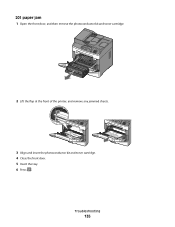
201 paper jam 1 Open the front door, and then remove the photoconductor kit and toner cartridge. 1@!. 4 GHI 2 ABC 5 JKL 3 DEF 7 PQRS 8 TUV 6 MNO * 9 WXYZ 0 # 2 Lift the flap at the front of the printer, and remove any jammed sheets. 3 Align and insert the photoconductor kit and toner cartridge. 4 Close the front door. 5 Insert the tray. 6 Press . Troubleshooting 135
201 paper jam 1 Open the front door, and then remove the photoconductor kit and toner cartridge. 1@!. 4 GHI 2 ABC 5 JKL 3 DEF 7 PQRS 8 TUV 6 MNO * 9 WXYZ 0 # 2 Lift the flap at the front of the printer, and remove any jammed sheets. 3 Align and insert the photoconductor kit and toner cartridge. 4 Close the front door. 5 Insert the tray. 6 Press . Troubleshooting 135

User's Guide
Page 136
202 paper jam CAUTION-HOT SURFACE: The inside of the printer, and then remove any jammed sheets. Troubleshooting 136 To reduce the risk of injury from a hot component, allow the surface to cool before touching. 1 Open the front door, and then remove the photoconductor kit and toner cartridge. 1@!. 4 GHI 2 ABC 5 JKL 3 DEF 7 PQRS 8 TUV 6 MNO * 9 WXYZ 0 # 2 Lift the flap at the front of the printer might be hot.
202 paper jam CAUTION-HOT SURFACE: The inside of the printer, and then remove any jammed sheets. Troubleshooting 136 To reduce the risk of injury from a hot component, allow the surface to cool before touching. 1 Open the front door, and then remove the photoconductor kit and toner cartridge. 1@!. 4 GHI 2 ABC 5 JKL 3 DEF 7 PQRS 8 TUV 6 MNO * 9 WXYZ 0 # 2 Lift the flap at the front of the printer might be hot.

User's Guide
Page 138
241 paper jam 1 Remove the tray from the printer. 1@!. 4 GHI 2 ABC 5 JKL 3 DEF 7 PQRS 8 TUV 6 MNO * 9 WXYZ 0 # 2 Remove the jam. 3 Insert the tray. 4 Press . Troubleshooting 138
241 paper jam 1 Remove the tray from the printer. 1@!. 4 GHI 2 ABC 5 JKL 3 DEF 7 PQRS 8 TUV 6 MNO * 9 WXYZ 0 # 2 Remove the jam. 3 Insert the tray. 4 Press . Troubleshooting 138

User's Guide
Page 139
251 paper jam A sheet of paper or specialty media failed to feed completely from the front of it is not visible, then complete the following steps: 1 Remove the photoconductor kit and toner cartridge. 1@!. 4 GHI 2 ABC 5 JKL 3 DEF 7 PQRS 8 TUV 6 MNO * 9 WXYZ 0 # Troubleshooting 139 If the sheet is visible, then gently pull the jammed sheet from the manual feeder. Part of the manual feeder. If it may be still visible.
251 paper jam A sheet of paper or specialty media failed to feed completely from the front of it is not visible, then complete the following steps: 1 Remove the photoconductor kit and toner cartridge. 1@!. 4 GHI 2 ABC 5 JKL 3 DEF 7 PQRS 8 TUV 6 MNO * 9 WXYZ 0 # Troubleshooting 139 If the sheet is visible, then gently pull the jammed sheet from the manual feeder. Part of the manual feeder. If it may be still visible.

User's Guide
Page 150
...you use it. Try one or more of the following topics may have a printer part that requires adjustment or replacement. Paper jam message remains after jam is cleared The paper path is not clear. You may help isolate print quality problems, print the print quality test pages: 1 Turn the ... print quality test pages print. 6 Press the arrow buttons until Prt Quality Pgs appears, and then press . Clear jammed paper from a fresh package. • Store paper in its original wrapper until you solve print quality problems. If these suggestions still do not correct the problem, then contact...
...you use it. Try one or more of the following topics may have a printer part that requires adjustment or replacement. Paper jam message remains after jam is cleared The paper path is not clear. You may help isolate print quality problems, print the print quality test pages: 1 Turn the ... print quality test pages print. 6 Press the arrow buttons until Prt Quality Pgs appears, and then press . Clear jammed paper from a fresh package. • Store paper in its original wrapper until you solve print quality problems. If these suggestions still do not correct the problem, then contact...
User's Guide
Page 181
... port 20 exterior of the printer cleaning 112 e-mail canceling 60 notice of low supply level 125 notice of paper jam 125 notice of paper needed 125 notice that different paper is needed 125 e-mail function setting up 57 e-mailing creating shortcuts using the Embedded Web Server 58 setting up... Quiet Mode 27 Index 181 I information, finding 10 installing printer software 20 Invalid Engine Code 127 IPv6 menu 108 J jams avoiding 132 jams, avoiding cutting paper and specialty media 38 selecting paper and specialty media 38 jams, clearing 200-201 134 202 136 241 138 251 139 290-294 130 L labels...
... port 20 exterior of the printer cleaning 112 e-mail canceling 60 notice of low supply level 125 notice of paper jam 125 notice of paper needed 125 notice that different paper is needed 125 e-mail function setting up 57 e-mailing creating shortcuts using the Embedded Web Server 58 setting up... Quiet Mode 27 Index 181 I information, finding 10 installing printer software 20 Invalid Engine Code 127 IPv6 menu 108 J jams avoiding 132 jams, avoiding cutting paper and specialty media 38 selecting paper and specialty media 38 jams, clearing 200-201 134 202 136 241 138 251 139 290-294 130 L labels...


