
User's Guide
Page 1
Lexmark X203n and X204n Series User's Guide March 2009 Machine type(s): 7011 Model(s): 200, 215 www.lexmark.com
Lexmark X203n and X204n Series User's Guide March 2009 Machine type(s): 7011 Model(s): 200, 215 www.lexmark.com
User's Guide
Page 10
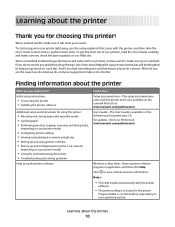
...the most out of our knowledgeable support representatives will meet your suggestions help us know. Finding information about the printer 10 User's Guide-The User's Guide is located in the printer Program folder or on the desktop, depending on the Software and Documentation CD. Click to ...make sure you're satisfied. To start using your printer, read the User's Guide carefully, and make sure you check the latest updates on the Lexmark Web site at www.lexmark.com/publications/. Learning about the printer What are the reason we do what we could...
...the most out of our knowledgeable support representatives will meet your suggestions help us know. Finding information about the printer 10 User's Guide-The User's Guide is located in the printer Program folder or on the desktop, depending on the Software and Documentation CD. Click to ...make sure you're satisfied. To start using your printer, read the User's Guide carefully, and make sure you check the latest updates on the Lexmark Web site at www.lexmark.com/publications/. Learning about the printer What are the reason we do what we could...

User's Guide
Page 73
... desk. Sending a fax using the printer control panel 1 Load an original document faceup, short edge first into the ADF, then adjust the paper guides. 3 From the printer control panel, press the Fax button. 4 Enter the fax number, and then press . This gives you the flexibility of...until the fax shortcut you prefer to end fax number entry. 6 Press . Sending a fax Sending a fax using the computer Faxing from software programs. For Windows users 1 With a file open, click File ΠPrint. 2 Click Properties, Preferences, Options, or Setup. 3 Click the Other Options tab, and then click ...
... desk. Sending a fax using the printer control panel 1 Load an original document faceup, short edge first into the ADF, then adjust the paper guides. 3 From the printer control panel, press the Fax button. 4 Enter the fax number, and then press . This gives you the flexibility of...until the fax shortcut you prefer to end fax number entry. 6 Press . Sending a fax Sending a fax using the computer Faxing from software programs. For Windows users 1 With a file open, click File ΠPrint. 2 Click Properties, Preferences, Options, or Setup. 3 Click the Other Options tab, and then click ...

User's Guide
Page 74
... or facedown on the scanner glass. Place these items on the scanner glass. 2 If you are loading a document into the ADF, then adjust the paper guides. 3 From the printer control panel, press the Fax button. 4 Enter the fax number, and then press . 5 From the Fax area, press the Options button. 6 Press... driver for your printer. Sending a fax at a scheduled time 1 Load an original document faceup, short edge first into the ADF. For Mac OS X version 10.5 users The steps for sending a fax from the computer vary depending on your printer.
... or facedown on the scanner glass. Place these items on the scanner glass. 2 If you are loading a document into the ADF, then adjust the paper guides. 3 From the printer control panel, press the Fax button. 4 Enter the fax number, and then press . 5 From the Fax area, press the Options button. 6 Press... driver for your printer. Sending a fax at a scheduled time 1 Load an original document faceup, short edge first into the ADF. For Mac OS X version 10.5 users The steps for sending a fax from the computer vary depending on your printer.

User's Guide
Page 81
...computer. A shortcut number was automatically assigned when you scan documents directly to a computer 1 Type the printer IP address into the ADF, then adjust the paper guides. b If you to receive Scan to scan your document. Note: The ADF is the name that appears in the TCP/IP section. 2 Click Scan ...directly connected to the printer for you are ready to PC images. You can scan the document back to save the scanned output file. 6 Enter a user name and scan name. Note: If you do not know the IP address of your scan settings, and then click Next. 5 Select a location ...
...computer. A shortcut number was automatically assigned when you scan documents directly to a computer 1 Type the printer IP address into the ADF, then adjust the paper guides. b If you to receive Scan to scan your document. Note: The ADF is the name that appears in the TCP/IP section. 2 Click Scan ...directly connected to the printer for you are ready to PC images. You can scan the document back to save the scanned output file. 6 Enter a user name and scan name. Note: If you do not know the IP address of your scan settings, and then click Next. 5 Select a location ...
User's Guide
Page 151
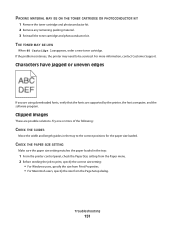
... of the following: CHECK THE GUIDES Move the width and length guides in the tray: 1 From the printer control panel, check the Paper Size setting from the Paper menu. 2 Before sending the job to print, specify the correct size setting: • For Windows users, specify the size from Print Properties.... • For Macintosh users, specify the...
... of the following: CHECK THE GUIDES Move the width and length guides in the tray: 1 From the printer control panel, check the Paper Size setting from the Paper menu. 2 Before sending the job to print, specify the correct size setting: • For Windows users, specify the size from Print Properties.... • For Macintosh users, specify the...
User's Guide
Page 153
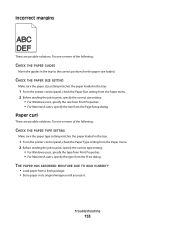
...more of the following : CHECK THE PAPER GUIDES Move the guides in the tray: 1 From the printer control panel, check the Paper Type setting from the Paper menu. 2 Before sending the job to print, specify the correct size setting: • For Windows users, specify the size from Print Properties. &#...8226; For Macintosh users, specify the size from...
...more of the following : CHECK THE PAPER GUIDES Move the guides in the tray: 1 From the printer control panel, check the Paper Type setting from the Paper menu. 2 Before sending the job to print, specify the correct size setting: • For Windows users, specify the size from Print Properties. &#...8226; For Macintosh users, specify the size from...
User's Guide
Page 167
...TIME WITHOUT NOTICE. Remote technical support is provided for this product throughout its duty cycle -Use of printing media outside of Lexmark specifications -Refurbishment, repair, refilling or remanufacture by a third party of products, supplies or parts -Products, supplies, parts,... not include repair of failures caused by: -Modification or unauthorized attachments -Accidents, misuse, abuse or use inconsistent with Lexmark user's guides, manuals, instructions or guidance -Unsuitable physical or operating environment -Maintenance by you specific legal rights. This limitation of ...
...TIME WITHOUT NOTICE. Remote technical support is provided for this product throughout its duty cycle -Use of printing media outside of Lexmark specifications -Refurbishment, repair, refilling or remanufacture by a third party of products, supplies or parts -Products, supplies, parts,... not include repair of failures caused by: -Modification or unauthorized attachments -Accidents, misuse, abuse or use inconsistent with Lexmark user's guides, manuals, instructions or guidance -Unsuitable physical or operating environment -Maintenance by you specific legal rights. This limitation of ...


