Quick Reference
Page 8
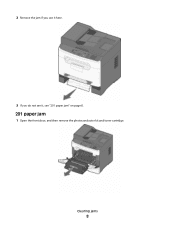
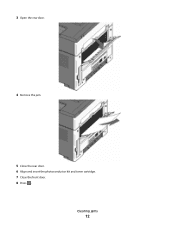
2 Remove the jam if you see it here. 3 If you do not see it, see "201 paper jam" on page 8. 201 paper jam 1 Open the front door, and then remove the photoconductor kit and toner cartridge. Clearing jams 8
2 Remove the jam if you see it here. 3 If you do not see it, see "201 paper jam" on page 8. 201 paper jam 1 Open the front door, and then remove the photoconductor kit and toner cartridge. Clearing jams 8
Quick Reference
Page 9
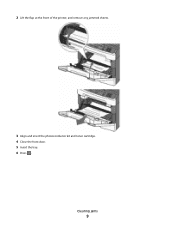
2 Lift the flap at the front of the printer, and remove any jammed sheets. 3 Align and insert the photoconductor kit and toner cartridge. 4 Close the front door. 5 Insert the tray. 6 Press . Clearing jams 9
2 Lift the flap at the front of the printer, and remove any jammed sheets. 3 Align and insert the photoconductor kit and toner cartridge. 4 Close the front door. 5 Insert the tray. 6 Press . Clearing jams 9
Quick Reference
Page 10
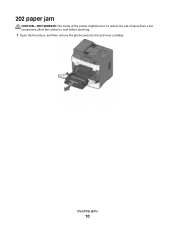
Clearing jams 10 202 paper jam CAUTION-HOT SURFACE: The inside of injury from a hot component, allow the surface to cool before touching. 1 Open the front door, and then remove the photoconductor kit and toner cartridge. To reduce the risk of the printer might be hot.
Clearing jams 10 202 paper jam CAUTION-HOT SURFACE: The inside of injury from a hot component, allow the surface to cool before touching. 1 Open the front door, and then remove the photoconductor kit and toner cartridge. To reduce the risk of the printer might be hot.
Quick Reference
Page 12
3 Open the rear door. 4 Remove the jam. 5 Close the rear door. 6 Align and insert the photoconductor kit and toner cartridge. 7 Close the front door. 8 Press . Clearing jams 12
3 Open the rear door. 4 Remove the jam. 5 Close the rear door. 6 Align and insert the photoconductor kit and toner cartridge. 7 Close the front door. 8 Press . Clearing jams 12

Quick Reference
Page 14
Clearing jams 14 If it may be still visible. 251 paper jam A sheet of paper or specialty media failed to feed completely from the front of it is not visible, then complete the following steps: 1 Remove the photoconductor kit and toner cartridge. If the sheet is visible, then gently pull the jammed sheet from the manual feeder. Part of the manual feeder.
Clearing jams 14 If it may be still visible. 251 paper jam A sheet of paper or specialty media failed to feed completely from the front of it is not visible, then complete the following steps: 1 Remove the photoconductor kit and toner cartridge. If the sheet is visible, then gently pull the jammed sheet from the manual feeder. Part of the manual feeder.

Quick Reference
Page 15
2 Lift the flap at the front of the printer, and then remove any jammed sheets. 3 Align and insert the photoconductor kit and toner cartridge. 4 Press . Clearing jams 15
2 Lift the flap at the front of the printer, and then remove any jammed sheets. 3 Align and insert the photoconductor kit and toner cartridge. 4 Press . Clearing jams 15

User's Guide
Page 2
... network 22 Minimizing your printer's environmental impact 24 Saving paper and toner...24 Using recycled paper ...24 Conserving supplies ...24 Saving energy...25 Using Eco-Mode...25 Adjusting Power Saver ...26 Recycling...26 Recycling Lexmark products ...26 Recycling Lexmark packaging...26 Returning Lexmark cartridges for reuse or recycling 27 Reducing printer noise...27 Loading...
... network 22 Minimizing your printer's environmental impact 24 Saving paper and toner...24 Using recycled paper ...24 Conserving supplies ...24 Saving energy...25 Using Eco-Mode...25 Adjusting Power Saver ...26 Recycling...26 Recycling Lexmark products ...26 Recycling Lexmark packaging...26 Returning Lexmark cartridges for reuse or recycling 27 Reducing printer noise...27 Loading...
User's Guide
Page 6
......115 Storing supplies...117 Checking the status of supplies from a network computer 117 Ordering supplies...118 Ordering toner cartridges ...118 Ordering a photoconductor kit ...118 Replacing supplies...119 Replacing the toner cartridge ...119 Replacing the photoconductor kit ...121 Moving the printer to another location 124 Shipping the printer...... or photo print, copies, or scans 128 Check the document placement...128 Check the paper size setting ...128 Reinstall the toner cartridge ...128 Understanding printer messages...129 Close front door ...129 Invalid Engine Code ...129 Contents 6
......115 Storing supplies...117 Checking the status of supplies from a network computer 117 Ordering supplies...118 Ordering toner cartridges ...118 Ordering a photoconductor kit ...118 Replacing supplies...119 Replacing the toner cartridge ...119 Replacing the photoconductor kit ...121 Moving the printer to another location 124 Shipping the printer...... or photo print, copies, or scans 128 Check the document placement...128 Check the paper size setting ...128 Reinstall the toner cartridge ...128 Understanding printer messages...129 Close front door ...129 Invalid Engine Code ...129 Contents 6
User's Guide
Page 7
... System Code DO NOT POWER OFF 129 Cartridge is low ...129 Waiting...130 31.yy Replace defective or missing cartridge 130 30 Invalid refill, change toner cartridge...130 32 Replace unsupported cartridge ...130 34 Short paper ...130 37 Insufficient memory to collate job...130 38 Memory full ...130 39 Complex page...
... System Code DO NOT POWER OFF 129 Cartridge is low ...129 Waiting...130 31.yy Replace defective or missing cartridge 130 30 Invalid refill, change toner cartridge...130 32 Replace unsupported cartridge ...130 34 Short paper ...130 37 Insufficient memory to collate job...130 38 Memory full ...130 39 Complex page...

User's Guide
Page 8
... Solid black or white streaks appear on transparencies or paper 158 Streaked horizontal lines ...159 Streaked vertical lines...160 Toner fog or background shading appears on the page 160 Toner rubs off ...161 Toner specks ...161 Transparency print quality is poor...162 Embedded Web Server does not open 162 Check the network connections...
... Solid black or white streaks appear on transparencies or paper 158 Streaked horizontal lines ...159 Streaked vertical lines...160 Toner fog or background shading appears on the page 160 Toner rubs off ...161 Toner specks ...161 Transparency print quality is poor...162 Embedded Web Server does not open 162 Check the network connections...

User's Guide
Page 24
...whether print appears on page 54. Using recycled paper As an environmentally conscious company, Lexmark supports the use of the Lexmark Web site at www.lexmark.com/environment • The Lexmark recycling program at www.lexmark.com/recycling By selecting certain printer settings or tasks, you may yield a greater ... of paper, see "Using recycled paper and other office papers" on one printer setting, see "Using Eco-Mode". Saving paper and toner Studies show that work well with the environment in laser printers. Conserving supplies There are a number of ways you can reduce the amount...
...whether print appears on page 54. Using recycled paper As an environmentally conscious company, Lexmark supports the use of the Lexmark Web site at www.lexmark.com/environment • The Lexmark recycling program at www.lexmark.com/recycling By selecting certain printer settings or tasks, you may yield a greater ... of paper, see "Using recycled paper and other office papers" on one printer setting, see "Using Eco-Mode". Saving paper and toner Studies show that work well with the environment in laser printers. Conserving supplies There are a number of ways you can reduce the amount...

User's Guide
Page 27
... either reused or demanufactured for reuse or recycling, follow the instructions that change when you can also: 1 Visit our Web site at www.lexmark.com/recycle. 2 From the Toner Cartridges section, select your area. This setting supports the performance specifications for the multiple settings that came in your country from the list...
... either reused or demanufactured for reuse or recycling, follow the instructions that change when you can also: 1 Visit our Web site at www.lexmark.com/recycle. 2 From the Toner Cartridges section, select your area. This setting supports the performance specifications for the multiple settings that came in your country from the list...
User's Guide
Page 37
... paper. Moisture content The amount of moisture in a sheet of paper. Extend the time several days if the storage or transportation environment is too rough, toner cannot fuse to moisture changes that weighs at its original wrapper until it can contribute to paper curling prior to 48 hours before buying large...
... paper. Moisture content The amount of moisture in a sheet of paper. Extend the time several days if the storage or transportation environment is too rough, toner cannot fuse to moisture changes that weighs at its original wrapper until it can contribute to paper curling prior to 48 hours before buying large...

User's Guide
Page 38
... and poor print quality: • Always use coated papers unless they are not affected by hand. • Do not mix sizes, types, or weights in toner. mixing results in .) wide. • Use only forms and letterhead printed using an offset lithographic or engraved printing process. • Avoid papers with a software application...
... and poor print quality: • Always use coated papers unless they are not affected by hand. • Do not mix sizes, types, or weights in toner. mixing results in .) wide. • Use only forms and letterhead printed using an offset lithographic or engraved printing process. • Avoid papers with a software application...
User's Guide
Page 103
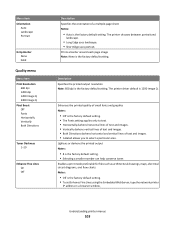
...Solid Quality menu Menu item Print Resolution 600 dpi 1200 dpi 1200 Image Q 2400 Image Q Pixel Boost Off Fonts Horizontally Vertically Both Directions Toner Darkness 1-10 Enhance Fine Lines On Off Description Specifies the orientation of a multiple-page sheet Notes: • Auto is 1200 Image ...vertical lines of small fonts and graphics Notes: • Off is the factory default setting. • Selecting a smaller number can help conserve toner. Enables a print mode preferable for files such as architectural drawings, maps, electrical circuit diagrams, and flow charts Notes: • Off is ...
...Solid Quality menu Menu item Print Resolution 600 dpi 1200 dpi 1200 Image Q 2400 Image Q Pixel Boost Off Fonts Horizontally Vertically Both Directions Toner Darkness 1-10 Enhance Fine Lines On Off Description Specifies the orientation of a multiple-page sheet Notes: • Auto is 1200 Image ...vertical lines of small fonts and graphics Notes: • Off is the factory default setting. • Selecting a smaller number can help conserve toner. Enables a print mode preferable for files such as architectural drawings, maps, electrical circuit diagrams, and flow charts Notes: • Off is ...
User's Guide
Page 118
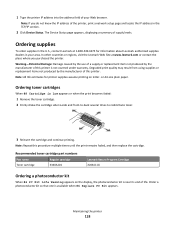
... part numbers Part name Regular cartridge Toner cartridge X340A21G Lexmark Return Program Cartridge X203A11G Ordering a photoconductor kit When 84 PC Kit Life Warning appears on letter- Maintaining the printer 118 Note: If you ... front-to-back several times to redistribute toner. 3 Reinsert the cartridge and continue printing. Ordering toner cartridges When 88 Cartridge is available when 84 Replace PC Kit appears. Note: All life estimates for information about Lexmark authorized supplies dealers in the U.S., contact Lexmark at www.lexmark.com or contact the place where you ...
... part numbers Part name Regular cartridge Toner cartridge X340A21G Lexmark Return Program Cartridge X203A11G Ordering a photoconductor kit When 84 PC Kit Life Warning appears on letter- Maintaining the printer 118 Note: If you ... front-to-back several times to redistribute toner. 3 Reinsert the cartridge and continue printing. Ordering toner cartridges When 88 Cartridge is available when 84 Replace PC Kit appears. Note: All life estimates for information about Lexmark authorized supplies dealers in the U.S., contact Lexmark at www.lexmark.com or contact the place where you ...

User's Guide
Page 119
...2 ABC 5 JKL 3 DEF 7 PQRS 8 TUV 6 MNO * 9 WXYZ 0 # Maintaining the printer 119 To replace the toner cartridge: 1 Open the front door by printing a network setup page. You can check to redistribute the toner, and then reinsert it side-to-side and front-to-back several times to see approximately how... much toner is low appears, or when you experience faded print, remove the toner cartridge. When shaking the cartridge no longer improves...
...2 ABC 5 JKL 3 DEF 7 PQRS 8 TUV 6 MNO * 9 WXYZ 0 # Maintaining the printer 119 To replace the toner cartridge: 1 Open the front door by printing a network setup page. You can check to redistribute the toner, and then reinsert it side-to-side and front-to-back several times to see approximately how... much toner is low appears, or when you experience faded print, remove the toner cartridge. When shaking the cartridge no longer improves...

User's Guide
Page 120
2 Press the button on the base of the photoconductor kit, and then pull the toner cartridge out using the handle. 1 1@!. 4 GHI 2 ABC 5 JKL 3 DEF 7 PQRS 8 TUV 6 MNO * 9 WXYZ 0 # 2 3 Unpack the new toner cartridge. 4 Shake the cartridge in all directions to distribute the toner. Maintaining the printer 120
2 Press the button on the base of the photoconductor kit, and then pull the toner cartridge out using the handle. 1 1@!. 4 GHI 2 ABC 5 JKL 3 DEF 7 PQRS 8 TUV 6 MNO * 9 WXYZ 0 # 2 3 Unpack the new toner cartridge. 4 Shake the cartridge in all directions to distribute the toner. Maintaining the printer 120
User's Guide
Page 121
... 6 MNO * 9 WXYZ 0 # 6 Close the front door. Note: The photoconductor kit is one item only. Maintaining the printer 121 5 Install the new toner cartridge by aligning the rollers on the toner cartridge with the arrows on the display. While the printer may continue to function properly after the photoconductor kit has reached its...
... 6 MNO * 9 WXYZ 0 # 6 Close the front door. Note: The photoconductor kit is one item only. Maintaining the printer 121 5 Install the new toner cartridge by aligning the rollers on the toner cartridge with the arrows on the display. While the printer may continue to function properly after the photoconductor kit has reached its...

User's Guide
Page 122
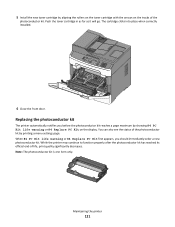
Note: The photoconductor kit and toner cartridge form a unit. 1@!. 4 GHI 2 ABC 5 JKL 3 DEF 7 PQRS 8 TUV 6 MNO * 9 WXYZ 0 # Place the unit on the toner cartridge handle. 1 Open the front door by pressing the button on the left side of the printer and lowering the front door. 1@!. 4 GHI 2 ABC 5 JKL 3 DEF 7 PQRS 8 TUV 6 MNO * 9 WXYZ 0 # 2 Pull the photoconductor kit and toner cartridge out of the printer as a unit by pulling on a flat, clean surface. Maintaining the printer 122
Note: The photoconductor kit and toner cartridge form a unit. 1@!. 4 GHI 2 ABC 5 JKL 3 DEF 7 PQRS 8 TUV 6 MNO * 9 WXYZ 0 # Place the unit on the toner cartridge handle. 1 Open the front door by pressing the button on the left side of the printer and lowering the front door. 1@!. 4 GHI 2 ABC 5 JKL 3 DEF 7 PQRS 8 TUV 6 MNO * 9 WXYZ 0 # 2 Pull the photoconductor kit and toner cartridge out of the printer as a unit by pulling on a flat, clean surface. Maintaining the printer 122


