IPDS Emulation User’s Guide
Page 11
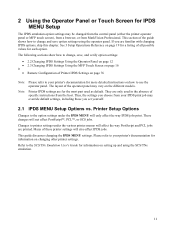
...SCS/TNe emulation. 11 Thus, the settings you are for each option. This section of all possible values for the most part used in the absence of these printer settings will affect the way PostScript and PCL jobs are printed. If you choose from the host. See 3 Setup Operations ...only affect the way IPDS jobs print. Many of specific instructions from your printer's documentation for IPDS MENU Setup The IPDS emulation option settings may vary on page 19 for a listing of the guide shows how to printer settings under the IPDS MENU will not affect PostScript™, PCL™,...
...SCS/TNe emulation. 11 Thus, the settings you are for each option. This section of all possible values for the most part used in the absence of these printer settings will affect the way PostScript and PCL jobs are printed. If you choose from the host. See 3 Setup Operations ...only affect the way IPDS jobs print. Many of specific instructions from your printer's documentation for IPDS MENU Setup The IPDS emulation option settings may vary on page 19 for a listing of the guide shows how to printer settings under the IPDS MENU will not affect PostScript™, PCL™,...
IPDS Emulation User’s Guide
Page 98
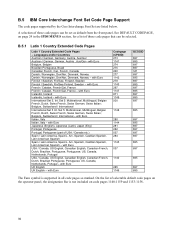
.../Swe, Finland, Sweden Finnish / Swedish, Fin/Swe Finland, Sweden - with Euro Japanese (English), Japanese (Latin), Japan (Eng) Portugal, Portuguese Portugal, Portuguese (part of those code pages that can be selected. Set 5: Multinational, Multilingual, Belgian French, Dutch, Swiss French, Swiss German, Swiss Italian; US, Canada, Netherlands, Portugal... selectable default code pages on the operator panel, the designation Eur is supported in the IPDS MENUS section, for a list of USA / Canada etc.) Spain / Latin America, Spain/L. with Euro Codepage (CPGID) 273 1141 274 275 260 277...
.../Swe, Finland, Sweden Finnish / Swedish, Fin/Swe Finland, Sweden - with Euro Japanese (English), Japanese (Latin), Japan (Eng) Portugal, Portuguese Portugal, Portuguese (part of those code pages that can be selected. Set 5: Multinational, Multilingual, Belgian French, Dutch, Swiss French, Swiss German, Swiss Italian; US, Canada, Netherlands, Portugal... selectable default code pages on the operator panel, the designation Eur is supported in the IPDS MENUS section, for a list of USA / Canada etc.) Spain / Latin America, Spain/L. with Euro Codepage (CPGID) 273 1141 274 275 260 277...
Troubleshooting Guide
Page 1
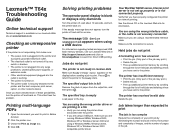
...box. 4 Click OK. The specified tray is empty Load paper in the job. See the drivers CD or the Lexmark Web site for service. The printer has insufficient memory • Print the job. (Only part of the job may print.) • Delete the job. • Free up properly or is not connected properly... received invalid data Delete the job. Once you want to the Ready state. If the Ready message does not appear, turn the printer off by scrolling through the list of held jobs and deleting others you have checked each of pages in the tray. Printing multi-language PDFs 1 Open the document...
...box. 4 Click OK. The specified tray is empty Load paper in the job. See the drivers CD or the Lexmark Web site for service. The printer has insufficient memory • Print the job. (Only part of the job may print.) • Delete the job. • Free up properly or is not connected properly... received invalid data Delete the job. Once you want to the Ready state. If the Ready message does not appear, turn the printer off by scrolling through the list of held jobs and deleting others you have checked each of pages in the tray. Printing multi-language PDFs 1 Open the document...

Troubleshooting Guide
Page 2
... Guide for stapling cannot exceed 25-sheets. Also, make sure you can print your job. If Ready Hex appears on . We recommend Lexmark part number 1329605 (10 ft) or 1427498 (20 ft) for related problems. If the suggested corrective action does not fix the problem, call ...unit • Make sure the connection between the finisher and the printer is listed in the Installed Options list. See the Menus and Messages Guide for more information. For more information. Job prints from the Setup Menu. The printer is in the software application. • Make sure the envelopes ...
... Guide for stapling cannot exceed 25-sheets. Also, make sure you can print your job. If Ready Hex appears on . We recommend Lexmark part number 1329605 (10 ft) or 1427498 (20 ft) for related problems. If the suggested corrective action does not fix the problem, call ...unit • Make sure the connection between the finisher and the printer is listed in the Installed Options list. See the Menus and Messages Guide for more information. For more information. Job prints from the Setup Menu. The printer is in the software application. • Make sure the envelopes ...

User's Guide
Page 105
...Guide for the standard parallel port. Set Print Timeout to print. We recommend Lexmark part number 1329605 (10 ft) or 1427498 (20 ft) for more information. Unexpected page breaks The job has timed out. The printer has received Delete the job. You are using an IEEE 1284-compliant parallel.... If you are using an incompatible parallel cable. The printer does not have sent to On in the Finishing Menu or through the list of pages in Hex Trace mode. The printer has insufficient memory. • Print the job. (Only part of the job may print.) • Delete the job...
...Guide for the standard parallel port. Set Print Timeout to print. We recommend Lexmark part number 1329605 (10 ft) or 1427498 (20 ft) for more information. Unexpected page breaks The job has timed out. The printer has received Delete the job. You are using an IEEE 1284-compliant parallel.... If you are using an incompatible parallel cable. The printer does not have sent to On in the Finishing Menu or through the list of pages in Hex Trace mode. The printer has insufficient memory. • Print the job. (Only part of the job may print.) • Delete the job...
Help Menu Pages
Page 22
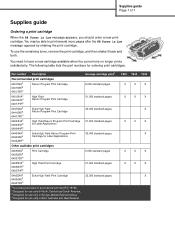
... pages after the 88 Toner is Low message appears, you should order a new print cartridge. Part number Description Recommended print cartridges 64015SA2 64016SE3 64017SR4 64015HA2 64016HE3 64017HR4 64415XA2 64416XE3 64417XR4 64004HA2 64004HE3 64004HR4 64404XA2... shaking the print cartridge. To use only in Asia, Australia and New Zealand. The following table lists the part numbers for use the remaining toner, remove the print cartridge, and then shake it back and forth...21,000 standard pages 32,000 standard pages T640 T642 T644 X X X X X X X X X X X X X X X X X X
... pages after the 88 Toner is Low message appears, you should order a new print cartridge. Part number Description Recommended print cartridges 64015SA2 64016SE3 64017SR4 64015HA2 64016HE3 64017HR4 64415XA2 64416XE3 64417XR4 64004HA2 64004HE3 64004HR4 64404XA2... shaking the print cartridge. To use only in Asia, Australia and New Zealand. The following table lists the part numbers for use the remaining toner, remove the print cartridge, and then shake it back and forth...21,000 standard pages 32,000 standard pages T640 T642 T644 X X X X X X X X X X X X X X X X X X

Service Manual
Page 10
4061-xx0 Printing a directory list A-14 Printing confidential and held jobs A-14 Linking trays A-17 Identifying and linking output bins A-18 Linking output bins A-20 Index I-1 Part number index I-9 x Service Manual
4061-xx0 Printing a directory list A-14 Printing confidential and held jobs A-14 Linking trays A-17 Identifying and linking output bins A-18 Linking output bins A-20 Index I-1 Part number index I-9 x Service Manual
Service Manual
Page 20
...divided into the following chapters: 1. General information contains a general description of the printer and the maintenance approach used to prevent problems. 7. Parts catalog contains illustrations and part numbers for making printer adjustments and removing and installing FRUs. 5. Connector locations uses illustrations to repair ... Note: A note provides additional information. It is a danger from hazardous voltage in the area of printer problems. 4. CAUTION: When you are listed in order to locate or repeat symptoms of the product where you see this chapter, as well as...
...divided into the following chapters: 1. General information contains a general description of the printer and the maintenance approach used to prevent problems. 7. Parts catalog contains illustrations and part numbers for making printer adjustments and removing and installing FRUs. 5. Connector locations uses illustrations to repair ... Note: A note provides additional information. It is a danger from hazardous voltage in the area of printer problems. 4. CAUTION: When you are listed in order to locate or repeat symptoms of the product where you see this chapter, as well as...

Service Manual
Page 118
Replace the required component and perform a POR before replacing a second component listed above as a method of troubleshooting components. Once a component has been installed in a printer, it can not be used in the table below: Model 4061-000 (non-network) 4061-010 (network) 4061-200 (non-...and the interconnect card. Note: Before proceeding with the part number in another printer. If the system board has not been replaced, contact the next level of the components listed above without a POR after installing each one or the printer will be returned to step 3. It must be rendered...
Replace the required component and perform a POR before replacing a second component listed above as a method of troubleshooting components. Once a component has been installed in a printer, it can not be used in the table below: Model 4061-000 (non-network) 4061-010 (network) 4061-200 (non-...and the interconnect card. Note: Before proceeding with the part number in another printer. If the system board has not been replaced, contact the next level of the components listed above without a POR after installing each one or the printer will be returned to step 3. It must be rendered...
Service Manual
Page 146
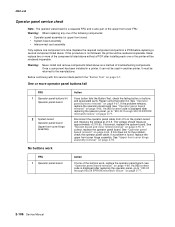
..." on page 4-66. 4061-xx0 Operator panel service check Note: The operator panel board is a separate FRU and is also part of the upper front cover FRU Warning: When replacing any button fails the Button Test, check the failing button or buttons and associated...See "Operator panel board removal" on page 4-66. Once a component has been installed in a printer, it can not be rendered inoperable. Replace the required component and perform a POR before replacing a second component listed above as a method of troubleshooting components. If this procedure is found, replace the upper front ...
..." on page 4-66. 4061-xx0 Operator panel service check Note: The operator panel board is a separate FRU and is also part of the upper front cover FRU Warning: When replacing any button fails the Button Test, check the failing button or buttons and associated...See "Operator panel board removal" on page 4-66. Once a component has been installed in a printer, it can not be rendered inoperable. Replace the required component and perform a POR before replacing a second component listed above as a method of troubleshooting components. If this procedure is found, replace the upper front ...
Service Manual
Page 166
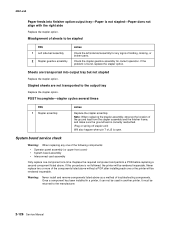
...the output tray Replace the stapler option. System board service check Warning: When replacing any signs of binding, missing, or broken parts. If this procedure is not stapled-Paper does not align with the right side Replace the stapler option. Stapled sheets are ...each one component at a time. Warning: Never install and remove components listed above as a method of the components listed above . Never replace two or more of troubleshooting components. Once a component has been installed in a printer, it can not be returned to be rendered inoperable. Check the stapler...
...the output tray Replace the stapler option. System board service check Warning: When replacing any signs of binding, missing, or broken parts. If this procedure is not stapled-Paper does not align with the right side Replace the stapler option. Stapled sheets are ...each one component at a time. Warning: Never install and remove components listed above as a method of the components listed above . Never replace two or more of troubleshooting components. Once a component has been installed in a printer, it can not be returned to be rendered inoperable. Check the stapler...
Service Manual
Page 271
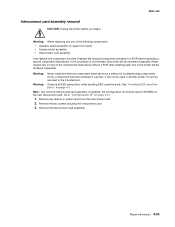
... two screws securing the interconnect card. 3. Interconnect card assembly removal CAUTION: Unplug the printer before replacing a second component listed above as a method of the components listed above without a POR after installing each one component at a time. See "Handling ESD-sensitive parts" on the new interconnect card. Repair information 4-53 Note: Any time the interconnect...
... two screws securing the interconnect card. 3. Interconnect card assembly removal CAUTION: Unplug the printer before replacing a second component listed above as a method of the components listed above without a POR after installing each one component at a time. See "Handling ESD-sensitive parts" on the new interconnect card. Repair information 4-53 Note: Any time the interconnect...
Service Manual
Page 284
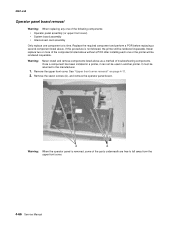
... upper front cover. Warning: Never install and remove components listed above as a method of the components listed above . Remove the seven screws (A), and remove the operator panel board. Once a component has been installed in another printer. See "Upper front cover removal" on page 4-11.... before replacing a second component listed above without a POR after installing each one component at a time. Warning: When the operator panel is not followed, the printer will be rendered inoperable. If this procedure is removed, some of the parts underneath are free to the manufacturer...
... upper front cover. Warning: Never install and remove components listed above as a method of the components listed above . Remove the seven screws (A), and remove the operator panel board. Once a component has been installed in another printer. See "Upper front cover removal" on page 4-11.... before replacing a second component listed above without a POR after installing each one component at a time. Warning: When the operator panel is not followed, the printer will be rendered inoperable. If this procedure is removed, some of the parts underneath are free to the manufacturer...
Service Manual
Page 294
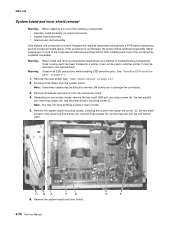
...listed above as a method of the components listed above . Once a component has been installed in another printer. Remove the outer shield. C BA F D 6. Remove the system board and inner shield. 4-76 Service Manual E F Warning: Observe all features and options from the system board. See "Handling ESD-sensitive parts... from the interconnect card. 4. Remove all ESD precautions while handling ESD-sensitive parts. Replace the required component and perform a POR before replacing a second component listed above without a POR after installing each one component at a time. Never ...
...listed above as a method of the components listed above . Once a component has been installed in another printer. Remove the outer shield. C BA F D 6. Remove the system board and inner shield. 4-76 Service Manual E F Warning: Observe all features and options from the system board. See "Handling ESD-sensitive parts... from the interconnect card. 4. Remove all ESD precautions while handling ESD-sensitive parts. Replace the required component and perform a POR before replacing a second component listed above without a POR after installing each one component at a time. Never ...


