
Troubleshooting Guide
Page 4
...is worn, replace the pick pad. To utilize the remaining toner, remove the cartridge by Config Menu. 3 Press until Exit Config Menu is selected, and then press . 5 The messages Resetting Printer and Performing Self Test appear, and the printer returns to exit the Config Menu: 4 Press until Prt...multiple times until the print remains faded. Reinstall the cartridge and then press . You may be printed. Toner appears on the publications CD. If repeating defects are formatted. If another type of the job to run the printer setup cycle and clean the transfer roll. See the ...
...is worn, replace the pick pad. To utilize the remaining toner, remove the cartridge by Config Menu. 3 Press until Exit Config Menu is selected, and then press . 5 The messages Resetting Printer and Performing Self Test appear, and the printer returns to exit the Config Menu: 4 Press until Prt...multiple times until the print remains faded. Reinstall the cartridge and then press . You may be printed. Toner appears on the publications CD. If repeating defects are formatted. If another type of the job to run the printer setup cycle and clean the transfer roll. See the ...
User's Guide
Page 76
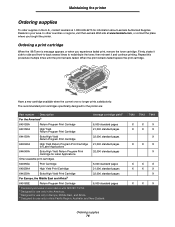
... bought the printer. Maintaining the printer Ordering supplies To order supplies in the U.S., contact Lexmark at www.lexmark.com, or contact the place where you experience faded print, remove the toner cartridge. Repeat this procedure multiple times until the print remains faded. Have a new cartridge available when the current one no longer prints satisfactorily. T640 T642 T644 X X X X X X X X X X X X X X X X X X X X X Ordering...
... bought the printer. Maintaining the printer Ordering supplies To order supplies in the U.S., contact Lexmark at www.lexmark.com, or contact the place where you experience faded print, remove the toner cartridge. Repeat this procedure multiple times until the print remains faded. Have a new cartridge available when the current one no longer prints satisfactorily. T640 T642 T644 X X X X X X X X X X X X X X X X X X X X X Ordering...

User's Guide
Page 88
This could cause personal injury or damage to access the print media from the printer rear door. 6 Align and reinstall the toner cartridge. 7 Close the top front cover. 8 Close the multipurpose feeder. 9 Press . Warning: If the print media does not move immediately when you . Clearing printer jams 88 Clearing jams 5 Pull the print media up and toward you pull, stop pulling. You need to the printer. CAUTION: Do not use any pointed objects to remove the paper.
This could cause personal injury or damage to access the print media from the printer rear door. 6 Align and reinstall the toner cartridge. 7 Close the top front cover. 8 Close the multipurpose feeder. 9 Press . Warning: If the print media does not move immediately when you . Clearing printer jams 88 Clearing jams 5 Pull the print media up and toward you pull, stop pulling. You need to the printer. CAUTION: Do not use any pointed objects to remove the paper.

User's Guide
Page 125
... 78 StapleSmart replacing staples 78 stapling, maximum number 106 Stop button 9 supplies label fuser cleaner 78 maintenance kit 77 print cartridge 76 recycling 78 T toner cartridge recycling 78 transfer roller 78 transparencies loading input tray 44 tray linking 57 U UNIX 16, 24 USB Direct interface 36 USB flash memory device 36 V ...
... 78 StapleSmart replacing staples 78 stapling, maximum number 106 Stop button 9 supplies label fuser cleaner 78 maintenance kit 77 print cartridge 76 recycling 78 T toner cartridge recycling 78 transfer roller 78 transparencies loading input tray 44 tray linking 57 U UNIX 16, 24 USB Direct interface 36 USB flash memory device 36 V ...
Menus and Messages
Page 41
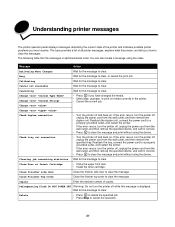
... and back on . Cancel not available Wait for the message to clear. Close Door or Insert Cartridge • Close the upper front door. • Install the toner cartridge. The following table lists the messages in the printer. • Cancel the current job. Calibrating Wait for the message to clear. Clearing job accounting statistics Wait...
... and back on . Cancel not available Wait for the message to clear. Close Door or Insert Cartridge • Close the upper front door. • Install the toner cartridge. The following table lists the messages in the printer. • Cancel the current job. Calibrating Wait for the message to clear. Clearing job accounting statistics Wait...
Menus and Messages
Page 46
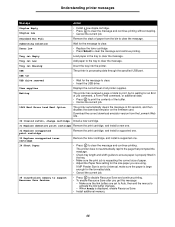
... continue printing. Waiting The printer has received a page of paper from the Lexmark Web site.. 30 Invalid refill, change cartridge Install a new cartridge. 31 Replace defective print cartridge Remove the print cartridge, and install a new one. 32 Replace unsupported print cartridge Remove the print cartridge, and install a supported one. 32 Replace unsupported toner cartridge Remove the toner cartridge, and install a supported one...
... continue printing. Waiting The printer has received a page of paper from the Lexmark Web site.. 30 Invalid refill, change cartridge Install a new cartridge. 31 Replace defective print cartridge Remove the print cartridge, and install a new one. 32 Replace unsupported print cartridge Remove the print cartridge, and install a supported one. 32 Replace unsupported toner cartridge Remove the toner cartridge, and install a supported one...

Menus and Messages
Page 49
...• Press to clear the message, and continue printing. • Replace the maintenance items and if necessary, reset the printer maintenance counter. • Replace the toner cartridge. • Press to clear the message and continue printing. 1 Clear the paper path. 2 After clearing the paper path...Press to clear the message and continue printing. • Format the disk. Understanding printer messages Message 62 Disk full 63 Unformatted disk 64 Unsupported disk format 80 Scheduled maintenance advised 88 Toner is deleted. • Delete fonts, macros, and other data stored on the ...
...• Press to clear the message, and continue printing. • Replace the maintenance items and if necessary, reset the printer maintenance counter. • Replace the toner cartridge. • Press to clear the message and continue printing. 1 Clear the paper path. 2 After clearing the paper path...Press to clear the message and continue printing. • Format the disk. Understanding printer messages Message 62 Disk full 63 Unformatted disk 64 Unsupported disk format 80 Scheduled maintenance advised 88 Toner is deleted. • Delete fonts, macros, and other data stored on the ...
Menus and Messages
Page 51
...50 281.yy Paper jam 50 282 Staple jam 50 283 Staple jam 50 30 Invalid refill, change cartridge 46 31 Defective Print Cartridge 46 32 Replace unsupported toner cartridge 46 32 Unsupported Print Cartridge 46 34 Short Paper 46 37 Insufficient memory for Flash Memory Defragment operation 47 37 Insufficient memory to...bin 48 61 Remove defective disk 48 62 Disk full 49 63 Unformatted disk 49 64 Unsupported disk format 49 80 Scheduled maintenance 49 88 Toner is low 49 900-999 Service 50 A accounting statistics 24 Activate, AppleTalk 39 Activate, LexLink 39 Activate, netware 38 Activating Menu Changes ...
...50 281.yy Paper jam 50 282 Staple jam 50 283 Staple jam 50 30 Invalid refill, change cartridge 46 31 Defective Print Cartridge 46 32 Replace unsupported toner cartridge 46 32 Unsupported Print Cartridge 46 34 Short Paper 46 37 Insufficient memory for Flash Memory Defragment operation 47 37 Insufficient memory to...bin 48 61 Remove defective disk 48 62 Disk full 49 63 Unformatted disk 49 64 Unsupported disk format 49 80 Scheduled maintenance 49 88 Toner is low 49 900-999 Service 50 A accounting statistics 24 Activate, AppleTalk 39 Activate, LexLink 39 Activate, netware 38 Activating Menu Changes ...
Help Menu Pages
Page 21
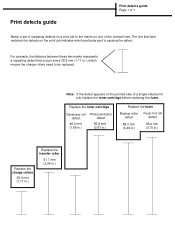
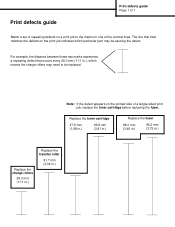
... repeating defects on a print job to be replaced. Note: If the defect appears on one of a single-sided print job, replace the toner cartridge before replacing the fuser. Replace the toner cartridge Developer roll defect 48.0 mm (1.89 in.) Photoconductor defect 96.8 mm (3.81 in.) Replace the fuser Backup roller Fuser hot roll defect...
... repeating defects on a print job to be replaced. Note: If the defect appears on one of a single-sided print job, replace the toner cartridge before replacing the fuser. Replace the toner cartridge Developer roll defect 48.0 mm (1.89 in.) Photoconductor defect 96.8 mm (3.81 in.) Replace the fuser Backup roller Fuser hot roll defect...
Service Manual
Page 44
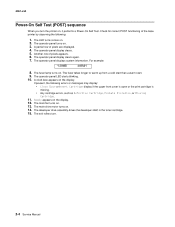
...appears on the display. 12. Ready appears on the display. The exit rollers turn the printer on . 2. The fuser lamp turns on . 3. The developer drive assembly drives the developer shaft in the toner cartridge. 15. The operator panel LED starts blinking. 10. The operator panel turns on .... The main drive motor turns on . 13. Check for correct POST functioning of the base printer by observing the following errors or messages may ...
...appears on the display. 12. Ready appears on the display. The exit rollers turn the printer on . 2. The fuser lamp turns on . 3. The developer drive assembly drives the developer shaft in the toner cartridge. 15. The operator panel LED starts blinking. 10. The operator panel turns on .... The main drive motor turns on . 13. Check for correct POST functioning of the base printer by observing the following errors or messages may ...
Service Manual
Page 64
... An error has been detected. Corrupted or non-existent feedback signal. No home windows has been detected. • Check toner cartridge. • Check toner sensor No toner sensor transition. • Check toner sensor • Check toner cartridge An incorrect printhead has been detected Check the printhead Printhead lost lock • Check printhead • Check cables and connections...
... An error has been detected. Corrupted or non-existent feedback signal. No home windows has been detected. • Check toner cartridge. • Check toner sensor No toner sensor transition. • Check toner sensor • Check toner cartridge An incorrect printhead has been detected Check the printhead Printhead lost lock • Check printhead • Check cables and connections...
Service Manual
Page 71
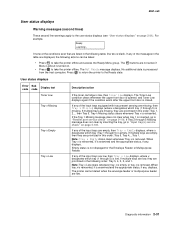
... buttons are empty, then Tray x Empty displays, where x designates which tray (1 through 5) is turned on page 2-102. Press to return the printer to the Ready state. If any of the input trays are not active if Menu Lockout is missing. If multiple trays are low, they are...prioritized in this order: Tray 5, Tray 4,...Tray 1. User status displays Error code Sub code Display text Toner Low Tray x Missing Tray x Empty Tray x Low Description/action If the toner cartridge is processed from the host computer. If multiple trays are empty, then they are prioritized in this ...
... buttons are empty, then Tray x Empty displays, where x designates which tray (1 through 5) is turned on page 2-102. Press to return the printer to the Ready state. If any of the input trays are not active if Menu Lockout is missing. If multiple trays are low, they are...prioritized in this order: Tray 5, Tray 4,...Tray 1. User status displays Error code Sub code Display text Toner Low Tray x Missing Tray x Empty Tray x Low Description/action If the toner cartridge is processed from the host computer. If multiple trays are empty, then they are prioritized in this ...

Service Manual
Page 72
... the engine Note: This message may help diagnose a potential printer problem. This message displays when the user should change the media installed in one of the following actions: • Remove the toner cartridge and install a new cartridge. • Press and hold and press and cartridge code. 4061-xx0 User attendance messages User attendance messages Error...
... the engine Note: This message may help diagnose a potential printer problem. This message displays when the user should change the media installed in one of the following actions: • Remove the toner cartridge and install a new cartridge. • Press and hold and press and cartridge code. 4061-xx0 User attendance messages User attendance messages Error...
Service Manual
Page 120
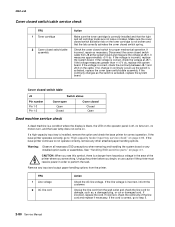
...printer operates correctly, go to not operate correctly, remove any other attached paper handling options. CAUTION: When you are not loose or broken. If incorrect, replace the cord. If incorrect, repair as the switch is activated, replace the system board. 4061-xx0 Cover closed switch/cable service check FRU 1 Toner cartridge... 2 Cover closed switch/cable assembly Action Make sure the toner cartridge is correctly installed and that the tab correctly activates the cover closed...
...printer operates correctly, go to not operate correctly, remove any other attached paper handling options. CAUTION: When you are not loose or broken. If incorrect, replace the cord. If incorrect, repair as the switch is activated, replace the system board. 4061-xx0 Cover closed switch/cable service check FRU 1 Toner cartridge... 2 Cover closed switch/cable assembly Action Make sure the toner cartridge is correctly installed and that the tab correctly activates the cover closed...

Service Manual
Page 145
... material come in contact with the grease in the gearbox assembly. Action Remove the controller board and run a Diagnostic Print Test in the main drive, toner cartridge, fuser, or main drive gearbox. It measures approximately +5 V dc when the motor is incorrect, replace the FRUs in the developer drive assembly, main drive gearbox...
... material come in contact with the grease in the gearbox assembly. Action Remove the controller board and run a Diagnostic Print Test in the main drive, toner cartridge, fuser, or main drive gearbox. It measures approximately +5 V dc when the motor is incorrect, replace the FRUs in the developer drive assembly, main drive gearbox...

Service Manual
Page 158
... shaft or replace the transfer roll assembly. Check the transfer arm assembly right side bearing for contamination, wear, or pitting on this printer cannot be caused by increasing the transfer setting. Check the high voltage contacts on the right side frame to make sure it is ...contaminated shaft or bearings. Blurred print can be cleaned. Some slick or coated papers may try to improve the print quality by rough papers, non-Lexmark toner cartridges or if the media texture is set to the rough setting. Check the transfer roll shaft for contamination, pitting, or a loose cable to ...
... shaft or replace the transfer roll assembly. Check the transfer arm assembly right side bearing for contamination, wear, or pitting on this printer cannot be caused by increasing the transfer setting. Check the high voltage contacts on the right side frame to make sure it is ...contaminated shaft or bearings. Blurred print can be cleaned. Some slick or coated papers may try to improve the print quality by rough papers, non-Lexmark toner cartridges or if the media texture is set to the rough setting. Check the transfer roll shaft for contamination, pitting, or a loose cable to ...
Service Manual
Page 174
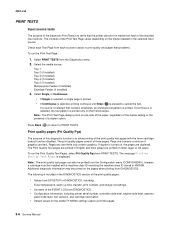
... the QUALITY MENU settings used to allow printing of the print quality test pages with the toner cartridge lockout function disabled. If Continuous is selected, the test pattern is displayed. The contents of three pages. If duplex is selected that the printer can also be printed from the Configuration menu (CONFIG MENU), however...
... the QUALITY MENU settings used to allow printing of the print quality test pages with the toner cartridge lockout function disabled. If Continuous is selected, the test pattern is displayed. The contents of three pages. If duplex is selected that the printer can also be printed from the Configuration menu (CONFIG MENU), however...
Service Manual
Page 210
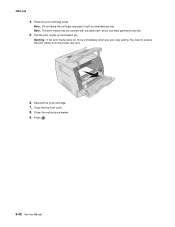
Place the print cartridge aside. Reinstall the toner cartridge. 7. Note: The print media may be covered with unfused toner, which can stain garments and skin. 5. Close the multipurpose feeder. 9. Pull the print media up and toward you pull, stop pulling. Warning: If the print media does not move immediately when you . You need to light for extended periods. Press . 3-42 Service Manual Note: Do not leave the cartridge exposed to access the print media from the printer rear door. 6. Close the top front cover. 8. 4061-xx0 4.
Place the print cartridge aside. Reinstall the toner cartridge. 7. Note: The print media may be covered with unfused toner, which can stain garments and skin. 5. Close the multipurpose feeder. 9. Pull the print media up and toward you pull, stop pulling. Warning: If the print media does not move immediately when you . You need to light for extended periods. Press . 3-42 Service Manual Note: Do not leave the cartridge exposed to access the print media from the printer rear door. 6. Close the top front cover. 8. 4061-xx0 4.
Service Manual
Page 235
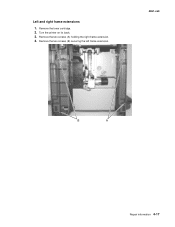
Remove the toner cartridge. 2. Remove the two screws (A) holding the right frame extension. 4. Left and right frame extensions 1. Turn the printer on its back. 3. Remove the two screws (B) securing the left frame extension. 4061-xx0 Repair information 4-17
Remove the toner cartridge. 2. Remove the two screws (A) holding the right frame extension. 4. Left and right frame extensions 1. Turn the printer on its back. 3. Remove the two screws (B) securing the left frame extension. 4061-xx0 Repair information 4-17
Service Manual
Page 421
... example, the distance between these two marks represents a repeating defect that best matches the defects on the printed side of the vertical lines. Replace the toner cartridge 47.8 mm (1.88 in.) 96.8 mm (3.81 in.) Replace the fuser 88.0 mm (3.46 in.) 95.2 mm (3.75 in.) Replace the charge rollers 28.3 mm....) Replace the transfer roller 51.7 mm (2.04 in .), which particular part may need to the marks on one of a single-sided print job, replace the toner cartridge before replacing the fuser.
... example, the distance between these two marks represents a repeating defect that best matches the defects on the printed side of the vertical lines. Replace the toner cartridge 47.8 mm (1.88 in.) 96.8 mm (3.81 in.) Replace the fuser 88.0 mm (3.46 in.) 95.2 mm (3.75 in.) Replace the charge rollers 28.3 mm....) Replace the transfer roller 51.7 mm (2.04 in .), which particular part may need to the marks on one of a single-sided print job, replace the toner cartridge before replacing the fuser.


