Clearing Jams Guide
Page 1
...sheet at a time through the multipurpose feeder. • Do not use print media that you have loaded. Warning: Do not touch the photoconductor drum on the printer, Open Rear and remove the jam. Make sure the guides are holding the cartridge. 4 Place the print cartridge aside. Open the finisher rear door...of print media you are not placed too tightly against the stack of print media. Lexmark™ T64x Clearing Jams Guide Avoiding jams The following hints can help you load it. CAUTION: The inside of the printer may be hot. 3 Lift and pull the print cartridge out of the cartridge. If...
...sheet at a time through the multipurpose feeder. • Do not use print media that you have loaded. Warning: Do not touch the photoconductor drum on the printer, Open Rear and remove the jam. Make sure the guides are holding the cartridge. 4 Place the print cartridge aside. Open the finisher rear door...of print media you are not placed too tightly against the stack of print media. Lexmark™ T64x Clearing Jams Guide Avoiding jams The following hints can help you load it. CAUTION: The inside of the printer may be hot. 3 Lift and pull the print cartridge out of the cartridge. If...

User's Guide
Page 87
Warning: Do not touch the photoconductor drum on the underside of the printer. CAUTION: The inside of the printer may be hot. Use the cartridge handle whenever you are holding the cartridge. 4 Place the print cartridge aside. Note: Do not leave the cartridge exposed ... 201 Paper Jam Remove Cartridge 1 Push the release latch, and lower the multipurpose feeder. 2 Push the release latch, and open the top front cover. Clearing printer jams 87 Allow the printer to light for extended periods.
Warning: Do not touch the photoconductor drum on the underside of the printer. CAUTION: The inside of the printer may be hot. Use the cartridge handle whenever you are holding the cartridge. 4 Place the print cartridge aside. Note: Do not leave the cartridge exposed ... 201 Paper Jam Remove Cartridge 1 Push the release latch, and lower the multipurpose feeder. 2 Push the release latch, and open the top front cover. Clearing printer jams 87 Allow the printer to light for extended periods.
Service Manual
Page 156
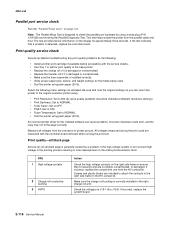
...: Set to ensure they fit securely and are measured with the controller board removed while running the print test. An incorrect printer driver for approximately three seconds. Check the voltages on page 3-8. Print quality service check Service tip: Before troubleshooting any print quality... correctly. FRU 1 High voltage contacts 2 Charge roll conductive bushing 3 HVPS Action Check the high voltage contacts on the entire photoconductor drum. If incorrect, replace the system board. 2-116 Service Manual Note: The Parallel Wrap Test is generally caused by using plain paper ...
...: Set to ensure they fit securely and are measured with the controller board removed while running the print test. An incorrect printer driver for approximately three seconds. Check the voltages on page 3-8. Print quality service check Service tip: Before troubleshooting any print quality... correctly. FRU 1 High voltage contacts 2 Charge roll conductive bushing 3 HVPS Action Check the high voltage contacts on the entire photoconductor drum. If incorrect, replace the system board. 2-116 Service Manual Note: The Parallel Wrap Test is generally caused by using plain paper ...
Service Manual
Page 157
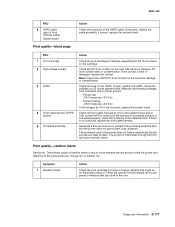
...voltages at CN1 on the cartridge. If there is bent or damaged, replace the contact. The printhead used in the printer does not have a mechanical shutter as previous laser printers. If open, replace the HVPS. Diagnostic information 2-117 Print quality-random marks Service tip: The primary cause of material... 5 Printhead assembly Action Check the print cartridge for loose or foreign material that are incorrect, replace the system board. Check the PC drum contact on the right side frame for any pieces of random marks is connected properly. 4061-xx0 FRU 4 HVPS cable (part of ...
...voltages at CN1 on the cartridge. If there is bent or damaged, replace the contact. The printhead used in the printer does not have a mechanical shutter as previous laser printers. If open, replace the HVPS. Diagnostic information 2-117 Print quality-random marks Service tip: The primary cause of material... 5 Printhead assembly Action Check the print cartridge for loose or foreign material that are incorrect, replace the system board. Check the PC drum contact on the right side frame for any pieces of random marks is connected properly. 4061-xx0 FRU 4 HVPS cable (part of ...
Service Manual
Page 209
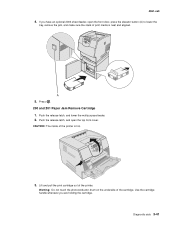
... the multipurpose feeder. 2. Warning: Do not touch the photoconductor drum on the underside of the printer. Push the release latch, and open the front door, press the elevator button (A) to lower the tray, remove the jam, and make sure the stack of the printer is neat and aligned. Lift and pull the print...
... the multipurpose feeder. 2. Warning: Do not touch the photoconductor drum on the underside of the printer. Push the release latch, and open the front door, press the elevator button (A) to lower the tray, remove the jam, and make sure the stack of the printer is neat and aligned. Lift and pull the print...
Service Manual
Page 323
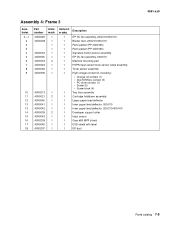
.../input sensor/toner sensor cable assembly Toner sensor assembly High voltage contact kit, including: • Charge roll contact (1) • Doc/TAR/Dev contact (3) • PC drum contact (1) • Screw (5) • Screw block (4) Tray bias assembly Cartridge holddown assembly Upper paper feed deflector Inner paper feed deflector, 000/010 Inner paper feed...
.../input sensor/toner sensor cable assembly Toner sensor assembly High voltage contact kit, including: • Charge roll contact (1) • Doc/TAR/Dev contact (3) • PC drum contact (1) • Screw (5) • Screw block (4) Tray bias assembly Cartridge holddown assembly Upper paper feed deflector Inner paper feed deflector, 000/010 Inner paper feed...


