
User's Guide
Page 75
... on one sheet of paper (16 images on the front and 16 on the display will indicate the printer is Ready and lets you know if any remaining toner. Lets you examine the first copy of a multiple-copy job to be sure it is available when you install an optional duplex unit.... If the job is printing or in the printer on both sides of a sheet of paper. Note: When toner is required. Causes the printer to print two or more information on changing these settings, see the Menus and Messages Guide on the...
... on one sheet of paper (16 images on the front and 16 on the display will indicate the printer is Ready and lets you know if any remaining toner. Lets you examine the first copy of a multiple-copy job to be sure it is available when you install an optional duplex unit.... If the job is printing or in the printer on both sides of a sheet of paper. Note: When toner is required. Causes the printer to print two or more information on changing these settings, see the Menus and Messages Guide on the...
User's Guide
Page 76
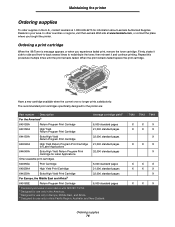
... and front-to-back several times to redistribute the toner, then reinsert it and continue printing. When the print remains faded replace the print cartridge. T640 T642 T644 X X X X X X X X X X X X X X X X X X X X X Ordering supplies 76 Maintaining the printer Ordering supplies To order supplies in the U.S., contact Lexmark at www.lexmark.com, or contact the place where you experience...
... and front-to-back several times to redistribute the toner, then reinsert it and continue printing. When the print remains faded replace the print cartridge. T640 T642 T644 X X X X X X X X X X X X X X X X X X X X X Ordering supplies 76 Maintaining the printer Ordering supplies To order supplies in the U.S., contact Lexmark at www.lexmark.com, or contact the place where you experience...
User's Guide
Page 78
...toner fog or background shading appears on the operator panel display, insert a new staple cartridge in the finisher. When ordering pick rollers, you need one set to Single or Continuous, the alarm is set per input tray excluding the multipurpose feeder. Ordering a transfer roller Order Lexmark... part number 40X0130. If Staple Alarm is sounded, the printer stops printing, and the Load staples message appears. Maintenance kit for T640, T642, and T644 ...
...toner fog or background shading appears on the operator panel display, insert a new staple cartridge in the finisher. When ordering pick rollers, you need one set to Single or Continuous, the alarm is set per input tray excluding the multipurpose feeder. Ordering a transfer roller Order Lexmark... part number 40X0130. If Staple Alarm is sounded, the printer stops printing, and the Load staples message appears. Maintenance kit for T640, T642, and T644 ...

User's Guide
Page 87
...cartridge exposed to cool before touching any internal components. 3 Lift and pull the print cartridge out of the printer. Allow the printer to light for extended periods. Clearing printer jams 87 Use the cartridge handle whenever you are holding the cartridge. 4 Place the print cartridge aside. Note...: The print media may be covered with unfused toner, which can stain garments and skin. CAUTION: The inside of the cartridge....
...cartridge exposed to cool before touching any internal components. 3 Lift and pull the print cartridge out of the printer. Allow the printer to light for extended periods. Clearing printer jams 87 Use the cartridge handle whenever you are holding the cartridge. 4 Place the print cartridge aside. Note...: The print media may be covered with unfused toner, which can stain garments and skin. CAUTION: The inside of the cartridge....

User's Guide
Page 88
You need to remove the paper. Warning: If the print media does not move immediately when you . CAUTION: Do not use any pointed objects to access the print media from the printer rear door. 6 Align and reinstall the toner cartridge. 7 Close the top front cover. 8 Close the multipurpose feeder. 9 Press . Clearing jams 5 Pull the print media up and toward you pull, stop pulling. This could cause personal injury or damage to the printer. Clearing printer jams 88
You need to remove the paper. Warning: If the print media does not move immediately when you . CAUTION: Do not use any pointed objects to access the print media from the printer rear door. 6 Align and reinstall the toner cartridge. 7 Close the top front cover. 8 Close the multipurpose feeder. 9 Press . Clearing jams 5 Pull the print media up and toward you pull, stop pulling. This could cause personal injury or damage to the printer. Clearing printer jams 88
User's Guide
Page 110
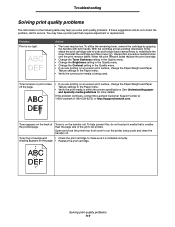
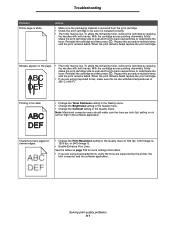
... problems. If these suggestions still do not load print media that requires adjustment or replacement. Open and close the printer top front cover to redistribute the toner. Toner fog or background • Check the print cartridge to make sure it is too light. shading appears on the...on the page. • Replace the print cartridge. If the problem continues, contact the Lexmark Customer Support Center at 1-800-Lexmark (1-800-539-6275) or http://support.lexmark.com. Toner is being used. Toner smears or print comes off the page. • If you are printing on an uneven ...
... problems. If these suggestions still do not load print media that requires adjustment or replacement. Open and close the printer top front cover to redistribute the toner. Toner fog or background • Check the print cartridge to make sure it is too light. shading appears on the...on the page. • Replace the print cartridge. If the problem continues, contact the Lexmark Customer Support Center at 1-800-Lexmark (1-800-539-6275) or http://support.lexmark.com. Toner is being used. Toner smears or print comes off the page. • If you are printing on an uneven ...
User's Guide
Page 111
...faded. Action • Make sure the packaging material is removed from the print cartridge. • Check the print cartridge to redistribute the toner. Reinstall the cartridge and then press . Repeat this procedure multiple times until the print remains faded. Reinstall the cartridge and then press ... lines per inch (lpi) setting is white. See the tables on the page. • The toner may be low. To utilize the remaining toner, remove the cartridge by the printer, the host computer, and the software application. With the cartridge arrows pointing downward, firmly shake the ...
...faded. Action • Make sure the packaging material is removed from the print cartridge. • Check the print cartridge to redistribute the toner. Reinstall the cartridge and then press . Repeat this procedure multiple times until the print remains faded. Reinstall the cartridge and then press ... lines per inch (lpi) setting is white. See the tables on the page. • The toner may be low. To utilize the remaining toner, remove the cartridge by the printer, the host computer, and the software application. With the cartridge arrows pointing downward, firmly shake the ...
User's Guide
Page 112
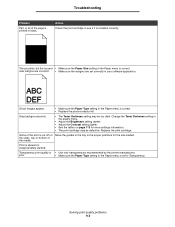
Action Check the print cartridge to see if it is • Use only transparencies recommended by the printer manufacturer. Change the Toner Darkness setting in the Paper menu is set correctly in black. the sides, top, or bottom of the print is cut off on page ...113 for the size loaded. Replace the print cartridge. Solving print quality problems 112 Gray background prints. • The Toner Darkness setting may be too dark. poor. • Make sure the Paper Type setting in the quality menu. • Adjust the Brightness setting darker....
Action Check the print cartridge to see if it is • Use only transparencies recommended by the printer manufacturer. Change the Toner Darkness setting in the Paper menu is set correctly in black. the sides, top, or bottom of the print is cut off on page ...113 for the size loaded. Replace the print cartridge. Solving print quality problems 112 Gray background prints. • The Toner Darkness setting may be too dark. poor. • Make sure the Paper Type setting in the quality menu. • Adjust the Brightness setting darker....
User's Guide
Page 113
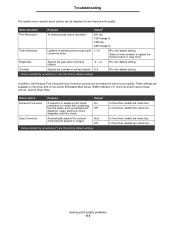
... contrast enhancement applied to images Auto Off* † Values marked by an asterisk (*) are available on the driver and on the printer Embedded Web Server (EWS) interface. Solving print quality problems 113 Menu selection Purpose Values† Print Resolution To select printed output resolution... † Values marked by an asterisk (*) are the factory default settings. Select a lower number to lighten the printed output or save toner. In addition, the Enhance Fine Lines and Gray Correction options can be enabled to improve print quality. In the driver, disable the check...
... contrast enhancement applied to images Auto Off* † Values marked by an asterisk (*) are available on the driver and on the printer Embedded Web Server (EWS) interface. Solving print quality problems 113 Menu selection Purpose Values† Print Resolution To select printed output resolution... † Values marked by an asterisk (*) are the factory default settings. Select a lower number to lighten the printed output or save toner. In addition, the Enhance Fine Lines and Gray Correction options can be enabled to improve print quality. In the driver, disable the check...

User's Guide
Page 121
...8226; Modification or unauthorized attachments • Accidents, misuse, abuse or use inconsistent with the product. You are substantially consumed when the printer displays a "Life Warning" or "Scheduled Maintenance" message for such item. The replacement item assumes the remaining warranty period of a ...of products by a third party, supplies or parts • Products, supplies, parts, materials (such as toners and inks), software, or interfaces not furnished by a Lexmark warranty, technical support may be a new or repaired item. For further explanation of your area, contact on...
...8226; Modification or unauthorized attachments • Accidents, misuse, abuse or use inconsistent with the product. You are substantially consumed when the printer displays a "Life Warning" or "Scheduled Maintenance" message for such item. The replacement item assumes the remaining warranty period of a ...of products by a third party, supplies or parts • Products, supplies, parts, materials (such as toners and inks), software, or interfaces not furnished by a Lexmark warranty, technical support may be a new or repaired item. For further explanation of your area, contact on...

User's Guide
Page 125
..., replacing 78 StapleSmart replacing staples 78 stapling, maximum number 106 Stop button 9 supplies label fuser cleaner 78 maintenance kit 77 print cartridge 76 recycling 78 T toner cartridge recycling 78 transfer roller 78 transparencies loading input tray 44 tray linking 57 U UNIX 16, 24 USB Direct interface 36 USB flash memory device...
..., replacing 78 StapleSmart replacing staples 78 stapling, maximum number 106 Stop button 9 supplies label fuser cleaner 78 maintenance kit 77 print cartridge 76 recycling 78 T toner cartridge recycling 78 transfer roller 78 transparencies loading input tray 44 tray linking 57 U UNIX 16, 24 USB Direct interface 36 USB flash memory device...
Service Manual
Page 5
4061-xx0 Printhead service check 2-122 Signature button assembly service check 2-122 StapleSmart finisher service check 2-123 System board service check 2-126 Toner sensor service check 2-127 Transfer roll service check 2-128 Diagnostic aids 3-1 Accessing service menus 3-1 Diagnostics mode 3-2 Entering Diagnostics mode 3-2 Available tests ... 3-17 BASE SENSOR TEST 3-18 DEVICE TESTS 3-18 Quick Disk Test 3-18 Disk Test/Clean 3-19 Flash Test 3-19 PRINTER SETUP 3-20 Defaults 3-20 Page Count 3-20 Perm Page Count (permanent page count 3-20 Serial Number 3-20 Table of contents v
4061-xx0 Printhead service check 2-122 Signature button assembly service check 2-122 StapleSmart finisher service check 2-123 System board service check 2-126 Toner sensor service check 2-127 Transfer roll service check 2-128 Diagnostic aids 3-1 Accessing service menus 3-1 Diagnostics mode 3-2 Entering Diagnostics mode 3-2 Available tests ... 3-17 BASE SENSOR TEST 3-18 DEVICE TESTS 3-18 Quick Disk Test 3-18 Disk Test/Clean 3-19 Flash Test 3-19 PRINTER SETUP 3-20 Defaults 3-20 Page Count 3-20 Perm Page Count (permanent page count 3-20 Serial Number 3-20 Table of contents v
Service Manual
Page 8
... shaft and spring removal 4-72 Printhead removal 4-73 Redrive assembly removal 4-74 Signature button contact assembly removal 4-75 System board and inner shield removal 4-76 Toner sensor removal 4-77 Transfer roll assembly removal 4-77 Upper front cover hinge assembly removal 4-78 Upper paper deflector assembly removal 4-79 USB board assembly removal...
... shaft and spring removal 4-72 Printhead removal 4-73 Redrive assembly removal 4-74 Signature button contact assembly removal 4-75 System board and inner shield removal 4-76 Toner sensor removal 4-77 Transfer roll assembly removal 4-77 Upper front cover hinge assembly removal 4-78 Upper paper deflector assembly removal 4-79 USB board assembly removal...


