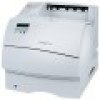
Setup Guide
Page 3
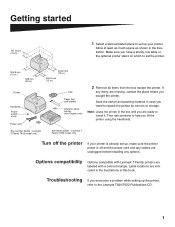
... to install it. Options compatibility Options compatible with Lexmark T Family printers are indicated in the illustrations in this book. If any options. Note: Leave the printer in case you encounter a problem while setting up the printer, refer to the Lexmark T620/T622 Publications CD. 1 Label locations are labeled ..., make sure the printer power is already set the printer. 304.8 mm (12 in.) 508 mm (20 in.) Printer Handhold Power switch cover Power cord 304.8 mm (12 in.) 304.8 mm (12 in the illustration. Lexmark T Family T622 model only 500 sheet drawer - Allow at least...
... to install it. Options compatibility Options compatible with Lexmark T Family printers are indicated in the illustrations in this book. If any options. Note: Leave the printer in case you encounter a problem while setting up the printer, refer to the Lexmark T620/T622 Publications CD. 1 Label locations are labeled ..., make sure the printer power is already set the printer. 304.8 mm (12 in.) 508 mm (20 in.) Printer Handhold Power switch cover Power cord 304.8 mm (12 in.) 304.8 mm (12 in the illustration. Lexmark T Family T622 model only 500 sheet drawer - Allow at least...

Setup Guide
Page 4
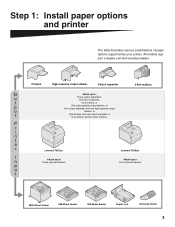
...expander page 11 High-capacity output stacker page 15 Finisher page 10 Envelope feeder page 16 Printer page 7 Print cartridge page 7 Duplex unit page 6 250-Sheet drawer page 5 * 500-Sheet drawer page 5 2000-Sheet drawer page 4 * Option install order may be reversed. page 24 Local printing - page ...33 page 25 See page 27 Configure for TCP/IP 6 See page 29 Install printer drivers 7 See page 31 Network printing ...
...expander page 11 High-capacity output stacker page 15 Finisher page 10 Envelope feeder page 16 Printer page 7 Print cartridge page 7 Duplex unit page 6 250-Sheet drawer page 5 * 500-Sheet drawer page 5 2000-Sheet drawer page 4 * Option install order may be reversed. page 24 Local printing - page ...33 page 25 See page 27 Configure for TCP/IP 6 See page 29 Install printer drivers 7 See page 31 Network printing ...
Setup Guide
Page 5
... mailboxes, t One of paper options supported by your printer. All models support a duplex unit and envelope feeder. P r i n t e r Lexmark T622(n) Lexmark T620(n) I n Attach up to : Three optional drawers. p u t Attach up to : Four optional drawers. 2000-Sheet drawer 250-Sheet drawer 500-Sheet drawer Duplex unit Envelope feeder 3 Step 1: Install paper options and printer The table illustrates various combinations of each, or...
... mailboxes, t One of paper options supported by your printer. All models support a duplex unit and envelope feeder. P r i n t e r Lexmark T622(n) Lexmark T620(n) I n Attach up to : Three optional drawers. p u t Attach up to : Four optional drawers. 2000-Sheet drawer 250-Sheet drawer 500-Sheet drawer Duplex unit Envelope feeder 3 Step 1: Install paper options and printer The table illustrates various combinations of each, or...
Setup Guide
Page 6
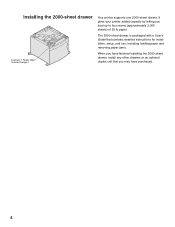
Installing the 2000-sheet drawer Lexmark T Family label (colored triangle) Your printer supports one 2000-sheet drawer. The 2000-sheet drawer is packaged with a User's Guide that contains detailed instructions for installation, setup, and use, including loading paper and removing paper jams. When you have purchased. 4 It gives your printer added capacity by letting you may have finished installing the 2000-sheet drawer, install any other drawers or an optional duplex unit that you load up to four reams (approximately 2,000 sheets) of 20 lb paper.
Installing the 2000-sheet drawer Lexmark T Family label (colored triangle) Your printer supports one 2000-sheet drawer. The 2000-sheet drawer is packaged with a User's Guide that contains detailed instructions for installation, setup, and use, including loading paper and removing paper jams. When you have purchased. 4 It gives your printer added capacity by letting you may have finished installing the 2000-sheet drawer, install any other drawers or an optional duplex unit that you load up to four reams (approximately 2,000 sheets) of 20 lb paper.

Setup Guide
Page 7
...drawer and the 500-sheet drawer are aligned properly. A drawer consists of any drawer help you plan to use the printer. Lexmark T Family label (colored triangle) 1 Remove the tray from both the support unit and the tray. Make sure the support unit is securely in place. 3 Attach another optional drawer, a duplex unit, or the printer: • To attach a drawer... peg 2 Place the support unit on top of any drawer that has been installed. Tray labels Installing a 250-sheet or 500-sheet drawer Paper drawers attach under the printer and optional duplex unit. The tab, round peg, and...
...drawer and the 500-sheet drawer are aligned properly. A drawer consists of any drawer help you plan to use the printer. Lexmark T Family label (colored triangle) 1 Remove the tray from both the support unit and the tray. Make sure the support unit is securely in place. 3 Attach another optional drawer, a duplex unit, or the printer: • To attach a drawer... peg 2 Place the support unit on top of any drawer that has been installed. Tray labels Installing a 250-sheet or 500-sheet drawer Paper drawers attach under the printer and optional duplex unit. The tab, round peg, and...
Setup Guide
Page 8
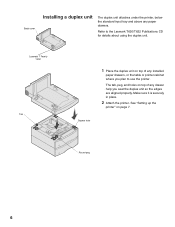
The tab, peg, and holes on top of any paper drawers. See "Setting up the printer" on top of any drawer help you plan to the Lexmark T620/T622 Publications CD for details about using the duplex unit. Refer to use the printer. Lexmark T Family label Tab 1 Place the duplex unit on page 7. Make sure it is securely...
The tab, peg, and holes on top of any paper drawers. See "Setting up the printer" on top of any drawer help you plan to the Lexmark T620/T622 Publications CD for details about using the duplex unit. Refer to use the printer. Lexmark T Family label Tab 1 Place the duplex unit on page 7. Make sure it is securely...
Setup Guide
Page 9
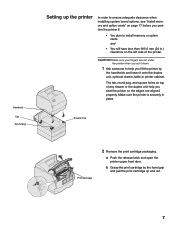
... are aligned properly. Make sure the printer is securely in .) clearance on top of the printer. CAUTION! b Grasp the print cartridge by the handholds and lower it onto the duplex unit, optional drawer, table or printer cabinet. a Push the release latch and open the printer upper front door. The tab, round... peg, and square holes on the left side of any drawer or the duplex unit help you lift the printer by the hand grip and pull the print cartridge up the printer In order to ensure adequate clearance when installing system board options, see "Install memory...
... are aligned properly. Make sure the printer is securely in .) clearance on top of the printer. CAUTION! b Grasp the print cartridge by the handholds and lower it onto the duplex unit, optional drawer, table or printer cabinet. a Push the release latch and open the printer upper front door. The tab, round... peg, and square holes on the left side of any drawer or the duplex unit help you lift the printer by the hand grip and pull the print cartridge up the printer In order to ensure adequate clearance when installing system board options, see "Install memory...
Setup Guide
Page 10
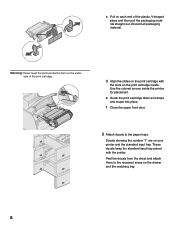
... the standard input tray. Warning! These decals keep the standard input tray paired with the slots on the print cartridge with the printer. f Close the upper front door. 3 Attach decals to the recessed areas on each end of the print cartridge. Decals showing the number "1" are on the ... cartridge down as it drops and snaps into place. Peel the decals from the sheet and attach them to the paper trays. c Pull on the drawer and the matching tray. 8 Use the colored arrows inside the printer for placement.
... the standard input tray. Warning! These decals keep the standard input tray paired with the slots on the print cartridge with the printer. f Close the upper front door. 3 Attach decals to the recessed areas on each end of the print cartridge. Decals showing the number "1" are on the ... cartridge down as it drops and snaps into place. Peel the decals from the sheet and attach them to the paper trays. c Pull on the drawer and the matching tray. 8 Use the colored arrows inside the printer for placement.

Roadmap
Page 1
...All or part of the following documents: • 2000-Sheet Drawer User's Guide • High-Capacity Output Stacker Installation Instructions • Setup Guide • Roadmap P/N 11K3116 E.C. 1K0911 Printed in all languages. Printer publications and software are also on how to find what you ...need Setup Guide Guides you through printer and options setup. All rights reserved. www.lexmark.com Printed on a network for other users. Lexmark T620 and T622 Roadmap Where to go ...
...All or part of the following documents: • 2000-Sheet Drawer User's Guide • High-Capacity Output Stacker Installation Instructions • Setup Guide • Roadmap P/N 11K3116 E.C. 1K0911 Printed in all languages. Printer publications and software are also on how to find what you ...need Setup Guide Guides you through printer and options setup. All rights reserved. www.lexmark.com Printed on a network for other users. Lexmark T620 and T622 Roadmap Where to go ...
Technical Reference
Page 294
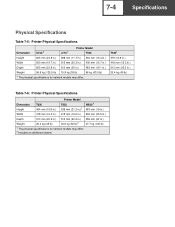
7-4 Specifications Physical Specifications Table 7-5: Printer Physical Specifications Dimension C720 1 J110 1 Printer Model T520 Height 605 mm (23.8 in.) 298 mm (11.7 in.) 340 mm (13.4 in.) Width 500 mm (19.7 in.) 515 mm (20.3 in.) 400 ... (105 lb) 1 The physical specifications for network models may differ. 2 Includes an additional drawer. T5221 379 (14.9 in.) 418 mm (16.5 in.) 513 mm (20.2 in.) 20.4 kg (45 lb) Table 7-6: Printer Physical Specifications Dimension Height T620 404 mm (15.9 in.) Printer Model T622 538 mm (21.2 in.)2 W820 1 483 mm (19 in.) Width...
7-4 Specifications Physical Specifications Table 7-5: Printer Physical Specifications Dimension C720 1 J110 1 Printer Model T520 Height 605 mm (23.8 in.) 298 mm (11.7 in.) 340 mm (13.4 in.) Width 500 mm (19.7 in.) 515 mm (20.3 in.) 400 ... (105 lb) 1 The physical specifications for network models may differ. 2 Includes an additional drawer. T5221 379 (14.9 in.) 418 mm (16.5 in.) 513 mm (20.2 in.) 20.4 kg (45 lb) Table 7-6: Printer Physical Specifications Dimension Height T620 404 mm (15.9 in.) Printer Model T622 538 mm (21.2 in.)2 W820 1 483 mm (19 in.) Width...

2000-Sheet Drawer User's Guide (2.1 MB)
Page 7
... front corner. To ensure reliable paper feeding, it properly. See page 14 for use a different paper size, see page 12. Introduction The 2000-sheet drawer gives your printer added capacity by allowing you load it is pre-configured to either letter or A4 paper size. To use with your... printer, verify your drawer is shown as Tray 2, Tray 3, Tray 4 or Tray 5, depending upon the number of 20 lb paper. Your printer has an autoconnect feature that you to load up to electronic emissions, safety, and warranty...
... front corner. To ensure reliable paper feeding, it properly. See page 14 for use a different paper size, see page 12. Introduction The 2000-sheet drawer gives your printer added capacity by allowing you load it is pre-configured to either letter or A4 paper size. To use with your... printer, verify your drawer is shown as Tray 2, Tray 3, Tray 4 or Tray 5, depending upon the number of 20 lb paper. Your printer has an autoconnect feature that you to load up to electronic emissions, safety, and warranty...
2000-Sheet Drawer User's Guide (2.1 MB)
Page 8
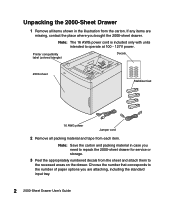
...carton and packing material in the illustration from the carton. If any items are attaching, including the standard input tray. 2 2000-Sheet Drawer User's Guide Note: The 16 AWG power cord is included only with units intended to the number of paper options you are missing,... corresponds to operate at 100 - 127V power. Printer compatibility label (colored triangle) Decals 2000-sheet Stabilizer feet 16 AWG power Jumper cord 2 Remove all items shown in case you bought the 2000-sheet drawer. Unpacking the 2000-Sheet Drawer 1 Remove all packing material and tape from the...
...carton and packing material in the illustration from the carton. If any items are attaching, including the standard input tray. 2 2000-Sheet Drawer User's Guide Note: The 16 AWG power cord is included only with units intended to the number of paper options you are missing,... corresponds to operate at 100 - 127V power. Printer compatibility label (colored triangle) Decals 2000-sheet Stabilizer feet 16 AWG power Jumper cord 2 Remove all items shown in case you bought the 2000-sheet drawer. Unpacking the 2000-Sheet Drawer 1 Remove all packing material and tape from the...
2000-Sheet Drawer User's Guide (2.1 MB)
Page 9
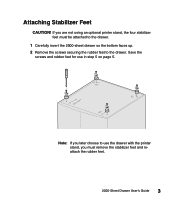
Attaching Stabilizer Feet CAUTION! Note: If you must be attached to the drawer. 1 Carefully invert the 2000-sheet drawer so the bottom faces up. 2 Remove the screws securing the rubber feet to use in step 5 on page 5. Save the screws and rubber feet for use the drawer with the printer stand, you later choose to the drawer. If you are not using an optional printer stand, the four stabilizer feet must remove the stabilizer feet and reattach the rubber feet. 2000-Sheet Drawer User's Guide 3
Attaching Stabilizer Feet CAUTION! Note: If you must be attached to the drawer. 1 Carefully invert the 2000-sheet drawer so the bottom faces up. 2 Remove the screws securing the rubber feet to use in step 5 on page 5. Save the screws and rubber feet for use the drawer with the printer stand, you later choose to the drawer. If you are not using an optional printer stand, the four stabilizer feet must remove the stabilizer feet and reattach the rubber feet. 2000-Sheet Drawer User's Guide 3
2000-Sheet Drawer User's Guide (2.1 MB)
Page 12
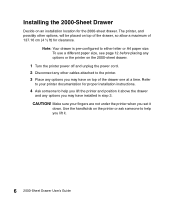
...any options you may have installed in step 3. To use a different paper size, see page 12 before placing any options or the printer on the 2000-sheet drawer. 1 Turn the printer power off and unplug the power cord. 2 Disconnect any other options, will be placed on top of 137.16 cm (4 ½... ft) for the 2000-sheet drawer. Installing the 2000-Sheet Drawer Decide on the printer or ask someone to help you lift it. 6 2000-Sheet Drawer User's Guide CAUTION! Note: Your drawer is pre-configured to either letter or A4 paper size.
...any options you may have installed in step 3. To use a different paper size, see page 12 before placing any options or the printer on the 2000-sheet drawer. 1 Turn the printer power off and unplug the power cord. 2 Disconnect any other options, will be placed on top of 137.16 cm (4 ½... ft) for the 2000-sheet drawer. Installing the 2000-Sheet Drawer Decide on the printer or ask someone to help you lift it. 6 2000-Sheet Drawer User's Guide CAUTION! Note: Your drawer is pre-configured to either letter or A4 paper size.
2000-Sheet Drawer User's Guide (2.1 MB)
Page 13
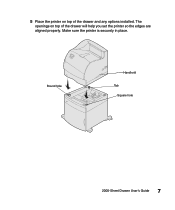
Round hole Handhold Tab Square hole 2000-Sheet Drawer User's Guide 7 The openings on top of the drawer will help you set the printer so the edges are aligned properly. 5 Place the printer on top of the drawer and any options installed. Make sure the printer is securely in place.
Round hole Handhold Tab Square hole 2000-Sheet Drawer User's Guide 7 The openings on top of the drawer will help you set the printer so the edges are aligned properly. 5 Place the printer on top of the drawer and any options installed. Make sure the printer is securely in place.
2000-Sheet Drawer User's Guide (2.1 MB)
Page 14
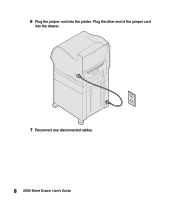
6 Plug the jumper cord into the drawer. 7 Reconnect any disconnected cables. 8 2000-Sheet Drawer User's Guide Plug the other end of the jumper cord into the printer.
6 Plug the jumper cord into the drawer. 7 Reconnect any disconnected cables. 8 2000-Sheet Drawer User's Guide Plug the other end of the jumper cord into the printer.
2000-Sheet Drawer User's Guide (2.1 MB)
Page 15
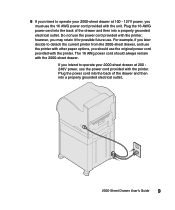
...decide to detach the current printer from the 2000-sheet drawer, and use the printer with other paper options, you should always remain with the 2000-sheet drawer. If you intend to operate your 2000-sheet drawer at 200 240V power, use the power cord provided with the printer. Plug the power cord ...into the back of the drawer and then into a properly grounded electrical outlet. 2000-Sheet Drawer User's Guide 9 8 If you intend to operate your 2000-sheet drawer at 100 - 127V power, you must use the 16...
...decide to detach the current printer from the 2000-sheet drawer, and use the printer with other paper options, you should always remain with the 2000-sheet drawer. If you intend to operate your 2000-sheet drawer at 200 240V power, use the power cord provided with the printer. Plug the power cord ...into the back of the drawer and then into a properly grounded electrical outlet. 2000-Sheet Drawer User's Guide 9 8 If you intend to operate your 2000-sheet drawer at 100 - 127V power, you must use the 16...

2000-Sheet Drawer User's Guide (2.1 MB)
Page 16
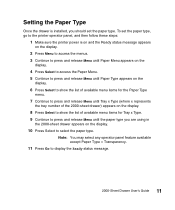
... 1 Make sure the printer power is not listed on the menu settings page lists all installation instructions. Installed Features on the page, the printer or other options may not be seated securely or aligned properly. Verifying Installation Once the 2000-sheet drawer has been installed, verify... that have been installed. If the drawer is on and the Ready status message appears on...
... 1 Make sure the printer power is not listed on the menu settings page lists all installation instructions. Installed Features on the page, the printer or other options may not be seated securely or aligned properly. Verifying Installation Once the 2000-sheet drawer has been installed, verify... that have been installed. If the drawer is on and the Ready status message appears on...
2000-Sheet Drawer User's Guide (2.1 MB)
Page 17
... Menu until the paper type you should set the paper type, go to the printer operator panel, and then follow these steps: 1 Make sure the printer power is installed, you are using in the 2000-sheet drawer appears on the display. 10 Press Select to display the Ready status message. 11... 2000-Sheet Drawer User's Guide Note: You may select any operator panel feature available except Paper Type...
... Menu until the paper type you should set the paper type, go to the printer operator panel, and then follow these steps: 1 Make sure the printer power is installed, you are using in the 2000-sheet drawer appears on the display. 10 Press Select to display the Ready status message. 11... 2000-Sheet Drawer User's Guide Note: You may select any operator panel feature available except Paper Type...

2000-Sheet Drawer User's Guide (2.1 MB)
Page 18
... as you set it . 7 Locate the paper size selector knob on page 17. 3 Remove paper from the 2000-sheet drawer. See illustration on top of the drawer. The printer elevator tray should be approximately halfway up position. 8 To make a selection, turn the knob clockwise to executive (EXEC). 12... 2000-Sheet Drawer User's Guide Remove the attached options one click sets the paper size to find the correct paper...
... as you set it . 7 Locate the paper size selector knob on page 17. 3 Remove paper from the 2000-sheet drawer. See illustration on top of the drawer. The printer elevator tray should be approximately halfway up position. 8 To make a selection, turn the knob clockwise to executive (EXEC). 12... 2000-Sheet Drawer User's Guide Remove the attached options one click sets the paper size to find the correct paper...


