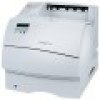
Setup Guide
Page 3
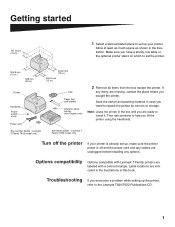
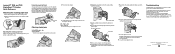
... encounter a problem while setting up your printer is already set up, make sure the printer power is off the printer If your printer. Then ask someone to help you bought the printer. Tray number decals - Lexmark T Family T622 model only Turn off and the power cord and any items are indicated in the illustrations in the illustration. Label locations are missing, contact the place where you lift the printer using the...
... encounter a problem while setting up your printer is already set up, make sure the printer power is off the printer If your printer. Then ask someone to help you bought the printer. Tray number decals - Lexmark T Family T622 model only Turn off and the power cord and any items are indicated in the illustrations in the illustration. Label locations are missing, contact the place where you lift the printer using the...
Setup Guide
Page 30
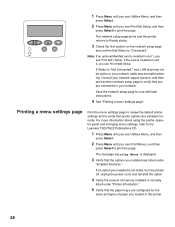
... network setup page prints and the printer returns to verify that printer options are configured for use with later instructions. 4 See "Printing a menu settings page". Save the network setup page for the sizes and types of paper you loaded in slot 2, you installed is not listed, turn the printer off, unplug the power cord, and reinstall the option. 4 Verify the amount of memory installed is "Connected." If the card is "Not Connected," your LAN drop may be active or your network. If Status is installed...
... network setup page prints and the printer returns to verify that printer options are configured for use with later instructions. 4 See "Printing a menu settings page". Save the network setup page for the sizes and types of paper you loaded in slot 2, you installed is not listed, turn the printer off, unplug the power cord, and reinstall the option. 4 Verify the amount of memory installed is "Connected." If the card is "Not Connected," your LAN drop may be active or your network. If Status is installed...
Setup Guide
Page 35
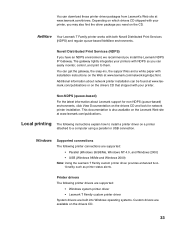
... using a parallel or USB connection. You can be found at www.lexmark.com/networking/ndps.html. Non-NDPS (queue-based) For the latest information about network printer installation can get the gateway, the snap-ins, the support files and a white paper with installation instructions on the Web at www.lexmark.com/publications or on a printer attached to them. Local printing The following printer drivers are supported: • Windows system printer driver • Lexmark T Family custom printer driver...
... using a parallel or USB connection. You can be found at www.lexmark.com/networking/ndps.html. Non-NDPS (queue-based) For the latest information about network printer installation can get the gateway, the snap-ins, the support files and a white paper with installation instructions on the Web at www.lexmark.com/publications or on a printer attached to them. Local printing The following printer drivers are supported: • Windows system printer driver • Lexmark T Family custom printer driver...
Finisher Quick Reference
Page 1
...-438-2468 for 282 Staple Jam only). 283 Staple Jam Check Stapler 1 Press the latch to open the stapler access door. 2 Firmly pull the colored tab to remove the staple cartridge holder from sliding forward when a large stapled or offset job is aligned with the arrow. To use part number 99A2480. To order replacement wheels with a maintenance kit, use the paper bail hook, adjust the paper bail to ensure the...
...-438-2468 for 282 Staple Jam only). 283 Staple Jam Check Stapler 1 Press the latch to open the stapler access door. 2 Firmly pull the colored tab to remove the staple cartridge holder from sliding forward when a large stapled or offset job is aligned with the arrow. To use part number 99A2480. To order replacement wheels with a maintenance kit, use the paper bail hook, adjust the paper bail to ensure the...
Technical Reference
Page 231
.... For example, assume there is legal-size paper in Tray 1 and letter-size paper in all the other trays, and the Policy for you to manually load a sheet of paper. 0 infinite wait or no matching occurs. If the default paper source is not a manual paper source, ManualFeed is 1. Specifies the color of the current media. Specifies the weight of copies to False. Use the N-up ), refer to determine the...
.... For example, assume there is legal-size paper in Tray 1 and letter-size paper in all the other trays, and the Policy for you to manually load a sheet of paper. 0 infinite wait or no matching occurs. If the default paper source is not a manual paper source, ManualFeed is 1. Specifies the color of the current media. Specifies the weight of copies to False. Use the N-up ), refer to determine the...

Printer Quick Reference (265 KB)
Page 2
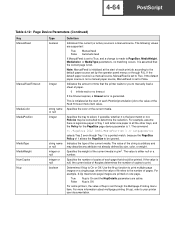
...The toner may be low. Verify that the correct print material is being used. • Check the print cartridge to make sure the ink can withstand temperatures of paper sources and possible paper jam areas. E.C. 1K0911 Copyright © 2001 Lexmark International, Inc. Operator panel menus Paper Menu Paper Source Paper Size Paper Type Custom Types Universal Setup Output Bin Configure Bins Overflow Bin Assign Type/Bin Substitute Size Configure MP Envelope Enhance Paper Texture Paper Weight Paper Loading Finishing Menu Duplex Duplex Bind Copies Blank Pages Collation Separator Sheets Separator...
...The toner may be low. Verify that the correct print material is being used. • Check the print cartridge to make sure the ink can withstand temperatures of paper sources and possible paper jam areas. E.C. 1K0911 Copyright © 2001 Lexmark International, Inc. Operator panel menus Paper Menu Paper Source Paper Size Paper Type Custom Types Universal Setup Output Bin Configure Bins Overflow Bin Assign Type/Bin Substitute Size Configure MP Envelope Enhance Paper Texture Paper Weight Paper Loading Finishing Menu Duplex Duplex Bind Copies Blank Pages Collation Separator Sheets Separator...
Service Manual
Page 29
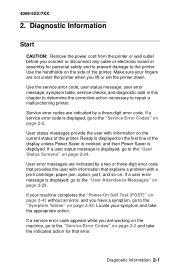
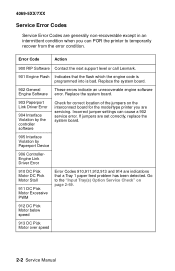
... error code that provides the user with a print cartridge, paper jam, option, port, and so on the side of the printer. If your fingers are indicated by a three-digit error code. Use the service error code, user status message, user error message, symptom table, service checks, and diagnostic aids in this chapter to determine the corrective action necessary to the printer. Ready is displayed on the first line of the display unless Power Saver is invoked, and then Power Saver is displayed...
... error code that provides the user with a print cartridge, paper jam, option, port, and so on the side of the printer. If your fingers are indicated by a three-digit error code. Use the service error code, user status message, user error message, symptom table, service checks, and diagnostic aids in this chapter to determine the corrective action necessary to the printer. Ready is displayed on the first line of the display unless Power Saver is invoked, and then Power Saver is displayed...
Service Manual
Page 30
... controller software Check for the model/type printer you can cause a 902 service error. Go to temporarily recover from the error condition. Incorrect jumper settings can POR the printer to the "Input Tray(s) Option Service Check" on the interconnect board for correct location of the jumpers on page 2-69. 912 DC Pick Motor below speed 913 DC Pick Motor over speed 2-2 Service Manual Replace the system board. 903 Paperport Link Driver Error...
... controller software Check for the model/type printer you can cause a 902 service error. Go to temporarily recover from the error condition. Incorrect jumper settings can POR the printer to the "Input Tray(s) Option Service Check" on the interconnect board for correct location of the jumpers on page 2-69. 912 DC Pick Motor below speed 913 DC Pick Motor over speed 2-2 Service Manual Replace the system board. 903 Paperport Link Driver Error...
Service Manual
Page 117
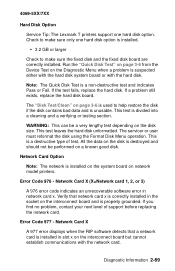
... lengthy test depending on network model printers. Check to make sure the fixed disk and the fixed disk board are correctly installed. If a problem still exists, replace the hard disk board. Diagnostic Information 2-89 4069-5XX/7XX Hard Disk Option Service Tip: The Lexmark T printers support one hard disk option is installed. • 3.2 GB or larger Check to make sure only one hard disk option. Note: The Quick Disk Test is a destructive type of support before replacing the network card. This test is installed on the system board on the disk size. Error Code...
... lengthy test depending on network model printers. Check to make sure the fixed disk and the fixed disk board are correctly installed. If a problem still exists, replace the hard disk board. Diagnostic Information 2-89 4069-5XX/7XX Hard Disk Option Service Tip: The Lexmark T printers support one hard disk option is installed. • 3.2 GB or larger Check to make sure only one hard disk option. Note: The Quick Disk Test is a destructive type of support before replacing the network card. This test is installed on the system board on the disk size. Error Code...
Service Manual
Page 118
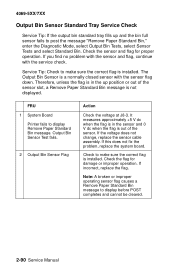
... sensor slot, a Remove Paper Standard Bin message is not displayed. FRU 1 System Board Printer fails to display before POST completes and cannot be cleared. 2-90 Service Manual If this does not fix the problem, replace the system board. If incorrect, replace the flag. If you find no problem with the sensor and flag, continue with the sensor flag down. The Output Bin Sensor is installed. Note: A broken or improper operating sensor flag causes a Remove Paper Standard Bin message to display Remove Paper Standard Bin message. Check...
... sensor slot, a Remove Paper Standard Bin message is not displayed. FRU 1 System Board Printer fails to display before POST completes and cannot be cleared. 2-90 Service Manual If this does not fix the problem, replace the system board. If incorrect, replace the flag. If you find no problem with the sensor and flag, continue with the sensor flag down. The Output Bin Sensor is installed. Note: A broken or improper operating sensor flag causes a Remove Paper Standard Bin message to display Remove Paper Standard Bin message. Check...
Service Manual
Page 122
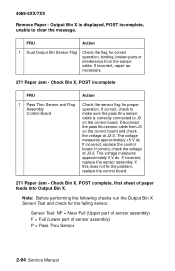
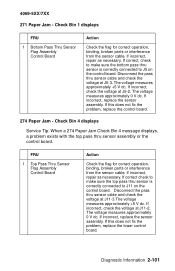
..., broken parts or interference from J3 on the control board. Output Bin X is correctly connected to clear the message. If incorrect, replace the control board. If correct, check the voltage at J3-3. Check Bin X, POST complete, first sheet of sensor assembly) P = Pass Thru Sensor 2-94 Service Manual FRU Action 1 Dual Output Bin Sensor Flag Check the flag for the failing sensor. Disconnect the pass thru sensor cable from the sensor cable, If incorrect, repair as necessary. 271 Paper Jam - Check Bin...
..., broken parts or interference from J3 on the control board. Output Bin X is correctly connected to clear the message. If incorrect, replace the control board. If correct, check the voltage at J3-3. Check Bin X, POST complete, first sheet of sensor assembly) P = Pass Thru Sensor 2-94 Service Manual FRU Action 1 Dual Output Bin Sensor Flag Check the flag for the failing sensor. Disconnect the pass thru sensor cable from the sensor cable, If incorrect, repair as necessary. 271 Paper Jam - Check Bin...
Service Manual
Page 127
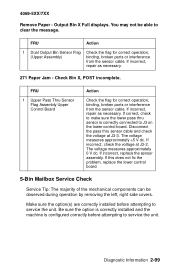
... sensor cable and check the voltage at J3-2. Be sure the option is correctly installed and the machine is correctly connected to service the unit. Output Bin X Full displays. If correct, check to make sure the lower pass thru sensor is configured correctly before attempting to clear the message. If incorrect, check the voltage at J3-3. If incorrect, replace the sensor assembly. If this does not fix the problem, replace the lower control board. 5-Bin...
... sensor cable and check the voltage at J3-2. Be sure the option is correctly installed and the machine is correctly connected to service the unit. Output Bin X Full displays. If correct, check to make sure the lower pass thru sensor is configured correctly before attempting to clear the message. If incorrect, check the voltage at J3-3. If incorrect, replace the sensor assembly. If this does not fix the problem, replace the lower control board. 5-Bin...
Service Manual
Page 129
... J11-2. Check Bin 4 displays Service Tip: When a 274 Paper Jam Check Bin 4 message displays, a problem exists with the top pass thru sensor assembly or the control board. FRU 1 Top Pass Thru Sensor Flag Assembly Control Board Action Check the flag for correct operation, binding, broken parts or interference from the sensor cable. If incorrect, repair as necessary. If incorrect, replace the sensor assembly. If incorrect, repair as necessary. If correct, check to make sure the...
... J11-2. Check Bin 4 displays Service Tip: When a 274 Paper Jam Check Bin 4 message displays, a problem exists with the top pass thru sensor assembly or the control board. FRU 1 Top Pass Thru Sensor Flag Assembly Control Board Action Check the flag for correct operation, binding, broken parts or interference from the sensor cable. If incorrect, repair as necessary. If incorrect, replace the sensor assembly. If incorrect, repair as necessary. If correct, check to make sure the...
Service Manual
Page 136
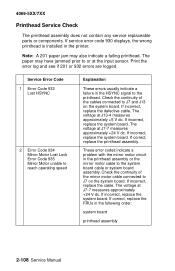
.../7XX Printhead Service Check The printhead assembly does not contain any service replaceable parts or components. If service error code 930 displays, the wrong printhead is installed in the following order: system board printhead assembly 2-108 Service Manual If incorrect, replace the defective cable. If incorrect, replace the cable. Note: A 201 paper jam may have jammed prior to or at J7-7 measures approximately +24 V dc. Service Error Code 1 Error Code 932 Lost HSYNC 2 Error Code 934...
.../7XX Printhead Service Check The printhead assembly does not contain any service replaceable parts or components. If service error code 930 displays, the wrong printhead is installed in the following order: system board printhead assembly 2-108 Service Manual If incorrect, replace the defective cable. If incorrect, replace the cable. Note: A 201 paper jam may have jammed prior to or at J7-7 measures approximately +24 V dc. Service Error Code 1 Error Code 932 Lost HSYNC 2 Error Code 934...
Service Manual
Page 137
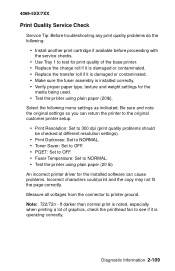
... the media being used. • Test the printer using plain paper (20 lb) An incorrect printer driver for the installed software can cause problems. Incorrect characters could print and the copy may not fit the page correctly. Diagnostic Information 2-109 Note: 722/72n - Be sure and note the original settings so you can return the printer to the original customer printer setup. • Print Resolution: Set to 300 dpi (print quality problems should be checked...
... the media being used. • Test the printer using plain paper (20 lb) An incorrect printer driver for the installed software can cause problems. Incorrect characters could print and the copy may not fit the page correctly. Diagnostic Information 2-109 Note: 722/72n - Be sure and note the original settings so you can return the printer to the original customer printer setup. • Print Resolution: Set to 300 dpi (print quality problems should be checked...
Service Manual
Page 171
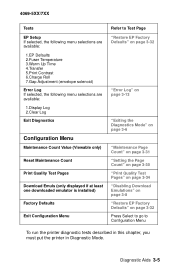
...Tests EP Setup If selected, the following menu selections are available: 1.EP Defaults 2.Fuser Temperature 3.Warm Up Time 4.Transfer 5.Print Contrast 6.Charge Roll 7.Gap Adjustment (envelope solenoid) Error Log If selected, the following menu selections are available: 1.Display Log 2.Clear Log Exit Diagnostics Configuration Menu Maintenance Count Value (Viewable only) Reset Maintenance Count Print Quality Test Pages Download Emuls (only displayed if at least one downloaded emulator is installed) Factory Defaults Exit Configuration Menu Refer to Test Page "Restore EP Factory Defaults" on page...
...Tests EP Setup If selected, the following menu selections are available: 1.EP Defaults 2.Fuser Temperature 3.Warm Up Time 4.Transfer 5.Print Contrast 6.Charge Roll 7.Gap Adjustment (envelope solenoid) Error Log If selected, the following menu selections are available: 1.Display Log 2.Clear Log Exit Diagnostics Configuration Menu Maintenance Count Value (Viewable only) Reset Maintenance Count Print Quality Test Pages Download Emuls (only displayed if at least one downloaded emulator is installed) Factory Defaults Exit Configuration Menu Refer to Test Page "Restore EP Factory Defaults" on page...
Service Manual
Page 185
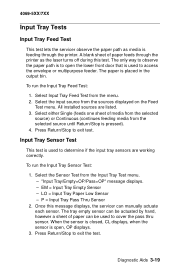
... the output bin. Press Return/Stop to determine if the input tray sensors are listed. 3. A blank sheet of media from the selected source) or Continuous (continues feeding media from the sources displayed on the Feed Test menu. 4069-5XX/7XX Input Tray Tests Input Tray Feed Test This test lets the servicer observe the paper path as the laser turns off during this message displays, the servicer can be used to exit the test. To run the Input Tray Feed Test: 1. Once this test...
... the output bin. Press Return/Stop to determine if the input tray sensors are listed. 3. A blank sheet of media from the selected source) or Continuous (continues feeding media from the sources displayed on the Feed Test menu. 4069-5XX/7XX Input Tray Tests Input Tray Feed Test This test lets the servicer observe the paper path as the laser turns off during this message displays, the servicer can be used to exit the test. To run the Input Tray Feed Test: 1. Once this test...
Service Manual
Page 192
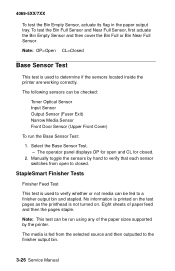
... operator panel displays OP for closed . The following sensors can be fed to closed . 2. The media is used to determine if the sensors located inside the printer are working correctly. Eight sheets of the paper sizes supported by hand to the finisher output bin. 3-26 Service Manual No information is printed on . Note: This test can be checked: Toner Optical Sensor Input Sensor Output Sensor (Fuser Exit) Narrow Media Sensor Front Door Sensor (Upper Front Cover) To run using any of paper feed and...
... operator panel displays OP for closed . The following sensors can be fed to closed . 2. The media is used to determine if the sensors located inside the printer are working correctly. Eight sheets of the paper sizes supported by hand to the finisher output bin. 3-26 Service Manual No information is printed on . Note: This test can be checked: Toner Optical Sensor Input Sensor Output Sensor (Fuser Exit) Narrow Media Sensor Front Door Sensor (Upper Front Cover) To run using any of paper feed and...
Service Manual
Page 197
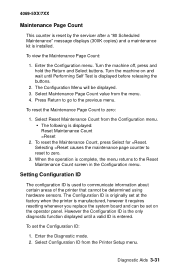
..." message displays (300K copies) and a maintenance kit is used to communicate information about certain areas of the printer that cannot be determined using hardware sensors. Selecting =Reset causes the maintenance page counter to reset to zero: 1. Setting Configuration ID The configuration ID is installed. Select Configuration ID from the Configuration menu. • The following is displayed: Reset Maintenance Count =Reset 2. Diagnostic Aids 3-31 The Configuration Menu will be set the Configuration ID: 1. Select Reset Maintenance Count from the Printer Setup menu. To reset...
..." message displays (300K copies) and a maintenance kit is used to communicate information about certain areas of the printer that cannot be determined using hardware sensors. Selecting =Reset causes the maintenance page counter to reset to zero: 1. Setting Configuration ID The configuration ID is installed. Select Configuration ID from the Configuration menu. • The following is displayed: Reset Maintenance Count =Reset 2. Diagnostic Aids 3-31 The Configuration Menu will be set the Configuration ID: 1. Select Reset Maintenance Count from the Printer Setup menu. To reset...
Service Manual
Page 198
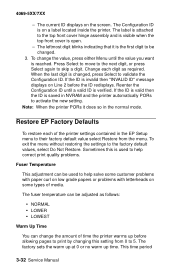
... value you want is open. - When the last digit is saved in the EP Setup menu to their factory default value select Restore from 0 to help solve some customer problems with paper curl on low grade papers or problems with letterheads on the screen. Note: When the printer PORs it is invalid then "INVALID ID" message displays on a label located inside the printer. The factory sets the warm up...
... value you want is open. - When the last digit is saved in the EP Setup menu to their factory default value select Restore from 0 to help solve some customer problems with paper curl on low grade papers or problems with letterheads on the screen. Note: When the printer PORs it is invalid then "INVALID ID" message displays on a label located inside the printer. The factory sets the warm up...


