
Service Manual
Page 3
...Service Check 2-56 Fan Service Check 2-63 Cold Fuser Service Check 2-65 Hot Fuser Service Check 2-67 Fuser Solenoid Service Check 2-68 Input Sensor Service Check 2-68 Input Tray(s) Option Service Check 2-69 High-Capacity Feeder Input Tray Service Check 2-72 Main Drive Service Check 2-85 Operator... Panel Service Check 2-86 Options Service Check 2-88 Output Bin Sensor Standard Tray Service Check 2-90 Output Expander Service Check 2-91 High-Capacity Output Stacker Service Check 2-96 5-Bin Mailbox Service Check 2-99...
...Service Check 2-56 Fan Service Check 2-63 Cold Fuser Service Check 2-65 Hot Fuser Service Check 2-67 Fuser Solenoid Service Check 2-68 Input Sensor Service Check 2-68 Input Tray(s) Option Service Check 2-69 High-Capacity Feeder Input Tray Service Check 2-72 Main Drive Service Check 2-85 Operator... Panel Service Check 2-86 Options Service Check 2-88 Output Bin Sensor Standard Tray Service Check 2-90 Output Expander Service Check 2-91 High-Capacity Output Stacker Service Check 2-96 5-Bin Mailbox Service Check 2-99...
Service Manual
Page 6
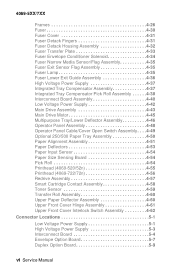
... Panel Assembly 4-48 Operator Panel Cable/Cover Open Switch Assembly . . . .4-49 Optional 250/500 Paper Tray Assembly 4-50 Paper Alignment Assembly 4-51 Paper Deflectors 4-53 Paper Input Sensor 4-54 Paper Size Sensing Board 4-54 Pick Roll 4-54 Printhead (4069-520/52n 4-55 Printhead (4069-722/72n... 4-56 Redrive Assembly 4-57 Smart Cartridge Contact Assembly 4-58 Toner Sensor 4-59 Transfer Roll Assembly 4-60 Upper Paper Deflector Assembly 4-60 Upper Front Cover Hinge Assembly 4-61 Upper Front Cover Interlock Switch Assembly 4-62 Connector ...
... Panel Assembly 4-48 Operator Panel Cable/Cover Open Switch Assembly . . . .4-49 Optional 250/500 Paper Tray Assembly 4-50 Paper Alignment Assembly 4-51 Paper Deflectors 4-53 Paper Input Sensor 4-54 Paper Size Sensing Board 4-54 Pick Roll 4-54 Printhead (4069-520/52n 4-55 Printhead (4069-722/72n... 4-56 Redrive Assembly 4-57 Smart Cartridge Contact Assembly 4-58 Toner Sensor 4-59 Transfer Roll Assembly 4-60 Upper Paper Deflector Assembly 4-60 Upper Front Cover Hinge Assembly 4-61 Upper Front Cover Interlock Switch Assembly 4-62 Connector ...
Service Manual
Page 38
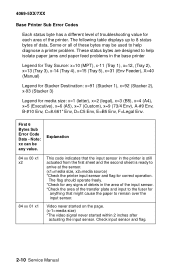
...x=1 (letter), x=2 (legal), x=3 (B5), x=4 (A4), x=5 (Executive), x=6 (A5), x=7 (Custom), x=9 (73/4 Env), A-#9 Env, B-#10 Env, C=8.661" Env, D=C5 Env, E=B5 Env, F=Legal Env. Check input sensor and flag. 2-10 Service Manual Some or all of the printer. 4069-5XX/7XX Base Printer Sub Error Codes Each status byte has a different level...84 xx 00 x1 x2 84 xx 01 x1 This code indicates that might cause the paper to remain over the input sensor. These status bytes are designed to help isolate paper jams and paper feed problems in the printer is still actuated from the first sheet and the second ...
...x=1 (letter), x=2 (legal), x=3 (B5), x=4 (A4), x=5 (Executive), x=6 (A5), x=7 (Custom), x=9 (73/4 Env), A-#9 Env, B-#10 Env, C=8.661" Env, D=C5 Env, E=B5 Env, F=Legal Env. Check input sensor and flag. 2-10 Service Manual Some or all of the printer. 4069-5XX/7XX Base Printer Sub Error Codes Each status byte has a different level...84 xx 00 x1 x2 84 xx 01 x1 This code indicates that might cause the paper to remain over the input sensor. These status bytes are designed to help isolate paper jams and paper feed problems in the printer is still actuated from the first sheet and the second ...

Service Manual
Page 39
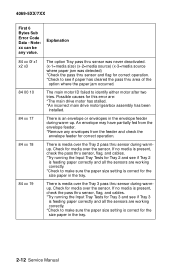
...xx 02 x1 This error is picking too fast. *A defective input sensor. 84 00 06 A paper jam has been declared by a piece of media. (x-1=media size) (x-2=media source) (x3=paper source where paper jam was detected) *Run the sensor test for the option tray that is displaying the error code and ... was turned on. *Clear the media from the printer. *Run the base sensor test (input sensor) from a lower paper source, see if paper is slipping in input to lock. Possible causes for paper picking from the selected paper input source. *If the error is being detected from the diagnostic tests menu ...
...xx 02 x1 This error is picking too fast. *A defective input sensor. 84 00 06 A paper jam has been declared by a piece of media. (x-1=media size) (x-2=media source) (x3=paper source where paper jam was detected) *Run the sensor test for the option tray that is displaying the error code and ... was turned on. *Clear the media from the printer. *Run the base sensor test (input sensor) from a lower paper source, see if paper is slipping in input to lock. Possible causes for paper picking from the selected paper input source. *If the error is being detected from the diagnostic tests menu ...
Service Manual
Page 40
... check the envelope feeder for this error are working correctly. *Check to make sure the paper size setting is media over the Tray 3 pass thru sensor during warm-up. If no media is present, check the pass thru sensor, flag, and cables. *Try running the Input Tray Tests for Tray 2 and see if... Tray 2 is feeding paper correctly and all the sensors are : *The main drive motor has stalled. *An incorrect main drive motor/gearbox assembly has been installed. 84 xx 17 There is an envelope or ...
... check the envelope feeder for this error are working correctly. *Check to make sure the paper size setting is media over the Tray 3 pass thru sensor during warm-up. If no media is present, check the pass thru sensor, flag, and cables. *Try running the Input Tray Tests for Tray 2 and see if... Tray 2 is feeding paper correctly and all the sensors are : *The main drive motor has stalled. *An incorrect main drive motor/gearbox assembly has been installed. 84 xx 17 There is an envelope or ...

Service Manual
Page 41
...Input Tray Tests for the size paper in the tray. 84 xx 1C There is feeding paper correctly and all the sensors are operating correctly, go to make sure the paper size setting is feeding paper correctly and all the sensors are feeding over the Tray 6 pass thru sensor during warmup. 4069-5XX/7XX...running the Input Tray Tests for media over the sensor. If the sensor and flag are working correctly. *Check to make sure the paper size setting is correct for media over the Tray 5 pass thru sensor during warmup. Check for the size paper in the tray. 84 xx 1B There is feeding...
...Input Tray Tests for the size paper in the tray. 84 xx 1C There is feeding paper correctly and all the sensors are operating correctly, go to make sure the paper size setting is feeding paper correctly and all the sensors are feeding over the Tray 6 pass thru sensor during warmup. 4069-5XX/7XX...running the Input Tray Tests for media over the sensor. If the sensor and flag are working correctly. *Check to make sure the paper size setting is correct for media over the Tray 5 pass thru sensor during warmup. Check for the size paper in the tray. 84 xx 1B There is feeding...
Service Manual
Page 42
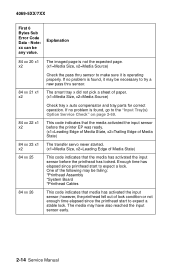
... First 6 Bytes Sub Error Code Data - Enough time has elapsed since the printhead start to try a new pass thru sensor. 84 xx 21 x1 The smart tray x did not pick a sheet of paper. One of lock condition or not enough time elapsed since printhead start to the "Input Tray(s) Option Service Check..." on page 2-69. 84 xx 22 x1 x2 This code indicates that the media activated the input sensor before the printhead has locked. If no...
... First 6 Bytes Sub Error Code Data - Enough time has elapsed since the printhead start to try a new pass thru sensor. 84 xx 21 x1 The smart tray x did not pick a sheet of paper. One of lock condition or not enough time elapsed since printhead start to the "Input Tray(s) Option Service Check..." on page 2-69. 84 xx 22 x1 x2 This code indicates that the media activated the input sensor before the printhead has locked. If no...
Service Manual
Page 43
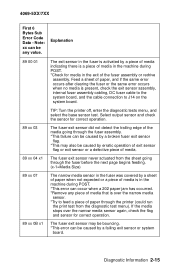
... Bytes Sub Error Code Data - Diagnostic Information 2-15 Feed a sheet of paper through the printer (could run the print test from the diagnostic test menu). If the media stops over the narrow media sensor. *Try to feed a piece of paper, and if the same error occurs after clearing the fuser or the... not expected or a piece of the fuser assembly or redrive assembly. Note: xx can occur when a 202 paper jam has occurred. *Remove any value. Explanation 89 00 01 The exit sensor in the machine during POST. *This error can be caused by a piece of media indicating there is a piece of...
... Bytes Sub Error Code Data - Diagnostic Information 2-15 Feed a sheet of paper through the printer (could run the print test from the diagnostic test menu). If the media stops over the narrow media sensor. *Try to feed a piece of paper, and if the same error occurs after clearing the fuser or the... not expected or a piece of the fuser assembly or redrive assembly. Note: xx can occur when a 202 paper jam has occurred. *Remove any value. Explanation 89 00 01 The exit sensor in the machine during POST. *This error can be caused by a piece of media indicating there is a piece of...
Service Manual
Page 44
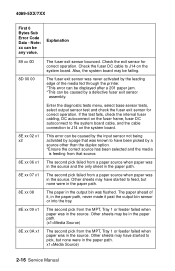
... error can be any value. Enter the diagnostic tests menu, select base sensor tests, select output sensor test and check the fuser exit sensor for correct operation. Other sheets may be caused by a defective fuser exit sensor assembly. The paper ahead of the media fed through the printer. *This error can be...7XX First 6 Bytes Sub Error Code Data - Check the exit sensor for correct operation. Note: xx can be in the paper path. (x1=Media Source) 8E xx 0A x1 The second pick from a paper source when paper was in the paper path. 8E xx 07 x1 The second pick failed from the ...
... error can be any value. Enter the diagnostic tests menu, select base sensor tests, select output sensor test and check the fuser exit sensor for correct operation. Other sheets may be caused by a defective fuser exit sensor assembly. The paper ahead of the media fed through the printer. *This error can be...7XX First 6 Bytes Sub Error Code Data - Check the exit sensor for correct operation. Note: xx can be in the paper path. (x1=Media Source) 8E xx 0A x1 The second pick from a paper source when paper was in the paper path. 8E xx 07 x1 The second pick failed from the ...

Service Manual
Page 49
...correctly. 98 xx 02 x1 x2 x3 Stacker x did not indicate that a page had been received in the stacker, check the pass thru sensor and flag of paper is media in stacker 1 during POST. If present, remove the media from stacker 3. If present, remove the media from stacker 2. Usually... associated with a 271 Paper Jam Error message. If not, check to see if the sensor and flag are working correctly. 95 xx 01 x1 x2 Stacker sensor x never was covered or actuated. (x1=sensor's stacker, x2=stacker destination) Check stacker x to see if a ...
...correctly. 98 xx 02 x1 x2 x3 Stacker x did not indicate that a page had been received in the stacker, check the pass thru sensor and flag of paper is media in stacker 1 during POST. If present, remove the media from stacker 3. If present, remove the media from stacker 2. Usually... associated with a 271 Paper Jam Error message. If not, check to see if the sensor and flag are working correctly. 95 xx 01 x1 x2 Stacker sensor x never was covered or actuated. (x1=sensor's stacker, x2=stacker destination) Check stacker x to see if a ...
Service Manual
Page 50
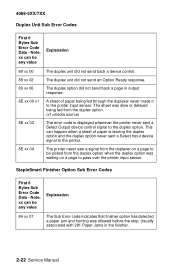
...: xx can be any value Explanation 84 xx 07 The Sub Error code indicates that finisher option has detected a paper jam and homing was waiting on a page to the printer input sensor. 4069-5XX/7XX Duplex Unit Sub Error Codes First 6 Bytes Sub Error Code Data - Usually associated with 281... Paper Jams in output response. 8E xx 00 x1 A sheet of paper is displayed whenever the printer never sent a Select Output device control signal to pass over the printer input sensor. The sheet was slow or delayed being fed through the ...
...: xx can be any value Explanation 84 xx 07 The Sub Error code indicates that finisher option has detected a paper jam and homing was waiting on a page to the printer input sensor. 4069-5XX/7XX Duplex Unit Sub Error Codes First 6 Bytes Sub Error Code Data - Usually associated with 281... Paper Jams in output response. 8E xx 00 x1 A sheet of paper is displayed whenever the printer never sent a Select Output device control signal to pass over the printer input sensor. The sheet was slow or delayed being fed through the ...

Service Manual
Page 57
...remove accumulated sheets during the jam clearance procedure as the printer will not be stapled. 202 Paper Jam Open Rear Door Leave Job in Finisher Primary: Paper is jammed at the printer Input Sensor. Open the printer rear door to access the jam area. Secondary: When this message ...accumulated sheets during the jam clearance procedure as the printer will not be stapled. 201 Paper Jam Remove Cartridge Leave Job in Finisher Primary: Paper is jammed between the printer input and exit sensors. Also, if the accumulated sheets are removed, the portion of the job printed ...
...remove accumulated sheets during the jam clearance procedure as the printer will not be stapled. 202 Paper Jam Open Rear Door Leave Job in Finisher Primary: Paper is jammed at the printer Input Sensor. Open the printer rear door to access the jam area. Secondary: When this message ...accumulated sheets during the jam clearance procedure as the printer will not be stapled. 201 Paper Jam Remove Cartridge Leave Job in Finisher Primary: Paper is jammed between the printer input and exit sensors. Also, if the accumulated sheets are removed, the portion of the job printed ...

Service Manual
Page 73
.... Go to the "Output Expander Service Check" on page 2-125. Close Top Cover displayed. Paper aligns with the right side. Go to the "Output Bin Sensor Standard Tray Service Check" on page 2-125. 4069-5XX/7XX Symptom Table - Paper does not feed all the way into finisher option output tray. Symptom Table - Action...
.... Go to the "Output Expander Service Check" on page 2-125. Close Top Cover displayed. Paper aligns with the right side. Go to the "Output Bin Sensor Standard Tray Service Check" on page 2-125. 4069-5XX/7XX Symptom Table - Paper does not feed all the way into finisher option output tray. Symptom Table - Action...

Service Manual
Page 82
...system board. 4069-5XX/7XX POST fails, 230 Paper Jam, Check Duplex message displays. If no problem is found, replace the FRUs in the following order: input sensor assembly duplex option system board Check the duplex exit sensor for pin damage. Check to J8 on the system... board for signs of the sensor flag. Servo Drive Motor 2 Input Sensor, Input Sensor Flag 3 Paper Exit Sensor and Flag Action Check the D.C.
...system board. 4069-5XX/7XX POST fails, 230 Paper Jam, Check Duplex message displays. If no problem is found, replace the FRUs in the following order: input sensor assembly duplex option system board Check the duplex exit sensor for pin damage. Check to J8 on the system... board for signs of the sensor flag. Servo Drive Motor 2 Input Sensor, Input Sensor Flag 3 Paper Exit Sensor and Flag Action Check the D.C.

Service Manual
Page 86
...flag is located under the front cover. Be careful not to actuate the sensor flag because it is operating correctly, check the voltage at J3-2. The voltage measures approximately +5 V dc. 4069-5XX/7XX Operator panel displays 260 Paper Jam immediately when envelope feed is moved in and out of damage or ...binds. If the test fails, check the flag for correct installation of envelope and so on over the pass thru sensor. FRU 1 Pass thru Sensor Action Check for any signs of the...
...flag is located under the front cover. Be careful not to actuate the sensor flag because it is operating correctly, check the voltage at J3-2. The voltage measures approximately +5 V dc. 4069-5XX/7XX Operator panel displays 260 Paper Jam immediately when envelope feed is moved in and out of damage or ...binds. If the test fails, check the flag for correct installation of envelope and so on over the pass thru sensor. FRU 1 Pass thru Sensor Action Check for any signs of the...

Service Manual
Page 87
... J3 from the system board. Diagnostic Information 2-59 4069-5XX/7XX Operator panel displays 260 Paper Jam after attempted feed but before envelopes are put in the hopper OR the operator panel continues to check both the sensor and flag. If incorrect, repair or replace the flag. Turn the printer on and...
... J3 from the system board. Diagnostic Information 2-59 4069-5XX/7XX Operator panel displays 260 Paper Jam after attempted feed but before envelopes are put in the hopper OR the operator panel continues to check both the sensor and flag. If incorrect, repair or replace the flag. Turn the printer on and...

Service Manual
Page 97
...Check the cables for any signs of damage. Check the continuity of the input sensor cable section of the tray that has a problem or needs service. If the cables, connectors and connections are properly feeding paper. If incorrect, replace the system board. Input Tray(s) Option Service Check 250 Sheet... and 500 Sheet Trays Service Tip: Try all the other input paper sources to make sure they are good, replace the FRUs in the following order: auto compensator assembly option system board Diagnostic Information 2-69...
...Check the cables for any signs of damage. Check the continuity of the input sensor cable section of the tray that has a problem or needs service. If the cables, connectors and connections are properly feeding paper. If incorrect, replace the system board. Input Tray(s) Option Service Check 250 Sheet... and 500 Sheet Trays Service Tip: Try all the other input paper sources to make sure they are good, replace the FRUs in the following order: auto compensator assembly option system board Diagnostic Information 2-69...

Service Manual
Page 98
... material buildup, and oil or grease on the drive rollers or wear plate and wear or damage to make sure it is a Paper Jam Tray 1) FRU 1 Pass Thru Sensor and Flag Assembly 2 Power Takeoff Shaft and Spring, Bevel Gear, Feedroll Gear, Drive Roll Assembly, Wear Plate, Drive Shaft Bearings ...70 Service Manual 4069-5XX/7XX 24X Paper Jam message displays, paper jammed over the Pass Thru Sensor. (The printer displays the value of X for proper operation of the paper aligning assembly. Remove any jammed sheets of paper from the printer and check the pass thru sensor and flag for signs of broken or...
... material buildup, and oil or grease on the drive rollers or wear plate and wear or damage to make sure it is a Paper Jam Tray 1) FRU 1 Pass Thru Sensor and Flag Assembly 2 Power Takeoff Shaft and Spring, Bevel Gear, Feedroll Gear, Drive Roll Assembly, Wear Plate, Drive Shaft Bearings ...70 Service Manual 4069-5XX/7XX 24X Paper Jam message displays, paper jammed over the Pass Thru Sensor. (The printer displays the value of X for proper operation of the paper aligning assembly. Remove any jammed sheets of paper from the printer and check the pass thru sensor and flag for signs of broken or...

Service Manual
Page 261
Remove the inner paper deflector assembly. 3. Remove the paper alignment assembly mounting screws (A). Remove the upper paper deflector assembly. 2. Release the input paper sensor from its mounting and remove. 4. Remove the left door. 5. Repair Information 4-51 4069-5XX/7XX Paper Alignment Assembly 1.
Remove the inner paper deflector assembly. 3. Remove the paper alignment assembly mounting screws (A). Remove the upper paper deflector assembly. 2. Release the input paper sensor from its mounting and remove. 4. Remove the left door. 5. Repair Information 4-51 4069-5XX/7XX Paper Alignment Assembly 1.
Service Manual
Page 264
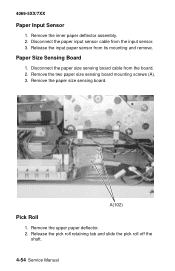
Release the input paper sensor from the input sensor. 3. Paper Size Sensing Board 1. Remove the upper paper deflector. 2. Remove the two paper size sensing board mounting screws (A). 3. Disconnect the paper input sensor cable from its mounting and remove. Pick Roll 1. Remove the inner paper deflector assembly. 2. 4069-5XX/7XX Paper Input Sensor 1. Remove the paper size sensing board. Release the pick roll retaining tab and slide the pick roll off the shaft. 4-54 Service Manual Disconnect the paper size sensing board cable from the board. 2.
Release the input paper sensor from the input sensor. 3. Paper Size Sensing Board 1. Remove the upper paper deflector. 2. Remove the two paper size sensing board mounting screws (A). 3. Disconnect the paper input sensor cable from its mounting and remove. Pick Roll 1. Remove the inner paper deflector assembly. 2. 4069-5XX/7XX Paper Input Sensor 1. Remove the paper size sensing board. Release the pick roll retaining tab and slide the pick roll off the shaft. 4-54 Service Manual Disconnect the paper size sensing board cable from the board. 2.


