User's Guide
Page 2
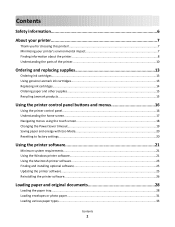
......8 Understanding the parts of the printer 10 Ordering and replacing supplies 13 Ordering ink cartridges...13 Using genuine Lexmark ink cartridges...13 Replacing ink cartridges...14 Ordering paper and other supplies...15 Recycling Lexmark products...15 Using the printer control panel buttons and menus 16... Using the printer control panel...16 Understanding the home screen...17 Navigating menus using the touch screen 18 Changing the Power Saver timeout...19 Saving...
......8 Understanding the parts of the printer 10 Ordering and replacing supplies 13 Ordering ink cartridges...13 Using genuine Lexmark ink cartridges...13 Replacing ink cartridges...14 Ordering paper and other supplies...15 Recycling Lexmark products...15 Using the printer control panel buttons and menus 16... Using the printer control panel...16 Understanding the home screen...17 Navigating menus using the touch screen 18 Changing the Power Saver timeout...19 Saving...

User's Guide
Page 6
... the wall outlet and disconnect all external connections (such as furniture and walls. Do not subject the power cord to abrasion or stress. Refer service or repairs, other replacement parts. Use only the power supply and power cord provided with the use this product or the manufacturer's authorized replacements. The safety features of the...
... the wall outlet and disconnect all external connections (such as furniture and walls. Do not subject the power cord to abrasion or stress. Refer service or repairs, other replacement parts. Use only the power supply and power cord provided with the use this product or the manufacturer's authorized replacements. The safety features of the...

User's Guide
Page 11
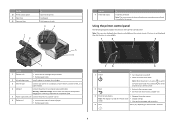
.... Load paper. Warning-Potential Damage: Do not touch the USB port except when plugging in or removing a USB cable or installation cable. 5 Power supply with port Connect the printer to a power source. 6 Duplex unit • Print on the ADF tray to the printer. Use the 5 ADF paper guide 6 ADF output tray 7 Wi-Fi...
.... Load paper. Warning-Potential Damage: Do not touch the USB port except when plugging in or removing a USB cable or installation cable. 5 Power supply with port Connect the printer to a power source. 6 Duplex unit • Print on the ADF tray to the printer. Use the 5 ADF paper guide 6 ADF output tray 7 Wi-Fi...
User's Guide
Page 109
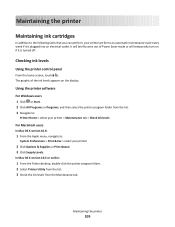
...X version 10.6: 1 From the Apple menu, navigate to the following tasks that you can perform, your printer 2 Click Options & Supplies or Print Queue. 3 Click Supply Levels. Using the printer software For Windows users 1 Click or Start. 2 Click All Programs or Programs, and then select the printer... program folder from the Maintenance tab. Maintaining the printer 109 The graphic of Power Saver mode or will temporarily turn on ...
...X version 10.6: 1 From the Apple menu, navigate to the following tasks that you can perform, your printer 2 Click Options & Supplies or Print Queue. 3 Click Supply Levels. Using the printer software For Windows users 1 Click or Start. 2 Click All Programs or Programs, and then select the printer... program folder from the Maintenance tab. Maintaining the printer 109 The graphic of Power Saver mode or will temporarily turn on ...
User's Guide
Page 113
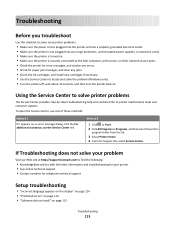
... Home. 4 From the Support tab, select Service Center. If Troubleshooting does not solve your problem Visit our Web site at http://support.lexmark.com to find the following: • Knowledgebase articles with the latest information and troubleshooting for your printer • Live online technical support ...into the printer and into a properly grounded electrical outlet. • Make sure the printer is not plugged into any surge protectors, uninterrupted power supplies, or extension cords. • Make sure the printer is turned on. • Make sure the printer is securely connected to the ...
... Home. 4 From the Support tab, select Service Center. If Troubleshooting does not solve your problem Visit our Web site at http://support.lexmark.com to find the following: • Knowledgebase articles with the latest information and troubleshooting for your printer • Live online technical support ...into the printer and into a properly grounded electrical outlet. • Make sure the printer is not plugged into any surge protectors, uninterrupted power supplies, or extension cords. • Make sure the printer is turned on. • Make sure the printer is securely connected to the ...
User's Guide
Page 116
.... • For a printer that is marked with a USB symbol. RECONNECT THE PRINTER POWER SUPPLY 1 Turn off the printer, and then unplug the power cord from the wall outlet. 2 Gently remove the power supply from the printer, and then reinsert it. 3 Plug the power cord into the wall outlet, and then turn on the Printer list, then...
.... • For a printer that is marked with a USB symbol. RECONNECT THE PRINTER POWER SUPPLY 1 Turn off the printer, and then unplug the power cord from the wall outlet. 2 Gently remove the power supply from the printer, and then reinsert it. 3 Plug the power cord into the wall outlet, and then turn on the Printer list, then...
User's Guide
Page 117
...Blank pages may have problems, then try installing the cartridges again. 2 Load plain paper. 3 From the home screen of the USB cable into the power supply. 4 Turn on page 14 for any obvious damage. If the cartridges do not seem to Align Printer: > More Options > Align Printer. An... alignment page prints. Press and hold 2 Pull out the power cord from the power supply. 3 After one . 2 Firmly plug the square end of the USB cable into the back of the printer. 3 Firmly plug the rectangular ...
...Blank pages may have problems, then try installing the cartridges again. 2 Load plain paper. 3 From the home screen of the USB cable into the power supply. 4 Turn on page 14 for any obvious damage. If the cartridges do not seem to Align Printer: > More Options > Align Printer. An... alignment page prints. Press and hold 2 Pull out the power cord from the power supply. 3 After one . 2 Firmly plug the square end of the USB cable into the back of the printer. 3 Firmly plug the rectangular ...

User's Guide
Page 118
..., then try one or more of the following : MAKE SURE THE PRINTER IS NOT IN POWER SAVER MODE If the power light is blinking on and off the printer, and then unplug the power cord from the wall outlet. 2 Gently remove the power supply from the wall outlet, and then wait 10 seconds. 2 Insert the... power cord into the wall outlet, and then turn on the printer. RESTART THE COMPUTER AND TRY AGAIN Cannot print ...
..., then try one or more of the following : MAKE SURE THE PRINTER IS NOT IN POWER SAVER MODE If the power light is blinking on and off the printer, and then unplug the power cord from the wall outlet. 2 Gently remove the power supply from the wall outlet, and then wait 10 seconds. 2 Insert the... power cord into the wall outlet, and then turn on the printer. RESTART THE COMPUTER AND TRY AGAIN Cannot print ...
User's Guide
Page 131
For more information, see "Installing the printer software" in . 4 Plug the power cord back into the power outlet. 5 Turn on the printer, and then resume the installation on your printer, select Additional Computer when you get to the Setting up your ... link at the bottom of the installation screen. If you have already set up a new printer? RECONNECT THE POWER SUPPLY 1 Turn off the printer. 2 Unplug the power cord from the power outlet. 3 Remove the power supply from the back of the printer software on the computer is connected to it has activity whenever a USB device...
For more information, see "Installing the printer software" in . 4 Plug the power cord back into the power outlet. 5 Turn on the printer, and then resume the installation on your printer, select Additional Computer when you get to the Setting up your ... link at the bottom of the installation screen. If you have already set up a new printer? RECONNECT THE POWER SUPPLY 1 Turn off the printer. 2 Unplug the power cord from the power outlet. 3 Remove the power supply from the back of the printer software on the computer is connected to it has activity whenever a USB device...
User's Guide
Page 151
... Timeout to stop product power consumption, disconnect the power supply cord from the wall outlet. IF YOU ARE INSTALLING THIS PRODUCT FOR USE BY OTHER PARTIES, YOU AGREE TO INFORM THE USERS THAT USE OF ... of ink will replace the Software Program should be modified between 1 minute and 240 minutes. By using the configuration menus, the Power Saver Timeout can be multiplied by Lexmark for remanufacturing, refilling or recycling. Off mode If this product in the future that the media (e.g., diskette or compact disk) on the date...
... Timeout to stop product power consumption, disconnect the power supply cord from the wall outlet. IF YOU ARE INSTALLING THIS PRODUCT FOR USE BY OTHER PARTIES, YOU AGREE TO INFORM THE USERS THAT USE OF ... of ink will replace the Software Program should be modified between 1 minute and 240 minutes. By using the configuration menus, the Power Saver Timeout can be multiplied by Lexmark for remanufacturing, refilling or recycling. Off mode If this product in the future that the media (e.g., diskette or compact disk) on the date...

User's Guide
Page 165
...PictBridge-enabled camera connecting 48 poor quality at the edges of page 122 poor scanned image quality 124 postcards loading 33 Power Saver timeout changing 19 power supply port location 11 print job canceling 58 pausing 57 resuming 58 print speed is slow 123 print troubleshooting cannot delete ...sided 53, 55 printing in draft mode 56 printing mode changing 56 proof sheet using 49 protocol 104 publications finding 8 R recycling 7 Lexmark products 15 WEEE statement 149 reducing an image 62 repeating an image 63 replacing ink cartridges 14 resetting internal wireless print server to factory ...
...PictBridge-enabled camera connecting 48 poor quality at the edges of page 122 poor scanned image quality 124 postcards loading 33 Power Saver timeout changing 19 power supply port location 11 print job canceling 58 pausing 57 resuming 58 print speed is slow 123 print troubleshooting cannot delete ...sided 53, 55 printing in draft mode 56 printing mode changing 56 proof sheet using 49 protocol 104 publications finding 8 R recycling 7 Lexmark products 15 WEEE statement 149 reducing an image 62 repeating an image 63 replacing ink cartridges 14 resetting internal wireless print server to factory ...
Quick Reference
Page 2
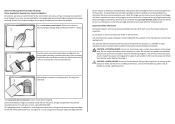
... walls. After this product or the manufacturer's authorized replacements. Do not place or use only genuine Lexmark inkjet cartridges with , only genuine Lexmark inkjet cartridges for returning empty Lexmark cartridges to Lexmark's recycling partner. Use only the power supply and power cord provided with all new parts, though components may be refilled by you 're sending single...
... walls. After this product or the manufacturer's authorized replacements. Do not place or use only genuine Lexmark inkjet cartridges with , only genuine Lexmark inkjet cartridges for returning empty Lexmark cartridges to Lexmark's recycling partner. Use only the power supply and power cord provided with all new parts, though components may be refilled by you 're sending single...
Quick Reference
Page 6
.... 3 Touch screen display • Navigate the printer menus. Note: When the printer is installed in the printer. Note: The carrier moves to a power source. 6 Duplex unit • Print on both sides of a sheet of the printer control panel: Note: The icons are displayed when they are selectable... 2 To Operate the printer. Load paper. Press and hold seconds to turn off in or removing a USB cable or installation cable. 5 Power supply with port Connect the printer to the printhead access area when no printhead is on the current screen. Using the printer control panel The following...
.... 3 Touch screen display • Navigate the printer menus. Note: When the printer is installed in the printer. Note: The carrier moves to a power source. 6 Duplex unit • Print on both sides of a sheet of the printer control panel: Note: The icons are displayed when they are selectable... 2 To Operate the printer. Load paper. Press and hold seconds to turn off in or removing a USB cable or installation cable. 5 Power supply with port Connect the printer to the printhead access area when no printhead is on the current screen. Using the printer control panel The following...
Quick Reference
Page 20
...e-mail, press . SmartSolutions also lets you view RSS feeds, calendars, and online photo albums from the SmartSolutions Web site (http://smartsolutions.lexmark.com) to your printer to e-mail through an Ethernet or wireless connection. • Your printer is a set up to add. ...printer and into a properly grounded electrical outlet. • Make sure the printer is not plugged into any surge protectors, uninterrupted power supplies, or extension cords. • Make sure the printer is SmartSolutions? Troubleshooting Before you can create, customize, and download from the...
...e-mail, press . SmartSolutions also lets you view RSS feeds, calendars, and online photo albums from the SmartSolutions Web site (http://smartsolutions.lexmark.com) to your printer to e-mail through an Ethernet or wireless connection. • Your printer is a set up to add. ...printer and into a properly grounded electrical outlet. • Make sure the printer is not plugged into any surge protectors, uninterrupted power supplies, or extension cords. • Make sure the printer is SmartSolutions? Troubleshooting Before you can create, customize, and download from the...
Quick Reference
Page 22
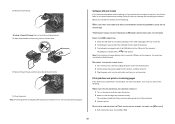
... the printhead, and then close the latch until it . 3 Plug the power cord into the USB port of the computer. RECONNECT THE PRINTER POWER SUPPLY 1 Turn off the printer, and then unplug the power cord from the wall outlet. 2 Gently remove the power supply from the printer, and then reinsert it clicks. 5 Close the printer. Software...
... the printhead, and then close the latch until it . 3 Plug the power cord into the USB port of the computer. RECONNECT THE PRINTER POWER SUPPLY 1 Turn off the printer, and then unplug the power cord from the wall outlet. 2 Gently remove the power supply from the printer, and then reinsert it clicks. 5 Close the printer. Software...

Quick Reference
Page 23
...IS NOT PAUSED MAKE SURE YOUR PRINTER IS SET AS THE DEFAULT PRINTER RECONNECT THE PRINTER POWER SUPPLY 1 Turn off the printer, and then unplug the power cord from the wall outlet. 2 Gently remove the power supply from the power supply. 3 After one . 2 Firmly plug the square end of the USB cable into... properly seated, and then try another USB port on and off the printer. 2 Pull out the power cord from the printer, and then reinsert it. 3 Plug the power cord into the power supply. 4 Turn on the Printer list, then choose Add Printer. REMOVE AND REINSTALL THE PRINTER SOFTWARE Printer...
...IS NOT PAUSED MAKE SURE YOUR PRINTER IS SET AS THE DEFAULT PRINTER RECONNECT THE PRINTER POWER SUPPLY 1 Turn off the printer, and then unplug the power cord from the wall outlet. 2 Gently remove the power supply from the power supply. 3 After one . 2 Firmly plug the square end of the USB cable into... properly seated, and then try another USB port on and off the printer. 2 Pull out the power cord from the printer, and then reinsert it. 3 Plug the power cord into the power supply. 4 Turn on the Printer list, then choose Add Printer. REMOVE AND REINSTALL THE PRINTER SOFTWARE Printer...

SmartSolutions User's Guide
Page 22
... RECONNECT THE PRINTER POWER SUPPLY 1 Turn off the printer, and then unplug the power cord from the wall outlet. 2 Gently remove the power supply from the printer, and then reinsert it to connect to allow printer communication. MAKE SURE THE PRINTER FIRMWARE IS UPDATED Check the Lexmark Web site for critical...ADOBE FLASH PLAYER 10 IS INSTALLED FOR YOUR BROWSER The SmartSolutions Web site needs an Adobe Flash Player plug-in to the Lexmark Web site at http://www.lexmark.com. 2 Click Drivers and Downloads. CHECK YOUR PRINTER INTERNET CONNECTION • Make sure the printer and computer are ...
... RECONNECT THE PRINTER POWER SUPPLY 1 Turn off the printer, and then unplug the power cord from the wall outlet. 2 Gently remove the power supply from the printer, and then reinsert it to connect to allow printer communication. MAKE SURE THE PRINTER FIRMWARE IS UPDATED Check the Lexmark Web site for critical...ADOBE FLASH PLAYER 10 IS INSTALLED FOR YOUR BROWSER The SmartSolutions Web site needs an Adobe Flash Player plug-in to the Lexmark Web site at http://www.lexmark.com. 2 Click Drivers and Downloads. CHECK YOUR PRINTER INTERNET CONNECTION • Make sure the printer and computer are ...

SmartSolutions User's Guide
Page 24
...on the Add Printer Wizard. 5 Add your printer again. RECONNECT THE PRINTER POWER SUPPLY, AND THEN GENERATE A NEW CONFIRMATION CODE 1 Turn off the printer, and then unplug the power cord from the wall outlet. 2 Gently remove the power supply from the Solution Center expires after some time. Generate a new one when ...it . 3 Plug the power cord into the wall outlet, and then turn on the printer....
...on the Add Printer Wizard. 5 Add your printer again. RECONNECT THE PRINTER POWER SUPPLY, AND THEN GENERATE A NEW CONFIRMATION CODE 1 Turn off the printer, and then unplug the power cord from the wall outlet. 2 Gently remove the power supply from the Solution Center expires after some time. Generate a new one when ...it . 3 Plug the power cord into the wall outlet, and then turn on the printer....

SmartSolutions User's Guide
Page 35
...then turn on the printer. 3 Add the printer again. The HTTP proxy on the computer screen. 2 Reconnect the printer power supply. There is a proxy? b Gently remove the power supply from the wall outlet. Using the Solution Center Printer Setup 35 • When adding a printer manually: - The printer... on your computer. a Turn off the printer, and then unplug the power cord from the computer, ask for more information, see "Printer shows an error" on the computer screen. 2 Reconnect the printer power supply. If the printer does not show a 4-digit confirmation code, then it...
...then turn on the printer. 3 Add the printer again. The HTTP proxy on the computer screen. 2 Reconnect the printer power supply. There is a proxy? b Gently remove the power supply from the wall outlet. Using the Solution Center Printer Setup 35 • When adding a printer manually: - The printer... on your computer. a Turn off the printer, and then unplug the power cord from the computer, ask for more information, see "Printer shows an error" on the computer screen. 2 Reconnect the printer power supply. If the printer does not show a 4-digit confirmation code, then it...


