User's Guide
Page 3
... Understanding the parts of the printer 13 Using the control panel 15 Navigating the control panel menus 17 Using the Copy menu 17 Using the Scan menu 18 Using the Photo Card menu 19 Learning about the printer software 22 Using the printer software 22 Opening the Imaging Studio 22 Using... the Imaging Studio buttons 23 Using the All-In-One Center 24 Using the Scanning & Copying tab 24 Using the Saved Images tab 26 Using the Maintain/Troubleshoot link 26 Using the Solution Center 27 Using Print Properties 29 Using...
... Understanding the parts of the printer 13 Using the control panel 15 Navigating the control panel menus 17 Using the Copy menu 17 Using the Scan menu 18 Using the Photo Card menu 19 Learning about the printer software 22 Using the printer software 22 Opening the Imaging Studio 22 Using... the Imaging Studio buttons 23 Using the All-In-One Center 24 Using the Scanning & Copying tab 24 Using the Saved Images tab 26 Using the Maintain/Troubleshoot link 26 Using the Solution Center 27 Using Print Properties 29 Using...
User's Guide
Page 5
... using the software 59 Scanning 60 Scanning a text-only document 60 Scanning a text and graphics document 60 Saving a scanned image 60 Scanning documents or images for e-mailing using the control panel...........61 Scanning documents or images for e-mailing using the computer 61 Scanning to a computer over a network 62 Scanning documents to edit text 62 Scanning clear images from magazines...
... using the software 59 Scanning 60 Scanning a text-only document 60 Scanning a text and graphics document 60 Saving a scanned image 60 Scanning documents or images for e-mailing using the control panel...........61 Scanning documents or images for e-mailing using the computer 61 Scanning to a computer over a network 62 Scanning documents to edit text 62 Scanning clear images from magazines...
User's Guide
Page 6
Using the cartridge storage area 77 Refilling the print cartridges 78 Ordering Lexmark Supplies 80 Ordering supplies 80 Troubleshooting 81 Setup troubleshooting 81 Print troubleshooting 85 Copy troubleshooting 88 Scan troubleshooting 89 Fax troubleshooting 90 Network troubleshooting 93 Jams and misfeeds troubleshooting 94 Memory card troubleshooting 97 Error messages 99 Removing and reinstalling the software 104 Notices 105 Index 111 Contents 6
Using the cartridge storage area 77 Refilling the print cartridges 78 Ordering Lexmark Supplies 80 Ordering supplies 80 Troubleshooting 81 Setup troubleshooting 81 Print troubleshooting 85 Copy troubleshooting 88 Scan troubleshooting 89 Fax troubleshooting 90 Network troubleshooting 93 Jams and misfeeds troubleshooting 94 Memory card troubleshooting 97 Error messages 99 Removing and reinstalling the software 104 Notices 105 Index 111 Contents 6
User's Guide
Page 14
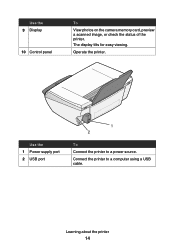
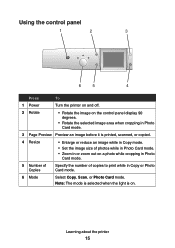
Use the 1 Power supply port 2 USB port 1 2 To Connect the printer to a computer using a USB cable. Learning about the printer 14 Operate the printer. Use the 9 Display 10 Control panel To View photos on the camera memory card, preview a scanned image, or check the status of the printer. Connect the printer to a power source. The display tilts for easy viewing.
Use the 1 Power supply port 2 USB port 1 2 To Connect the printer to a computer using a USB cable. Learning about the printer 14 Operate the printer. Use the 9 Display 10 Control panel To View photos on the camera memory card, preview a scanned image, or check the status of the printer. Connect the printer to a power source. The display tilts for easy viewing.
User's Guide
Page 15
Learning about the printer 15 Note: The mode is selected when the light is printed, scanned, or copied. 4 Resize • Enlarge or reduce an image while in Copy mode. • Set the image size of copies to print while in or ... mode. 5 Number of Copies Specify the number of photos while in Photo Card mode. • Zoom in Copy or Photo Card mode. 6 Mode Select Copy, Scan, or Photo Card mode.
Learning about the printer 15 Note: The mode is selected when the light is printed, scanned, or copied. 4 Resize • Enlarge or reduce an image while in Copy mode. • Set the image size of copies to print while in or ... mode. 5 Number of Copies Specify the number of photos while in Photo Card mode. • Zoom in Copy or Photo Card mode. 6 Mode Select Copy, Scan, or Photo Card mode.
User's Guide
Page 17
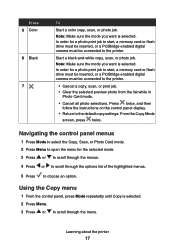
...is selected. 2 Press Menu. 3 Press or to scroll through the options list of the highlighted menus. 5 Press to the printer. • Cancel a copy, scan, or print job. • Clear the selected preview photo from the list while in Photo Card mode. • Cancel all photo selections. Navigating the control... panel menus 1 Press Mode to select the Copy, Scan, or Photo Card mode. 2 Press Menu to open the menu for a photo print job to start , a memory card or flash drive must be...
...is selected. 2 Press Menu. 3 Press or to scroll through the options list of the highlighted menus. 5 Press to the printer. • Cancel a copy, scan, or print job. • Clear the selected preview photo from the list while in Photo Card mode. • Cancel all photo selections. Navigating the control... panel menus 1 Press Mode to select the Copy, Scan, or Photo Card mode. 2 Press Menu to open the menu for a photo print job to start , a memory card or flash drive must be...
User's Guide
Page 18
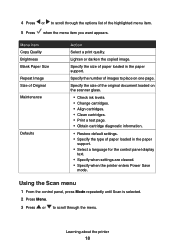
... 1 From the control panel, press Mode repeatedly until Scan is selected. 2 Press Menu. 3 Press or to scroll through the options list of the highlighted menu item. 5 Press when the menu item you want appears. ...
... 1 From the control panel, press Mode repeatedly until Scan is selected. 2 Press Menu. 3 Press or to scroll through the options list of the highlighted menu item. 5 Press when the menu item you want appears. ...
User's Guide
Page 19
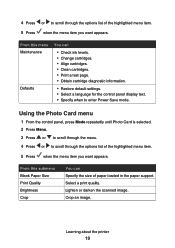
Lighten or darken the scanned image. 4 Press or to enter Power Save mode. From this menu Maintenance Defaults You can Specify the size of paper loaded in the paper support. ...
Lighten or darken the scanned image. 4 Press or to enter Power Save mode. From this menu Maintenance Defaults You can Specify the size of paper loaded in the paper support. ...
User's Guide
Page 22
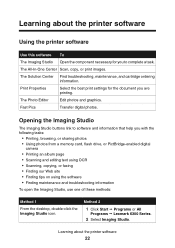
Method 2 1 Click Start Œ Programs or All Programs Œ Lexmark 6300 Series. 2 Select Imaging Studio. The All-In-One Center Scan, copy, or print images. The Photo Editor Edit photos and graphics. Fast Pics Transfer digital photos. The Solution Center Find ...8226; Using photos from a memory card, flash drive, or PictBridge-enabled digital camera • Printing an album page • Scanning and editing text using OCR • Scanning, copying, or faxing • Finding our Web site • Finding tips on using the software • Finding maintenance and troubleshooting...
Method 2 1 Click Start Œ Programs or All Programs Œ Lexmark 6300 Series. 2 Select Imaging Studio. The All-In-One Center Scan, copy, or print images. The Photo Editor Edit photos and graphics. Fast Pics Transfer digital photos. The Solution Center Find ...8226; Using photos from a memory card, flash drive, or PictBridge-enabled digital camera • Printing an album page • Scanning and editing text using OCR • Scanning, copying, or faxing • Finding our Web site • Finding tips on using the software • Finding maintenance and troubleshooting...
User's Guide
Page 23
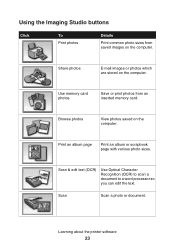
... to a word processor so you can edit the text. Use memory card photos Save or print photos from saved images on the computer. Scan Scan a photo or document. Using the Imaging Studio buttons Click To Print photos Details Print common photo sizes from an inserted memory card. Browse photos View ...
... to a word processor so you can edit the text. Use memory card photos Save or print photos from saved images on the computer. Scan Scan a photo or document. Using the Imaging Studio buttons Click To Print photos Details Print common photo sizes from an inserted memory card. Browse photos View ...

User's Guide
Page 24
... these methods: Method 1 Method 2 From the desktop, double-click the Imaging Studio icon, and then click the Scan or Copy button. 1 Click Start Œ Programs or All Programs Œ Lexmark 6300 Series. 2 Select All-In-One Center. Fax a document or an image saved on the computer. Using the... Scanning & Copying tab From this section Scan You can do with this software. Learning about what you can • Select a program to send a scanned image to keep the...
... these methods: Method 1 Method 2 From the desktop, double-click the Imaging Studio icon, and then click the Scan or Copy button. 1 Click Start Œ Programs or All Programs Œ Lexmark 6300 Series. 2 Select All-In-One Center. Fax a document or an image saved on the computer. Using the... Scanning & Copying tab From this section Scan You can do with this software. Learning about what you can • Select a program to send a scanned image to keep the...
User's Guide
Page 25
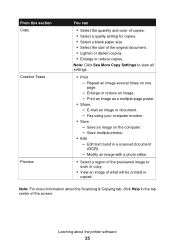
...multiple-page poster. • Share - Edit text found in the top center of what will be printed or copied. Learning about the Scanning & Copying tab, click Help in a scanned document (OCR). - From this section Copy Creative Tasks Preview You can • Select the quantity and color of copies. • ...previewed image to view all settings. • Print - Note: For more information about the printer software 25 Note: Click See More Copy Settings to scan or copy. • View an image of the screen. Enlarge or reduce an image. - Fax using your computer modem. • Save - Modify...
...multiple-page poster. • Share - Edit text found in the top center of what will be printed or copied. Learning about the Scanning & Copying tab, click Help in a scanned document (OCR). - From this section Copy Creative Tasks Preview You can • Select the quantity and color of copies. • ...previewed image to view all settings. • Print - Note: For more information about the printer software 25 Note: Click See More Copy Settings to scan or copy. • View an image of the screen. Enlarge or reduce an image. - Fax using your computer modem. • Save - Modify...
User's Guide
Page 26
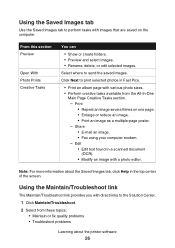
... to the Solution Center. 1 Click Maintain/Troubleshoot. 2 Select from the All-In-One Main Page Creative Tasks section. - Click Next to print selected photos in a scanned document (OCR). • Modify an image with a photo editor. Note: For more information about the printer software 26 Using the Saved Images tab Use the...
... to the Solution Center. 1 Click Maintain/Troubleshoot. 2 Select from the All-In-One Main Page Creative Tasks section. - Click Next to print selected photos in a scanned document (OCR). • Modify an image with a photo editor. Note: For more information about the printer software 26 Using the Saved Images tab Use the...
User's Guide
Page 28
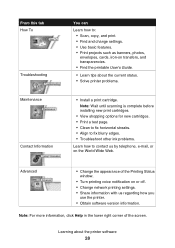
... appearance of the screen. Learning about the current status. • Solve printer problems. • Install a print cartridge. Note: Wait until scanning is complete before installing new print cartridges. • View shopping options for new cartridges. • Print a test page. • Clean to... fix horizontal streaks. • Align to fix blurry edges. • Troubleshoot other ink problems. Learn how to : • Scan, copy, and print. • Find and change settings. • Use basic features. • Print projects such as banners, photos, envelopes, cards,...
... appearance of the screen. Learning about the current status. • Solve printer problems. • Install a print cartridge. Note: Wait until scanning is complete before installing new print cartridges. • View shopping options for new cartridges. • Print a test page. • Clean to... fix horizontal streaks. • Align to fix blurry edges. • Troubleshoot other ink problems. Learn how to : • Scan, copy, and print. • Find and change settings. • Use basic features. • Print projects such as banners, photos, envelopes, cards,...
User's Guide
Page 36
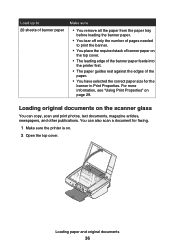
... print photos, text documents, magazine articles, newspapers, and other publications. Loading original documents on the scanner glass You can also scan a document for the banner in Print Properties. For more information, see "Using Print Properties" on the top cover. • The leading edge of the banner ...
... print photos, text documents, magazine articles, newspapers, and other publications. Loading original documents on the scanner glass You can also scan a document for the banner in Print Properties. For more information, see "Using Print Properties" on the top cover. • The leading edge of the banner ...

User's Guide
Page 37
3 Place the original document face down on the scanner glass in the lower right corner. 4 Close the top cover to avoid dark edges on the scanned image. Loading paper and original documents 37
3 Place the original document face down on the scanner glass in the lower right corner. 4 Close the top cover to avoid dark edges on the scanned image. Loading paper and original documents 37

User's Guide
Page 60
... the desktop, double-click the Imaging Studio icon. 4 Click Scan. Scanning a text and graphics document 1 Make sure the printer is being scanned?" Scanning 60 menu, select Mixed Graphics and Text. 6 Adjust the settings as needed . 7 Click Scan Now. Saving a scanned image 1 Make sure the printer is connected to a computer,... on. 2 Load an original document face down on the scanner glass. 3 From the desktop, double-click the Imaging Studio icon. 4 Click Scan. 5 From the "What is connected to a computer, and both the printer and the computer are on. 2 Load an original document face...
... the desktop, double-click the Imaging Studio icon. 4 Click Scan. Scanning a text and graphics document 1 Make sure the printer is being scanned?" Scanning 60 menu, select Mixed Graphics and Text. 6 Adjust the settings as needed . 7 Click Scan Now. Saving a scanned image 1 Make sure the printer is connected to a computer,... on. 2 Load an original document face down on the scanner glass. 3 From the desktop, double-click the Imaging Studio icon. 4 Click Scan. 5 From the "What is connected to a computer, and both the printer and the computer are on. 2 Load an original document face...

User's Guide
Page 61
..., and both the printer and the computer are on. 2 Load an original document face down on the scanner glass. 3 Press Mode repeatedly until Scan is connected to a computer, and both the printer and the computer are on. 2 Load an original document on the scanner glass. 3 From ... Follow the instructions on the screen to which you want the scanned image saved. 10 Click Save. Scanning 61 5 From the "Send scanned images to" menu, select the application where you want to save the scanned image. 6 Adjust the settings as needed. 7 Click Scan Now. 8 From the software application, click File Œ...
..., and both the printer and the computer are on. 2 Load an original document face down on the scanner glass. 3 Press Mode repeatedly until Scan is connected to a computer, and both the printer and the computer are on. 2 Load an original document on the scanner glass. 3 From ... Follow the instructions on the screen to which you want the scanned image saved. 10 Click Save. Scanning 61 5 From the "Send scanned images to" menu, select the application where you want to save the scanned image. 6 Adjust the settings as needed. 7 Click Scan Now. 8 From the software application, click File Œ...

User's Guide
Page 62
... network. 2 Load an original document face down on the scanner glass. 3 Press Mode repeatedly until the computer to which you can edit with the Scanning & Copying tab expanded. The All-In-One Center appears with a word-processing application. Note: Make sure that ABBYY Fine Reader is selected. 4 Press... Menu. 5 Press or repeatedly until PC appears. 6 Press . 7 Press or repeatedly until Scan is installed. 1 Load an original document face down on the scanner glass. 2 From the desktop, double-click the Imaging Studio icon. 3 Click...
... network. 2 Load an original document face down on the scanner glass. 3 Press Mode repeatedly until the computer to which you can edit with the Scanning & Copying tab expanded. The All-In-One Center appears with a word-processing application. Note: Make sure that ABBYY Fine Reader is selected. 4 Press... Menu. 5 Press or repeatedly until PC appears. 6 Press . 7 Press or repeatedly until Scan is installed. 1 Load an original document face down on the scanner glass. 2 From the desktop, double-click the Imaging Studio icon. 3 Click...

User's Guide
Page 63
...the file name, format, and location where you want the edited document saved. 10 Click Save. Scanning clear images from magazines or newspapers Descreening helps to remove wavy patterns from images scanned from magazine/newspaper (descreen) check box. 8 From the "What is connected to edit the text... an original document face down on the scanner glass. 3 From the desktop, double-click the Imaging Studio icon. 4 Click Scan. 5 Click Display Advanced Scan Settings. 6 Select the Image Patterns tab. 7 Select the Remove image patterns from magazines or newspapers. 1 Make sure the printer is...
...the file name, format, and location where you want the edited document saved. 10 Click Save. Scanning clear images from magazines or newspapers Descreening helps to remove wavy patterns from images scanned from magazine/newspaper (descreen) check box. 8 From the "What is connected to edit the text... an original document face down on the scanner glass. 3 From the desktop, double-click the Imaging Studio icon. 4 Click Scan. 5 Click Display Advanced Scan Settings. 6 Select the Image Patterns tab. 7 Select the Remove image patterns from magazines or newspapers. 1 Make sure the printer is...


