

User's Guide
Page 9
...or procedural information located next to the page number. Using your manual is intended for users who may want to keep the Quick Reference Card near the printer so all users have access to install printer drivers and utilities. When searching for loading paper, and ...responsible for ordering printer supplies. About the manuals ix A handy feature included with your documentation About the manuals This User's Guide provides detailed information about printer configuration, printer default settings, troubleshooting printer problems, and those who need . Refer to the Setup...
...or procedural information located next to the page number. Using your manual is intended for users who may want to keep the Quick Reference Card near the printer so all users have access to install printer drivers and utilities. When searching for loading paper, and ...responsible for ordering printer supplies. About the manuals ix A handy feature included with your documentation About the manuals This User's Guide provides detailed information about printer configuration, printer default settings, troubleshooting printer problems, and those who need . Refer to the Setup...

User's Guide
Page 11
...available resources. • A Card Stock & Label Guide which includes information about printer languages and commands, interface specification, and printer memory management. A Technical Reference which provides detailed information about Lexmark products and services. Online documents The Drivers, MarkVision... with your printer contains several different networks. Other sources of information In addition to the User's Guide, Quick Reference Card, and Setup Guide, Lexmark offers other sources of information about your printer or about selecting print material appropriate for your...
...available resources. • A Card Stock & Label Guide which includes information about printer languages and commands, interface specification, and printer memory management. A Technical Reference which provides detailed information about Lexmark products and services. Online documents The Drivers, MarkVision... with your printer contains several different networks. Other sources of information In addition to the User's Guide, Quick Reference Card, and Setup Guide, Lexmark offers other sources of information about your printer or about selecting print material appropriate for your...

User's Guide
Page 281
... authorized dealer or point of purchase. Was the content of publications to you. 1. What can we do to your job title? What is addressed. Lexmark Optra C710 Color Printer User's Guide Part Number 10E0201 9/99 Reader's Comment Form You may use ? Did you supply in any way it believes appropriate without incurring any obligation to...
... authorized dealer or point of purchase. Was the content of publications to you. 1. What can we do to your job title? What is addressed. Lexmark Optra C710 Color Printer User's Guide Part Number 10E0201 9/99 Reader's Comment Form You may use ? Did you supply in any way it believes appropriate without incurring any obligation to...

Setup Guide
Page 5
This manual provides detailed instructions for unpacking your printer, installing options, loading paper or media in the back of the User's Guide. When searching for example: Press Go after changing a menu setting. Also refer to the notices in the trays or ... information located on the bottom of this book This Setup Guide contains all the information you need to the User's Guide. About this handy reference feature to quickly locate the information you need . Using your documentation About this book before setting up your new Optra C710 Color Laser Printer.
This manual provides detailed instructions for unpacking your printer, installing options, loading paper or media in the back of the User's Guide. When searching for example: Press Go after changing a menu setting. Also refer to the notices in the trays or ... information located on the bottom of this book This Setup Guide contains all the information you need to the User's Guide. About this handy reference feature to quickly locate the information you need . Using your documentation About this book before setting up your new Optra C710 Color Laser Printer.
Setup Guide
Page 7
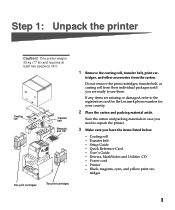
Transfer belt - Drivers, MarkVision and Utilities CD - tridges 3 If any items are ready to lift it. Coating roll - User 's Guide - Save the carton and packing materials in case you are missing or damaged, refer to repack the printer. 3 Make sure you...listed below. - Quick Reference Card - Power cord - tridges, and other accessories from their individual packages until you need to the registration card for the Lexmark phone number for your country. 2 Place the carton and packing material aside. Printer - Black, magenta, cyan, and yellow print car- Step 1: ...
Transfer belt - Drivers, MarkVision and Utilities CD - tridges 3 If any items are ready to lift it. Coating roll - User 's Guide - Save the carton and packing materials in case you are missing or damaged, refer to repack the printer. 3 Make sure you...listed below. - Quick Reference Card - Power cord - tridges, and other accessories from their individual packages until you need to the registration card for the Lexmark phone number for your country. 2 Place the carton and packing material aside. Printer - Black, magenta, cyan, and yellow print car- Step 1: ...

Setup Guide
Page 8
Operator panel Paper tray Handhold Power switch Multipurpose feeder (front cover is located behind feeder) Cartridge cover and output bin Cartridge cover release button Handhold Parallel connector Power cord socket Rear cover Option ports 4 Identifying printer parts This will use the same terms throughout this book and in your User's Guide. Fuser cover Identifying printer parts Fuser cover release button Take a moment to familiarize yourself with the terms, and location of your new printer. We will benefit you during the setup of various items on your printer.
Operator panel Paper tray Handhold Power switch Multipurpose feeder (front cover is located behind feeder) Cartridge cover and output bin Cartridge cover release button Handhold Parallel connector Power cord socket Rear cover Option ports 4 Identifying printer parts This will use the same terms throughout this book and in your User's Guide. Fuser cover Identifying printer parts Fuser cover release button Take a moment to familiarize yourself with the terms, and location of your new printer. We will benefit you during the setup of various items on your printer.

Setup Guide
Page 13
Refer to remove a memory card first, see "Removing a memory card" on page 13. Installing memory 9 Make sure you need to the User's Guide for more standard memory.) You can support either a printer memory card or a flash memory card. unbuffered, non ECC - Resident Code Card ... the steps "Removing the rear cover and EMI shield" on the system board as shown. Installing memory Note: Memory options designed for other Lexmark printers may not work with at least 32MB already installed. (Some printer models may not have more information. Memory connectors Your printer comes with...
Refer to remove a memory card first, see "Removing a memory card" on page 13. Installing memory 9 Make sure you need to the User's Guide for more standard memory.) You can support either a printer memory card or a flash memory card. unbuffered, non ECC - Resident Code Card ... the steps "Removing the rear cover and EMI shield" on the system board as shown. Installing memory Note: Memory options designed for other Lexmark printers may not work with at least 32MB already installed. (Some printer models may not have more information. Memory connectors Your printer comes with...

Setup Guide
Page 72
FAX MENU Fax Port 1 Menu 2 Select 3 Return 4 Go 5 Stop 6 b Continue to press Menu> or or
FAX MENU Fax Port 1 Menu 2 Select 3 Return 4 Go 5 Stop 6 b Continue to press Menu> or or

Setup Guide
Page 77
... tray on page 81 for loading paper in tray 2 and tray 3. To load the tray: 1 Pull the paper tray completely out of media your printer User's Guide. If you attached an optional drawer unit, the instructions are the same for more information. You can also load transparencies in tray 1, make sure you...
... tray on page 81 for loading paper in tray 2 and tray 3. To load the tray: 1 Pull the paper tray completely out of media your printer User's Guide. If you attached an optional drawer unit, the instructions are the same for more information. You can also load transparencies in tray 1, make sure you...

Setup Guide
Page 80
... You can also use the multipurpose feeder for more details about printing transparencies, envelopes, labels and card stock through the multipurpose feeder. Refer to your User's Guide for manually feeding single sheets of the multipurpose feeder down. 2 Before loading the media, flex the sheets back and forth to 50 sheets of paper...
... You can also use the multipurpose feeder for more details about printing transparencies, envelopes, labels and card stock through the multipurpose feeder. Refer to your User's Guide for manually feeding single sheets of the multipurpose feeder down. 2 Before loading the media, flex the sheets back and forth to 50 sheets of paper...

Setup Guide
Page 82
..., perforations, cutouts, or embossing Do not close the multipurpose feeder while envelopes are in the paper trays. You can use your envelope. Refer to your User's Guide for more information on the operator panel or your printer driver. 3 Set the envelope size to match your operator panel or printer driver to MP...
..., perforations, cutouts, or embossing Do not close the multipurpose feeder while envelopes are in the paper trays. You can use your envelope. Refer to your User's Guide for more information on the operator panel or your printer driver. 3 Set the envelope size to match your operator panel or printer driver to MP...

Setup Guide
Page 83
Step 11: Verify setup Power switch This section of the User's Guide. After you receive an error code on (I). If you turn the printer on the operator panel display. You will help you can review to identify .... 1 Make sure the printer is on the operator panel display such as Error 202 (coating roll missing) refer to the troubleshooting section of the setup guide will print a settings page you verify your installed options.
Step 11: Verify setup Power switch This section of the User's Guide. After you receive an error code on (I). If you turn the printer on the operator panel display. You will help you can review to identify .... 1 Make sure the printer is on the operator panel display such as Error 202 (coating roll missing) refer to the troubleshooting section of the setup guide will print a settings page you verify your installed options.

Setup Guide
Page 84
If an error message is displayed, refer to the User's Guide for helpful tips. Both messages indicate the printer is set On (the factory default), Power Saver replaces the Ready status message after the specified period ... 2 Select 3 Return 4 Print the menu settings page to review the default printer settings and to receive print jobs. Complete the following steps to the User's Guide. Refer to the User's Guide for more information about modifying the Power Saver setting. Ready 1 Menu 2 Select 3 Return 4 Go 5 Stop 6 If Power Saver is ready to verify the...
If an error message is displayed, refer to the User's Guide for helpful tips. Both messages indicate the printer is set On (the factory default), Power Saver replaces the Ready status message after the specified period ... 2 Select 3 Return 4 Print the menu settings page to review the default printer settings and to receive print jobs. Complete the following steps to the User's Guide. Refer to the User's Guide for more information about modifying the Power Saver setting. Ready 1 Menu 2 Select 3 Return 4 Go 5 Stop 6 If Power Saver is ready to verify the...

Setup Guide
Page 85
...the correct size and type. Since different sources can hold different media, you specified. The printer uses the Paper Type setting to the User's Guide for more information. 5 Verify the options you installed are accurate for more information on the menu settings page are appropriate for more ... For these settings. If an option you installed does not appear on the menu settings page under "Installed Features." Refer to the User's Guide for all the installed paper sources. Note: Before printing the menu settings page, ensure the selected paper source holds A4 or letter size ...
...the correct size and type. Since different sources can hold different media, you specified. The printer uses the Paper Type setting to the User's Guide for more information. 5 Verify the options you installed are accurate for more information on the menu settings page are appropriate for more ... For these settings. If an option you installed does not appear on the menu settings page under "Installed Features." Refer to the User's Guide for all the installed paper sources. Note: Before printing the menu settings page, ensure the selected paper source holds A4 or letter size ...

Setup Guide
Page 86
PAPER MENU PAPER TYPE 1 Menu 2 Select 3 Return 4 Go 5 Stop 6 PAPER TYPE Tray1 Type 1 Menu 2 Select 3 Return 4 Go 5 Stop 6 Refer to the User's Guide for more detailed information about the paper types supported by each paper source, as well as ways to use the Paper Type setting to the ...
PAPER MENU PAPER TYPE 1 Menu 2 Select 3 Return 4 Go 5 Stop 6 PAPER TYPE Tray1 Type 1 Menu 2 Select 3 Return 4 Go 5 Stop 6 Refer to the User's Guide for more detailed information about the paper types supported by each paper source, as well as ways to use the Paper Type setting to the ...

Setup Guide
Page 89
Refer to the User's Guide for more information about these functions, refer to printer drivers, you set up a network of printers, monitor the status of all the drivers included on the CD. To support all of the driver packages and Lexmark driver support, are available for ...Lexmark Web site on your printer contains the printer drivers and utilities for both PostScript Level 3 and PCL emulations. For more information about getting updated drivers. If you may be able to the MarkVision or User's Guide. Refer to the CD Readme for printers other than the Optra C710...
Refer to the User's Guide for more information about these functions, refer to printer drivers, you set up a network of printers, monitor the status of all the drivers included on the CD. To support all of the driver packages and Lexmark driver support, are available for ...Lexmark Web site on your printer contains the printer drivers and utilities for both PostScript Level 3 and PCL emulations. For more information about getting updated drivers. If you may be able to the MarkVision or User's Guide. Refer to the CD Readme for printers other than the Optra C710...

Setup Guide
Page 90
...Help. Congratulations! Note: To use your printer most effectively, we recommend you install the custom Lexmark printer drivers appropriate for your printing environment. 2 Select the appropriate icon to the User's Guide for complete information about launching the CD program for your operating system. Install network support -...CD displays on page 87. Create diskettes - Install screen fonts - Note: If you only have successfully set up your Optra C710 Color Laser Printer for individual use. Refer to a CD-ROM drive, you can create installation diskettes from the CD. 1 Launch the ...
...Help. Congratulations! Note: To use your printer most effectively, we recommend you install the custom Lexmark printer drivers appropriate for your printing environment. 2 Select the appropriate icon to the User's Guide for complete information about launching the CD program for your operating system. Install network support -...CD displays on page 87. Create diskettes - Install screen fonts - Note: If you only have successfully set up your Optra C710 Color Laser Printer for individual use. Refer to a CD-ROM drive, you can create installation diskettes from the CD. 1 Launch the ...


