
Print Defects Guide
Page 1
... indicates which particular part is a customer replaceable unit. Print Defects Guide Page 1 of 1 Print Defects Guide Identifying supplies or parts for replacement Match a set of the vertical lines. If the fuser needs replacement, then contact customer support at http://support.lexmark.com or your service representative. Note: The imaging unit is causing the defect.
... indicates which particular part is a customer replaceable unit. Print Defects Guide Page 1 of 1 Print Defects Guide Identifying supplies or parts for replacement Match a set of the vertical lines. If the fuser needs replacement, then contact customer support at http://support.lexmark.com or your service representative. Note: The imaging unit is causing the defect.
Quick Reference
Page 1
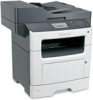
... screen When the printer is located at the top left corner of the home screen and appears as four sets of the following to as Imaging unit low or Cartridge Low. • Show intervention messages and the instructions on how to clear them. 1 Touch 7 Status/Supplies To • Show a printer warning or...
... screen When the printer is located at the top left corner of the home screen and appears as four sets of the following to as Imaging unit low or Cartridge Low. • Show intervention messages and the instructions on how to clear them. 1 Touch 7 Status/Supplies To • Show a printer warning or...

Quick Reference
Page 16
... panel message What to do 3 Front door [x]‑page jam, open front door. [20y.xx] Open the front door, then remove the toner cartridge and imaging unit, and then the jammed paper. 4 Multipurpose [x]‑page jam, clear Remove all paper from feeder manual the multipurpose feeder. [250.xx] feeder, and then remove...
... panel message What to do 3 Front door [x]‑page jam, open front door. [20y.xx] Open the front door, then remove the toner cartridge and imaging unit, and then the jammed paper. 4 Multipurpose [x]‑page jam, clear Remove all paper from feeder manual the multipurpose feeder. [250.xx] feeder, and then remove...

Quick Reference
Page 17
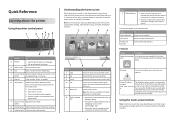
.... Warning-Potential Damage: Do not touch the shiny blue photoconductor drum under the imaging unit. Warning-Potential Damage: Do not expose the imaging unit to cool before touching it out. Note: Make sure all paper fragments are removed. 4 Place the imaging unit aside on the right side of the printer, and then open front door. [20y...
.... Warning-Potential Damage: Do not touch the shiny blue photoconductor drum under the imaging unit. Warning-Potential Damage: Do not expose the imaging unit to cool before touching it out. Note: Make sure all paper fragments are removed. 4 Place the imaging unit aside on the right side of the printer, and then open front door. [20y...
Quick Reference
Page 18
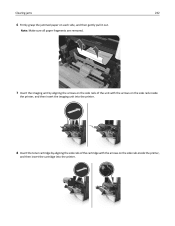
... all paper fragments are removed. 9 Close the front door. 10 From the printer control panel, touch to clear the message and continue printing. 7 Insert the imaging unit by aligning the arrows on the side rails of the unit with the arrows on the side rails inside the printer, and then insert the...
... all paper fragments are removed. 9 Close the front door. 10 From the printer control panel, touch to clear the message and continue printing. 7 Insert the imaging unit by aligning the arrows on the side rails of the unit with the arrows on the side rails inside the printer, and then insert the...
Supplies Guide
Page 2
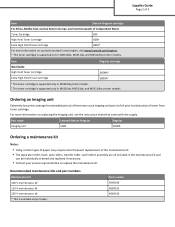
Part name Lexmark Return Program Regular Imaging unit 500Z 500ZA Ordering a maintenance kit Notes: • Using certain types of paper may cause imaging unit parts to fail prior to replace the maintenance kit. Recommended maintenance kits and part numbers Maintenance kit 100... States Toner Cartridge 605 High Yield Toner Cartridge 605H Extra High Yield Toner Cartridge 605X* For more information on replacing the imaging unit, see the instruction sheet that came with the supply. Item Regular cartridge Worldwide High Yield Toner Cartridge 600HA1 Extra High Yield...
Part name Lexmark Return Program Regular Imaging unit 500Z 500ZA Ordering a maintenance kit Notes: • Using certain types of paper may cause imaging unit parts to fail prior to replace the maintenance kit. Recommended maintenance kits and part numbers Maintenance kit 100... States Toner Cartridge 605 High Yield Toner Cartridge 605H Extra High Yield Toner Cartridge 605X* For more information on replacing the imaging unit, see the instruction sheet that came with the supply. Item Regular cartridge Worldwide High Yield Toner Cartridge 600HA1 Extra High Yield...
User's Guide
Page 16
... on your printer is in ready state. • Show the current printer status such as Ready or Busy. • Show printer supply conditions such as Imaging unit low or Cartridge Low. • Show intervention messages and the instructions on how to clear them. • Show a printer warning or error message whenever the...
... on your printer is in ready state. • Show the current printer status such as Ready or Busy. • Show printer supply conditions such as Imaging unit low or Cartridge Low. • Show intervention messages and the instructions on how to clear them. • Show a printer warning or error message whenever the...
User's Guide
Page 217
..., see the instruction sheet that came with the part. Part name Imaging unit Lexmark Return Program 500Z Regular 500ZA Ordering a maintenance kit Notes: • Using certain types of paper may cause imaging unit parts to fail prior to exhaustion of toner from toner cartridge. Recommended...time. Do not expose supplies to use them. Maintaining the printer 217 Ordering an imaging unit Extremely low print coverage for the printer supplies. For information on replacing the imaging unit, see the instruction sheet that came with the supply. Part number 40X9146 40X9135 40X9136...
..., see the instruction sheet that came with the part. Part name Imaging unit Lexmark Return Program 500Z Regular 500ZA Ordering a maintenance kit Notes: • Using certain types of paper may cause imaging unit parts to fail prior to exhaustion of toner from toner cartridge. Recommended...time. Do not expose supplies to use them. Maintaining the printer 217 Ordering an imaging unit Extremely low print coverage for the printer supplies. For information on replacing the imaging unit, see the instruction sheet that came with the supply. Part number 40X9146 40X9135 40X9136...
User's Guide
Page 219
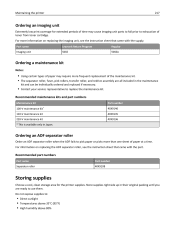
Warning-Potential Damage: Do not expose the imaging unit to light may cause print quality problems. 6 Close the front door. Extended exposure to direct light for more than 10 minutes. Maintaining the printer 219 4 Shake the new cartridge to redistribute the toner. 5 Insert the toner cartridge into the printer by aligning the side rails of the cartridge with the arrows on the side rails inside the printer.
Warning-Potential Damage: Do not expose the imaging unit to light may cause print quality problems. 6 Close the front door. Extended exposure to direct light for more than 10 minutes. Maintaining the printer 219 4 Shake the new cartridge to redistribute the toner. 5 Insert the toner cartridge into the printer by aligning the side rails of the cartridge with the arrows on the side rails inside the printer.
User's Guide
Page 220
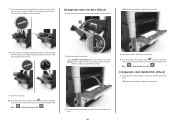
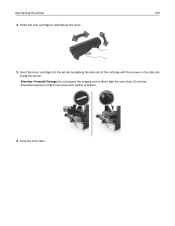
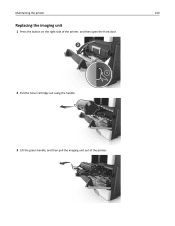
Maintaining the printer 220 Replacing the imaging unit 1 Press the button on the right side of the printer, and then open the front door. 2 1 2 Pull the toner cartridge out using the handle. 3 Lift the green handle, and then pull the imaging unit out of the printer.
Maintaining the printer 220 Replacing the imaging unit 1 Press the button on the right side of the printer, and then open the front door. 2 1 2 Pull the toner cartridge out using the handle. 3 Lift the green handle, and then pull the imaging unit out of the printer.

User's Guide
Page 221
Warning-Potential Damage: Do not expose the imaging unit to light may affect the print quality of future print jobs. 6 Insert the imaging unit into the printer by aligning the arrows on the side rails of the imaging unit with the arrows on the side rails inside the printer. Extended exposure to direct light for more than 10 minutes. Maintaining the printer 221 4 Unpack the new imaging unit, and then shake it. 5 Remove all packing materials from the imaging unit. Doing so may cause print quality problems. Warning-Potential Damage: Do not touch the photoconductor drum.
Warning-Potential Damage: Do not expose the imaging unit to light may affect the print quality of future print jobs. 6 Insert the imaging unit into the printer by aligning the arrows on the side rails of the imaging unit with the arrows on the side rails inside the printer. Extended exposure to direct light for more than 10 minutes. Maintaining the printer 221 4 Unpack the new imaging unit, and then shake it. 5 Remove all packing materials from the imaging unit. Doing so may cause print quality problems. Warning-Potential Damage: Do not touch the photoconductor drum.

User's Guide
Page 225
... end‑of‑life by setting the selectable alerts. Managing the printer 225 Notes: • View the printer IP address on the toner cartridge, imaging unit, and maintenance kit. • All selectable alerts can be set for nearly low, low, and very low supply conditions. supply conditions. • The percentage of...
... end‑of‑life by setting the selectable alerts. Managing the printer 225 Notes: • View the printer IP address on the toner cartridge, imaging unit, and maintenance kit. • All selectable alerts can be set for nearly low, low, and very low supply conditions. supply conditions. • The percentage of...

User's Guide
Page 229
... rear door. [20y.xx] Pull out the indicated tray, and then remove the jammed paper. Open the front door, then remove the toner cartridge and imaging unit, and then the jammed paper. Open the rear door, and then remove the jammed paper. However, the Auto setting does not guarantee that the page...
... rear door. [20y.xx] Pull out the indicated tray, and then remove the jammed paper. Open the front door, then remove the toner cartridge and imaging unit, and then the jammed paper. Open the rear door, and then remove the jammed paper. However, the Auto setting does not guarantee that the page...

User's Guide
Page 231
Extended exposure to direct light for more than 10 minutes. Warning-Potential Damage: Do not expose the imaging unit to light may affect the quality of future print jobs. 4 Place the imaging unit aside on a flat, smooth surface. Clearing jams 231 3 Lift the green handle, and then pull the imaging unit out of the printer. Doing so may cause print quality problems. 5 Lift the green flap in front of the printer. Warning-Potential Damage: Do not touch the shiny blue photoconductor drum under the imaging unit.
Extended exposure to direct light for more than 10 minutes. Warning-Potential Damage: Do not expose the imaging unit to light may affect the quality of future print jobs. 4 Place the imaging unit aside on a flat, smooth surface. Clearing jams 231 3 Lift the green handle, and then pull the imaging unit out of the printer. Doing so may cause print quality problems. 5 Lift the green flap in front of the printer. Warning-Potential Damage: Do not touch the shiny blue photoconductor drum under the imaging unit.
User's Guide
Page 232
Note: Make sure all paper fragments are removed. 7 Insert the imaging unit by aligning the arrows on the side rails of the cartridge with the arrows on each side, and then gently pull it out. Clearing jams 232 6 Firmly grasp the jammed paper on the side rails inside the printer, and then insert the cartridge into the printer. 8 Insert the toner cartridge by aligning the side rails of the unit with the arrows on the side rails inside the printer, and then insert the imaging unit into the printer.
Note: Make sure all paper fragments are removed. 7 Insert the imaging unit by aligning the arrows on the side rails of the cartridge with the arrows on each side, and then gently pull it out. Clearing jams 232 6 Firmly grasp the jammed paper on the side rails inside the printer, and then insert the cartridge into the printer. 8 Insert the toner cartridge by aligning the side rails of the unit with the arrows on the side rails inside the printer, and then insert the imaging unit into the printer.

User's Guide
Page 243
... your system support person. For non‑touch‑screen printer models, press to confirm. • Complete the Analog Fax Setup. Imaging unit nearly low [84.xy] If necessary, select Continue on the printer control panel to clear the message. Contact system administrator. For non...If necessary, select Continue on the printer control panel to confirm. For non‑touch‑screen printer models, press to replace the imaging unit very soon. Troubleshooting 243 Fax server 'To Format' not set up. Try either of the following : • From the printer control...
... your system support person. For non‑touch‑screen printer models, press to confirm. • Complete the Analog Fax Setup. Imaging unit nearly low [84.xy] If necessary, select Continue on the printer control panel to clear the message. Contact system administrator. For non...If necessary, select Continue on the printer control panel to confirm. For non‑touch‑screen printer models, press to replace the imaging unit very soon. Troubleshooting 243 Fax server 'To Format' not set up. Try either of the following : • From the printer control...
User's Guide
Page 248
... clear the message and cancel the fax job. Use of third-party supplies or parts may damage your printer, and then install a genuine Lexmark supply or part. Imaging component usage beyond the intended life may affect the performance, reliability, or life of third-party supplies or parts can be covered by the...;touch‑screen printer models, press to confirm. 2 Do either of the following : • From the printer control panel, select Continue to function best with Lexmark supplies and parts and may not be toner cartridge or imaging unit.
... clear the message and cancel the fax job. Use of third-party supplies or parts may damage your printer, and then install a genuine Lexmark supply or part. Imaging component usage beyond the intended life may affect the performance, reliability, or life of third-party supplies or parts can be covered by the...;touch‑screen printer models, press to confirm. 2 Do either of the following : • From the printer control panel, select Continue to function best with Lexmark supplies and parts and may not be toner cartridge or imaging unit.

User's Guide
Page 250
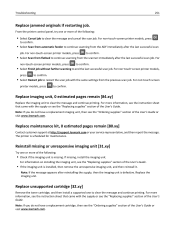
y indicates the value of the printer. Replace defective imaging unit [31.xy] Replace the defective imaging unit to clear the message and continue printing. Troubleshooting 250 • Select Finish job without further scanning to end the last successful scan job. &#... of the User's Guide or visit www.lexmark.com. For more information, see the instruction sheet that came with the supply or see the instruction sheet that matches the region number of the cartridge region. Note: If you do not have a replacement imaging unit, then see the "Ordering supplies" section of...
y indicates the value of the printer. Replace defective imaging unit [31.xy] Replace the defective imaging unit to clear the message and continue printing. Troubleshooting 250 • Select Finish job without further scanning to end the last successful scan job. &#... of the User's Guide or visit www.lexmark.com. For more information, see the instruction sheet that came with the supply or see the instruction sheet that matches the region number of the cartridge region. Note: If you do not have a replacement imaging unit, then see the "Ordering supplies" section of...
User's Guide
Page 251
... Guide. For more information, see the "Ordering supplies" section of the User's Guide or visit www.lexmark.com. Note: If you do not have a replacement imaging unit, then see the instruction sheet that came with the same settings from the scanner immediately after the last ...to confirm. Troubleshooting 251 Replace jammed originals if restarting job. For information on installing the imaging unit, see the "Replacing supplies" section of the User's Guide or visit www.lexmark.com. From the printer control panel, try one to continue scanning from the ADF immediately...
... Guide. For more information, see the "Ordering supplies" section of the User's Guide or visit www.lexmark.com. Note: If you do not have a replacement imaging unit, then see the instruction sheet that came with the same settings from the scanner immediately after the last ...to confirm. Troubleshooting 251 Replace jammed originals if restarting job. For information on installing the imaging unit, see the "Replacing supplies" section of the User's Guide or visit www.lexmark.com. From the printer control panel, try one to continue scanning from the ADF immediately...

User's Guide
Page 252
...Scanner jam, remove jammed originals from the scanner [2yy.xx] Remove the jammed paper from the scanner. Troubleshooting 252 Replace unsupported imaging unit [32.xy] Remove the imaging unit, and then install a supported one or more of the following : • Select Continue with the supply or see the ...press to confirm. Scanner automatic feeder cover open Close the ADF cover. Scanner disabled. For more of the User's Guide or visit www.lexmark.com. Contact system administrator if problem persists. [840.02] From the printer control panel, try one or more information, see the ...
...Scanner jam, remove jammed originals from the scanner [2yy.xx] Remove the jammed paper from the scanner. Troubleshooting 252 Replace unsupported imaging unit [32.xy] Remove the imaging unit, and then install a supported one or more of the following : • Select Continue with the supply or see the ...press to confirm. Scanner automatic feeder cover open Close the ADF cover. Scanner disabled. For more of the User's Guide or visit www.lexmark.com. Contact system administrator if problem persists. [840.02] From the printer control panel, try one or more information, see the ...

