Quick Reference
Page 21
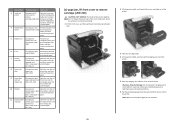
...area [x]‑page jam, open upper and lower rear door. [231-234] Open the rear door of rear door remove paper, open the staple finisher, and finisher rear then remove the door. Extended exposure to light may cause print quality problems. 6 Pull the jammed paper gently to direct...the printer [x]‑page jam, lift front cover to remove cartridge. [200-201] Open the front cover and the multipurpose feeder, then remove the toner cartridge and the imaging unit, and then remove the jammed paper. 4 Multipurpose [x]‑page jam, clear Remove all paper fragments are removed. 21 ...
...area [x]‑page jam, open upper and lower rear door. [231-234] Open the rear door of rear door remove paper, open the staple finisher, and finisher rear then remove the door. Extended exposure to light may cause print quality problems. 6 Pull the jammed paper gently to direct...the printer [x]‑page jam, lift front cover to remove cartridge. [200-201] Open the front cover and the multipurpose feeder, then remove the toner cartridge and the imaging unit, and then remove the jammed paper. 4 Multipurpose [x]‑page jam, clear Remove all paper fragments are removed. 21 ...
Quick Reference
Page 30
...page jam, remove standard bin jam. [203] 23 [x]‑page jam, remove tray 1 to clear duplex. [235- 239] 24 A accessing the Embedded Web Server 9 adjusting toner darkness 1, 4, 8 avoiding paper jams 19 B Background and Idle Screen using 10 buttons, printer control panel 1, 3 buttons, touch screen using 4, 7 C canceling print job,... 24 in finisher rear door 27 in mailbox rear door 28 in multipurpose feeder 25 in rear expander door 29 in standard bin 23 in staple finisher 25 in the tray 24 inside the printer 21 paper size setting 4, 7 paper type setting 4, 7 print job canceling from the printer ...
...page jam, remove standard bin jam. [203] 23 [x]‑page jam, remove tray 1 to clear duplex. [235- 239] 24 A accessing the Embedded Web Server 9 adjusting toner darkness 1, 4, 8 avoiding paper jams 19 B Background and Idle Screen using 10 buttons, printer control panel 1, 3 buttons, touch screen using 4, 7 C canceling print job,... 24 in finisher rear door 27 in mailbox rear door 28 in multipurpose feeder 25 in rear expander door 29 in standard bin 23 in staple finisher 25 in the tray 24 inside the printer 21 paper size setting 4, 7 paper type setting 4, 7 print job canceling from the printer ...

User's Guide
Page 235
... setting. Note: Off is installed. "4 holes" is the international factory default setting. • This menu appears only when a supported staple, hole punch finisher is the factory default setting. To Specify the printed output resolution in order to enhance images horizontally or vertically, or...the number of copies printed. • This menu appears only when a supported staple finisher is installed. Notes: • "3 holes" is the factory default setting. • Selecting a smaller number can help conserve toner. Enable more pixels to print in clusters for clarity, in dots per inch....
... setting. Note: Off is installed. "4 holes" is the international factory default setting. • This menu appears only when a supported staple, hole punch finisher is the factory default setting. To Specify the printed output resolution in order to enhance images horizontally or vertically, or...the number of copies printed. • This menu appears only when a supported staple finisher is installed. Notes: • "3 holes" is the factory default setting. • Selecting a smaller number can help conserve toner. Enable more pixels to print in clusters for clarity, in dots per inch....
User's Guide
Page 250
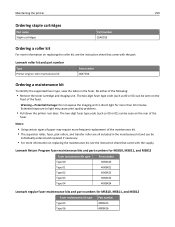
...fuser type code (such as 00 or 01) can be seen on the rear of the following: • Remove the toner cartridge and imaging unit. Lexmark roller kit and part number Type Printer engine roller maintenance kit Part number 40X7706 Ordering a maintenance kit To identify the supported...the label on the fuser. Extended exposure to direct light for MS810, MS811, and MS812 Fuser maintenance kit type Type 05 Type 06 Part number 40X8425 40X8426 Maintaining the printer 250 Ordering staple cartridges Part name Staple cartridges Part number 25A0013 Ordering a roller kit For more information on...
...fuser type code (such as 00 or 01) can be seen on the rear of the following: • Remove the toner cartridge and imaging unit. Lexmark roller kit and part number Type Printer engine roller maintenance kit Part number 40X7706 Ordering a maintenance kit To identify the supported...the label on the fuser. Extended exposure to direct light for MS810, MS811, and MS812 Fuser maintenance kit type Type 05 Type 06 Part number 40X8425 40X8426 Maintaining the printer 250 Ordering staple cartridges Part name Staple cartridges Part number 25A0013 Ordering a roller kit For more information on...
User's Guide
Page 264
...pages if adequate printer memory is set to remove Open the front cover and the multipurpose feeder, cartridge. [200-201] then remove the toner cartridge and the imaging unit, and then remove the jammed paper. 4 Multipurpose feeder [x]‑page jam, clear manual feeder. [250] .... Clearing jams 264 • When Jam Recovery is available. 1 2 3 4 5 6 11 7 10 9 8 Jam location Printer message What to do 1 Staple finisher [x]‑page jam, remove paper, open Remove paper from the multipurpose feeder, and then remove the jammed paper. 5 Duplex area [x]‑page jam, remove...
...pages if adequate printer memory is set to remove Open the front cover and the multipurpose feeder, cartridge. [200-201] then remove the toner cartridge and the imaging unit, and then remove the jammed paper. 4 Multipurpose feeder [x]‑page jam, clear manual feeder. [250] .... Clearing jams 264 • When Jam Recovery is available. 1 2 3 4 5 6 11 7 10 9 8 Jam location Printer message What to do 1 Staple finisher [x]‑page jam, remove paper, open Remove paper from the multipurpose feeder, and then remove the jammed paper. 5 Duplex area [x]‑page jam, remove...

User's Guide
Page 359
...24 printer hard disk, removing 29 updating in printer driver 36 ordering imaging unit 249 maintenance kit 250 roller kit 250 staple cartridges 250 ordering supplies toner cartridges 248 P paper characteristics 180 letterhead 182 preprinted forms 182 recycled 182 selecting 181 setting size 48 setting type 48 ... printer control panel 123 checking, on the printer control panel 170 checking, using the Embedded Web Server 77, 123, 171 using genuine Lexmark 248 parts and supplies, status of checking, on printer control panel 77 PCL Emul menu 239 PDF menu 238 Personal Identification Number method...
...24 printer hard disk, removing 29 updating in printer driver 36 ordering imaging unit 249 maintenance kit 250 roller kit 250 staple cartridges 250 ordering supplies toner cartridges 248 P paper characteristics 180 letterhead 182 preprinted forms 182 recycled 182 selecting 181 setting size 48 setting type 48 ... printer control panel 123 checking, on the printer control panel 170 checking, using the Embedded Web Server 77, 123, 171 using genuine Lexmark 248 parts and supplies, status of checking, on printer control panel 77 PCL Emul menu 239 PDF menu 238 Personal Identification Number method...

User's Guide
Page 362
... 170 checking, using the Embedded Web Server 77, 123, 171 conserving 245 storing 251 using genuine Lexmark 248 using recycled paper 245 supplies, ordering imaging unit 249 maintenance kit 250 roller kit 250 staple cartridges 250 toner cartridges 248 Supply needed to find 85, 131, 178 selecting a location for the printer 11, 12...
... 170 checking, using the Embedded Web Server 77, 123, 171 conserving 245 storing 251 using genuine Lexmark 248 using recycled paper 245 supplies, ordering imaging unit 249 maintenance kit 250 roller kit 250 staple cartridges 250 toner cartridges 248 Supply needed to find 85, 131, 178 selecting a location for the printer 11, 12...


