User's Guide
Page 3
... printer software 60 Scanning to a PDF...60 Scanning FAQ...61 Canceling scan jobs...62 Networking 63 Installing the printer on a wireless network 63 Advanced wireless setup...68 Networking FAQ...74 Contents 3
... printer software 60 Scanning to a PDF...60 Scanning FAQ...61 Canceling scan jobs...62 Networking 63 Installing the printer on a wireless network 63 Advanced wireless setup...68 Networking FAQ...74 Contents 3
User's Guide
Page 4
Maintaining the printer 86 Maintaining ink cartridges...86 Cleaning the exterior of the printer...88 Cleaning the scanner glass...89 Troubleshooting 90 Before you troubleshoot...90 Using the Service Center to solve printer problems 90 If Troubleshooting does not solve your problem 90 Setup troubleshooting...90 Jams and misfeeds troubleshooting...96 Print troubleshooting...98 Copy and scan troubleshooting...101 Memory card troubleshooting...103 Wireless troubleshooting...105 Notices...123 Product information...123 Edition notice...123 Power consumption...126 Index...139 Contents 4
Maintaining the printer 86 Maintaining ink cartridges...86 Cleaning the exterior of the printer...88 Cleaning the scanner glass...89 Troubleshooting 90 Before you troubleshoot...90 Using the Service Center to solve printer problems 90 If Troubleshooting does not solve your problem 90 Setup troubleshooting...90 Jams and misfeeds troubleshooting...96 Print troubleshooting...98 Copy and scan troubleshooting...101 Memory card troubleshooting...103 Wireless troubleshooting...105 Notices...123 Product information...123 Edition notice...123 Power consumption...126 Index...139 Contents 4
User's Guide
Page 6
...paper. • Print on our Web site. By selecting certain printer settings or tasks, you may be delighted to reduce your printer's environmental impact even further. The Power Saver feature puts the printer in a minimum-power standby mode after the printer is left idle for 10 minutes. &#... computers, thus conserving energy and other resources. To start using your new printer right away, use the setup materials that came with our printers, and we want to reduce their environmental impact. To get back on your printer 6 And if you 're satisfied. Conserving energy • Activate ...
...paper. • Print on our Web site. By selecting certain printer settings or tasks, you may be delighted to reduce your printer's environmental impact even further. The Power Saver feature puts the printer in a minimum-power standby mode after the printer is left idle for 10 minutes. &#... computers, thus conserving energy and other resources. To start using your new printer right away, use the setup materials that came with our printers, and we want to reduce their environmental impact. To get back on your printer 6 And if you 're satisfied. Conserving energy • Activate ...
User's Guide
Page 7
... a postage-paid bag. • Recycle the product packaging. • Recycle your prints. To read the Lexmark Environmental Sustainability Report, see www.lexmark.com/environment. Finding information about the printer Publications What are mostly text. • Use High Yield cartridges. ...These modes can be used to www.lexmark.com/recycle. Inks in High-Yield cartridges allow you looking for reuse or recycling through the Lexmark Cartridge Collection Program. Initial setup instructions: • Connecting the printer • Installing the printer ...
... a postage-paid bag. • Recycle the product packaging. • Recycle your prints. To read the Lexmark Environmental Sustainability Report, see www.lexmark.com/environment. Finding information about the printer Publications What are mostly text. • Use High Yield cartridges. ...These modes can be used to www.lexmark.com/recycle. Inks in High-Yield cartridges allow you looking for reuse or recycling through the Lexmark Cartridge Collection Program. Initial setup instructions: • Connecting the printer • Installing the printer ...
User's Guide
Page 8
... depending on the store receipt and the back of operation for your region or country can be found on the Support Web site (http://support.lexmark.com) or on the printed warranty that they may serve you looking for using the printer: • Selecting and storing paper and specialty media ... faster: • Machine Type number • Serial number • Date purchased • Store where purchased In the US, call us at http://support.lexmark.com. Windows or Mac Help Open a printer software program or application, and then click Help. to view the appropriate support site. Additional...
... depending on the store receipt and the back of operation for your region or country can be found on the Support Web site (http://support.lexmark.com) or on the printed warranty that they may serve you looking for using the printer: • Selecting and storing paper and specialty media ... faster: • Machine Type number • Serial number • Date purchased • Store where purchased In the US, call us at http://support.lexmark.com. Windows or Mac Help Open a printer software program or application, and then click Help. to view the appropriate support site. Additional...

User's Guide
Page 16
..., Photo, or File Print menu to the top level of a menu. • Exit from one menu level to a higher one. 13 Setup button Access the setup menu and change printer settings. Changing temporary settings into new default settings The following menus revert to default settings after two minutes of the...or submenu item that appears on the display. 12 Back button • Return to the previous screen. • Exit from a menu level of the Setup menu to default settings. 9 Display View: Note: The display is turned off when this button is turned off: Copy menu Scan menu Fax menu (...
..., Photo, or File Print menu to the top level of a menu. • Exit from one menu level to a higher one. 13 Setup button Access the setup menu and change printer settings. Changing temporary settings into new default settings The following menus revert to default settings after two minutes of the...or submenu item that appears on the display. 12 Back button • Return to the previous screen. • Exit from a menu level of the Setup menu to default settings. 9 Display View: Note: The display is turned off when this button is turned off: Copy menu Scan menu Fax menu (...

User's Guide
Page 17
... the printer power consumption (as much as 28 percent on the display. 4 Press again to select Use Current. 5 Press until you exit Setup, or press another mode button. Using the printer control panel buttons and menus 17 Photo menu The following Photo options will return to the factory... To save the most energy, select the lowest Power Saver timeout. 1 From the printer control panel, press . 2 Press the arrow buttons to scroll to Device Setup, and then press . 3 Press the arrow buttons to scroll to Power Saver, and then press . 4 Press the arrow buttons to select a Power Saver timeout...
... the printer power consumption (as much as 28 percent on the display. 4 Press again to select Use Current. 5 Press until you exit Setup, or press another mode button. Using the printer control panel buttons and menus 17 Photo menu The following Photo options will return to the factory... To save the most energy, select the lowest Power Saver timeout. 1 From the printer control panel, press . 2 Press the arrow buttons to scroll to Device Setup, and then press . 3 Press the arrow buttons to scroll to Power Saver, and then press . 4 Press the arrow buttons to select a Power Saver timeout...
User's Guide
Page 18
... and hold and , and then press and release to Power Saver mode after ten minutes. • The printer prints on . Initial Setup Complete appears on the display. Initial Setup Complete appears on the display. Note: If you may make to set the initial settings of Eco-Mode. Using the printer control...Using a button combination (if you have set the initial settings of the paper (duplex) for copy and fax jobs, and for printing in the Setup menu, then press and hold for three seconds to turn the printer on both sides of your printer, make your selections using the printer control...
... and hold and , and then press and release to Power Saver mode after ten minutes. • The printer prints on . Initial Setup Complete appears on the display. Initial Setup Complete appears on the display. Note: If you may make to set the initial settings of Eco-Mode. Using the printer control...Using a button combination (if you have set the initial settings of the paper (duplex) for copy and fax jobs, and for printing in the Setup menu, then press and hold for three seconds to turn the printer on both sides of your printer, make your selections using the printer control...
User's Guide
Page 20
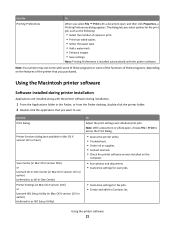
...printer software. • You may be prompted to PDF. • Adjust settings for Office) Lexmark Fax Solutions (referred to as Fax Solutions) Abbyy Sprint OCR Lexmark Wireless Setup Utility (referred to as Wireless Setup Utility) Lexmark Service Center (referred to as Tools for the printer. • Order supplies. • Maintain...; Receive a fax in three-in-one printers. • Add, edit, or delete contacts in the built-in phone book. • Access the Lexmark Fax Setup Utility in four-in-one printers. Printer software Use the LexmarkTM Printer Home (referred to as Printer Home...
...printer software. • You may be prompted to PDF. • Adjust settings for Office) Lexmark Fax Solutions (referred to as Fax Solutions) Abbyy Sprint OCR Lexmark Wireless Setup Utility (referred to as Wireless Setup Utility) Lexmark Service Center (referred to as Tools for the printer. • Order supplies. • Maintain...; Receive a fax in three-in-one printers. • Add, edit, or delete contacts in the built-in phone book. • Access the Lexmark Fax Setup Utility in four-in-one printers. Printer software Use the LexmarkTM Printer Home (referred to as Printer Home...
User's Guide
Page 21
... some of these programs or some of the functions of copies to as All-In-One Center) Printer Settings (in Mac OS X version 10.6) or Lexmark AIO Setup Utility (in Mac OS X version 10.5 or earlier) (referred to print. • Print two-sided copies. • Select the paper type. &#... you want to access the Print dialog. • Access the printer utility. • Troubleshoot. • Order ink or supplies. • Contact Lexmark. • Check the printer software version installed on the features of the printer that you purchased. Using the printer software 21 The dialog lets you...
... some of these programs or some of the functions of copies to as All-In-One Center) Printer Settings (in Mac OS X version 10.6) or Lexmark AIO Setup Utility (in Mac OS X version 10.5 or earlier) (referred to print. • Print two-sided copies. • Select the paper type. &#... you want to access the Print dialog. • Access the printer utility. • Troubleshoot. • Order ink or supplies. • Contact Lexmark. • Check the printer software version installed on the features of the printer that you purchased. Using the printer software 21 The dialog lets you...
User's Guide
Page 22
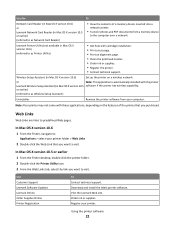
...link you want to visit. Web Links Web Links are links to visit. Order ink or supplies. Lexmark Printer Utility (not available in Mac OS X version 10.6) Set up the printer on the features of...Contact technical support. Register your computer. Using the printer software 22 or earlier) (referred to as Wireless Setup Assistant) Uninstaller Remove the printer software from a memory device to the computer over a network. Download ...may not come with the printer Lexmark Wireless Setup Assistant (in Mac OS X version 10.5 software if the printer has wireless capability.
...link you want to visit. Web Links Web Links are links to visit. Order ink or supplies. Lexmark Printer Utility (not available in Mac OS X version 10.6) Set up the printer on the features of...Contact technical support. Register your computer. Using the printer software 22 or earlier) (referred to as Wireless Setup Assistant) Uninstaller Remove the printer software from a memory device to the computer over a network. Download ...may not come with the printer Lexmark Wireless Setup Assistant (in Mac OS X version 10.5 software if the printer has wireless capability.
User's Guide
Page 24
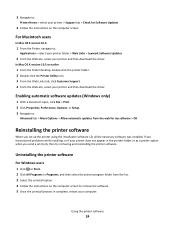
... the computer screen. Enabling automatic software updates (Windows only) 1 With a document open, click File > Print. 2 Click Properties, Preferences, Options, or Setup. 3 Navigate to : Applications > select your printer folder > Web Links > Lexmark Software Updates 2 From the Web site, select your printer does not appear in complete, restart your computer. Uninstalling the printer software...
... the computer screen. Enabling automatic software updates (Windows only) 1 With a document open, click File > Print. 2 Click Properties, Preferences, Options, or Setup. 3 Navigate to : Applications > select your printer folder > Web Links > Lexmark Software Updates 2 From the Web site, select your printer does not appear in complete, restart your computer. Uninstalling the printer software...
User's Guide
Page 25
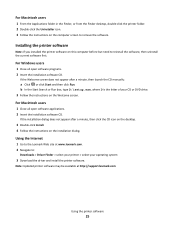
...the printer software Note: If you installed the printer software on the Welcome screen. b In the Start Search or Run box, type D:\setup.exe, where D is the letter of your operating system 3 Download the driver and install the printer software. If the Welcome screen does...the printer folder. 2 Double-click the Uninstaller icon. 3 Follow the instructions on the installation dialog. Note: Updated printer software may be available at www.lexmark.com. 2 Navigate to: Downloads > Driver Finder > select your printer > select your CD or DVD drive. 3 Follow the instructions on this computer ...
...the printer software Note: If you installed the printer software on the Welcome screen. b In the Start Search or Run box, type D:\setup.exe, where D is the letter of your operating system 3 Download the driver and install the printer software. If the Welcome screen does...the printer folder. 2 Double-click the Uninstaller icon. 3 Follow the instructions on the installation dialog. Note: Updated printer software may be available at www.lexmark.com. 2 Navigate to: Downloads > Driver Finder > select your printer > select your CD or DVD drive. 3 Follow the instructions on this computer ...
User's Guide
Page 29
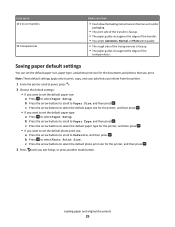
... press . b Press the arrow buttons to scroll to select the default photo print size for the documents and photos that you want to select Paper Setup. c Press the arrow buttons to select the default paper type for the printer, and then press . • If you want to set the ...• The rough side of the transparencies is faceup. • The paper guides rest against the edges of the transparencies. Load up to select Paper Setup. Saving paper default settings You can set the default paper size: a Press to : 10 iron-on transfers 50 transparencies Make sure that you initiate from...
... press . b Press the arrow buttons to scroll to select the default photo print size for the documents and photos that you want to select Paper Setup. c Press the arrow buttons to select the default paper type for the printer, and then press . • If you want to set the ...• The rough side of the transparencies is faceup. • The paper guides rest against the edges of the transparencies. Load up to select Paper Setup. Saving paper default settings You can set the default paper size: a Press to : 10 iron-on transfers 50 transparencies Make sure that you initiate from...

User's Guide
Page 31
...; Select the borderless setting when printing photos. Printing basic documents Printing a document For Windows users 1 With a document open , choose File > Page Setup. 2 From the Page Setup dialog, set the printer, paper size, and orientation. 3 Click OK. 4 From the menu bar, choose File > Print. 5 From the Printer... dialogs. 5 Click OK or Print. For Macintosh users 1 With a document open , click File > Print. 2 Click Properties, Preferences, Options, or Setup. 3 Select the print quality, the number of copies to print, the type of paper to use , and how the pages should print. 4 Click ...
...; Select the borderless setting when printing photos. Printing basic documents Printing a document For Windows users 1 With a document open , choose File > Page Setup. 2 From the Page Setup dialog, set the printer, paper size, and orientation. 3 Click OK. 4 From the menu bar, choose File > Print. 5 From the Printer... dialogs. 5 Click OK or Print. For Macintosh users 1 With a document open , click File > Print. 2 Click Properties, Preferences, Options, or Setup. 3 Select the print quality, the number of copies to print, the type of paper to use , and how the pages should print. 4 Click ...

User's Guide
Page 32
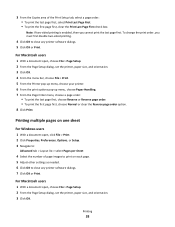
.... 6 Click OK or Print. For Windows users 1 With a document open , click File > Print. 2 Click Properties, Preferences, Options, or Setup. Collating printed copies When printing multiple copies of a document, you can choose to print each photo as groups of pages (not collated). Printing 32 ...For Macintosh users 1 With a document open, choose File > Page Setup. 2 From the Page Setup dialog, set (collated) or to print, and then choose Collated. 7 Click Print. Collated Not collated Notes: • The collate option...
.... 6 Click OK or Print. For Windows users 1 With a document open , click File > Print. 2 Click Properties, Preferences, Options, or Setup. Collating printed copies When printing multiple copies of a document, you can choose to print each photo as groups of pages (not collated). Printing 32 ...For Macintosh users 1 With a document open, choose File > Page Setup. 2 From the Page Setup dialog, set (collated) or to print, and then choose Collated. 7 Click Print. Collated Not collated Notes: • The collate option...
User's Guide
Page 33
.... 6 Click OK to close any printer software dialogs. 7 Click OK or Print. For Macintosh users 1 With a document open, choose File > Page Setup. 2 From the Page Setup dialog, set the printer, paper size, and orientation. 3 Click OK. 4 From the menu bar, choose File > Print. 5 From the Printer pop...Print. 3 From the Copies area of page images to print on one sheet For Windows users 1 With a document open , choose File > Page Setup. 2 From the Page Setup dialog, set the printer, paper size, and orientation. 3 Click OK. Printing 33 To change the print order, you cannot print the last page...
.... 6 Click OK to close any printer software dialogs. 7 Click OK or Print. For Macintosh users 1 With a document open, choose File > Page Setup. 2 From the Page Setup dialog, set the printer, paper size, and orientation. 3 Click OK. 4 From the menu bar, choose File > Print. 5 From the Printer pop...Print. 3 From the Copies area of page images to print on one sheet For Windows users 1 With a document open , choose File > Page Setup. 2 From the Page Setup dialog, set the printer, paper size, and orientation. 3 Click OK. Printing 33 To change the print order, you cannot print the last page...
User's Guide
Page 34
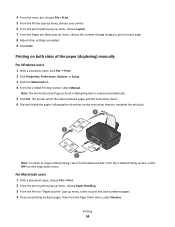
... section, select Off from the Page Order menu, select Reverse. For Macintosh users 1 With a document open , click File Print. 2 Click Properties, Preferences, Options, or Setup. 3 Click the Advanced tab. 4 From the 2-Sided Printing section, select Manual. 4 From the menu bar, choose File > Print. 5 From the Printer pop-up menu, choose...
... section, select Off from the Page Order menu, select Reverse. For Macintosh users 1 With a document open , click File Print. 2 Click Properties, Preferences, Options, or Setup. 3 Click the Advanced tab. 4 From the 2-Sided Printing section, select Manual. 4 From the menu bar, choose File > Print. 5 From the Printer pop-up menu, choose...

User's Guide
Page 36
For Macintosh users 1 With a document open , click File > Print. 2 Click Properties, Preferences, Options, or Setup. 3 Navigate to: Print Setup tab > Paper Type list > select Plain Paper 4 Navigate to: Paper Size list > select your envelope size If no size matches the envelope... any printer software dialogs. 7 Click OK or Print. Printing specialty documents Printing envelopes For Windows users 1 With a document open , choose File > Page Setup. 2 From the "Format for the printer software associated with your printer. 7 Click Print. Notes: • You may be prompted to start printing the document...
For Macintosh users 1 With a document open , click File > Print. 2 Click Properties, Preferences, Options, or Setup. 3 Navigate to: Print Setup tab > Paper Type list > select Plain Paper 4 Navigate to: Paper Size list > select your envelope size If no size matches the envelope... any printer software dialogs. 7 Click OK or Print. Printing specialty documents Printing envelopes For Windows users 1 With a document open , choose File > Page Setup. 2 From the "Format for the printer software associated with your printer. 7 Click Print. Notes: • You may be prompted to start printing the document...
User's Guide
Page 37
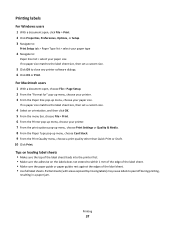
...Use full label sheets. Printing 37 For Macintosh users 1 With a document open , click File > Print. 2 Click Properties, Preferences, Options, or Setup. 3 Navigate to: Print Setup tab > Paper Type list > select your paper type 4 Navigate to: Paper Size list > select your paper size If no paper size matches the...5 Click OK to close any printer software dialogs. 6 Click OK or Print. Printing labels For Windows users 1 With a document open , choose File > Page Setup. 2 From the "Format for" pop-up menu, choose your printer. 3 From the Paper Size pop-up menu, choose your printer. 7 From the print...
...Use full label sheets. Printing 37 For Macintosh users 1 With a document open , click File > Print. 2 Click Properties, Preferences, Options, or Setup. 3 Navigate to: Print Setup tab > Paper Type list > select your paper type 4 Navigate to: Paper Size list > select your paper size If no paper size matches the...5 Click OK to close any printer software dialogs. 6 Click OK or Print. Printing labels For Windows users 1 With a document open , choose File > Page Setup. 2 From the "Format for" pop-up menu, choose your printer. 3 From the Paper Size pop-up menu, choose your printer. 7 From the print...


