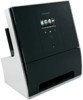
User Manual
Page 2
......7 Finding information about the printer...8 Understanding the parts of the printer...10 Ordering and replacing supplies 13 Ordering ink cartridges...13 Using genuine Lexmark ink cartridges...13 Replacing ink cartridges...14 Ordering paper and other supplies...15 Recycling Lexmark products...16 Using the printer control panel buttons and menus 17 Using the printer control panel...17 Understanding the...
......7 Finding information about the printer...8 Understanding the parts of the printer...10 Ordering and replacing supplies 13 Ordering ink cartridges...13 Using genuine Lexmark ink cartridges...13 Replacing ink cartridges...14 Ordering paper and other supplies...15 Recycling Lexmark products...16 Using the printer control panel buttons and menus 17 Using the printer control panel...17 Understanding the...
User Manual
Page 4
... Advanced wireless setup...104 Networking FAQ...110 Using SmartSolutions 122 What is SmartSolutions?...122 Creating and customizing printer solutions...123 Maintaining the printer 125 Maintaining ink cartridges...125 Cleaning the exterior of the printer...126 Cleaning the scanner glass...127 Cleaning the touch screen...127 Troubleshooting 128 Before you troubleshoot...128 Using...
... Advanced wireless setup...104 Networking FAQ...110 Using SmartSolutions 122 What is SmartSolutions?...122 Creating and customizing printer solutions...123 Maintaining the printer 125 Maintaining ink cartridges...125 Cleaning the exterior of the printer...126 Cleaning the scanner glass...127 Cleaning the touch screen...127 Troubleshooting 128 Before you troubleshoot...128 Using...
User Manual
Page 8
... printer and is available on the Lexmark Web site at http://support.lexmark.com. Before replacing and recycling your printer 8 Inks in High Yield cartridges allow you looking for reuse or recycling through the Lexmark Cartridge Collection Program. To read the Lexmark Environmental Sustainability Report, see www.lexmark.com/environment. About your ink cartridges, try using the "Clean Printhead" and...
... printer and is available on the Lexmark Web site at http://support.lexmark.com. Before replacing and recycling your printer 8 Inks in High Yield cartridges allow you looking for reuse or recycling through the Lexmark Cartridge Collection Program. To read the Lexmark Environmental Sustainability Report, see www.lexmark.com/environment. About your ink cartridges, try using the "Clean Printhead" and...
User Manual
Page 10
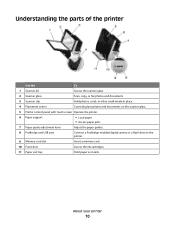
... and USB port Connect a PictBridge-enabled digital camera or a flash drive to the printer. 9 Memory card slot Insert a memory card. 10 Front door Access the ink cartridges. 11 Paper exit tray Hold paper as it exits.
... and USB port Connect a PictBridge-enabled digital camera or a flash drive to the printer. 9 Memory card slot Insert a memory card. 10 Front door Access the ink cartridges. 11 Paper exit tray Hold paper as it exits.
User Manual
Page 11
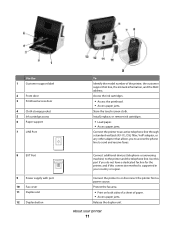
... method is supported in your printer 11 Use the 1 Customer support label 2 Front door 3 Printhead access door 4 Cloth storage pocket 5 Ink cartridge access 6 Paper support 7 LINE Port 8 EXT Port 9 Power supply with port 10 Fax cover 11 Duplex unit 12 Duplex button To ...sheet of the printer, the customer support hot line, the ink tank information, and the MAC address. About your country or region. Connect additional devices (telephone or answering machine) to send and receive faxes. Access the ink cartridges. • Access the printhead. • Access paper jams...
... method is supported in your printer 11 Use the 1 Customer support label 2 Front door 3 Printhead access door 4 Cloth storage pocket 5 Ink cartridge access 6 Paper support 7 LINE Port 8 EXT Port 9 Power supply with port 10 Fax cover 11 Duplex unit 12 Duplex button To ...sheet of the printer, the customer support hot line, the ink tank information, and the MAC address. About your country or region. Connect additional devices (telephone or answering machine) to send and receive faxes. Access the ink cartridges. • Access the printhead. • Access paper jams...
User Manual
Page 13
..., or recycling. 2 Available only on the Lexmark Web site at www.lexmark.com. Lexmark's warranty does not cover damage caused by non-Lexmark ink or ink cartridges. Using genuine Lexmark ink cartridges Lexmark printers, ink cartridges, and photo paper are designed to perform together for superior print quality, and our inks are formulated to Lexmark for a single use only Lexmark ink cartridges. Ordering and replacing supplies 13 After...
..., or recycling. 2 Available only on the Lexmark Web site at www.lexmark.com. Lexmark's warranty does not cover damage caused by non-Lexmark ink or ink cartridges. Using genuine Lexmark ink cartridges Lexmark printers, ink cartridges, and photo paper are designed to perform together for superior print quality, and our inks are formulated to Lexmark for a single use only Lexmark ink cartridges. Ordering and replacing supplies 13 After...
User Manual
Page 14
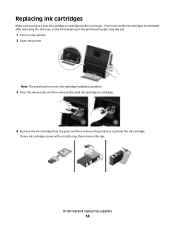
... remove the cap. Note: The printhead moves to the cartridge installation position. 3 Press the release tab, and then remove the used ink cartridge or cartridges. 4 Remove the ink cartridge from the pack, and then remove the protective cap from the ink cartridge. Replacing ink cartridges Make sure you have a new ink cartridge or cartridges before you begin. Ordering and replacing supplies 14 If...
... remove the cap. Note: The printhead moves to the cartridge installation position. 3 Press the release tab, and then remove the used ink cartridge or cartridges. 4 Remove the ink cartridge from the pack, and then remove the protective cap from the ink cartridge. Replacing ink cartridges Make sure you have a new ink cartridge or cartridges before you begin. Ordering and replacing supplies 14 If...

User Manual
Page 15
Item USB cable For more information, go to www.lexmark.com. Note: Install the new ink cartridges immediately after removing the protective cap to avoid exposing the ink to install the black cartridge. Part Number 1021294 Paper Paper size Lexmark photo paper • Letter • A4 • 4 x 6 in. •L Notes: • Availability may vary by country or...
Item USB cable For more information, go to www.lexmark.com. Note: Install the new ink cartridges immediately after removing the protective cap to avoid exposing the ink to install the black cartridge. Part Number 1021294 Paper Paper size Lexmark photo paper • Letter • A4 • 4 x 6 in. •L Notes: • Availability may vary by country or...

User Manual
Page 23
...fax in three-in-one printers. • Add, edit, or delete contacts in the built-in phone book. • Access the Lexmark Printer Setup Utility in four-in-one printers. Note: This program is installed automatically with the printer software if the printer has wireless capability...Access your printer model. Use the Printer Setup Utility to PDF. • Adjust settings for the printer. • Order supplies. • Maintain ink cartridges. • Print a test page. • Register the printer. • Contact technical support. Notes: • This program is installed automatically with...
...fax in three-in-one printers. • Add, edit, or delete contacts in the built-in phone book. • Access the Lexmark Printer Setup Utility in four-in-one printers. Note: This program is installed automatically with the printer software if the printer has wireless capability...Access your printer model. Use the Printer Setup Utility to PDF. • Adjust settings for the printer. • Order supplies. • Maintain ink cartridges. • Print a test page. • Register the printer. • Contact technical support. Notes: • This program is installed automatically with...

User Manual
Page 34
.... 5 From the Printer pop-up menu, choose your print job. • Select a higher print quality for better prints. • Make sure there is enough ink in the ink cartridges. • Remove each sheet as it is printed when printing photos or when working with specialty media. • Select the borderless setting when printing...
.... 5 From the Printer pop-up menu, choose your print job. • Select a higher print quality for better prints. • Make sure there is enough ink in the ink cartridges. • Remove each sheet as it is printed when printing photos or when working with specialty media. • Select the borderless setting when printing...
User Manual
Page 125
Checking ink levels Using the printer control panel From the home screen, touch . Using the printer control panel 1 Load plain paper. 2 From the home screen, navigate to: > ... jagged or wavy, then you can perform, your printer performs an automatic maintenance cycle every week if it is turned off. Maintaining the printer Maintaining ink cartridges In addition to the following tasks that you may need to align the printhead. Maintaining the printer 125 It will briefly come out of the...
Checking ink levels Using the printer control panel From the home screen, touch . Using the printer control panel 1 Load plain paper. 2 From the home screen, navigate to: > ... jagged or wavy, then you can perform, your printer performs an automatic maintenance cycle every week if it is turned off. Maintaining the printer Maintaining ink cartridges In addition to the following tasks that you may need to align the printhead. Maintaining the printer 125 It will briefly come out of the...
User Manual
Page 126
...: • Cleaning the printhead nozzles uses ink, so clean them only when necessary. • Deep cleaning uses more ink, so try the Clean Printhead option first to save ink. • If the ink levels are too low, then you must replace the ink cartridges before proceeding. 2 Remove all cables to... to: Printer Home > select your prints. Clean the printhead nozzles to improve the quality of your printer > Maintenance tab > Align cartridges 5 Follow the instructions on the computer screen. Cleaning the exterior of the printer, unplug the power cord from the wall outlet and disconnect...
...: • Cleaning the printhead nozzles uses ink, so clean them only when necessary. • Deep cleaning uses more ink, so try the Clean Printhead option first to save ink. • If the ink levels are too low, then you must replace the ink cartridges before proceeding. 2 Remove all cables to... to: Printer Home > select your prints. Clean the printhead nozzles to improve the quality of your printer > Maintenance tab > Align cartridges 5 Follow the instructions on the computer screen. Cleaning the exterior of the printer, unplug the power cord from the wall outlet and disconnect...
User Manual
Page 128
... for error messages, and resolve any errors. • Check for paper jam messages, and clear any jams. • Check the ink cartridges, and install new cartridges if necessary. • Turn the printer off, wait about 10 seconds, and then turn off the printer. • Use the ...3 Navigate to: Printer Home > Support tab > Service Center If Troubleshooting does not solve your problem Visit our Web site at http://support.lexmark.com to find the following: • Knowledgebase articles with the latest information and troubleshooting for your printer • Live online technical support &#...
... for error messages, and resolve any errors. • Check for paper jam messages, and clear any jams. • Check the ink cartridges, and install new cartridges if necessary. • Turn the printer off, wait about 10 seconds, and then turn off the printer. • Use the ...3 Navigate to: Printer Home > Support tab > Service Center If Troubleshooting does not solve your problem Visit our Web site at http://support.lexmark.com to find the following: • Knowledgebase articles with the latest information and troubleshooting for your printer • Live online technical support &#...
User Manual
Page 132
... is missing pages If the "Before you troubleshoot" checklist does not solve the problem, then try one or more of the following: MAKE SURE THE INK CARTRIDGES ARE INSERTED CORRECTLY 1 Turn on the printer, and then open , choose File > Print. 2 From the printer pop-up menu, choose your printer, and then click.... 7 Reconnect the power cord into the power supply, and then plug the power cord into the matching color slot of the printer. 2 Make sure the cartridges are inserted correctly. The cartridges should click firmly into the wall outlet. 8 Turn on the Printer list, then choose Add Printer.
... is missing pages If the "Before you troubleshoot" checklist does not solve the problem, then try one or more of the following: MAKE SURE THE INK CARTRIDGES ARE INSERTED CORRECTLY 1 Turn on the printer, and then open , choose File > Print. 2 From the printer pop-up menu, choose your printer, and then click.... 7 Reconnect the power cord into the power supply, and then plug the power cord into the matching color slot of the printer. 2 Make sure the cartridges are inserted correctly. The cartridges should click firmly into the wall outlet. 8 Turn on the Printer list, then choose Add Printer.
User Manual
Page 134
...2 Insert the power cord into the USB port of the computer. You may be caused by improperly installed ink cartridges. REINSTALL THE INK CARTRIDGES AND DEEP CLEAN AND ALIGN THE PRINTHEAD 1 Reinstall the ink cartridges. Troubleshooting 134 Note: If you troubleshoot" checklist does not solve the problem, then try one or more ...information, see "Replacing ink cartridges" on the printer. If this problem persists, then check our Web site for updates for your printer software or firmware. ...
...2 Insert the power cord into the USB port of the computer. You may be caused by improperly installed ink cartridges. REINSTALL THE INK CARTRIDGES AND DEEP CLEAN AND ALIGN THE PRINTHEAD 1 Reinstall the ink cartridges. Troubleshooting 134 Note: If you troubleshoot" checklist does not solve the problem, then try one or more ...information, see "Replacing ink cartridges" on the printer. If this problem persists, then check our Web site for updates for your printer software or firmware. ...
User Manual
Page 140
... lines on printed image If the "Before you troubleshoot" checklist does not solve the problem, then try one or more of the following: CHECK THE INK LEVELS Replace low or empty ink cartridges.
... lines on printed image If the "Before you troubleshoot" checklist does not solve the problem, then try one or more of the following: CHECK THE INK LEVELS Replace low or empty ink cartridges.
User Manual
Page 141
MAKE SURE THE INK CARTRIDGES ARE PROPERLY INSTALLED ALIGN THE PRINTHEAD CLEAN OR DEEP CLEAN THE PRINTHEAD NOZZLES Note: If these solutions do not remove the streaks or lines on . 2 ...
MAKE SURE THE INK CARTRIDGES ARE PROPERLY INSTALLED ALIGN THE PRINTHEAD CLEAN OR DEEP CLEAN THE PRINTHEAD NOZZLES Note: If these solutions do not remove the streaks or lines on . 2 ...

User Manual
Page 186
...if any) is furnished is available at www.lexmark.com. CARTRIDGE LICENSE AGREEMENT* I agree that is /are licensed for a single use only and is sold subject to the above terms, I may use only genuine Lexmark ink cartridges with this printer. EXCEPT AS PROVIDED IN ...limited warranty. 2 DISCLAIMER AND LIMITATION OF WARRANTIES. Lexmark will remain in the future that the patented print cartridge(s) shipped with only genuine Lexmark ink cartridges for , and designed to a written software license agreement between you and Lexmark or its original packaging to the original end-user...
...if any) is furnished is available at www.lexmark.com. CARTRIDGE LICENSE AGREEMENT* I agree that is /are licensed for a single use only and is sold subject to the above terms, I may use only genuine Lexmark ink cartridges with this printer. EXCEPT AS PROVIDED IN ...limited warranty. 2 DISCLAIMER AND LIMITATION OF WARRANTIES. Lexmark will remain in the future that the patented print cartridge(s) shipped with only genuine Lexmark ink cartridges for , and designed to a written software license agreement between you and Lexmark or its original packaging to the original end-user...

User Manual
Page 192
... information finding 8 information needed for setting up printer on wireless network 100 informational solutions 122 infrastructure network 115 ink conserving 7 ink cartridge access location 11 ink cartridges ordering 13 replacing 14 using genuine Lexmark 13 Index 192 ink levels checking 125 installation cable 114 installing network printer 121 installing optional software 25 installing printer on wireless network...
... information finding 8 information needed for setting up printer on wireless network 100 informational solutions 122 infrastructure network 115 ink conserving 7 ink cartridge access location 11 ink cartridges ordering 13 replacing 14 using genuine Lexmark 13 Index 192 ink levels checking 125 installation cable 114 installing network printer 121 installing optional software 25 installing printer on wireless network...

User Manual
Page 194
... faxes Auto Answer setting 92 automatically 92 manually 92 tips 92 Index 194 recycling 7 Lexmark products 16 WEEE statement 174 redial attempts setting 86 redial time setting 86 reducing an image 57 repeating an image 58 replacing ink cartridges 14 reports fax history 97 reports, fax setting 86 resetting internal wireless print server...
... faxes Auto Answer setting 92 automatically 92 manually 92 tips 92 Index 194 recycling 7 Lexmark products 16 WEEE statement 174 redial attempts setting 86 redial time setting 86 reducing an image 57 repeating an image 58 replacing ink cartridges 14 reports fax history 97 reports, fax setting 86 resetting internal wireless print server...


