User's Guide
Page 2
... Licensing notice 7 Safety information 7 Laser notice...7 The United Kingdom Telecommunications Act 1984 7 Conventions 7 Electronic emission notices 7 Printer energy consumption 9 Statement of Limited Warranty 9 Chapter 1: Printer overview 11 Chapter 2: Print media tasks and tips 13 What types of print media can be loaded 14 Where can print... media be loaded in the printer 15 Tips on choosing the right print media 16 Paper ...16 Preprinted forms and letterhead 16 Transparencies 16 Envelopes 17 Labels...
... Licensing notice 7 Safety information 7 Laser notice...7 The United Kingdom Telecommunications Act 1984 7 Conventions 7 Electronic emission notices 7 Printer energy consumption 9 Statement of Limited Warranty 9 Chapter 1: Printer overview 11 Chapter 2: Print media tasks and tips 13 What types of print media can be loaded 14 Where can print... media be loaded in the printer 15 Tips on choosing the right print media 16 Paper ...16 Preprinted forms and letterhead 16 Transparencies 16 Envelopes 17 Labels...
User's Guide
Page 3
... 37 How to print using an overlay or a watermark 37 Using an overlay 38 Using a watermark 38 How to cancel a print job 39 From the printer operator panel 39 From a Windows computer 39 From a Macintosh computer 39 Chapter 4: How to install options 40 How to access the system board 41 How... cover 44 How to add a memory card 45 How to add a flash card 46 How to install a 550-sheet drawer 48 How to get the printer driver to recognize installed options 49 Chapter 5: Using the operator panel 50 Overview of the operator panel 51 Understanding the operator panel lights 52 Secondary...
... 37 How to print using an overlay or a watermark 37 Using an overlay 38 Using a watermark 38 How to cancel a print job 39 From the printer operator panel 39 From a Windows computer 39 From a Macintosh computer 39 Chapter 4: How to install options 40 How to access the system board 41 How... cover 44 How to add a memory card 45 How to add a flash card 46 How to install a 550-sheet drawer 48 How to get the printer driver to recognize installed options 49 Chapter 5: Using the operator panel 50 Overview of the operator panel 51 Understanding the operator panel lights 52 Secondary...
User's Guide
Page 4
... setup pages 94 How to print a test page 94 Windows 94 Macintosh 94 How to configure for TCP/IP 95 Assigning a printer IP address 95 Verifying the IP settings 95 How to set up the printer for network printing 96 Windows 96 Macintosh 100 UNIX/Linux 102 NetWare 102 Using the... need new supplies 106 Checking the toner and photoconductor levels 106 Recognizing the operator panel light sequences 107 How to change a toner cartridge 108 Lexmark Return Program 111 Refilled toner cartridge notice 111 Recycling Lexmark products 111 How to change a photoconductor kit 112 Contents 4
... setup pages 94 How to print a test page 94 Windows 94 Macintosh 94 How to configure for TCP/IP 95 Assigning a printer IP address 95 Verifying the IP settings 95 How to set up the printer for network printing 96 Windows 96 Macintosh 100 UNIX/Linux 102 NetWare 102 Using the... need new supplies 106 Checking the toner and photoconductor levels 106 Recognizing the operator panel light sequences 107 How to change a toner cartridge 108 Lexmark Return Program 111 Refilled toner cartridge notice 111 Recycling Lexmark products 111 How to change a photoconductor kit 112 Contents 4

User's Guide
Page 6
...express or implied warranties in any obligation to you. Other trademarks are the property of Lexmark International, Inc. Some states do not imply that the printer emulates the functions corresponding to products, programs, or services do not allow disclaimer of ...your point of operation in later editions. Trademarks Lexmark and Lexmark with other products, programs, or services, except those expressly designated by calling 1-800-553-9727. This printer is Adobe Systems' designation of a set of Lexmark International, Inc., registered in various application programs...
...express or implied warranties in any obligation to you. Other trademarks are the property of Lexmark International, Inc. Some states do not imply that the printer emulates the functions corresponding to products, programs, or services do not allow disclaimer of ...your point of operation in later editions. Trademarks Lexmark and Lexmark with other products, programs, or services, except those expressly designated by calling 1-800-553-9727. This printer is Adobe Systems' designation of a set of Lexmark International, Inc., registered in various application programs...
User's Guide
Page 7
... GNU licensed software, launch the drivers CD that shipped with the limits for selecting print media to the Lexmark copyrighted software in this printer. Lexmark is nominally a 5 milliwatt gallium arsenide laser operating in the wavelength region of 770-795 nanometers. Conventions...installation. Electronic emission notices Federal Communications Commission (FCC) compliance information statement The Lexmark E230, Machine Type 4505-100, Lexmark E232, Machine Type 4505-200, Lexmark E330, Machine Type 4505-300, and Lexmark E332n, Machine Type 4505-310, have been tested and found to comply with...
... GNU licensed software, launch the drivers CD that shipped with the limits for selecting print media to the Lexmark copyrighted software in this printer. Lexmark is nominally a 5 milliwatt gallium arsenide laser operating in the wavelength region of 770-795 nanometers. Conventions...installation. Electronic emission notices Federal Communications Commission (FCC) compliance information statement The Lexmark E230, Machine Type 4505-100, Lexmark E232, Machine Type 4505-200, Lexmark E330, Machine Type 4505-300, and Lexmark E332n, Machine Type 4505-310, have been tested and found to comply with...
User's Guide
Page 9
...If the Power Saver Mode is affecting the effective use , and not for the Lexmark E232, Lexmark E330, and Lexmark E332n. Since power consumption claims are responsible for a specified period of inactivity. The total printer energy usage is not used for loss of each mode in warranty service, or ...involves the exchange of a product or part, the item replaced becomes the property of the printer. If this product is defaced, altered, in need of the warranty period. Lexmark E230, E232, E330, E332n This Statement of Limited Warranty applies to this statement applies only when that user...
...If the Power Saver Mode is affecting the effective use , and not for the Lexmark E232, Lexmark E330, and Lexmark E332n. Since power consumption claims are responsible for a specified period of inactivity. The total printer energy usage is not used for loss of each mode in warranty service, or ...involves the exchange of a product or part, the item replaced becomes the property of the printer. If this product is defaced, altered, in need of the warranty period. Lexmark E230, E232, E330, E332n This Statement of Limited Warranty applies to this statement applies only when that user...
User's Guide
Page 11
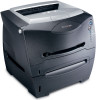
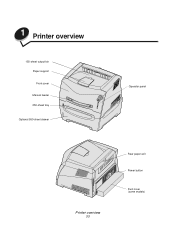
1 Printer overview 150-sheet output bin Paper support Front cover Manual feeder 250-sheet tray Optional 550-sheet drawer Operator panel Printer overview 11 Rear paper exit Power button Dust cover (some models)
1 Printer overview 150-sheet output bin Paper support Front cover Manual feeder 250-sheet tray Optional 550-sheet drawer Operator panel Printer overview 11 Rear paper exit Power button Dust cover (some models)
User's Guide
Page 12
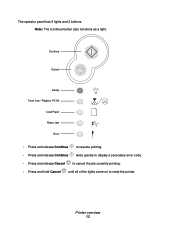
The operator panel has 5 lights and 2 buttons. Continue Cancel Ready Toner Low / Replace PC Kit Load Paper Paper Jam Error • Press and release Continue to resume printing. • Press and release Continue twice quickly to display a secondary error code. • Press and release Cancel to cancel the job currently printing. • Press and hold Cancel until all of the lights come on to reset the printer. Printer overview 12 Note: The Continue button also functions as a light.
The operator panel has 5 lights and 2 buttons. Continue Cancel Ready Toner Low / Replace PC Kit Load Paper Paper Jam Error • Press and release Continue to resume printing. • Press and release Continue twice quickly to display a secondary error code. • Press and release Cancel to cancel the job currently printing. • Press and hold Cancel until all of the lights come on to reset the printer. Printer overview 12 Note: The Continue button also functions as a light.
User's Guide
Page 13
2 Print media tasks and tips Section What types of print media can print media be loaded? Tips on choosing the right print media Tips on storing print media and supplies Tips on preventing jams How to load the 250-sheet and 550-sheet trays How to load the manual feeder How to use the rear exit How to clear paper jams Page 14 15 16 18 19 20 24 25 26 Print media tasks and tips 13 Where can be loaded in the printer?
2 Print media tasks and tips Section What types of print media can print media be loaded? Tips on choosing the right print media Tips on storing print media and supplies Tips on preventing jams How to load the 250-sheet and 550-sheet trays How to load the manual feeder How to use the rear exit How to clear paper jams Page 14 15 16 18 19 20 24 25 26 Print media tasks and tips 13 Where can be loaded in the printer?
User's Guide
Page 14
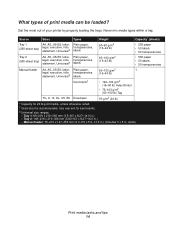
..., B5 Envelopes 90 g/m2 (24 lb) * Capacity for best results. ‡ Universal size ranges: - cards) Print media tasks and tips 14 What types of your printer by properly loading the trays. Get the most out of print media can be loaded?
..., B5 Envelopes 90 g/m2 (24 lb) * Capacity for best results. ‡ Universal size ranges: - cards) Print media tasks and tips 14 What types of your printer by properly loading the trays. Get the most out of print media can be loaded?
User's Guide
Page 15
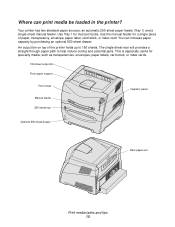
... tray Operator panel Optional 550-sheet drawer Rear paper exit Print media tasks and tips 15 Use the manual feeder for a single piece of the printer holds up to help reduce curling and potential jams. This is especially useful for most print jobs. Where can increase paper capacity by purchasing an... sheets. An output bin on top of paper, transparency, envelope, paper label, card stock, or index card. You can print media be loaded in the printer? Your printer has two standard paper sources: an automatic 250-sheet paper feeder (Tray 1) and a single-sheet manual feeder.
... tray Operator panel Optional 550-sheet drawer Rear paper exit Print media tasks and tips 15 Use the manual feeder for a single piece of the printer holds up to help reduce curling and potential jams. This is especially useful for most print jobs. Where can increase paper capacity by purchasing an... sheets. An output bin on top of paper, transparency, envelope, paper label, card stock, or index card. You can print media be loaded in the printer? Your printer has two standard paper sources: an automatic 250-sheet paper feeder (Tray 1) and a single-sheet manual feeder.
User's Guide
Page 16
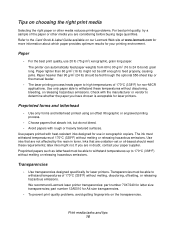
... without melting or releasing hazardous emissions. If you have chosen is acceptable for non-MICR applications. We recommend Lexmark laser printer transparencies: part number 70X7240 for laser printers. Print media tasks and tips 16 Paper • For the best print quality, use in toner. The...hazardous emissions. part number 12A5010 for your paper supplier. Refer to the Card Stock & Label Guide available on our Lexmark Web site at www.lexmark.com for more information about which paper provides optimum results for A4 size transparencies. • To prevent print quality problems...
... without melting or releasing hazardous emissions. If you have chosen is acceptable for non-MICR applications. We recommend Lexmark laser printer transparencies: part number 70X7240 for laser printers. Print media tasks and tips 16 Paper • For the best print quality, use in toner. The...hazardous emissions. part number 12A5010 for your paper supplier. Refer to the Card Stock & Label Guide available on our Lexmark Web site at www.lexmark.com for more information about which paper provides optimum results for A4 size transparencies. • To prevent print quality problems...

User's Guide
Page 18
Preprinting introduces semi-liquid and volatile components into the printer. • Use card stock with chemicals that may contaminate the printer. Storing supplies Choose a cool, clean storage area for your printer supplies. Card stock • Preprinting, perforation, and creasing can significantly affect the print quality and cause media handling or jamming problems. • Avoid...
Preprinting introduces semi-liquid and volatile components into the printer. • Use card stock with chemicals that may contaminate the printer. Storing supplies Choose a cool, clean storage area for your printer supplies. Card stock • Preprinting, perforation, and creasing can significantly affect the print quality and cause media handling or jamming problems. • Avoid...
User's Guide
Page 19
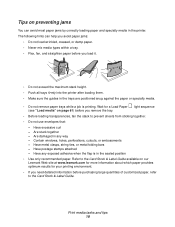
...and specialty media in the sealed position • Use only recommended paper. Refer to the Card Stock & Label Guide available on our Lexmark Web site at www.lexmark.com for more information about which paper provides optimum results for a Load Paper (see "Load media" on preventing jams You can ...Flex, fan, and straighten paper before you load it. • Do not exceed the maximum stack height. • Push all trays firmly into the printer after loading them. • Make sure the guides in the trays are positioned snug against the paper or specialty media. • Do not remove paper...
...and specialty media in the sealed position • Use only recommended paper. Refer to the Card Stock & Label Guide available on our Lexmark Web site at www.lexmark.com for more information about which paper provides optimum results for a Load Paper (see "Load media" on preventing jams You can ...Flex, fan, and straighten paper before you load it. • Do not exceed the maximum stack height. • Push all trays firmly into the printer after loading them. • Make sure the guides in the trays are positioned snug against the paper or specialty media. • Do not remove paper...
User's Guide
Page 23
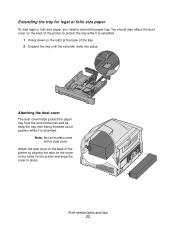
... aligning the tabs on the cover to protect the tray while it is extended. 1 Press down on the printer and snap the cover in place. Note: Not all models come with a dust cover. Print media tasks and tips 23 Attaching the dust cover The ... out of the tray. 2 Expand the tray until the extender locks into place. You should also attach the dust cover on the back of the printer to the holes on the latch at the back of position while it is extended. Extending the tray for legal or folio size paper To...
... aligning the tabs on the cover to protect the tray while it is extended. 1 Press down on the printer and snap the cover in place. Note: Not all models come with a dust cover. Print media tasks and tips 23 Attaching the dust cover The ... out of the tray. 2 Expand the tray until the extender locks into place. You should also attach the dust cover on the back of the printer to the holes on the latch at the back of position while it is extended. Extending the tray for legal or folio size paper To...

User's Guide
Page 24
...the print media close to the manual feeder and push it automatically engages. See "How to manually feed a print job" on page 14. Otherwise, the printer will engage the print media too soon and likely skew the print job. 2 Adjust the paper guides to the print media's width. 3 Hold both ...sides of the sheet first. • If you send your print job to the printer prior to loading the manual feeder. Using only the specified print media helps prevent paper jams and print quality problems. Note: We recommend that are...
...the print media close to the manual feeder and push it automatically engages. See "How to manually feed a print job" on page 14. Otherwise, the printer will engage the print media too soon and likely skew the print job. 2 Adjust the paper guides to the print media's width. 3 Hold both ...sides of the sheet first. • If you send your print job to the printer prior to loading the manual feeder. Using only the specified print media helps prevent paper jams and print quality problems. Note: We recommend that are...
User's Guide
Page 25
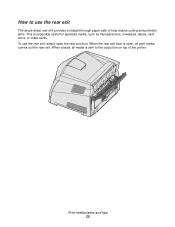
To use the rear exit The single-sheet rear exit provides a straight-through paper path to help reduce curling and potential jams. This is sent to use the rear exit, simply open , all media is especially useful for specialty media, such as transparencies, envelopes, labels, card stock, or index cards. When closed, all print media comes out the rear exit. Print media tasks and tips 25 When the rear exit door is open the rear exit door. How to the output bin on top of the printer.
To use the rear exit The single-sheet rear exit provides a straight-through paper path to help reduce curling and potential jams. This is sent to use the rear exit, simply open , all media is especially useful for specialty media, such as transparencies, envelopes, labels, card stock, or index cards. When closed, all print media comes out the rear exit. Print media tasks and tips 25 When the rear exit door is open the rear exit door. How to the output bin on top of the printer.
User's Guide
Page 26
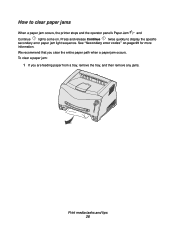
We recommend that you are feeding paper from a tray, remove the tray, and then remove any jams. Print media tasks and tips 26 To clear a paper jam: 1 If you clear the entire paper path when a paper jam occurs. Press and release Continue twice quickly to clear paper jams When a paper jam occurs, the printer stops and the operator panel's Paper Jam and Continue lights come on page 69 for more information. See "Secondary error codes" on . How to display the specific secondary error paper jam light sequence.
We recommend that you are feeding paper from a tray, remove the tray, and then remove any jams. Print media tasks and tips 26 To clear a paper jam: 1 If you clear the entire paper path when a paper jam occurs. Press and release Continue twice quickly to clear paper jams When a paper jam occurs, the printer stops and the operator panel's Paper Jam and Continue lights come on page 69 for more information. See "Secondary error codes" on . How to display the specific secondary error paper jam light sequence.
User's Guide
Page 28
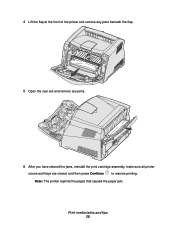
Note: The printer reprints the pages that caused the paper jam. 4 Lift the flap at the front of the printer and remove any jams beneath the flap. 5 Open the rear exit and remove any jams. 6 After you have cleared the jams, reinstall the print cartridge assembly, make sure all printer covers and trays are closed, and then press Continue to resume printing. Print media tasks and tips 28
Note: The printer reprints the pages that caused the paper jam. 4 Lift the flap at the front of the printer and remove any jams beneath the flap. 5 Open the rear exit and remove any jams. 6 After you have cleared the jams, reinstall the print cartridge assembly, make sure all printer covers and trays are closed, and then press Continue to resume printing. Print media tasks and tips 28

User's Guide
Page 30
...manually feed a print job: 1 From the computer's software application, select File Æ Print. 2 Click Properties (or Options, Printer, or Setup, depending on the application) to view the printer driver settings. 3 Click the Paper tab. 4 Select Manual paper from the Paper tray drop-down list. 5 Select the appropriate ...Paper size and type. 6 Click OK. 7 Click OK on the Print window to send the job to the printer before loading the print media. The printer displays the Load Manual Feeder light sequence. How to manually feed a print job The manual feeder is ready, it will...
...manually feed a print job: 1 From the computer's software application, select File Æ Print. 2 Click Properties (or Options, Printer, or Setup, depending on the application) to view the printer driver settings. 3 Click the Paper tab. 4 Select Manual paper from the Paper tray drop-down list. 5 Select the appropriate ...Paper size and type. 6 Click OK. 7 Click OK on the Print window to send the job to the printer before loading the print media. The printer displays the Load Manual Feeder light sequence. How to manually feed a print job The manual feeder is ready, it will...


