User's Guide
Page 5
Chapter 9: Troubleshooting 115 General problems 116 Print quality problems 118 How to clean the printhead lens 122 Index 125 Contents 5
Chapter 9: Troubleshooting 115 General problems 116 Print quality problems 118 How to clean the printhead lens 122 Index 125 Contents 5

User's Guide
Page 18
Storing supplies Choose a cool, clean storage area for your printer supplies. Tips on storing print media and supplies Storing paper Use the following guidelines to avoid paper feeding problems and ...
Storing supplies Choose a cool, clean storage area for your printer supplies. Tips on storing print media and supplies Storing paper Use the following guidelines to avoid paper feeding problems and ...
User's Guide
Page 105
...supplies. Within the United States or Canada, you , call 1-800-539-6275. The settings range from any authorized Lexmark supplies dealer. Supplies information 105 Storing supplies Choose a cool, clean storage area for your printer driver. Store supplies right side up to 30,000 pages (at www....lexmark.com or contact the place where you have to conserve supplies Conserving supplies lowers printing costs. • When ...
...supplies. Within the United States or Canada, you , call 1-800-539-6275. The settings range from any authorized Lexmark supplies dealer. Supplies information 105 Storing supplies Choose a cool, clean storage area for your printer driver. Store supplies right side up to 30,000 pages (at www....lexmark.com or contact the place where you have to conserve supplies Conserving supplies lowers printing costs. • When ...
User's Guide
Page 113
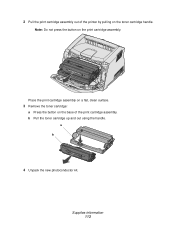
Note: Do not press the button on the base of the printer by pulling on the toner cartridge handle. Supplies information 113 a b 4 Unpack the new photoconductor kit. b Pull the toner cartridge up and out using the handle. Place the print cartridge assembly on a flat, clean surface. 3 Remove the toner cartridge: a Press the button on the print cartridge assembly. 2 Pull the print cartridge assembly out of the print cartridge assembly.
Note: Do not press the button on the base of the printer by pulling on the toner cartridge handle. Supplies information 113 a b 4 Unpack the new photoconductor kit. b Pull the toner cartridge up and out using the handle. Place the print cartridge assembly on a flat, clean surface. 3 Remove the toner cartridge: a Press the button on the print cartridge assembly. 2 Pull the print cartridge assembly out of the print cartridge assembly.
User's Guide
Page 115
9 Troubleshooting Section General problems Print quality problems • How to clean the printhead lens Page 116 118 122 Troubleshooting 115
9 Troubleshooting Section General problems Print quality problems • How to clean the printhead lens Page 116 118 122 Troubleshooting 115
User's Guide
Page 118
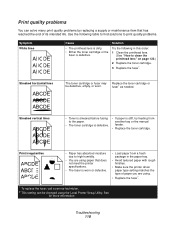
... maintenance item that does not meet the printer specifications. • The fuser is stiff, try feeding from a fresh package in this order: 1 Clean the printhead lens. (See "How to high humidity. • You are using paper that has reached the end of paper you are using the... Local Printer Setup Utility. Troubleshooting 118 fuser* as needed. Print irregularities ABCDE ABCDE ABCDE • Paper has absorbed moisture due to clean the printhead lens" on page 103 for more information. Use the following in the paper tray. • Avoid textured paper with rough finishes....
... maintenance item that does not meet the printer specifications. • The fuser is stiff, try feeding from a fresh package in this order: 1 Clean the printhead lens. (See "How to high humidity. • You are using paper that has reached the end of paper you are using the... Local Printer Setup Utility. Troubleshooting 118 fuser* as needed. Print irregularities ABCDE ABCDE ABCDE • Paper has absorbed moisture due to clean the printhead lens" on page 103 for more information. Use the following in the paper tray. • Avoid textured paper with rough finishes....
User's Guide
Page 122
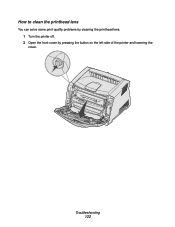
Troubleshooting 122 How to clean the printhead lens You can solve some print quality problems by cleaning the printhead lens. 1 Turn the printer off. 2 Open the front cover by pressing the button on the left side of the printer and lowering the cover.
Troubleshooting 122 How to clean the printhead lens You can solve some print quality problems by cleaning the printhead lens. 1 Turn the printer off. 2 Open the front cover by pressing the button on the left side of the printer and lowering the cover.
User's Guide
Page 123
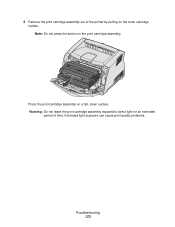
Place the print cartridge assembly on the toner cartridge handle. Extended light exposure can cause print quality problems. Troubleshooting 123 3 Remove the print cartridge assembly out of time. Note: Do not press the button on the print cartridge assembly. Warning: Do not leave the print cartridge assembly exposed to direct light for an extended period of the printer by pulling on a flat, clean surface.
Place the print cartridge assembly on the toner cartridge handle. Extended light exposure can cause print quality problems. Troubleshooting 123 3 Remove the print cartridge assembly out of time. Note: Do not press the button on the print cartridge assembly. Warning: Do not leave the print cartridge assembly exposed to direct light for an extended period of the printer by pulling on a flat, clean surface.

User's Guide
Page 124
... cover. 8 Turn the printer on the tracks in the printer and pushing the print cartridge assembly in the top of the print cartridge assembly with a clean, dry, lint-free cloth. Printhead lens 5 Gently wipe the printhead lens with the green arrows on . Warning: Not using...
... cover. 8 Turn the printer on the tracks in the printer and pushing the print cartridge assembly in the top of the print cartridge assembly with a clean, dry, lint-free cloth. Printhead lens 5 Gently wipe the printhead lens with the green arrows on . Warning: Not using...
User's Guide
Page 125
... LF (Setup menu) 86 Auto LF after CR (Setup menu) 86 B booklets 35 Busy light 58 buttons 51 C canceling a print job 39 card stock 18 cleaning the printhead lens 122 clearing paper jams 26 configuration menus Network MAC Binary PS 85 NPA Mode 85 Set Card Speed 85 Parallel MAC Binary...) 87 I interfaces network 85 parallel 86 USB 87 IP address setting 95 verifying 95 J jams 26 L labels 17 legal 23 letterhead 16, 37 Lexmark Cartridge Collection Program 111 Lexmark Return Program 111 lights 51, 52 Linux 93, 102 Load Paper light manual feeder 62 Tray 1 or 550-sheet tray 61 loading 250...
... LF (Setup menu) 86 Auto LF after CR (Setup menu) 86 B booklets 35 Busy light 58 buttons 51 C canceling a print job 39 card stock 18 cleaning the printhead lens 122 clearing paper jams 26 configuration menus Network MAC Binary PS 85 NPA Mode 85 Set Card Speed 85 Parallel MAC Binary...) 87 I interfaces network 85 parallel 86 USB 87 IP address setting 95 verifying 95 J jams 26 L labels 17 legal 23 letterhead 16, 37 Lexmark Cartridge Collection Program 111 Lexmark Return Program 111 lights 51, 52 Linux 93, 102 Load Paper light manual feeder 62 Tray 1 or 550-sheet tray 61 loading 250...
User's Guide
Page 126
... 36 print cartridge See toner cartridge print quality problems 118 Print Quality Test Pages (Utilities menu) 87 Printer Settings Configuration sheet printing 83 printhead lens, cleaning 122 printing booklets 35 duplex 32 letterhead 37 multi-page (N-up) 34 overlays 37 posters 36 watermarks 37 problems print quality 118 Protocol (Parallel menu...
... 36 print cartridge See toner cartridge print quality problems 118 Print Quality Test Pages (Utilities menu) 87 Printer Settings Configuration sheet printing 83 printhead lens, cleaning 122 printing booklets 35 duplex 32 letterhead 37 multi-page (N-up) 34 overlays 37 posters 36 watermarks 37 problems print quality 118 Protocol (Parallel menu...


