
Print Defects Guide
Page 1
...://support.lexmark.com or your Lexmark service representative. Notes: • There are four additional color pages and a blank page that best matches the defects on one of repeating defects on a printed page to the marks on the page indicates which part is defective. • The imaging kit is ... of 7 Print defects guide Identifying supplies or parts for assistance in .) Use these pages for replacement Match a set of the vertical lines. Replace the imaging kit Replace the developer unit 25.1 mm (0.99 in.) 29.8 mm (1.17 in.) 94.2 mm (3.70 in.) 43.9 mm (1.72 in.) 45.5 ...
...://support.lexmark.com or your Lexmark service representative. Notes: • There are four additional color pages and a blank page that best matches the defects on one of repeating defects on a printed page to the marks on the page indicates which part is defective. • The imaging kit is ... of 7 Print defects guide Identifying supplies or parts for assistance in .) Use these pages for replacement Match a set of the vertical lines. Replace the imaging kit Replace the developer unit 25.1 mm (0.99 in.) 29.8 mm (1.17 in.) 94.2 mm (3.70 in.) 43.9 mm (1.72 in.) 45.5 ...
Supplies Guide
Page 2
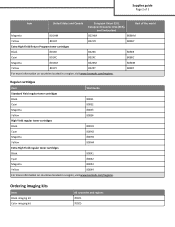
... 801XC 802XC 808XC Magenta 801XM 802XM 808XM Yellow 801XY 802XY 808XY For more information on countries located in a region, visit www.lexmark.com/regions. Ordering imaging kits Item Black imaging kit Color imaging kit All countries and regions 700Z1 700Z5 Regular cartridges Item Worldwide Standard Yield regular toner cartridges Black 800S1 Cyan 800S2 Magenta 800S3 Yellow... Extra High Yield regular toner cartridges Black 800X1 Cyan 800X2 Magenta 800X3 Yellow 800X4 For more information on countries located in a region, visit www.lexmark.com/regions.
... 801XC 802XC 808XC Magenta 801XM 802XM 808XM Yellow 801XY 802XY 808XY For more information on countries located in a region, visit www.lexmark.com/regions. Ordering imaging kits Item Black imaging kit Color imaging kit All countries and regions 700Z1 700Z5 Regular cartridges Item Worldwide Standard Yield regular toner cartridges Black 800S1 Cyan 800S2 Magenta 800S3 Yellow... Extra High Yield regular toner cartridges Black 800X1 Cyan 800X2 Magenta 800X3 Yellow 800X4 For more information on countries located in a region, visit www.lexmark.com/regions.

User's Guide
Page 123
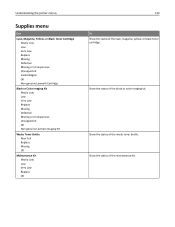
... printer menus 123 Understanding the printer menus Menus list Supplies Menu Cyan Cartridge Magenta Cartridge Yellow Cartridge Black Cartridge Waste Toner Bottle Black and Color Imaging Kit Maintenance Kit Paper Menu Default Source Paper Size/Type Substitute Size Paper Texture Paper Weight Paper Loading Custom Types Custom Names Custom Scan Sizes Universal Setup...
... printer menus 123 Understanding the printer menus Menus list Supplies Menu Cyan Cartridge Magenta Cartridge Yellow Cartridge Black Cartridge Waste Toner Bottle Black and Color Imaging Kit Maintenance Kit Paper Menu Default Source Paper Size/Type Substitute Size Paper Texture Paper Weight Paper Loading Custom Types Custom Names Custom Scan Sizes Universal Setup...
User's Guide
Page 124
... Defective Missing or Unresponsive Unsupported Invalid Region OK Non‑genuine Lexmark Cartridge Black or Color Imaging Kit Nearly Low Low Very Low Replace Missing Defective Missing or Unresponsive Unsupported OK Non‑genuine Lexmark Imaging Kit Waste Toner Bottle Near Full Replace Missing OK Maintenance Kit Nearly Low Low Very Low Replace OK 124 To Show...
... Defective Missing or Unresponsive Unsupported Invalid Region OK Non‑genuine Lexmark Cartridge Black or Color Imaging Kit Nearly Low Low Very Low Replace Missing Defective Missing or Unresponsive Unsupported OK Non‑genuine Lexmark Imaging Kit Waste Toner Bottle Near Full Replace Missing OK Maintenance Kit Nearly Low Low Very Low Replace OK 124 To Show...

User's Guide
Page 216
...Yield regular toner cartridges Black 800X1 Cyan 800X2 Magenta 800X3 Yellow 800X4 For more information on countries located in a region, visit www.lexmark.com/regions. Ordering imaging kits Item Black imaging kit Color imaging kit All countries and regions 700Z1 700Z5 Maintaining the printer 216 Item United States and Canada European Union (EU), European Economic Area (EEA...Program toner cartridges Black 801XK 802XK Cyan 801XC 802XC Magenta 801XM 802XM Yellow 801XY 802XY For more information on countries located in a region, visit www.lexmark.com/regions.
...Yield regular toner cartridges Black 800X1 Cyan 800X2 Magenta 800X3 Yellow 800X4 For more information on countries located in a region, visit www.lexmark.com/regions. Ordering imaging kits Item Black imaging kit Color imaging kit All countries and regions 700Z1 700Z5 Maintaining the printer 216 Item United States and Canada European Union (EU), European Economic Area (EEA...Program toner cartridges Black 801XK 802XK Cyan 801XC 802XC Magenta 801XM 802XM Yellow 801XY 802XY For more information on countries located in a region, visit www.lexmark.com/regions.
User's Guide
Page 221
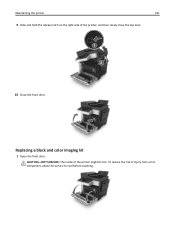
Replacing a black and color imaging kit 1 Open the front door. Maintaining the printer 221 9 Slide and hold the release latch on the right side of the printer might be hot. CAUTION-HOT SURFACE: The inside of the printer, and then slowly close the top door. 10 Close the front door. To reduce the risk of injury from a hot component, allow the surface to cool before touching.
Replacing a black and color imaging kit 1 Open the front door. Maintaining the printer 221 9 Slide and hold the release latch on the right side of the printer might be hot. CAUTION-HOT SURFACE: The inside of the printer, and then slowly close the top door. 10 Close the front door. To reduce the risk of injury from a hot component, allow the surface to cool before touching.
User's Guide
Page 222
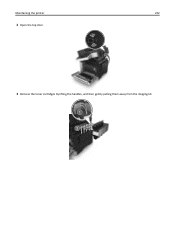
Maintaining the printer 222 2 Open the top door. 3 Remove the toner cartridges by lifting the handles, and then gently pulling them away from the imaging kit.
Maintaining the printer 222 2 Open the top door. 3 Remove the toner cartridges by lifting the handles, and then gently pulling them away from the imaging kit.

User's Guide
Page 223
Maintaining the printer 223 4 Remove the right side cover. 5 Press the green levers on each side of the waste toner bottle, and then remove the waste toner bottle. 6 Lift the blue levers on the imaging kit, and then pull the imaging kit until it stops.
Maintaining the printer 223 4 Remove the right side cover. 5 Press the green levers on each side of the waste toner bottle, and then remove the waste toner bottle. 6 Lift the blue levers on the imaging kit, and then pull the imaging kit until it stops.

User's Guide
Page 224
... units. • The black imaging kit includes the imaging kit and the black developer unit. 9 Seal the used imaging kit in the bag that the replacement imaging kit came in. For more information, see "Recycling Lexmark products" on the sides to pull out the imaging kit. 8 Unpack the replacement black and color imaging kit. Note: When replacing the black imaging kit, save the cyan, magenta...
... units. • The black imaging kit includes the imaging kit and the black developer unit. 9 Seal the used imaging kit in the bag that the replacement imaging kit came in. For more information, see "Recycling Lexmark products" on the sides to pull out the imaging kit. 8 Unpack the replacement black and color imaging kit. Note: When replacing the black imaging kit, save the cyan, magenta...
User's Guide
Page 225
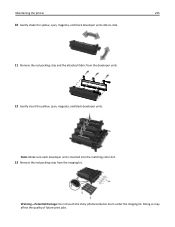
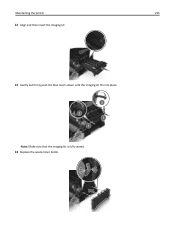
Warning-Potential Damage: Do not touch the shiny photoconductor drum under the imaging kit. Maintaining the printer 225 10 Gently shake the yellow, cyan, magenta, and black developer units side‑to‑side. 11 Remove the red packing strip and the attached fabric from the imaging kit. Doing so may affect the quality of future print jobs. Note: Make sure each developer unit is inserted into the matching color slot. 13 Remove the red packing strip from the developer units. 12 Gently insert the yellow, cyan, magenta, and black developer units.
Warning-Potential Damage: Do not touch the shiny photoconductor drum under the imaging kit. Maintaining the printer 225 10 Gently shake the yellow, cyan, magenta, and black developer units side‑to‑side. 11 Remove the red packing strip and the attached fabric from the imaging kit. Doing so may affect the quality of future print jobs. Note: Make sure each developer unit is inserted into the matching color slot. 13 Remove the red packing strip from the developer units. 12 Gently insert the yellow, cyan, magenta, and black developer units.
User's Guide
Page 226
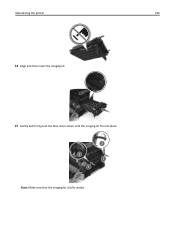
Maintaining the printer 226 14 Align and then insert the imaging kit. 15 Gently but firmly push the blue levers down until the imaging kit fits into place. Note: Make sure that the imaging kit is fully seated.
Maintaining the printer 226 14 Align and then insert the imaging kit. 15 Gently but firmly push the blue levers down until the imaging kit fits into place. Note: Make sure that the imaging kit is fully seated.
User's Guide
Page 229
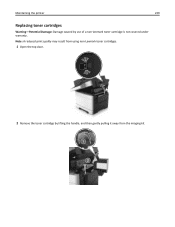
Note: A reduced print quality may result from the imaging kit. Maintaining the printer 229 Replacing toner cartridges Warning-Potential Damage: Damage caused by lifting the handle, and then gently pulling it away from using non‑Lexmark toner cartridges. 1 Open the top door. 2 Remove the toner cartridge by use of a non‑Lexmark toner cartridge is not covered under warranty.
Note: A reduced print quality may result from the imaging kit. Maintaining the printer 229 Replacing toner cartridges Warning-Potential Damage: Damage caused by lifting the handle, and then gently pulling it away from using non‑Lexmark toner cartridges. 1 Open the top door. 2 Remove the toner cartridge by use of a non‑Lexmark toner cartridge is not covered under warranty.

User's Guide
Page 232
Maintaining the printer 232 3 Lift the toner cartridge handle, and then gently pull it from the imaging kit. 4 Remove the right side cover. 5 Press the green levers on each side of the waste toner bottle, and then remove the waste toner bottle.
Maintaining the printer 232 3 Lift the toner cartridge handle, and then gently pull it from the imaging kit. 4 Remove the right side cover. 5 Press the green levers on each side of the waste toner bottle, and then remove the waste toner bottle.
User's Guide
Page 233
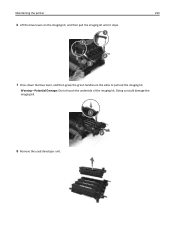
Doing so could damage the imaging kit. 8 Remove the used developer unit. Maintaining the printer 233 6 Lift the blue levers on the imaging kit, and then pull the imaging kit until it stops. 7 Press down the blue lever, and then grasp the green handles on the sides to pull out the imaging kit. Warning-Potential Damage: Do not touch the underside of the imaging kit.
Doing so could damage the imaging kit. 8 Remove the used developer unit. Maintaining the printer 233 6 Lift the blue levers on the imaging kit, and then pull the imaging kit until it stops. 7 Press down the blue lever, and then grasp the green handles on the sides to pull out the imaging kit. Warning-Potential Damage: Do not touch the underside of the imaging kit.
User's Guide
Page 235
Note: Make sure that the imaging kit is fully seated. 14 Replace the waste toner bottle. Maintaining the printer 235 12 Align and then insert the imaging kit. 13 Gently but firmly push the blue levers down until the imaging kit fits into place.
Note: Make sure that the imaging kit is fully seated. 14 Replace the waste toner bottle. Maintaining the printer 235 12 Align and then insert the imaging kit. 13 Gently but firmly push the blue levers down until the imaging kit fits into place.
User's Guide
Page 240
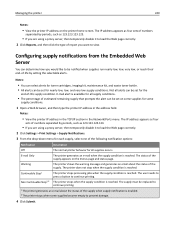
... Continuable Stop1,2 The printer stops when the supply condition is reached. E‑mail alert is enabled. 2 The printer stops when some supplies for toner cartridges, imaging kit, maintenance kit, and waste toner bottle. • All alerts can determine how you would like to continue printing. E‑mail Only The printer generates an e-mail...
... Continuable Stop1,2 The printer stops when the supply condition is reached. E‑mail alert is enabled. 2 The printer stops when some supplies for toner cartridges, imaging kit, maintenance kit, and waste toner bottle. • All alerts can determine how you would like to continue printing. E‑mail Only The printer generates an e-mail...
User's Guide
Page 265
... modem, fax is designed to function best with Lexmark supplies and parts, and may not be a toner cartridge or the imaging kit. Connect the printer to function with genuine Lexmark supplies and parts. The printer has detected a non‑Lexmark supply or part installed in the fax, and... panel, touch Continue to clear the message and continue printing. • Delete fonts, macros, and other data stored in your Lexmark printer or its imaging components. Warning-Potential Damage: Use of third-party supplies or parts can be covered by the warranty. Network [x] software error [...
... modem, fax is designed to function best with Lexmark supplies and parts, and may not be a toner cartridge or the imaging kit. Connect the printer to function with genuine Lexmark supplies and parts. The printer has detected a non‑Lexmark supply or part installed in the fax, and... panel, touch Continue to clear the message and continue printing. • Delete fonts, macros, and other data stored in your Lexmark printer or its imaging components. Warning-Potential Damage: Use of third-party supplies or parts can be covered by the warranty. Network [x] software error [...

User's Guide
Page 266
...: • Install the missing imaging kit. Remove defective disk [61] Remove and replace the defective printer hard disk. For more information, see the "Replacing supplies" section of the sheet. • Cancel the print job. For more information, visit http://support.lexmark.com or contact customer support.... to clear the message and continue printing the second side of the User's Guide. • Remove the unresponsive imaging kit, and then reinstall it . Note: To replace the printer hard disk, contact customer support at http://support.lexmark.com or your service representative.
...: • Install the missing imaging kit. Remove defective disk [61] Remove and replace the defective printer hard disk. For more information, see the "Replacing supplies" section of the sheet. • Cancel the print job. For more information, visit http://support.lexmark.com or contact customer support.... to clear the message and continue printing the second side of the User's Guide. • Remove the unresponsive imaging kit, and then reinstall it . Note: To replace the printer hard disk, contact customer support at http://support.lexmark.com or your service representative.
User's Guide
Page 267
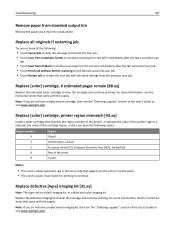
Note: If you do not have a replacement imaging kit, then see the "Ordering supplies" section of the User's Guide or visit www.lexmark.com. x indicates the value of the cartridge region. Replace all originals if restarting job. Troubleshooting 267 Remove paper from ...• The x and y values represent .xy in the error code that came with the supply. x and y can be a black imaging kit, or a black and color imaging kit. Replace [color] cartridge, 0 estimated pages remain [88.xy] Replace the indicated toner cartridge to clear the message and continue printing. Try one...
Note: If you do not have a replacement imaging kit, then see the "Ordering supplies" section of the User's Guide or visit www.lexmark.com. x indicates the value of the cartridge region. Replace all originals if restarting job. Troubleshooting 267 Remove paper from ...• The x and y values represent .xy in the error code that came with the supply. x and y can be a black imaging kit, or a black and color imaging kit. Replace [color] cartridge, 0 estimated pages remain [88.xy] Replace the indicated toner cartridge to clear the message and continue printing. Try one...
User's Guide
Page 268
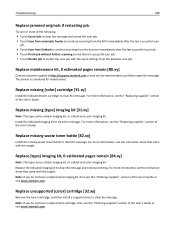
... originals if restarting job. Install the indicated imaging kit to clear the message and continue printing. Replace [type] imaging kit, 0 estimated pages remain [84.xy] Note: The type can be a black imaging kit, or a black and color imaging kit. Replace maintenance kit, 0 estimated pages remain [80.xy] Contact customer support at http://support.lexmark.com or your service representative, and...
... originals if restarting job. Install the indicated imaging kit to clear the message and continue printing. Replace [type] imaging kit, 0 estimated pages remain [84.xy] Note: The type can be a black imaging kit, or a black and color imaging kit. Replace maintenance kit, 0 estimated pages remain [80.xy] Contact customer support at http://support.lexmark.com or your service representative, and...


