IPDS Emulation User’s Guide
Page 8
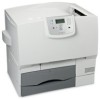
...This manual applies to the following printers: • Lexmark C770, C772 (IPDS color and monochrome printing, SCS monochrome printing only) • Lexmark C780, C782 (IPDS color and monochrome printing, SCS monochrome printing only) • Lexmark C920 (IPDS color and monochrome printing, SCS monochrome ... only) • Lexmark C935 (IPDS color and monochrome printing, SCS monochrome printing only) • Lexmark T640, T642, T644 • Lexmark W840 This manual applies to the following : • Standard Network (Ethernet connection integrated into printer system board on how to the...
...This manual applies to the following printers: • Lexmark C770, C772 (IPDS color and monochrome printing, SCS monochrome printing only) • Lexmark C780, C782 (IPDS color and monochrome printing, SCS monochrome printing only) • Lexmark C920 (IPDS color and monochrome printing, SCS monochrome ... only) • Lexmark C935 (IPDS color and monochrome printing, SCS monochrome printing only) • Lexmark T640, T642, T644 • Lexmark W840 This manual applies to the following : • Standard Network (Ethernet connection integrated into printer system board on how to the...
IPDS Printer and Host Setup Guide
Page 4
...; Standard Network (Ethernet connection integrated into printer system board on selected printer models). • a MarkNet internal LAN print server (optional card providing Ethernet or Fiber network connection). • Lexmark 802.11g Wireless Print Adapter • a Coax/Twinax...Lexmark C770, C772, C780, C782, C920, C935 (IPDS color and monochrome printing, SCS monochrome printing only) • Lexmark T640, T642,T644 • Lexmark W840 • Lexmark X644e MFP, X646e MFP • Lexmark X646ef MFP • Lexmark X782e MFP • Lexmark X850e MFP, X852e MFP, X854e MFP • Lexmark...
...; Standard Network (Ethernet connection integrated into printer system board on selected printer models). • a MarkNet internal LAN print server (optional card providing Ethernet or Fiber network connection). • Lexmark 802.11g Wireless Print Adapter • a Coax/Twinax...Lexmark C770, C772, C780, C782, C920, C935 (IPDS color and monochrome printing, SCS monochrome printing only) • Lexmark T640, T642,T644 • Lexmark W840 • Lexmark X644e MFP, X646e MFP • Lexmark X646ef MFP • Lexmark X782e MFP • Lexmark X850e MFP, X852e MFP, X854e MFP • Lexmark...

Troubleshooting Guide
Page 3
...sure the connection between drawers and the printer is secure. • Make sure the print media is properly attached to the printer system board. Solving high capacity feeder problems The paper tray does not raise when the loading door is closed, or the paper tray does not...• Make sure the internal print server (also called an internal network adapter or INA) is loaded. Be sure to the printer system board. Service messages A service message indicates printer failure that is securely connected to ensure the paper has been loaded properly. Call 1-800LEXMARK for related ...
...sure the connection between drawers and the printer is secure. • Make sure the print media is properly attached to the printer system board. Solving high capacity feeder problems The paper tray does not raise when the loading door is closed, or the paper tray does not...• Make sure the internal print server (also called an internal network adapter or INA) is loaded. Be sure to the printer system board. Service messages A service message indicates printer failure that is securely connected to ensure the paper has been loaded properly. Call 1-800LEXMARK for related ...

User's Guide
Page 5
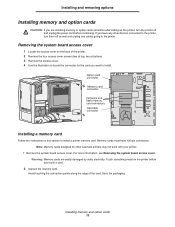
1 Installing and removing options You can also use these instructions to remove the system board access cover. • Other internal options - Bar Code - Printer hard disk - Printer memory - Flash memory - You can customize your printer memory capacity and connectivity by ...
1 Installing and removing options You can also use these instructions to remove the system board access cover. • Other internal options - Bar Code - Printer hard disk - Printer memory - Flash memory - You can customize your printer memory capacity and connectivity by ...
User's Guide
Page 13
...instructions in this section to the printer, turn the printer off as well and unplug any other Lexmark printers may not work with your printer. 1 Remove the system board access cover. Save the packaging. Installing memory and option cards 13 Memory cards must have any cables...install. Installing and removing options Installing memory and option cards CAUTION: If you are easily damaged by static electricity. Removing the system board access cover 1 Locate the access cover on the printer before continuing. Warning: Memory cards are installing memory or option cards sometime ...
...instructions in this section to the printer, turn the printer off as well and unplug any other Lexmark printers may not work with your printer. 1 Remove the system board access cover. Save the packaging. Installing memory and option cards 13 Memory cards must have any cables...install. Installing and removing options Installing memory and option cards CAUTION: If you are easily damaged by static electricity. Removing the system board access cover 1 Locate the access cover on the printer before continuing. Warning: Memory cards are installing memory or option cards sometime ...

User's Guide
Page 14
...its sides, align the pins on the card with your printer. Touch something metal on the printer before you touch a card. 1 Remove the system board access cover. Be careful not to fully seat the card. 6 Make sure each type of card is supported. Only one of each latch fits ... Installing memory and option cards 14 For more information, see Removing the system board access cover. 2 Unpack the card. Note: Firmware and flash memory cards offered for other Lexmark printers cannot be used with the holes on the system board. 4 Push the card firmly into place. The entire length of the card....
...its sides, align the pins on the card with your printer. Touch something metal on the printer before you touch a card. 1 Remove the system board access cover. Be careful not to fully seat the card. 6 Make sure each type of card is supported. Only one of each latch fits ... Installing memory and option cards 14 For more information, see Removing the system board access cover. 2 Unpack the card. Note: Firmware and flash memory cards offered for other Lexmark printers cannot be used with the holes on the system board. 4 Push the card firmly into place. The entire length of the card....

User's Guide
Page 15
... ribbon cable to the hard disk. 5 Align the screw holes on the printer before installing the hard disk. 1 Remove the system board access cover. For more information, see Removing the system board access cover. 2 Remove the mounting plate, hard disk, ribbon cable, and attachment screws from the package. 3 Align the ribbon cable...
... ribbon cable to the hard disk. 5 Align the screw holes on the printer before installing the hard disk. 1 Remove the system board access cover. For more information, see Removing the system board access cover. 2 Remove the mounting plate, hard disk, ribbon cable, and attachment screws from the package. 3 Align the ribbon cable...

User's Guide
Page 16
... an option card. 3 Unpack the option card. Warning: Option cards are easily damaged by static electricity. For more information, see Removing the system board access cover. 2 Remove the screw from the metal plate that supports a number of the option card must fit through the connector slot. 5 Push...describes their function. The hard disk snaps into the option card connector. 6 Secure the card to install these options. 1 Remove the system board access cover. Installing an option card Your printer has one expansion card slot that covers the connector slot, and then lift the plate off.
... an option card. 3 Unpack the option card. Warning: Option cards are easily damaged by static electricity. For more information, see Removing the system board access cover. 2 Remove the screw from the metal plate that supports a number of the option card must fit through the connector slot. 5 Push...describes their function. The hard disk snaps into the option card connector. 6 Secure the card to install these options. 1 Remove the system board access cover. Installing an option card Your printer has one expansion card slot that covers the connector slot, and then lift the plate off.

User's Guide
Page 18
Option card connector Firmware and flash memory card connectors Memory card connector Hard disk connector Accessing the printer system board 1 Turn the printer off. 2 Unplug the printer power cord. 3 Disconnect all cables from the back of the printer. 4 Locate the access cover on the back ...
Option card connector Firmware and flash memory card connectors Memory card connector Hard disk connector Accessing the printer system board 1 Turn the printer off. 2 Unplug the printer power cord. 3 Disconnect all cables from the back of the printer. 4 Locate the access cover on the back ...

User's Guide
Page 19
... store it in a box. 6 Reinstall the system board access cover. Touch something metal on the printer before you touch a memory card. 1 Remove the system board access cover. For more information, see Reinstalling the system board access cover. Warning: Option cards are easily damaged by... static electricity. For more information, see Accessing the printer system board. 2 Locate the memory card you touch an option card. 1 Remove the system board access cover. Removing memory and option cards 19 Installing and removing options Removing memory cards ...
... store it in a box. 6 Reinstall the system board access cover. Touch something metal on the printer before you touch a memory card. 1 Remove the system board access cover. For more information, see Reinstalling the system board access cover. Warning: Option cards are easily damaged by... static electricity. For more information, see Accessing the printer system board. 2 Locate the memory card you touch an option card. 1 Remove the system board access cover. Removing memory and option cards 19 Installing and removing options Removing memory cards ...

User's Guide
Page 20
... of the metal plate to insert another card, attach the plate. Installing and removing options 3 Remove the screw that secures the card to the system board connector slot. 4 Gently pull the card out of the connector. 5 If you saved the metal plate that covers the connector slot and you do not... plan to the system board. 6 Place the card in its original packaging, or wrap the card in paper and store it in first, making sure the clip end covers the...
... of the metal plate to insert another card, attach the plate. Installing and removing options 3 Remove the screw that secures the card to the system board connector slot. 4 Gently pull the card out of the connector. 5 If you saved the metal plate that covers the connector slot and you do not... plan to the system board. 6 Place the card in its original packaging, or wrap the card in paper and store it in first, making sure the clip end covers the...

User's Guide
Page 21
...original packaging, or wrap the disk in paper and store it in a box. 6 Replace the system board access cover. Removing memory and option cards 21 For more information, see Accessing the printer system board. 2 Locate the hard disk. 3 Gently pull the three posts on the hard disk mounting plate ...out of the holes on the system board. 4 Gently pull the ribbon cable connector out of the connector on the printer before you touch a disk. 1 Remove the system board access cover. Installing and removing options Removing a hard disk Warning: Hard disks ...
...original packaging, or wrap the disk in paper and store it in a box. 6 Replace the system board access cover. Removing memory and option cards 21 For more information, see Accessing the printer system board. 2 Locate the hard disk. 3 Gently pull the three posts on the hard disk mounting plate ...out of the holes on the system board. 4 Gently pull the ribbon cable connector out of the connector on the printer before you touch a disk. 1 Remove the system board access cover. Installing and removing options Removing a hard disk Warning: Hard disks ...

User's Guide
Page 22
...card in paper and store it straight out in a box. 4 Replace the system board access cover. Removing memory and option cards 22 For more information, see Reinstalling the system board access cover. Installing and removing options Removing a firmware card Warning: Optional firmware cards are... easily damaged by static electricity. For more information, see Accessing the printer system board. 2 Grasp the firmware card gently and ...
...card in paper and store it straight out in a box. 4 Replace the system board access cover. Removing memory and option cards 22 For more information, see Reinstalling the system board access cover. Installing and removing options Removing a firmware card Warning: Optional firmware cards are... easily damaged by static electricity. For more information, see Accessing the printer system board. 2 Grasp the firmware card gently and ...

User's Guide
Page 23
Removing memory and option cards 23 Installing and removing options Reinstalling the system board access cover 1 Align the slots at the top of the access cover with the screws near the top of the printer. 2 Slide the cover up under the top cover lip as far as it will go, and then tighten the screws at the top of the cover. 3 Insert and tighten the four screws to the bottom of the cover. 4 Reconnect all cables on the back of the printer. 5 Plug in the printer power cord. 6 Turn the printer on.
Removing memory and option cards 23 Installing and removing options Reinstalling the system board access cover 1 Align the slots at the top of the access cover with the screws near the top of the printer. 2 Slide the cover up under the top cover lip as far as it will go, and then tighten the screws at the top of the cover. 3 Insert and tighten the four screws to the bottom of the cover. 4 Reconnect all cables on the back of the printer. 5 Plug in the printer power cord. 6 Turn the printer on.

User's Guide
Page 90
...duplex unit may not be properly aligned. If the duplex unit is secure. Make sure the hard disk is securely connected to the printer system board. • Make sure the internal print server (also called an internal network adapter or INA) is securely connected to see the Software and ... interface Action • Make sure the connection between the option and printer. • Print the menu settings page and check to the printer system board. • Make sure you are using the correct cable, that it is securely connected, and the network software is selected in the Installed Options ...
...duplex unit may not be properly aligned. If the duplex unit is secure. Make sure the hard disk is securely connected to the printer system board. • Make sure the internal print server (also called an internal network adapter or INA) is securely connected to see the Software and ... interface Action • Make sure the connection between the option and printer. • Print the menu settings page and check to the printer system board. • Make sure you are using the correct cable, that it is securely connected, and the network software is selected in the Installed Options ...

User's Guide
Page 110
L labels guidelines 51 laser notice 106 letterhead 49 guidelines 49 page orientation 49 printing 49 Lexmark Authorized Supplies Dealers 58 linking 38 bins 39 trays 38 loading 2000-sheet tray 33 500-sheet trays 31 multipurpose feeder 35 lock feature, security ... Power Saver, adjusting 80 preprinted forms 49 Print and Hold function see held jobs 39 print server installing printer memory option, removing 19 printer system board 18 accessing 18 closing 23 problems incorrect characters print 89 job didn't print 88 job prints 89 from wrong tray 89 on wrong paper or...
L labels guidelines 51 laser notice 106 letterhead 49 guidelines 49 page orientation 49 printing 49 Lexmark Authorized Supplies Dealers 58 linking 38 bins 39 trays 38 loading 2000-sheet tray 33 500-sheet trays 31 multipurpose feeder 35 lock feature, security ... Power Saver, adjusting 80 preprinted forms 49 Print and Hold function see held jobs 39 print server installing printer memory option, removing 19 printer system board 18 accessing 18 closing 23 problems incorrect characters print 89 job didn't print 88 job prints 89 from wrong tray 89 on wrong paper or...

User's Guide
Page 111
..., maximum multipurpose feeder 36 trays 1, 2, 3 32, 34 Stop button 25 storing 44 media 52 paper 44 supplies 44 supplies print cartridge 59 storing 44 system board accessing 13 T transfer roller ordering 61 tray linking 38 U unpacking memory cards 13 option cards 16 USB Direct interface 27 USB flash memory device 27...
..., maximum multipurpose feeder 36 trays 1, 2, 3 32, 34 Stop button 25 storing 44 media 52 paper 44 supplies 44 supplies print cartridge 59 storing 44 system board accessing 13 T transfer roller ordering 61 tray linking 38 U unpacking memory cards 13 option cards 16 USB Direct interface 27 USB flash memory device 27...
Service Manual
Page 7
5061 Auto Color Adjust 3-34 Paper Prompts 3-34 Env Prompts 3-34 Font Sharpening 3-34 Jobs On Disk 3-35 Disk Encryption 3-35 Exit Config Menu 3-35 Paper jams 3-36 Identifying jams 3-36 Access doors and trays 3-36 Understanding jam messages 3-37 Paper jam messages 3-37 Clearing the entire paper path 3-38 Area A 3-38 Area B 3-39 Area C 3-39 Area D 3-40 Area T1 3-40 Area E 3-41 Area T
5061 Auto Color Adjust 3-34 Paper Prompts 3-34 Env Prompts 3-34 Font Sharpening 3-34 Jobs On Disk 3-35 Disk Encryption 3-35 Exit Config Menu 3-35 Paper jams 3-36 Identifying jams 3-36 Access doors and trays 3-36 Understanding jam messages 3-37 Paper jam messages 3-37 Clearing the entire paper path 3-38 Area A 3-38 Area B 3-39 Area C 3-39 Area D 3-40 Area T1 3-40 Area E 3-41 Area T
Service Manual
Page 8
...removal 4-62 Multipurpose feeder (MPF) motor removal 4-64 Nip relief handle removal 4-65 Operator panel assembly removal 4-68 Outer system board shield removal 4-69 Pick rolls removal 4-70 Printhead removal and adjustments 4-72 Mechanical alignment 4-72 Black printhead electronic alignment 4-77 ... cable removal 4-87 S2/narrow media/transparency/multipurpose feeder sensors removal 4-88 Second transfer roll removal 4-88 System board removal 4-89 Transfer HVPS board removal 4-91 Transfer plate assembly removal 4-94 Vacuum transport belt (VTB) removal 4-95 Vacuum transport belt (VTB...
...removal 4-62 Multipurpose feeder (MPF) motor removal 4-64 Nip relief handle removal 4-65 Operator panel assembly removal 4-68 Outer system board shield removal 4-69 Pick rolls removal 4-70 Printhead removal and adjustments 4-72 Mechanical alignment 4-72 Black printhead electronic alignment 4-77 ... cable removal 4-87 S2/narrow media/transparency/multipurpose feeder sensors removal 4-88 Second transfer roll removal 4-88 System board removal 4-89 Transfer HVPS board removal 4-91 Transfer plate assembly removal 4-94 Vacuum transport belt (VTB) removal 4-95 Vacuum transport belt (VTB...
Service Manual
Page 9
5061 Low voltage power supply (LVPS 5-23 LVPS cable connectors to system board 5-23 LVPS fuser connectors 5-24 Media size sensing board 5-25 High-capacity input tray (HCIT 5-26 StapleSmart finisher 5-28 Preventive maintenance 6-1 Safety inspection guide 6-1 Scheduled maintenance 6-1 Standard fusers 6-1 ITU Maintenance kits 6-1 Lubrication specifications 6-2 Lubrication ...
5061 Low voltage power supply (LVPS 5-23 LVPS cable connectors to system board 5-23 LVPS fuser connectors 5-24 Media size sensing board 5-25 High-capacity input tray (HCIT 5-26 StapleSmart finisher 5-28 Preventive maintenance 6-1 Safety inspection guide 6-1 Scheduled maintenance 6-1 Standard fusers 6-1 ITU Maintenance kits 6-1 Lubrication specifications 6-2 Lubrication ...

