User Guide
Page 58
... the multipurpose feeder, Configure MP must be properly processed if an inaccurate Paper Type is on a network, you do not match the settings of the fuser varies according to change the following tray settings so that are loaded. 1 Type the printer IP address into the address field of the paper guides...
... the multipurpose feeder, Configure MP must be properly processed if an inaccurate Paper Type is on a network, you do not match the settings of the fuser varies according to change the following tray settings so that are loaded. 1 Type the printer IP address into the address field of the paper guides...
User Guide
Page 61
... (NCR) paper • Preprinted papers with chemicals that may contaminate the printer • Preprinted papers that can be affected by the temperature in the printer fuser • Preprinted papers that require a registration (the precise print location on the page) greater than 60 g/m2 (16 lb) • Multiple‑part forms or...
... (NCR) paper • Preprinted papers with chemicals that may contaminate the printer • Preprinted papers that can be affected by the temperature in the printer fuser • Preprinted papers that require a registration (the precise print location on the page) greater than 60 g/m2 (16 lb) • Multiple‑part forms or...
User Guide
Page 65
... use inkjet or 3M CG3710 transparencies. 3 Paper labels are supported. For more information, see the Card Stock & Label Guide available on the Lexmark Web site at http://support.lexmark.com. 4 Use envelopes that lie flat when individually placed on a table facedown. Other media such as vinyl may show print quality defects in...
... use inkjet or 3M CG3710 transparencies. 3 Paper labels are supported. For more information, see the Card Stock & Label Guide available on the Lexmark Web site at http://support.lexmark.com. 4 Use envelopes that lie flat when individually placed on a table facedown. Other media such as vinyl may show print quality defects in...
User Guide
Page 68
...edge, and use a non‑oozing adhesive. • Portrait orientation works best, especially when printing bar codes. Partial sheets may reduce fuser life. Partial sheets also contaminate the printer and the cartridge with adhesive, and could void the warranty. • If zone coating of ..., oozing around the edges, or releasing hazardous fumes. • Do not use envelopes that : - Zone coating of the adhesive at http://support.lexmark.com. Printing 68 • Use only new envelopes. • To optimize performance and minimize jams, do not use labels with exposed adhesive. &#...
...edge, and use a non‑oozing adhesive. • Portrait orientation works best, especially when printing bar codes. Partial sheets may reduce fuser life. Partial sheets also contaminate the printer and the cartridge with adhesive, and could void the warranty. • If zone coating of ..., oozing around the edges, or releasing hazardous fumes. • Do not use envelopes that : - Zone coating of the adhesive at http://support.lexmark.com. Printing 68 • Use only new envelopes. • To optimize performance and minimize jams, do not use labels with exposed adhesive. &#...

User Guide
Page 76
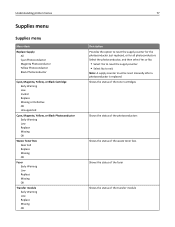
... menus Menus list Supplies Replace Supply Cyan Cartridge Magenta Cartridge Yellow Cartridge Black Cartridge Cyan Photoconductor Magenta Photoconductor Yellow Photoconductor Black Photoconductor Waste Toner Box Fuser Transfer Module Paper Menu Default Source Paper Size/Type Configure MP Substitute Size Paper Texture Paper Weight Paper Loading Custom Types Universal Setup Reports Menu...
... menus Menus list Supplies Replace Supply Cyan Cartridge Magenta Cartridge Yellow Cartridge Black Cartridge Cyan Photoconductor Magenta Photoconductor Yellow Photoconductor Black Photoconductor Waste Toner Box Fuser Transfer Module Paper Menu Default Source Paper Size/Type Configure MP Substitute Size Paper Texture Paper Weight Paper Loading Custom Types Universal Setup Reports Menu...
User Guide
Page 77
... Missing or Defective OK Unsupported Cyan, Magenta, Yellow, or Black Photoconductor Early Warning Low Replace Missing OK Waste Toner Box Near Full Replace Missing OK Fuser Early Warning Low Replace Missing OK Transfer module Early Warning Low Replace Missing OK 77 Description Provides the option to reset the supply counter for... the status of the toner cartridges Shows the status of the photoconductors Shows the status of the waste toner box Shows the status of the fuser Shows the status of the transfer module
... Missing or Defective OK Unsupported Cyan, Magenta, Yellow, or Black Photoconductor Early Warning Low Replace Missing OK Waste Toner Box Near Full Replace Missing OK Fuser Early Warning Low Replace Missing OK Transfer module Early Warning Low Replace Missing OK 77 Description Provides the option to reset the supply counter for... the status of the toner cartridges Shows the status of the photoconductors Shows the status of the waste toner box Shows the status of the fuser Shows the status of the transfer module
User Guide
Page 133
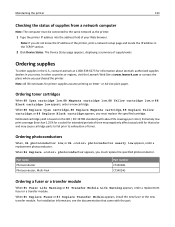
...appears, displaying a summary of the printer, print a network setup page and locate the IP address in the U.S., contact Lexmark at www.lexmark.com or contact the place where you must replace the specified photoconductor. For installation information, see the documentation that color and...). Part name Photoconductor Photoconductor, Multi‑Pack Part number C734X20G C734X24G Ordering a fuser or a transfer module When 80 Fuser Life Warning or 83 Transfer Module Life Warning appears, order a replacement fuser or a transfer module. Estimated cartridge yield is based on letter‑ or ...
...appears, displaying a summary of the printer, print a network setup page and locate the IP address in the U.S., contact Lexmark at www.lexmark.com or contact the place where you must replace the specified photoconductor. For installation information, see the documentation that color and...). Part name Photoconductor Photoconductor, Multi‑Pack Part number C734X20G C734X24G Ordering a fuser or a transfer module When 80 Fuser Life Warning or 83 Transfer Module Life Warning appears, order a replacement fuser or a transfer module. Estimated cartridge yield is based on letter‑ or ...
User Guide
Page 134
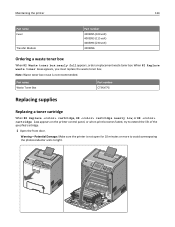
When 82 Replace waste toner box appears, you must replace the waste toner box. Maintaining the printer 134 Part name Fuser Transfer Module Part number 40X5095 (100 volt) 40X5093 (115 volt) 40X5094 (230 volt) 40X5096 Ordering a waste toner box When 82 Waste toner box nearly full ...
When 82 Replace waste toner box appears, you must replace the waste toner box. Maintaining the printer 134 Part name Fuser Transfer Module Part number 40X5095 (100 volt) 40X5093 (115 volt) 40X5094 (230 volt) 40X5096 Ordering a waste toner box When 82 Waste toner box nearly full ...

User Guide
Page 151
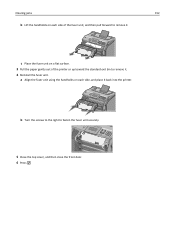
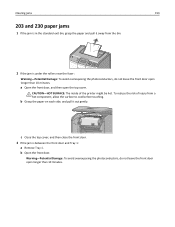
.... 1 Open the front door, and then open the top cover. To reduce the risk of injury from a hot component, allow the surface to remove the fuser unit. CAUTION-HOT SURFACE: The inside of injury from a hot component, allow the surface to cool before touching. 2 Grasp the jammed paper on the... top cover, and then close the front door. 4 Press . Doing so may cause your fingers to loosen them. CAUTION-HOT SURFACE: The inside of the fuser unit. Warning-Potential Damage: Do not touch the center of the printer might be hot. a Turn the screws on each side and pull it towards...
.... 1 Open the front door, and then open the top cover. To reduce the risk of injury from a hot component, allow the surface to remove the fuser unit. CAUTION-HOT SURFACE: The inside of injury from a hot component, allow the surface to cool before touching. 2 Grasp the jammed paper on the... top cover, and then close the front door. 4 Press . Doing so may cause your fingers to loosen them. CAUTION-HOT SURFACE: The inside of the fuser unit. Warning-Potential Damage: Do not touch the center of the printer might be hot. a Turn the screws on each side and pull it towards...
User Guide
Page 152
b Turn the screws to the right to remove it. 4 Reinstall the fuser unit. c Place the fuser unit on a flat surface. 3 Pull the paper gently out of the fuser unit, and then pull forward to remove it. a Align the fuser unit using the handholds on each side of the printer or up toward the standard exit bin to fasten the fuser unit securely. 5 Close the top cover, and then close the front door. 6 Press . Clearing jams 152 b Lift the handholds on each side, and place it back into the printer.
b Turn the screws to the right to remove it. 4 Reinstall the fuser unit. c Place the fuser unit on a flat surface. 3 Pull the paper gently out of the fuser unit, and then pull forward to remove it. a Align the fuser unit using the handholds on each side of the printer or up toward the standard exit bin to fasten the fuser unit securely. 5 Close the top cover, and then close the front door. 6 Press . Clearing jams 152 b Lift the handholds on each side, and place it back into the printer.
User Guide
Page 153
CAUTION-HOT SURFACE: The inside of injury from the bin. 2 If the jam is under the rollers near the fuser: Warning-Potential Damage: To avoid overexposing the photoconductors, do not leave the front door open longer than 10 minutes. To reduce the risk of the ...
CAUTION-HOT SURFACE: The inside of injury from the bin. 2 If the jam is under the rollers near the fuser: Warning-Potential Damage: To avoid overexposing the photoconductors, do not leave the front door open longer than 10 minutes. To reduce the risk of the ...
User Guide
Page 161
... the message and print in the Config menu. Remove the unsupported device, and then install a supported one of paper from the printer. 2 Make sure the fuser, transfer module, trays, and supplies are cleared. Try one . Restore Held Jobs? • Press the up or down arrow button until the printer hard disk...
... the message and print in the Config menu. Remove the unsupported device, and then install a supported one of paper from the printer. 2 Make sure the fuser, transfer module, trays, and supplies are cleared. Try one . Restore Held Jobs? • Press the up or down arrow button until the printer hard disk...
User Guide
Page 166
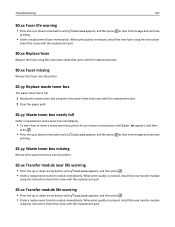
...button until Continue appears, and then press printing. • Format the disk. to clear the message and continue printing. • Order a replacement fuser immediately. Note: Optional trays lock together when stacked. to clear the message and continue If the error message remains, the hard disk may be ...defective and require replacing. 80.xx Fuser near life warning • Press the up or down arrow button until Continue appears, and then press to clear the message and continue...
...button until Continue appears, and then press printing. • Format the disk. to clear the message and continue printing. • Order a replacement fuser immediately. Note: Optional trays lock together when stacked. to clear the message and continue If the error message remains, the hard disk may be ...defective and require replacing. 80.xx Fuser near life warning • Press the up or down arrow button until Continue appears, and then press to clear the message and continue...
User Guide
Page 167
...the up or down arrow button until Continue appears, and then press to clear the message and continue printing. • Order a replacement fuser immediately. When print quality is reduced, install the new transfer module using the instruction sheet that came with the replacement part. When print ...quality is reduced, install the new fuser using the instruction sheet that came with the replacement part. 80.xx Replace fuser Replace the fuser using the instruction sheet that came with the replacement part. 80.xx Fuser missing Reinsert the fuser into the printer. 82.yy Replace waste ...
...the up or down arrow button until Continue appears, and then press to clear the message and continue printing. • Order a replacement fuser immediately. When print quality is reduced, install the new transfer module using the instruction sheet that came with the replacement part. When print ...quality is reduced, install the new fuser using the instruction sheet that came with the replacement part. 80.xx Replace fuser Replace the fuser using the instruction sheet that came with the replacement part. 80.xx Fuser missing Reinsert the fuser into the printer. 82.yy Replace waste ...

User Guide
Page 183
... BE WORN OR DEFECTIVE Replace the toner cartridge, the transfer module, or the fuser. CHECK THE PAPER TYPE AND WEIGHT SETTINGS Make sure the paper type and weight settings match the paper loaded in the tray: 1 From the printer ...
... BE WORN OR DEFECTIVE Replace the toner cartridge, the transfer module, or the fuser. CHECK THE PAPER TYPE AND WEIGHT SETTINGS Make sure the paper type and weight settings match the paper loaded in the tray: 1 From the printer ...

User Guide
Page 185
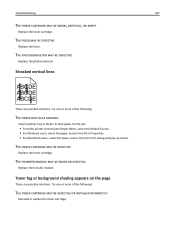
....) • 35.3 mm (1.39 in.) Replace the photoconductor if the defects occur every: • 28.3 mm (1.11 in.) • 72.4 mm (2.85 in.) Replace the fuser if the defects occur every: • 47.4 mm (1.87 in.) • 94.8 mm (3.73 in.) • 113.0 mm (4.45 in the tray: 1 From the printer...
....) • 35.3 mm (1.39 in.) Replace the photoconductor if the defects occur every: • 28.3 mm (1.11 in.) • 72.4 mm (2.85 in.) Replace the fuser if the defects occur every: • 47.4 mm (1.87 in.) • 94.8 mm (3.73 in.) • 113.0 mm (4.45 in the tray: 1 From the printer...
User Guide
Page 187
... INSTALLED INCORRECTLY Reinstall or replace the toner cartridge. Troubleshooting 187 THE TONER CARTRIDGE MAY BE WORN, DEFECTIVE, OR EMPTY Replace the toner cartridge. THE FUSER MAY BE DEFECTIVE Replace the fuser. THE PHOTOCONDUCTOR MAY BE DEFECTIVE Replace the photoconductor. Toner fog or background shading appears on the page These are possible solutions.
... INSTALLED INCORRECTLY Reinstall or replace the toner cartridge. Troubleshooting 187 THE TONER CARTRIDGE MAY BE WORN, DEFECTIVE, OR EMPTY Replace the toner cartridge. THE FUSER MAY BE DEFECTIVE Replace the fuser. THE PHOTOCONDUCTOR MAY BE DEFECTIVE Replace the photoconductor. Toner fog or background shading appears on the page These are possible solutions.

User Guide
Page 188
... the Paper Type and Paper Weight settings. If necessary, change the Paper Texture setting from the printer control panel Quality menu. THE FUSER MAY BE WORN OR DEFECTIVE Replace the fuser. CHECK THE SOFTWARE PROGRAM OR APPLICATION The software program or application may need to print, specify the correct type setting: •...
... the Paper Type and Paper Weight settings. If necessary, change the Paper Texture setting from the printer control panel Quality menu. THE FUSER MAY BE WORN OR DEFECTIVE Replace the fuser. CHECK THE SOFTWARE PROGRAM OR APPLICATION The software program or application may need to print, specify the correct type setting: •...

User Guide
Page 189
... the toner cartridge. Try one or more information, contact Customer Support. THE PHOTOCONDUCTOR MAY BE DEFECTIVE Replace the photoconductor. Troubleshooting 189 THE FUSER MAY BE WORN OR DEFECTIVE Replace the fuser. THERE IS TONER IN THE PAPER PATH The printer may need to print, specify the correct type setting: • For Windows...
... the toner cartridge. Try one or more information, contact Customer Support. THE PHOTOCONDUCTOR MAY BE DEFECTIVE Replace the photoconductor. Troubleshooting 189 THE FUSER MAY BE WORN OR DEFECTIVE Replace the fuser. THERE IS TONER IN THE PAPER PATH The printer may need to print, specify the correct type setting: • For Windows...
User Guide
Page 208
... 166 61 Remove defective hard disk 166 62 Disk full 166 63 Unformatted disk 166 80.xx Fuser life warning 167 80.xx Fuser missing 167 80.xx Fuser near life warning 166 80.xx Replace fuser 167 82.yy Replace waste toner box 167 82.yy Waste toner box missing 167 82.yy...
... 166 61 Remove defective hard disk 166 62 Disk full 166 63 Unformatted disk 166 80.xx Fuser life warning 167 80.xx Fuser missing 167 80.xx Fuser near life warning 166 80.xx Replace fuser 167 82.yy Replace waste toner box 167 82.yy Waste toner box missing 167 82.yy...


