
User Guide
Page 77
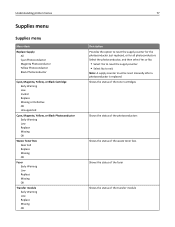
...status of the transfer module Understanding printer menus Supplies menu Supplies menu Menu item Replace Supply All Cyan Photoconductor Magenta Photoconductor Yellow Photoconductor Black Photoconductor Cyan, Magenta, Yellow, or Black Cartridge Early Warning Low Invalid Replace Missing or Defective OK Unsupported Cyan,...Low Replace Missing OK 77 Description Provides the option to reset the supply counter for the photoconductor just replaced, or for all photoconductors Select the photoconductor, and then select Yes or No: • Select Yes to reset the supply counter. • Select No to exit...
...status of the transfer module Understanding printer menus Supplies menu Supplies menu Menu item Replace Supply All Cyan Photoconductor Magenta Photoconductor Yellow Photoconductor Black Photoconductor Cyan, Magenta, Yellow, or Black Cartridge Early Warning Low Invalid Replace Missing or Defective OK Unsupported Cyan,...Low Replace Missing OK 77 Description Provides the option to reset the supply counter for the photoconductor just replaced, or for all photoconductors Select the photoconductor, and then select Yes or No: • Select Yes to reset the supply counter. • Select No to exit...
User Guide
Page 138
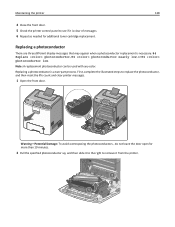
... messages. 6 Repeat as needed for more than 10 minutes. 2 Pull the specified photoconductor up, and then slide it to the right to replace the photoconductor, and then reset the life count and clear printer messages. 1 Open the front door. Note: A replacement photoconductor can be used with any color. First, complete the illustrated steps to...
... messages. 6 Repeat as needed for more than 10 minutes. 2 Pull the specified photoconductor up, and then slide it to the right to replace the photoconductor, and then reset the life count and clear printer messages. 1 Open the front door. Note: A replacement photoconductor can be used with any color. First, complete the illustrated steps to...
User Guide
Page 140
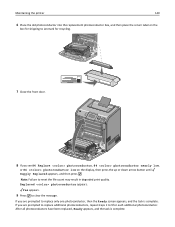
..., and the task is complete. If you see 84 Replace photoconductor, 84 photoconductor nearly low, or 84 photoconductor low on the box for shipping to Lexmark for each additional photoconductor. Yes appears. 9 Press to 9 for recycling. 7 Close the front door. 8 If you are prompted to reset the life count may result in degraded print quality. Replaced...
..., and the task is complete. If you see 84 Replace photoconductor, 84 photoconductor nearly low, or 84 photoconductor low on the box for shipping to Lexmark for each additional photoconductor. Yes appears. 9 Press to 9 for recycling. 7 Close the front door. 8 If you are prompted to reset the life count may result in degraded print quality. Replaced...
User Guide
Page 179
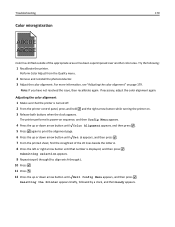
Perform Color Adjust from the Quality menu. 2 Remove and reinstall the photoconductor. 3 Adjust the color alignment. If necessary, adjust the color alignment again. Adjusting the color alignment 1 Make sure that number is turned off. 2 From... arrow button while turning the printer on. 3 Release both buttons when the clock appears. Note: If you have not resolved the issue, then recalibrate again. Resetting the Printer appears briefly, followed by a clock, and then Ready appears. Try the following: 1 Recalibrate the printer. Submitting selection appears. 9 Repeat steps 6 through ...
Perform Color Adjust from the Quality menu. 2 Remove and reinstall the photoconductor. 3 Adjust the color alignment. If necessary, adjust the color alignment again. Adjusting the color alignment 1 Make sure that number is turned off. 2 From... arrow button while turning the printer on. 3 Release both buttons when the clock appears. Note: If you have not resolved the issue, then recalibrate again. Resetting the Printer appears briefly, followed by a clock, and then Ready appears. Try the following: 1 Recalibrate the printer. Submitting selection appears. 9 Repeat steps 6 through ...

