User's Guide
Page 5
... printer for long-term storage 80 Storing supplies ...81 Storing media ...81 Storing the toner cartridges and photoconductor units 81 Replacing the toner cartridges ...81 Recycling Lexmark products ...83 Replacing the photoconductor units ...83 Replacing the fuser ...83 Replacing the waste toner box ...83 Replacing the transfer belt ...83 Cleaning the printhead lenses ...84 Aligning...
... printer for long-term storage 80 Storing supplies ...81 Storing media ...81 Storing the toner cartridges and photoconductor units 81 Replacing the toner cartridges ...81 Recycling Lexmark products ...83 Replacing the photoconductor units ...83 Replacing the fuser ...83 Replacing the waste toner box ...83 Replacing the transfer belt ...83 Cleaning the printhead lenses ...84 Aligning...
User's Guide
Page 80
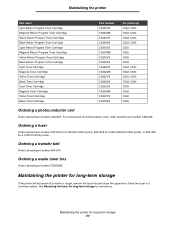
.... Ordering a waste toner box Order Lexmark part number C52025X. For a multi-pack of photoconductor units, order Lexmark part number C52034X...Toner Cartridge Cyan Toner Cartridge Magenta Toner Cartridge Yellow Toner Cartridge Black Toner Cartridge Cyan Toner Cartridge Magenta Toner Cartridge Yellow Toner Cartridge Black Toner Cartridge Part Number C5220CS C5220MS C5220YS C5220KS C5200CS C5200MS C5200YS C5200KS C5222CS C5222MS C5222YS C5222KS C5202CS C5202MS C5202YS C5202KS For printer(s) C522, C524 C522, C524 C522, C524 C522, C524 C520 C520 C520 C520 C522, C524 C522, C524 C522, C524 C522...
.... Ordering a waste toner box Order Lexmark part number C52025X. For a multi-pack of photoconductor units, order Lexmark part number C52034X...Toner Cartridge Cyan Toner Cartridge Magenta Toner Cartridge Yellow Toner Cartridge Black Toner Cartridge Cyan Toner Cartridge Magenta Toner Cartridge Yellow Toner Cartridge Black Toner Cartridge Part Number C5220CS C5220MS C5220YS C5220KS C5200CS C5200MS C5200YS C5200KS C5222CS C5222MS C5222YS C5222KS C5202CS C5202MS C5202YS C5202KS For printer(s) C522, C524 C522, C524 C522, C524 C522, C524 C520 C520 C520 C520 C522, C524 C522, C524 C522, C524 C522...
User's Guide
Page 83
... waste toner box When 82 Waste toner box nearly full appears on the operator panel, replace the photoconductor unit immediately. Make sure one is on the computer screen. Wait for it to light when printing black-only text and art for long periods. See Ordering a transfer belt for more information. Maintaining the printer Recycling Lexmark...
... waste toner box When 82 Waste toner box nearly full appears on the operator panel, replace the photoconductor unit immediately. Make sure one is on the computer screen. Wait for it to light when printing black-only text and art for long periods. See Ordering a transfer belt for more information. Maintaining the printer Recycling Lexmark...
User's Guide
Page 144
... verifying installation with menu settings page 28 ordering maintenance items 79 fuser 80 photoconductor units 80 toner cartridges 79 transfer belt 80 waste toner box 80 supplies 79 fuser 80 photoconductor units 80 toner cartridges 79 transfer belt 80 waste toner box 80 P paper letterhead 37 loading manual feed slot 58 multipurpose feeder 53, 55 optional...
... verifying installation with menu settings page 28 ordering maintenance items 79 fuser 80 photoconductor units 80 toner cartridges 79 transfer belt 80 waste toner box 80 supplies 79 fuser 80 photoconductor units 80 toner cartridges 79 transfer belt 80 waste toner box 80 P paper letterhead 37 loading manual feed slot 58 multipurpose feeder 53, 55 optional...
User's Guide
Page 145
... breaks 92 unresponsive printer 90 R recycling products 83 used supplies 82 repeat print 111 replacing fuser 83 photoconductor units 83 toner cartridges 81 transfer belt 83 waste toner box 83 reserve print 111 restoring factory default settings 107 S safety information 2 Secure mode 116 security 802.1x Authenticating... job 24 serial number 105 setting Paper Size 62 Paper Type 62 settings, restoring factory defaults 107 Setup Menu using Alarm Control 109 Toner Alarm 109 Simple Network Management Protocol, security 116 sizes, media 40, 41 status of supplies, determining 78 storing media 40, 81 ...
... breaks 92 unresponsive printer 90 R recycling products 83 used supplies 82 repeat print 111 replacing fuser 83 photoconductor units 83 toner cartridges 81 transfer belt 83 waste toner box 83 reserve print 111 restoring factory default settings 107 S safety information 2 Secure mode 116 security 802.1x Authenticating... job 24 serial number 105 setting Paper Size 62 Paper Type 62 settings, restoring factory defaults 107 Setup Menu using Alarm Control 109 Toner Alarm 109 Simple Network Management Protocol, security 116 sizes, media 40, 41 status of supplies, determining 78 storing media 40, 81 ...

User's Guide
Page 146
Index transfer belt 80 waste toner box 80 paper 78 recycling 82 specialty media 78 status 78 storing 81 toner 78 supplies, determining status 78 system board accessing 120 covering with metal plate 123 T toner cartridges recycling 82 replacing 81 storing 81...93 skewed print 96 solid color pages 96 streaked horizontal lines 94 streaked vertical lines 94 toner rubs off paper easily 95 toner specks 95 uneven print density 96 white or colored lines 93 printing problems 91 held jobs...92 unresponsive printer 90 U UNIX 15, 23 USB 133 V verify print 111 W waste toner box, replacing 83 Windows 10, 17 146
Index transfer belt 80 waste toner box 80 paper 78 recycling 82 specialty media 78 status 78 storing 81 toner 78 supplies, determining status 78 system board accessing 120 covering with metal plate 123 T toner cartridges recycling 82 replacing 81 storing 81...93 skewed print 96 solid color pages 96 streaked horizontal lines 94 streaked vertical lines 94 toner rubs off paper easily 95 toner specks 95 uneven print density 96 white or colored lines 93 printing problems 91 held jobs...92 unresponsive printer 90 U UNIX 15, 23 USB 133 V verify print 111 W waste toner box, replacing 83 Windows 10, 17 146
Menus and Messages Guide
Page 4
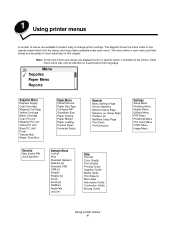
... Replace Supply Cyan Cartridge Magenta Cartridge Yellow Cartridge Black Cartridge Cyan PC Unit Magenta PC Unit Yellow PC Unit Black PC Unit Fuser Transfer Belt Waste Toner Box Paper Menu Default Source Paper Size/Type Configure MP Substitute Size Paper Texture Paper Weight Paper Loading Custom Types Universal Setup Reports Menu Settings...
... Replace Supply Cyan Cartridge Magenta Cartridge Yellow Cartridge Black Cartridge Cyan PC Unit Magenta PC Unit Yellow PC Unit Black PC Unit Fuser Transfer Belt Waste Toner Box Paper Menu Default Source Paper Size/Type Configure MP Substitute Size Paper Texture Paper Weight Paper Loading Custom Types Universal Setup Reports Menu Settings...
Menus and Messages Guide
Page 8
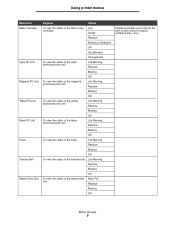
... Replace Missing OK To view the status of the yellow photoconductor unit. Menu Groups 8 Life Warning Replace Missing OK To view the status of the waste toner Near Full box. Life Warning Replace Missing OK To view the status of the transfer belt. Using printer menus Menu item Black Cartridge Cyan PC...
... Replace Missing OK To view the status of the yellow photoconductor unit. Menu Groups 8 Life Warning Replace Missing OK To view the status of the waste toner Near Full box. Life Warning Replace Missing OK To view the status of the transfer belt. Using printer menus Menu item Black Cartridge Cyan PC...
Menus and Messages Guide
Page 49
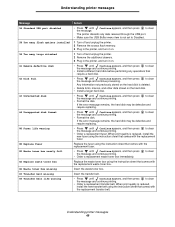
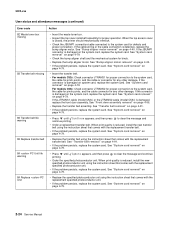
... Buffer menu item is deleted. • Delete fonts, macros, and other data stored on . • Press until the message. Insert the waste toner box. to clear If the error message remains, the hard disk may be defective and require replacing. • Press until Continue appears, and then...defective disk 62 Disk full 63 Unformatted disk 64 Unsupported disk format 80 Fuser life warning 80 Replace fuser 82 Waste toner box nearly full 82 Replace waste toner box 82 Waste toner box missing 83 Transfer belt missing 83 Transfer belt life warning Action • Press until Continue appears, and...
... Buffer menu item is deleted. • Delete fonts, macros, and other data stored on . • Press until the message. Insert the waste toner box. to clear If the error message remains, the hard disk may be defective and require replacing. • Press until Continue appears, and then...defective disk 62 Disk full 63 Unformatted disk 64 Unsupported disk format 80 Fuser life warning 80 Replace fuser 82 Waste toner box nearly full 82 Replace waste toner box 82 Waste toner box missing 83 Transfer belt missing 83 Transfer belt life warning Action • Press until Continue appears, and...
Menus and Messages Guide
Page 51
... full 49 63 Unformatted disk 49 64 Unsupported disk format 49 80 Fuser life warning 49 80 Replace fuser 49 82 Replace waste toner box 49 82 Waste toner box missing 49 82 Waste toner box nearly full 49 83 Replace transfer belt 50 83 Transfer belt life warning 49 83 Transfer belt missing 49 84...
... full 49 63 Unformatted disk 49 64 Unsupported disk format 49 80 Fuser life warning 49 80 Replace fuser 49 82 Replace waste toner box 49 82 Waste toner box missing 49 82 Waste toner box nearly full 49 83 Replace transfer belt 50 83 Transfer belt life warning 49 83 Transfer belt missing 49 84...
Menus and Messages Guide
Page 54
... Guide, Help 42 Supplies Menu 7 Black Cartridge 8 Black PC Unit 8 Cyan Cartridge 7 Cyan PC Unit 8 Fuser 8 Magenta Cartridge 7 Magenta PC Unit 8 Replace Supply 7 Transfer Belt 8 Waste Toner Box 8 Yellow Cartridge 7 Yellow PC Unit 8 Symbol Set, PCL 28 T TCP/IP 33 textured paper 12 Timeouts 17 Print Timeout 17 54
... Guide, Help 42 Supplies Menu 7 Black Cartridge 8 Black PC Unit 8 Cyan Cartridge 7 Cyan PC Unit 8 Fuser 8 Magenta Cartridge 7 Magenta PC Unit 8 Replace Supply 7 Transfer Belt 8 Waste Toner Box 8 Yellow Cartridge 7 Yellow PC Unit 8 Symbol Set, PCL 28 T TCP/IP 33 textured paper 12 Timeouts 17 Print Timeout 17 54

Service Manual
Page 19
Supplies Menu Replace Supply Cyan Cartridge Magenta Cartridge Yellow Cartridge Black Cartridge Cyan PC Unit Magenta PC Unit Yellow PC Unit Black PC Unit Waste Toner Box Fuser Transfer Belt Paper Menu Default Source Paper Size/Type Configure MP Substitute Size Paper Texture Paper Weight Paper Loading Custom Types Universal Setup ...
Supplies Menu Replace Supply Cyan Cartridge Magenta Cartridge Yellow Cartridge Black Cartridge Cyan PC Unit Magenta PC Unit Yellow PC Unit Black PC Unit Waste Toner Box Fuser Transfer Belt Paper Menu Default Source Paper Size/Type Configure MP Substitute Size Paper Texture Paper Weight Paper Loading Custom Types Universal Setup ...

Service Manual
Page 38
... • Press until Continue appears, and then press to clear the message and continue printing. • If printing continues, order a replacement waste toner box immediately. • If the problem persists, open the front access door and check the bump aligner shaft for binding. See "System card ...continued) Error code 62 Disk full 63 Unformatted disk 64 Unsupported disk format 80 Fuser life warning 80 Replace fuser 82 Waste toner box nearly full 82 Replace waste toner box Action • Press until Continue appears, and then press to clear the message and continue printing. • ...
... • Press until Continue appears, and then press to clear the message and continue printing. • If printing continues, order a replacement waste toner box immediately. • If the problem persists, open the front access door and check the bump aligner shaft for binding. See "System card ...continued) Error code 62 Disk full 63 Unformatted disk 64 Unsupported disk format 80 Fuser life warning 80 Replace fuser 82 Waste toner box nearly full 82 Replace waste toner box Action • Press until Continue appears, and then press to clear the message and continue printing. • ...
Service Manual
Page 39
... assembly. When print quality is defective, replace the bump aligner motor. 5022-xxx User status and attendance messages (continued) Error code Action 82 Waste toner box missing • Insert the waste toner box. • Inspect the top cover camshaft assembly for defects and proper connection. See "Bump aligner motor removal" on the system card...
... assembly. When print quality is defective, replace the bump aligner motor. 5022-xxx User status and attendance messages (continued) Error code Action 82 Waste toner box missing • Insert the waste toner box. • Inspect the top cover camshaft assembly for defects and proper connection. See "Bump aligner motor removal" on the system card...

Service Manual
Page 57
...Questions / actions Yes 4 Reconnect JHVPS1 cable to step 5. Replace the toner level sensor that the waste toner assembly is reinstalled. Replace the system card. Attach the negative end of each toner level sensor cable. See "Toner level sensor removal" on any of the HVPS (see the illustration below...). Pin1 (typical) 4X Negative lead Waste toner assembly Is there approximately 5 V dc on page 4-83. ...
...Questions / actions Yes 4 Reconnect JHVPS1 cable to step 5. Replace the toner level sensor that the waste toner assembly is reinstalled. Replace the system card. Attach the negative end of each toner level sensor cable. See "Toner level sensor removal" on any of the HVPS (see the illustration below...). Pin1 (typical) 4X Negative lead Waste toner assembly Is there approximately 5 V dc on page 4-83. ...
Service Manual
Page 92
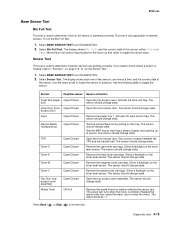
...exit) Inner Door (front Open/Closed access door) Input Open/Closed Narrow Media (transparency) Open/Closed TPS Toner C Toner K Toner M Toner Y Top Door (top access cover assembly) Waste Toner Open/Closed Open/Closed Open/Closed Open/Closed Open/Closed Open/Closed OK/Full Open the top access cover. ...The sensor should change state. The sensor should change state. Open the top access cover assembly. Remove the waste toner box before entering the sensor test. Replace the waste toner box, leave the menu, and re-enter the menu. Diagnostic aids 3-15 Activate the input sensor flag...
...exit) Inner Door (front Open/Closed access door) Input Open/Closed Narrow Media (transparency) Open/Closed TPS Toner C Toner K Toner M Toner Y Top Door (top access cover assembly) Waste Toner Open/Closed Open/Closed Open/Closed Open/Closed Open/Closed Open/Closed OK/Full Open the top access cover. ...The sensor should change state. The sensor should change state. Open the top access cover assembly. Remove the waste toner box before entering the sensor test. Replace the waste toner box, leave the menu, and re-enter the menu. Diagnostic aids 3-15 Activate the input sensor flag...

Service Manual
Page 115
Bump aligner roll Bump aligner gears Bump aligner gears Bump aligner motor Note: If this motor is supplied from the bump aligner motor. The motor drives a set of bump aligner gears which causes the bump aligner roll to turn . 5022-xxx Bump aligner drive The power to turn the bump aligner roll is stalling or causing waste toner box full messages, the vertical auger mechanism might be causing the problem. 3-38 Service Manual
Bump aligner roll Bump aligner gears Bump aligner gears Bump aligner motor Note: If this motor is supplied from the bump aligner motor. The motor drives a set of bump aligner gears which causes the bump aligner roll to turn . 5022-xxx Bump aligner drive The power to turn the bump aligner roll is stalling or causing waste toner box full messages, the vertical auger mechanism might be causing the problem. 3-38 Service Manual

Service Manual
Page 130
... located inside the transfer belt unit. Photoconductor drum cleaning blade Transfer belt cleaning blade Transfer belt waste toner container Transfer belt cleaning shaft Diagnostic aids 3-53 Any waste toner that is scraped off of the electrophotographic process cycle. 5022-xxx Cleaning The transfer belt and ...photoconductor drum are cleaned at the end of the belt is collected in the waste toner container located next to the belt...
... located inside the transfer belt unit. Photoconductor drum cleaning blade Transfer belt cleaning blade Transfer belt waste toner container Transfer belt cleaning shaft Diagnostic aids 3-53 Any waste toner that is scraped off of the electrophotographic process cycle. 5022-xxx Cleaning The transfer belt and ...photoconductor drum are cleaned at the end of the belt is collected in the waste toner container located next to the belt...

Service Manual
Page 153
A C B 4-20 Service Manual Place the printer on page 7-3 for the part number. 1. Warning: Be careful not to remove the cover. Remove the three screws (A). 6. Remove the waste toner assembly. Open the top access door. 4. Open the front access door. 5. Press the locking tab (B), slide the cover down, and lift the bottom out to damage the two small locking tabs (C). 5022-xxx Left cover removal See "Left cover" on the table with the left side edge hanging over slightly. 2. See "Waste toner assembly removal" on page 4-93. 3.
A C B 4-20 Service Manual Place the printer on page 7-3 for the part number. 1. Warning: Be careful not to remove the cover. Remove the three screws (A). 6. Remove the waste toner assembly. Open the top access door. 4. Open the front access door. 5. Press the locking tab (B), slide the cover down, and lift the bottom out to damage the two small locking tabs (C). 5022-xxx Left cover removal See "Left cover" on the table with the left side edge hanging over slightly. 2. See "Waste toner assembly removal" on page 4-93. 3.

Service Manual
Page 221
Install the e-clip (N). Install the rear mounting screws (K). 9. Place the left side of the camshaft assembly through the opening in the waste toner shutter (G). 5022-xxx 7. Also make sure the drive pinion (I H L K J M N 4-88 Service Manual G I ) engages the upper retraction plate (J). 8. Make sure the cam (H) engages the waste toner shutter (G). Slide the spring (L) and the lever arm (M) onto the shaft. 10.
Install the e-clip (N). Install the rear mounting screws (K). 9. Place the left side of the camshaft assembly through the opening in the waste toner shutter (G). 5022-xxx 7. Also make sure the drive pinion (I H L K J M N 4-88 Service Manual G I ) engages the upper retraction plate (J). 8. Make sure the cam (H) engages the waste toner shutter (G). Slide the spring (L) and the lever arm (M) onto the shaft. 10.


