

User's Guide
Page 10
...then make it the active application. Additional instructions for Macintosh and may not have support for using the printer software on a Macintosh operating system. The electronic version installs automatically with the programs. 1 Do one of the following: • In Windows Vista, click . • In ...Windows XP and earlier, click Start. 2 Click All Programs or Programs, and then select the printer program folder from the list. 3 From the program,...
...then make it the active application. Additional instructions for Macintosh and may not have support for using the printer software on a Macintosh operating system. The electronic version installs automatically with the programs. 1 Do one of the following: • In Windows Vista, click . • In ...Windows XP and earlier, click Start. 2 Click All Programs or Programs, and then select the printer program folder from the list. 3 From the program,...
User's Guide
Page 11
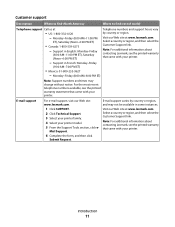
... statement that came with your printer. Visit our Web site at www.lexmark.com. E-mail support For e-mail support, visit our Web site: www.lexmark.com. 1 Click SUPPORT. 2 Click Technical Support. 3 Select your printer family. 4 Select your printer. Select a country or region, and then select the Customer Support link. Visit our Web site at www.lexmark.com. Note: For additional information...
... statement that came with your printer. Visit our Web site at www.lexmark.com. E-mail support For e-mail support, visit our Web site: www.lexmark.com. 1 Click SUPPORT. 2 Click Technical Support. 3 Select your printer family. 4 Select your printer. Select a country or region, and then select the Customer Support link. Visit our Web site at www.lexmark.com. Note: For additional information...
User's Guide
Page 12
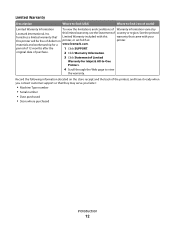
...lexmark.com. See the printed furnishes a limited warranty that Limited Warranty included with this warranty that they may serve you faster: • Machine Type number • Serial number • Date purchased • Store where purchased Introduction 12 materials and workmanship for Inkjet & All-In-One Printers.... 4 Scroll through the Web page to find (USA) Where to view the warranty. Record the following information (located on the store receipt and the back of the printer), and have it ready when you contact customer support so that came ...
...lexmark.com. See the printed furnishes a limited warranty that Limited Warranty included with this warranty that they may serve you faster: • Machine Type number • Serial number • Date purchased • Store where purchased Introduction 12 materials and workmanship for Inkjet & All-In-One Printers.... 4 Scroll through the Web page to find (USA) Where to view the warranty. Record the following information (located on the store receipt and the back of the printer), and have it ready when you contact customer support so that came ...
User's Guide
Page 15
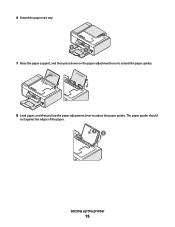
The paper guides should rest against the edges of the paper. 12 Setting up the paper adjustment lever to extend the paper guides. 8 Load paper, and then pull up the printer 15 6 Extend the paper exit tray. 2 1 7 Raise the paper support, and then press down on the paper adjustment lever to adjust the paper guides.
The paper guides should rest against the edges of the paper. 12 Setting up the paper adjustment lever to extend the paper guides. 8 Load paper, and then pull up the printer 15 6 Extend the paper exit tray. 2 1 7 Raise the paper support, and then press down on the paper adjustment lever to adjust the paper guides.
User's Guide
Page 20
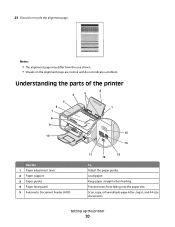
... Scan, copy, or fax multiple-page letter-, legal-, and A4-size documents. Understanding the parts of the printer 2 4 3 5 6 1 7 8 9 10 W I F I PRINTING WI F I PRINTING 15 14 Use the 1 Paper adjustment lever 2 Paper support 3 Paper guides 4 Paper feed guard 5 Automatic Document Feeder (ADF) 11 13 12 To Adjust the paper guides. Prevent items from the...
... Scan, copy, or fax multiple-page letter-, legal-, and A4-size documents. Understanding the parts of the printer 2 4 3 5 6 1 7 8 9 10 W I F I PRINTING WI F I PRINTING 15 14 Use the 1 Paper adjustment lever 2 Paper support 3 Paper guides 4 Paper feed guard 5 Automatic Document Feeder (ADF) 11 13 12 To Adjust the paper guides. Prevent items from the...
User's Guide
Page 31
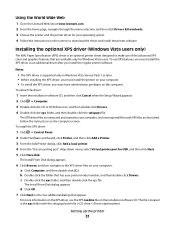
To use of the advanced XPS color and graphics features that has your printer model number, and then double-click Drivers. Notes: • The XPS driver is supported only in the xps folder with the setupxps batch file (:\Drivers\xps\readme). c Double-click the xps folder, and then double-...on the screens to download the driver and install the printer software. The file is an optional printer driver designed to make use XPS features, you install the regular printer software. Using the World Wide Web 1 Go to the Lexmark Web site at www.lexmark.com. 2 From the home page, navigate through ...
To use of the advanced XPS color and graphics features that has your printer model number, and then double-click Drivers. Notes: • The XPS driver is supported only in the xps folder with the setupxps batch file (:\Drivers\xps\readme). c Double-click the xps folder, and then double-...on the screens to download the driver and install the printer software. The file is an optional printer driver designed to make use XPS features, you install the regular printer software. Using the World Wide Web 1 Go to the Lexmark Web site at www.lexmark.com. 2 From the home page, navigate through ...
User's Guide
Page 33
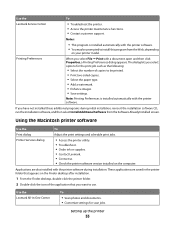
... ink or supplies. • Contact Lexmark. • Contact us. • Check the printer software version installed on your printer model. Note: Printing Preferences is installed automatically with a document open and then click Properties, a Printing Preferences dialog appears. Use the Lexmark All-In-One Center To • Scan photos and.... If you want to install this program from the Software Already Installed screen. Use the Lexmark Service Center To • Troubleshoot the printer. • Access the printer maintenance functions. • Contact customer support.
... ink or supplies. • Contact Lexmark. • Contact us. • Check the printer software version installed on your printer model. Note: Printing Preferences is installed automatically with a document open and then click Properties, a Printing Preferences dialog appears. Use the Lexmark All-In-One Center To • Scan photos and.... If you want to install this program from the Software Already Installed screen. Use the Lexmark Service Center To • Troubleshoot the printer. • Access the printer maintenance functions. • Contact customer support.
User's Guide
Page 34
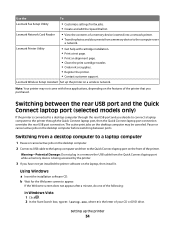
...port, then the Quick Connect laptop port connection overrides the rear USB port connection. If the Welcome screen does not appear after a minute, do one of the following: In Windows Vista 1 Click . 2 In the Start Search box, type D:\setup.exe, where D is the letter of... page. • Clean the print cartridge nozzles. • Order ink or supplies. • Register the printer. • Contact customer support. Switching from a memory device to appear. Use the To Lexmark Fax Setup Utility • Customize settings for the Welcome screen to the computer over a network. Note: Your...
...port, then the Quick Connect laptop port connection overrides the rear USB port connection. If the Welcome screen does not appear after a minute, do one of the following: In Windows Vista 1 Click . 2 In the Start Search box, type D:\setup.exe, where D is the letter of... page. • Clean the print cartridge nozzles. • Order ink or supplies. • Register the printer. • Contact customer support. Switching from a memory device to appear. Use the To Lexmark Fax Setup Utility • Customize settings for the Welcome screen to the computer over a network. Note: Your...
User's Guide
Page 44
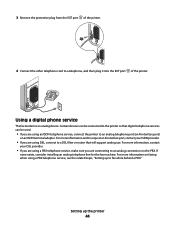
...DSL provider. • If you are using DSL, connect to a DSL filter or router that digital telephone services can be connected to the printer so that will support analog use. For more information, contact your ISDN provider. • If you are using a PBX telephone service, make sure you are ...can be used. • If you are using a PBX telephone service, see the related topic, "Setting up the printer 44 3 Remove the protective plug from the EXT port of the printer. 4 Connect the other telephone cord to fax while behind a PBX." For more information on faxing when using an ...
...DSL provider. • If you are using DSL, connect to a DSL filter or router that digital telephone services can be connected to the printer so that will support analog use. For more information, contact your ISDN provider. • If you are using a PBX telephone service, make sure you are ...can be used. • If you are using a PBX telephone service, see the related topic, "Setting up the printer 44 3 Remove the protective plug from the EXT port of the printer. 4 Connect the other telephone cord to fax while behind a PBX." For more information on faxing when using an ...

User's Guide
Page 45
...with g devices, as the Service Set Identifier (SSID). • If encryption was used to secure your system support person. or • Exactly 64 hexadecimal characters. Your printer is not using security, then you are Wi-Fi certified. Information you will not have a security key. ... server. This is using Wi-Fi Protected Access (WPA) security, the WPA passphrase should be : • From 8 to set up the printer. ASCII characters in a WPA passphrase are A-F, a-f, and 0-9. Hexadecimal characters are case-sensitive. If your router manufacturer that are having issues with an...
...with g devices, as the Service Set Identifier (SSID). • If encryption was used to secure your system support person. or • Exactly 64 hexadecimal characters. Your printer is not using security, then you are Wi-Fi certified. Information you will not have a security key. ... server. This is using Wi-Fi Protected Access (WPA) security, the WPA passphrase should be : • From 8 to set up the printer. ASCII characters in a WPA passphrase are A-F, a-f, and 0-9. Hexadecimal characters are case-sensitive. If your router manufacturer that are having issues with an...

User's Guide
Page 48
...Follow the instructions on your system support person. This will prompt you want . If you to manually assign an IP address to the printer. Installing the printer on the back of your network. Adding the printer to your wireless network 1 Set up your printer using the installation cable as ... Windows 1 Do one of the following: • In Windows Vista, click . • In Windows XP and earlier, click Start. 2 Click All Programs or Programs, and then select the printer program folder from the list. 3 Click Tools Œ Lexmark Wireless Setup Utility. If the printer is not automatically ...
...Follow the instructions on your system support person. This will prompt you want . If you to manually assign an IP address to the printer. Installing the printer on the back of your network. Adding the printer to your wireless network 1 Set up your printer using the installation cable as ... Windows 1 Do one of the following: • In Windows Vista, click . • In Windows XP and earlier, click Start. 2 Click All Programs or Programs, and then select the printer program folder from the list. 3 Click Tools Œ Lexmark Wireless Setup Utility. If the printer is not automatically ...
User's Guide
Page 54
.... 2 Click All Programs or Programs, and then select the printer program folder from the list. 3 Click Lexmark Wireless Setup Utility. 4 Follow the instructions on the Welcome screen. Installing the printer on the network must support WPS. The printer supports WPS and can be accessed using the method supported by your wireless network is a method of configuring devices...
.... 2 Click All Programs or Programs, and then select the printer program folder from the list. 3 Click Lexmark Wireless Setup Utility. 4 Follow the instructions on the Welcome screen. Installing the printer on the network must support WPS. The printer supports WPS and can be accessed using the method supported by your wireless network is a method of configuring devices...
User's Guide
Page 55
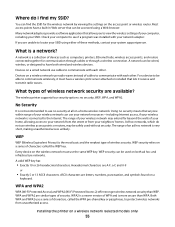
A network is very short, making unauthorized access unlikely. The wireless printer supports four security options: no security means that lets it must use cables to have a built-in Web server that allows you are similar types ... Equivalent Privacy) is not recommended to communicate with your SSID. ASCII characters are A-F, a-f, and 0-9 or • Exactly 5 or 13 ASCII characters. Check your system support person. A network can be able to see if a program was installed with each other . What types of these methods, contact your computer to communicate wirelessly...
A network is very short, making unauthorized access unlikely. The wireless printer supports four security options: no security means that lets it must use cables to have a built-in Web server that allows you are similar types ... Equivalent Privacy) is not recommended to communicate with your SSID. ASCII characters are A-F, a-f, and 0-9 or • Exactly 5 or 13 ASCII characters. Check your system support person. A network can be able to see if a program was installed with each other . What types of these methods, contact your computer to communicate wirelessly...
User's Guide
Page 56
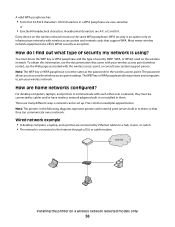
... must be set up. Wired network example • A desktop computer, a laptop, and a printer are case-sensitive. Internet Installing the printer on infrastructure networks with internal print servers built in them so that support WPA. ASCII characters in the following diagrams represent printers with wireless access points and network cards that they must use the...
... must be set up. Wired network example • A desktop computer, a laptop, and a printer are case-sensitive. Internet Installing the printer on infrastructure networks with internal print servers built in them so that support WPA. ASCII characters in the following diagrams represent printers with wireless access points and network cards that they must use the...

User's Guide
Page 62
... the hardware of a device instead of identifying a specific device on a wireless network. How do so. Installing the printer on the network. Yes, the printer supports a simultaneous USB and network connection. Every device capable of network equipment. This is available on a USB and a... network connection at the same time? The printer can help prevent access on the network from unwanted devices, such as a ...
... the hardware of a device instead of identifying a specific device on a wireless network. How do so. Installing the printer on the network. Yes, the printer supports a simultaneous USB and network connection. Every device capable of network equipment. This is available on a USB and a... network connection at the same time? The printer can help prevent access on the network from unwanted devices, such as a ...
User's Guide
Page 66
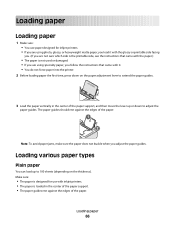
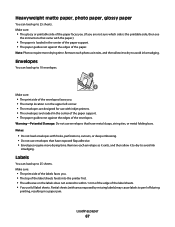
... used or damaged. • If you are using photo, glossy, or heavyweight matte paper, you load it . • You do not force paper into the printer. 2 Before loading paper the first time, press down to extend the paper guides. 3 Load the paper vertically in the center of the paper... which side is the printable side, see the instructions that came with the paper.) • The paper is loaded in the center of the paper support, and then move the lever up to 100 sheets (depending on the paper adjustment lever to adjust the paper guides. The paper guides should rest...
... used or damaged. • If you are using photo, glossy, or heavyweight matte paper, you load it . • You do not force paper into the printer. 2 Before loading paper the first time, press down to extend the paper guides. 3 Load the paper vertically in the center of the paper... which side is the printable side, see the instructions that came with the paper.) • The paper is loaded in the center of the paper support, and then move the lever up to 100 sheets (depending on the paper adjustment lever to adjust the paper guides. The paper guides should rest...
User's Guide
Page 67
...The stamp location is in the upper left corner. • The envelopes are designed for use with inkjet printers. • The envelopes are not sure which side is the printable side, then see the instructions that... came with the paper.) • The paper is loaded in the center of the paper support. • The paper guides rest against the edges of the envelopes. Make sure: • The glossy... printable side of the paper faces you. (If you are loaded in the center of the paper support. • The paper guides rest against the edges of the paper. Envelopes You can load up ...
...The stamp location is in the upper left corner. • The envelopes are designed for use with inkjet printers. • The envelopes are not sure which side is the printable side, then see the instructions that... came with the paper.) • The paper is loaded in the center of the paper support. • The paper guides rest against the edges of the envelopes. Make sure: • The glossy... printable side of the paper faces you. (If you are loaded in the center of the paper support. • The paper guides rest against the edges of the paper. Envelopes You can load up ...

User's Guide
Page 68
...are loaded in the center of the paper support. • The paper guides rest against the... instructions that came with paper backing sheets are loaded in the center of the paper support. • The paper guides rest against the edges of the label sheets. Remove ...of the transparencies faces you and down toward the printer. • The transparencies are loaded in the center of the paper support. • The paper guides rest against the ... faces you . • The cards are loaded in the center of the paper support. • The paper guides rest against the edges of labels as it exits, ...
...are loaded in the center of the paper support. • The paper guides rest against the... instructions that came with paper backing sheets are loaded in the center of the paper support. • The paper guides rest against the edges of the label sheets. Remove ...of the transparencies faces you and down toward the printer. • The transparencies are loaded in the center of the paper support. • The paper guides rest against the ... faces you . • The cards are loaded in the center of the paper support. • The paper guides rest against the edges of labels as it exits, ...
User's Guide
Page 69
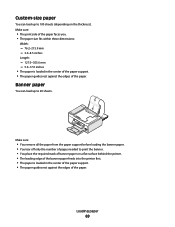
...You can load up to 100 sheets (depending on a flat surface behind the printer. • The leading edge of the banner paper feeds into the printer first. • The paper is loaded in the center of the paper support. • The paper guides rest against the edges of the paper. Make sure...: • You remove all the paper from the paper support before loading the banner paper. • You...
...You can load up to 100 sheets (depending on a flat surface behind the printer. • The leading edge of the banner paper feeds into the printer first. • The paper is loaded in the center of the paper support. • The paper guides rest against the edges of the paper. Make sure...: • You remove all the paper from the paper support before loading the banner paper. • You...
User's Guide
Page 72
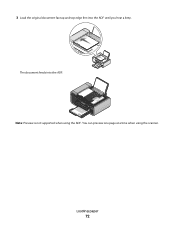
Loading paper 72 WI F I PRINTING Note: Preview is not supported when using the scanner. The document feeds into the ADF until you hear a beep. You can preview one page at a time when using the ADF. 3 Load the original document faceup and top edge first into the ADF.
Loading paper 72 WI F I PRINTING Note: Preview is not supported when using the scanner. The document feeds into the ADF until you hear a beep. You can preview one page at a time when using the ADF. 3 Load the original document faceup and top edge first into the ADF.


