Setup Sheet
Page 1
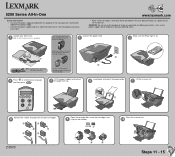
... you continue, remove the photo cartridge from the print cartridges. 8 Open the cartridge lids, insert the cartridges, and 9 snap the lids closed. Connect the power cord. 2 Make sure the Power light is near the product and easily accessible. Lift the paper support and extend 5 the paper exit tray. Note: You may need to a professional service person. Load paper and adjust the paper guide. 6 Lift the scanner unit. 7 Remove the sticker and tape from the print cartridge storage unit. CAUTION: Do...
... you continue, remove the photo cartridge from the print cartridges. 8 Open the cartridge lids, insert the cartridges, and 9 snap the lids closed. Connect the power cord. 2 Make sure the Power light is near the product and easily accessible. Lift the paper support and extend 5 the paper exit tray. Note: You may need to a professional service person. Load paper and adjust the paper guide. 6 Lift the scanner unit. 7 Remove the sticker and tape from the print cartridge storage unit. CAUTION: Do...
Setup Sheet
Page 2
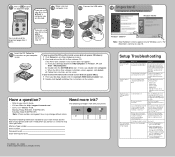
Connect the USB cable. 13 14 Important! For Macintosh, continue to a working electrical outlet? If necessary, double-click setup.exe. c When the All-In-One software installation screen appears, click Install. d Follow the instructions on your computer screen. Is your operating system compatible with a computer, continue to step 12. Remove the print cartridges, check for Windows users. Windows 98/Me You may serve you are using your All-In-One with the All-InOne...
Connect the USB cable. 13 14 Important! For Macintosh, continue to a working electrical outlet? If necessary, double-click setup.exe. c When the All-In-One software installation screen appears, click Install. d Follow the instructions on your computer screen. Is your operating system compatible with a computer, continue to step 12. Remove the print cartridges, check for Windows users. Windows 98/Me You may serve you are using your All-In-One with the All-InOne...


