Wireless Setup Guide
Page 6
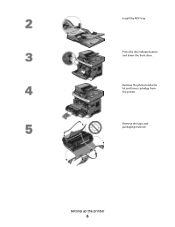
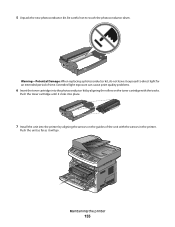
Setting up the printer 6 Press the door release button and lower the front door. Remove the tape and packaging material. Remove the photoconductor kit and toner cartridge from the printer. Install the ADF tray.
Setting up the printer 6 Press the door release button and lower the front door. Remove the tape and packaging material. Remove the photoconductor kit and toner cartridge from the printer. Install the ADF tray.
Wireless Setup Guide
Page 7
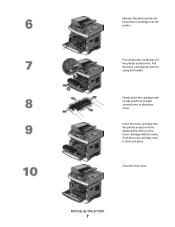
Firmly shake the cartridge side to side and front to back several times to distribute toner. Press the button on the toner cartridge with the tracks. Reinsert the photoconductor kit and toner cartridge into place. Setting up and out using the handle. Insert the toner cartridge into the photoconductor kit by aligning the rollers on the base of the photoconductor kit. Pull the toner cartridge up the printer 7 Close the front door. Push the toner cartridge until it clicks into the printer.
Firmly shake the cartridge side to side and front to back several times to distribute toner. Press the button on the toner cartridge with the tracks. Reinsert the photoconductor kit and toner cartridge into place. Setting up and out using the handle. Insert the toner cartridge into the photoconductor kit by aligning the rollers on the base of the photoconductor kit. Pull the toner cartridge up the printer 7 Close the front door. Push the toner cartridge until it clicks into the printer.
User's Guide
Page 2
... the printer software...25 Setting up wireless printing...27 Installing the printer on a wired network...32 Minimizing your printer's environmental impact 35 Saving paper and toner...35 Saving energy...36 Recycling...37 Reducing printer noise...38 Loading paper and specialty media 40 Setting the Paper Size and Paper Type...40 Configuring...
... the printer software...25 Setting up wireless printing...27 Installing the printer on a wired network...32 Minimizing your printer's environmental impact 35 Saving paper and toner...35 Saving energy...36 Recycling...37 Reducing printer noise...38 Loading paper and specialty media 40 Setting the Paper Size and Paper Type...40 Configuring...
User's Guide
Page 35
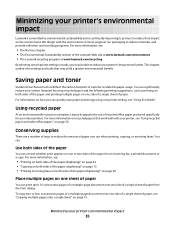
... office paper produced specifically for an incoming fax, a printed document, or a copy. Using recycled paper As an environmentally conscious company, Lexmark supports the use of a printer is continually improving its printers to reduce their impact on page 75. For more information, see "Using... on both sides of paper you can significantly reduce your printer's impact even further. Saving paper and toner Studies show that work well with the environment in laser printers. Conserving supplies There are a number of ways to reduce materials, and provide collection and recycling ...
... office paper produced specifically for an incoming fax, a printed document, or a copy. Using recycled paper As an environmentally conscious company, Lexmark supports the use of a printer is continually improving its printers to reduce their impact on page 75. For more information, see "Using... on both sides of paper you can significantly reduce your printer's impact even further. Saving paper and toner Studies show that work well with the environment in laser printers. Conserving supplies There are a number of ways to reduce materials, and provide collection and recycling ...

User's Guide
Page 38
...and then click the links or use the pre-paid shipping label. When you return a cartridge to Lexmark, you can also: 1 Visit our Web site at www.lexmark.com/recycle. 2 From the Toner Cartridges section, select your country from the list. 3 Follow the instructions on the computer screen. One ...hundred percent of the empty cartridges returned to Lexmark are transported in your area. Reducing printer noise Use ...
...and then click the links or use the pre-paid shipping label. When you return a cartridge to Lexmark, you can also: 1 Visit our Web site at www.lexmark.com/recycle. 2 From the Toner Cartridges section, select your country from the list. 3 Follow the instructions on the computer screen. One ...hundred percent of the empty cartridges returned to Lexmark are transported in your area. Reducing printer noise Use ...

User's Guide
Page 54
... mm (7.2 x 10.1 in the trays, can automatically feed paper weights up to 90 g/m2 (24 lb bond) grain long paper. Curl Curl is too rough, toner cannot fuse to printing and can automatically feed paper weights up to use paper between 150-250 Sheffield points produces the best print quality. If...
... mm (7.2 x 10.1 in the trays, can automatically feed paper weights up to 90 g/m2 (24 lb bond) grain long paper. Curl Curl is too rough, toner cannot fuse to printing and can automatically feed paper weights up to use paper between 150-250 Sheffield points produces the best print quality. If...
User's Guide
Page 55
... to withstand temperatures up to 230°C (446°F) without melting or releasing hazardous emissions. Use papers printed with a high degree of stability resulting in toner. Inks that are specifically designed for use paper, paper labels, or card stock that has been cut or trimmed by the temperature in .), such as...
... to withstand temperatures up to 230°C (446°F) without melting or releasing hazardous emissions. Use papers printed with a high degree of stability resulting in toner. Inks that are specifically designed for use paper, paper labels, or card stock that has been cut or trimmed by the temperature in .), such as...

User's Guide
Page 139
... Menu item Print Resolution 300 dpi 600 dpi 1200 dpi 1200 Image Q 2400 Image Q Pixel Boost Off Fonts Horizontally Vertically Both Directions Toner Darkness 1-10 Enhance Fine Lines On Off Gray Correction Auto Off Description Specifies the orientation of text and images. • Both Directions ...images. Description Specifies the printed output resolution Note: 600 dpi is the factory default setting. • Selecting a smaller number can help conserve toner. The printer driver default is the factory default setting. • To set Enhance Fine Lines using the Embedded Web Server, type the ...
... Menu item Print Resolution 300 dpi 600 dpi 1200 dpi 1200 Image Q 2400 Image Q Pixel Boost Off Fonts Horizontally Vertically Both Directions Toner Darkness 1-10 Enhance Fine Lines On Off Gray Correction Auto Off Description Specifies the orientation of text and images. • Both Directions ...images. Description Specifies the printed output resolution Note: 600 dpi is the factory default setting. • Selecting a smaller number can help conserve toner. The printer driver default is the factory default setting. • To set Enhance Fine Lines using the Embedded Web Server, type the ...
User's Guide
Page 140
... item Format Flash No Yes Defragment Flash No Yes Hex Trace Activate Coverage Estimator Off On Description Adjusts or darkens printed output and conserves toner Notes: • 0 is complete, the downloads are not executed. • To exit Hex Trace, turn the printer off or reset... the printer. When formatting is the factory default setting. • A negative value will lighten them and conserve toner. Adjusts the degree of difference between levels of black on a separator page. Note: Off is defragmenting. Menu item Brightness -6 to receive new...
... item Format Flash No Yes Defragment Flash No Yes Hex Trace Activate Coverage Estimator Off On Description Adjusts or darkens printed output and conserves toner Notes: • 0 is complete, the downloads are not executed. • To exit Hex Trace, turn the printer off or reset... the printer. When formatting is the factory default setting. • A negative value will lighten them and conserve toner. Adjusts the degree of difference between levels of black on a separator page. Note: Off is defragmenting. Menu item Brightness -6 to receive new...
User's Guide
Page 150
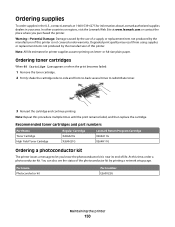
...: Repeat this time, order a photoconductor kit. At this procedure multiple times until the print remains faded, and then replace the cartridge. Recommended toner cartridges and part numbers Part Name Toner Cartridge High Yield Toner Cartridge Regular Cartridge X264A21G X264H21G Lexmark Return Program Cartridge X264A11G X264H11G Ordering a photoconductor kit The printer issues a message to redistribute...
...: Repeat this time, order a photoconductor kit. At this procedure multiple times until the print remains faded, and then replace the cartridge. Recommended toner cartridges and part numbers Part Name Toner Cartridge High Yield Toner Cartridge Regular Cartridge X264A21G X264H21G Lexmark Return Program Cartridge X264A11G X264H11G Ordering a photoconductor kit The printer issues a message to redistribute...
User's Guide
Page 151
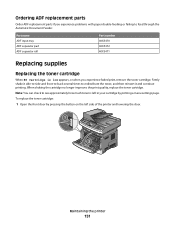
... to feed through the Automatic Document Feeder. To replace the toner cartridge: 1 Open the front door by printing a menu settings page. When shaking the cartridge no longer improves the print quality, replace the toner cartridge. Ordering ADF replacement parts Order ADF replacement parts if... you experience faded print, remove the toner cartridge. Part name ADF input tray ADF separator pad ADF separator roll Part number...
... to feed through the Automatic Document Feeder. To replace the toner cartridge: 1 Open the front door by printing a menu settings page. When shaking the cartridge no longer improves the print quality, replace the toner cartridge. Ordering ADF replacement parts Order ADF replacement parts if... you experience faded print, remove the toner cartridge. Part name ADF input tray ADF separator pad ADF separator roll Part number...
User's Guide
Page 152
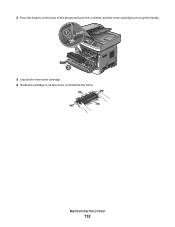
2 Press the button on the base of the photoconductor kit, and then pull the toner cartridge out using the handle. 1 2 3 Unpack the new toner cartridge. 4 Shake the cartridge in all directions to distribute the toner. Maintaining the printer 152
2 Press the button on the base of the photoconductor kit, and then pull the toner cartridge out using the handle. 1 2 3 Unpack the new toner cartridge. 4 Shake the cartridge in all directions to distribute the toner. Maintaining the printer 152
User's Guide
Page 153
... life warning or 84 Replace PC Kit first appears, you before the photoconductor kit reaches a page maximum by printing a menu settings page. Push the toner cartridge in as far as it will go. You can also see the status of the photoconductor kit by showing 84 PC Kit life warning... or 84 Replace PC Kit on the tracks of -life, print quality significantly decreases. 5 Install the new toner cartridge by aligning the rollers on the toner cartridge with the arrows on the display. The cartridge clicks into place when correctly installed. 6 Close the front door.
... life warning or 84 Replace PC Kit first appears, you before the photoconductor kit reaches a page maximum by printing a menu settings page. Push the toner cartridge in as far as it will go. You can also see the status of the photoconductor kit by showing 84 PC Kit life warning... or 84 Replace PC Kit on the tracks of -life, print quality significantly decreases. 5 Install the new toner cartridge by aligning the rollers on the toner cartridge with the arrows on the display. The cartridge clicks into place when correctly installed. 6 Close the front door.
User's Guide
Page 154
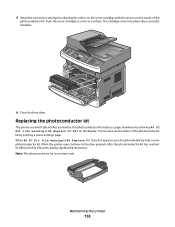
To replace the photoconductor kit: 1 Open the front door by pressing the button on the left side of the printer and lowering the front door. 2 Pull the photoconductor kit and toner cartridge out of the printer as a unit by pulling on the toner cartridge handle. 1 2 3 3 Place the unit on a flat, clean surface. 4 Press the button on the base of the photoconductor kit. Pull the toner cartridge up and out using the handle. 2 1 Maintaining the printer 154
To replace the photoconductor kit: 1 Open the front door by pressing the button on the left side of the printer and lowering the front door. 2 Pull the photoconductor kit and toner cartridge out of the printer as a unit by pulling on the toner cartridge handle. 1 2 3 3 Place the unit on a flat, clean surface. 4 Press the button on the base of the photoconductor kit. Pull the toner cartridge up and out using the handle. 2 1 Maintaining the printer 154
User's Guide
Page 155
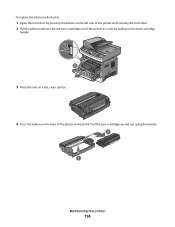
... of time. Push the unit as far as it clicks into place. 7 Install the unit into the photoconductor kit by aligning the arrows on the toner cartridge with the arrows in the printer. Be careful not to direct light for an extended period of the unit with the tracks. Push the... toner cartridge until it will go. Maintaining the printer 155 Warning-Potential Damage: When replacing a photoconductor kit, do not leave it exposed to touch the photoconductor ...
... of time. Push the unit as far as it clicks into place. 7 Install the unit into the photoconductor kit by aligning the arrows on the toner cartridge with the arrows in the printer. Be careful not to direct light for an extended period of the unit with the tracks. Push the... toner cartridge until it will go. Maintaining the printer 155 Warning-Potential Damage: When replacing a photoconductor kit, do not leave it exposed to touch the photoconductor ...
User's Guide
Page 158
... of your Web browser. These reports are useful for access to the Security menu mode. 6 Click Submit to see tray settings, the level of toner in the toner cartridge, the percentage of life remaining in the photoconductor kit, and capacity measurements of the printer, then print a network setup page and locate the...
... of your Web browser. These reports are useful for access to the Security menu mode. 6 Click Submit to see tray settings, the level of toner in the toner cartridge, the percentage of life remaining in the photoconductor kit, and capacity measurements of the printer, then print a network setup page and locate the...
User's Guide
Page 161
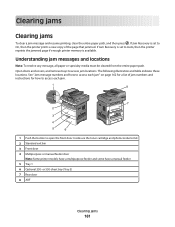
... enough printer memory is available. The following illustration and table indicate these locations. If Jam Recovery is set to access jam locations. Inside are the toner cartridge and photoconductor kit. 2 Standard exit bin 3 Front door 4 Multipurpose or manual feeder door Note: Some printer models have a multipurpose feeder and some have a manual...
... enough printer memory is available. The following illustration and table indicate these locations. If Jam Recovery is set to access jam locations. Inside are the toner cartridge and photoconductor kit. 2 Standard exit bin 3 Front door 4 Multipurpose or manual feeder door Note: Some printer models have a multipurpose feeder and some have a manual...
User's Guide
Page 163
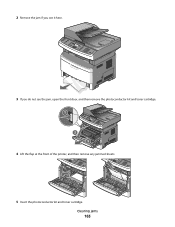
Clearing jams 163 2 Remove the jam if you see it here. 3 If you do not see the jam, open the front door, and then remove the photoconductor kit and toner cartridge. 1 2 3 4 Lift the flap at the front of the printer, and then remove any jammed sheets. 5 Insert the photoconductor kit and toner cartridge.
Clearing jams 163 2 Remove the jam if you see it here. 3 If you do not see the jam, open the front door, and then remove the photoconductor kit and toner cartridge. 1 2 3 4 Lift the flap at the front of the printer, and then remove any jammed sheets. 5 Insert the photoconductor kit and toner cartridge.
User's Guide
Page 164
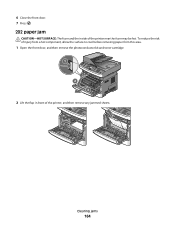
To reduce the risk of injury from a hot component, allow the surface to cool before removing paper from this area. 1 Open the front door, and then remove the photoconductor kit and toner cartridge. 1 2 3 2 Lift the flap in front of the printer near the fuser may be hot. Clearing jams 164 6 Close the front door. 7 Press . 202 paper jam CAUTION-HOT SURFACE: The fuser and the inside of the printer, and then remove any jammed sheets.
To reduce the risk of injury from a hot component, allow the surface to cool before removing paper from this area. 1 Open the front door, and then remove the photoconductor kit and toner cartridge. 1 2 3 2 Lift the flap in front of the printer near the fuser may be hot. Clearing jams 164 6 Close the front door. 7 Press . 202 paper jam CAUTION-HOT SURFACE: The fuser and the inside of the printer, and then remove any jammed sheets.
User's Guide
Page 165
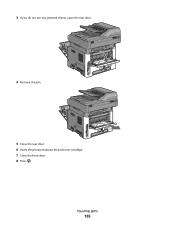
3 If you do not see any jammed sheets, open the rear door. 4 Remove the jam. 5 Close the rear door. 6 Insert the photoconductor kit and toner cartridge. 7 Close the front door. 8 Press . Clearing jams 165
3 If you do not see any jammed sheets, open the rear door. 4 Remove the jam. 5 Close the rear door. 6 Insert the photoconductor kit and toner cartridge. 7 Close the front door. 8 Press . Clearing jams 165


