User Guide
Page 3
Contents 3 Adjusting Power Saver ...41 Recycling...42 Recycling Lexmark products ...42 Recycling Lexmark packaging...42 Returning Lexmark cartridges for reuse or recycling 43 Loading paper and specialty media 44 Setting the paper size and type...44 Configuring Universal paper ... papers 59 Storing paper ...59 Supported paper sizes, types, weights, and capacities 60 Paper types and weights supported by the printer 60 Paper sizes supported by the printer...61 Paper tray capacities...62 Printing...63 Printing a document...63 Printing a document ...63 Printing on specialty media...64 Tips on...
Contents 3 Adjusting Power Saver ...41 Recycling...42 Recycling Lexmark products ...42 Recycling Lexmark packaging...42 Returning Lexmark cartridges for reuse or recycling 43 Loading paper and specialty media 44 Setting the paper size and type...44 Configuring Universal paper ... papers 59 Storing paper ...59 Supported paper sizes, types, weights, and capacities 60 Paper types and weights supported by the printer 60 Paper sizes supported by the printer...61 Paper tray capacities...62 Printing...63 Printing a document...63 Printing a document ...63 Printing on specialty media...64 Tips on...
User Guide
Page 5
...menu ...109 Image menu ...110 Maintaining the printer 111 Cleaning the exterior of the printer...111 Storing supplies...111 Checking the status of supplies from a network computer 111 Ordering supplies...112 Ordering toner cartridges ...112 Ordering a photoconductor kit ...113 Ordering...a maintenance kit ...113 Replacing supplies...113 Replacing the toner cartridge ...113 Replacing the photoconductor kit ...115 Moving the printer...118 Moving the printer to another location...118 Shipping the printer ...118 Administrative support 119 Finding advanced networking and administrator information ...
...menu ...109 Image menu ...110 Maintaining the printer 111 Cleaning the exterior of the printer...111 Storing supplies...111 Checking the status of supplies from a network computer 111 Ordering supplies...112 Ordering toner cartridges ...112 Ordering a photoconductor kit ...113 Ordering...a maintenance kit ...113 Replacing supplies...113 Replacing the toner cartridge ...113 Replacing the photoconductor kit ...115 Moving the printer...118 Moving the printer to another location...118 Shipping the printer ...118 Administrative support 119 Finding advanced networking and administrator information ...

User Guide
Page 6
Contents 6 Understanding jam messages and locations 124 200 paper jam...126 201 paper jam...128 202 paper jam...129 231 paper jam...130 233 paper jam...132 234 paper jam...132 235 paper jam...133 24x paper jam...133 251 paper jam...134 Troubleshooting 136 Understanding printer messages...136 Calibrating ...136 Cartridge Life Exceeded ...136 Change to ...136 Change to ...136 Change to ...137 Change to ...137 Close front door ...137 Load with ...137 Load with ...138 Load with ...138 Load with ...138 Load Manual Feeder with
Contents 6 Understanding jam messages and locations 124 200 paper jam...126 201 paper jam...128 202 paper jam...129 231 paper jam...130 233 paper jam...132 234 paper jam...132 235 paper jam...133 24x paper jam...133 251 paper jam...134 Troubleshooting 136 Understanding printer messages...136 Calibrating ...136 Cartridge Life Exceeded ...136 Change to ...136 Change to ...136 Change to ...137 Change to ...137 Close front door ...137 Load with ...137 Load with ...138 Load with ...138 Load with ...138 Load Manual Feeder with
User Guide
Page 7
...memory, some Held Jobs were deleted 143 38 Memory full ...143 39 Complex page, some data may not have printed 143 42.xy Cartridge region mismatch...143 51 Defective flash detected ...144 52 Not enough free space in flash memory for resources 144 53 Unformatted flash detected ......145 80 Routine Maintenance ...145 84 PC Kit life warning ...145 84 Replace PC Kit ...145 88 Cartridge low ...145 1565 Emulation error, load emulation option 146 Solving basic printer problems...146 Printer control panel display is blank or displays only diamonds 146 Solving printing problems...146 Jobs do not print...
...memory, some Held Jobs were deleted 143 38 Memory full ...143 39 Complex page, some data may not have printed 143 42.xy Cartridge region mismatch...143 51 Defective flash detected ...144 52 Not enough free space in flash memory for resources 144 53 Unformatted flash detected ......145 80 Routine Maintenance ...145 84 PC Kit life warning ...145 84 Replace PC Kit ...145 88 Cartridge low ...145 1565 Emulation error, load emulation option 146 Solving basic printer problems...146 Printer control panel display is blank or displays only diamonds 146 Solving printing problems...146 Jobs do not print...

User Guide
Page 41
... print a network setup page and locate the IP address in standby mode. • The alarm control and cartridge alarm sounds are turned off . • If your printer's environmental impact 41 Choose On (Text/Graphics) Note: This setting is ready to print. Off (Image/Photo) Note: Selecting Photo from 1-240 minutes.... Note: If you do one ‑half the normal processing speed. • Printer engine motors do not start until Quiet Mode appears, and then press . 6 Press the up or down arrow button to wait before the...
... print a network setup page and locate the IP address in standby mode. • The alarm control and cartridge alarm sounds are turned off . • If your printer's environmental impact 41 Choose On (Text/Graphics) Note: This setting is ready to print. Off (Image/Photo) Note: Selecting Photo from 1-240 minutes.... Note: If you do one ‑half the normal processing speed. • Printer engine motors do not start until Quiet Mode appears, and then press . 6 Press the up or down arrow button to wait before the...

User Guide
Page 42
... your area. Less packaging helps to recycle, and then select your area. When you return a cartridge to Lexmark, you want to ensure that the cartridge came in your printer's environmental impact 42 Using the printer control panel 1 Make sure the printer is less packaging to increase or decrease the number of . Facilities may not exist in...
... your area. Less packaging helps to recycle, and then select your area. When you return a cartridge to Lexmark, you want to ensure that the cartridge came in your printer's environmental impact 42 Using the printer control panel 1 Make sure the printer is less packaging to increase or decrease the number of . Facilities may not exist in...
User Guide
Page 43
You can also: 1 Visit our Web site at www.lexmark.com/recycle. 2 From the Toner Cartridges section, select your printer's environmental impact 43 Returning Lexmark cartridges for reuse or recycling The Lexmark Cartridge Collection Program diverts millions of the empty cartridges returned to return the cartridges are either reused or demanufactured for reuse or recycling, follow the instructions that came...
You can also: 1 Visit our Web site at www.lexmark.com/recycle. 2 From the Toner Cartridges section, select your printer's environmental impact 43 Returning Lexmark cartridges for reuse or recycling The Lexmark Cartridge Collection Program diverts millions of the empty cartridges returned to return the cartridges are either reused or demanufactured for reuse or recycling, follow the instructions that came...
User Guide
Page 66
... impact print quality. Partial sheets may contaminate the printer. Partial sheets also contaminate the printer and the cartridge with adhesive, and could void the warranty. • If zone coating of the adhesive at http://support.lexmark.com. Adhesive material contaminates the printer and could void the printer and cartridge warranties. • Do not use before buying large...
... impact print quality. Partial sheets may contaminate the printer. Partial sheets also contaminate the printer and the cartridge with adhesive, and could void the warranty. • If zone coating of the adhesive at http://support.lexmark.com. Adhesive material contaminates the printer and could void the printer and cartridge warranties. • Do not use before buying large...
User Guide
Page 98
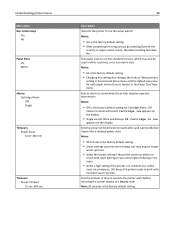
..., this setting also changes the Units of Measurement setting in the Univeral Setup menu and the default size value for Cartridge Alarm. Sets an alarm to sound when the printer requires operator intervention Notes: • Off is low appears on the display. Sets paper sizes to use the standard...wizard by selecting Done at the country or region select screen, the default setting becomes No. Understanding printer menus Menu item Run Initial setup Yes No Paper Sizes US Metric Alarms Cartridge Alarm Off Single Timeouts Power Saver 1min-240 min Timeouts Screen Timeout 15 sec-300 sec 98 ...
..., this setting also changes the Units of Measurement setting in the Univeral Setup menu and the default size value for Cartridge Alarm. Sets an alarm to sound when the printer requires operator intervention Notes: • Off is low appears on the display. Sets paper sizes to use the standard...wizard by selecting Done at the country or region select screen, the default setting becomes No. Understanding printer menus Menu item Run Initial setup Yes No Paper Sizes US Metric Alarms Cartridge Alarm Off Single Timeouts Power Saver 1min-240 min Timeouts Screen Timeout 15 sec-300 sec 98 ...
User Guide
Page 112
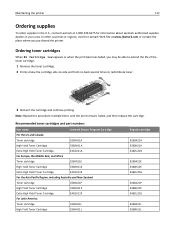
... print remains faded, and then replace the cartridge. Maintaining the printer 112 Ordering supplies To order supplies in your area. In other countries or regions, visit the Lexmark Web Site at 1-800-539-6275 for information about Lexmark authorized supplies dealers in the U.S., contact Lexmark at www.lexmark.com or contact the place where you may...
... print remains faded, and then replace the cartridge. Maintaining the printer 112 Ordering supplies To order supplies in your area. In other countries or regions, visit the Lexmark Web Site at 1-800-539-6275 for information about Lexmark authorized supplies dealers in the U.S., contact Lexmark at www.lexmark.com or contact the place where you may...

User Guide
Page 113
.... Order a maintenance kit when this time, order a photoconductor kit. When shaking the cartridge no longer improves the print quality, replace the toner cartridge. Maintaining the printer 113 Part name Extra High Yield Toner Cartridge Lexmark Return Program Cartridge E462U11L Regular cartridge E462U21G Ordering a photoconductor kit The printer issues a message to let you experience faded print, remove the toner...
.... Order a maintenance kit when this time, order a photoconductor kit. When shaking the cartridge no longer improves the print quality, replace the toner cartridge. Maintaining the printer 113 Part name Extra High Yield Toner Cartridge Lexmark Return Program Cartridge E462U11L Regular cartridge E462U21G Ordering a photoconductor kit The printer issues a message to let you experience faded print, remove the toner...
User Guide
Page 114
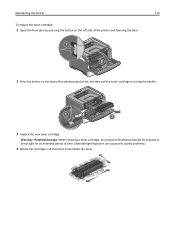
Extended light exposure can cause print quality problems. 4 Rotate the cartridge in all directions to direct light for an extended period of the photoconductor kit, and then pull the toner cartridge out using the handle. 3 Unpack the new toner cartridge. Maintaining the printer 114 To replace the toner cartridge: 1 Open the front door by pressing the button on the left side of the printer and lowering the door. 2 Press the button on the base of time. Warning-Potential Damage: When replacing a toner cartridge, do not leave the photoconductor kit exposed to distribute the toner.
Extended light exposure can cause print quality problems. 4 Rotate the cartridge in all directions to direct light for an extended period of the photoconductor kit, and then pull the toner cartridge out using the handle. 3 Unpack the new toner cartridge. Maintaining the printer 114 To replace the toner cartridge: 1 Open the front door by pressing the button on the left side of the printer and lowering the door. 2 Press the button on the base of time. Warning-Potential Damage: When replacing a toner cartridge, do not leave the photoconductor kit exposed to distribute the toner.

User Guide
Page 115
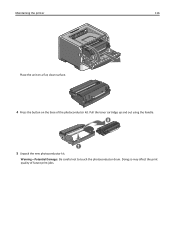
... door by pressing the button on the left side of the printer and lowering the front door. 3 Pull the photoconductor kit and toner cartridge out of the printer as it will go. Replacing the photoconductor kit The printer automatically notifies you should immediately order a new photoconductor kit. When... page maximum by pulling on the display. Note: The photoconductor kit and toner cartridge form a unit. Maintaining the printer 115 5 Install the new toner cartridge by printing a menu settings page. Push the toner cartridge in as far as a unit by showing 84 PC Kit life warning or 84...
... door by pressing the button on the left side of the printer and lowering the front door. 3 Pull the photoconductor kit and toner cartridge out of the printer as it will go. Replacing the photoconductor kit The printer automatically notifies you should immediately order a new photoconductor kit. When... page maximum by pulling on the display. Note: The photoconductor kit and toner cartridge form a unit. Maintaining the printer 115 5 Install the new toner cartridge by printing a menu settings page. Push the toner cartridge in as far as a unit by showing 84 PC Kit life warning or 84...
User Guide
Page 116
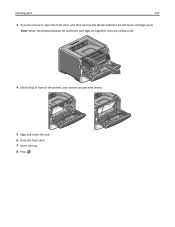
Pull the toner cartridge up and out using the handle. 5 Unpack the new photoconductor kit. Maintaining the printer 116 Place the unit on a flat, clean surface. 4 Press the button on the base of future print jobs. Warning-Potential Damage: Be careful not to touch the photoconductor drum. Doing so may affect the print quality of the photoconductor kit.
Pull the toner cartridge up and out using the handle. 5 Unpack the new photoconductor kit. Maintaining the printer 116 Place the unit on a flat, clean surface. 4 Press the button on the base of future print jobs. Warning-Potential Damage: Be careful not to touch the photoconductor drum. Doing so may affect the print quality of the photoconductor kit.
User Guide
Page 117
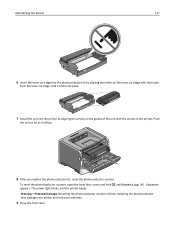
... far as it clicks into place. 7 Install the unit into the photoconductor kit by aligning the arrows on the toner cartridge with the arrows in the printer. To reset the photoconductor counter, open the front door, press and hold until it will go. 8 After you replace... the photoconductor counter without replacing the photoconductor may damage your printer and void your warranty. 9 Close the front door. Push the toner cartridge until Resetting PC Counter appears. Maintaining the printer 117 6 Insert the toner cartridge into the printer by aligning the rollers on the guides of the unit ...
... far as it clicks into place. 7 Install the unit into the photoconductor kit by aligning the arrows on the toner cartridge with the arrows in the printer. To reset the photoconductor counter, open the front door, press and hold until it will go. 8 After you replace... the photoconductor counter without replacing the photoconductor may damage your printer and void your warranty. 9 Close the front door. Push the toner cartridge until Resetting PC Counter appears. Maintaining the printer 117 6 Insert the toner cartridge into the printer by aligning the rollers on the guides of the unit ...
User Guide
Page 120
... of your Web browser. Note: If you do not know the IP address of the printer, the network, and supplies. Viewing reports You can view paper tray settings, the level of toner in the print cartridge, the percentage of life remaining in the address field of report you want to view.... To view reports from the Embedded Web Server. To view the device status: 1 Type the printer IP address in the maintenance kit, and capacity measurements ...
... of your Web browser. Note: If you do not know the IP address of the printer, the network, and supplies. Viewing reports You can view paper tray settings, the level of toner in the print cartridge, the percentage of life remaining in the address field of report you want to view.... To view reports from the Embedded Web Server. To view the device status: 1 Type the printer IP address in the maintenance kit, and capacity measurements ...
User Guide
Page 127
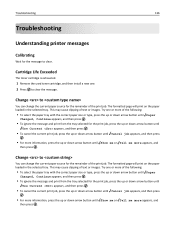
Note: When the photoconductor kit and toner cartridge are together, they are called a unit. 4 Lift the flap in front of the printer, and remove any jammed sheets. 5 Align and insert the unit. 6 Close the front door. 7 Insert the tray. 8 Press . Clearing jams 127 3 If you do not see it, open the front door, and then remove the photoconductor kit and toner cartridge (unit).
Note: When the photoconductor kit and toner cartridge are together, they are called a unit. 4 Lift the flap in front of the printer, and remove any jammed sheets. 5 Align and insert the unit. 6 Close the front door. 7 Insert the tray. 8 Press . Clearing jams 127 3 If you do not see it, open the front door, and then remove the photoconductor kit and toner cartridge (unit).
User Guide
Page 136
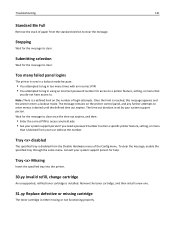
... paper loaded in the selected tray. The formatted page will print on the paper loaded in the selected tray. Cartridge Life Exceeded The toner cartridge is exhausted. 1 Remove the used toner cartridge, and then install a new one. 2 Press to clear. Try one or more of the print job. ...Show me or Tell me more appears, and then press . Try one or more of the print job. Troubleshooting 136 Troubleshooting Understanding printer messages Calibrating Wait for the message to clear the message. Change to You can change the current paper source for the remainder of the...
... paper loaded in the selected tray. The formatted page will print on the paper loaded in the selected tray. Cartridge Life Exceeded The toner cartridge is exhausted. 1 Remove the used toner cartridge, and then install a new one. 2 Press to clear. Try one or more of the print job. ...Show me or Tell me more appears, and then press . Try one or more of the print job. Troubleshooting 136 Troubleshooting Understanding printer messages Calibrating Wait for the message to clear the message. Change to You can change the current paper source for the remainder of the...

User Guide
Page 140
... printing unless the value for the message to clear. Resetting the printer Wait for the Cartridge Alarm is the early warning message for the message to clear the message and continue printing. Resetting without replacing may affect print quality. ... Then contact Customer Support, and report the message. Replace PC Kit This is changed from the printer control panel or set to clear the message. Replace Cartridge The toner cartridge is On, then the printer stops printing. Restoring Factory Defaults Wait for the message to have scheduled maintenance done. This includes fonts...
... printing unless the value for the message to clear. Resetting the printer Wait for the Cartridge Alarm is the early warning message for the message to clear the message and continue printing. Resetting without replacing may affect print quality. ... Then contact Customer Support, and report the message. Replace PC Kit This is changed from the printer control panel or set to clear the message. Replace Cartridge The toner cartridge is On, then the printer stops printing. Restoring Factory Defaults Wait for the message to have scheduled maintenance done. This includes fonts...
User Guide
Page 141
... this message appears and the printer enters a lockout mode. To clear the message, enable the specified tray through the same menu. Remove the toner cartridge, and then install a new one. 31.yy Replace defective or missing cartridge The toner cartridge is set by your system support... properly. Tray disabled The specified tray is installed. Tray Missing Insert the specified tray into the printer. 30.yy Invalid refill, change cartridge An unsupported, refilled toner cartridge is disabled from the standard exit bin to . Submitting selection Wait for access to clear. The...
... this message appears and the printer enters a lockout mode. To clear the message, enable the specified tray through the same menu. Remove the toner cartridge, and then install a new one. 31.yy Replace defective or missing cartridge The toner cartridge is set by your system support... properly. Tray disabled The specified tray is installed. Tray Missing Insert the specified tray into the printer. 30.yy Invalid refill, change cartridge An unsupported, refilled toner cartridge is disabled from the standard exit bin to . Submitting selection Wait for access to clear. The...


