

User Manual
Page 2
... Loading the optional 250- Contents Safety information 9 Learning about the printer 11 Finding information about the printer...11 Printer configurations...12 Understanding the printer control panel...15 Using the standard exit bin and paper stop...18 Additional printer setup 20 Selecting a location for the printer...20 Installing internal options...21 Available internal options...21 Accessing the...
... Loading the optional 250- Contents Safety information 9 Learning about the printer 11 Finding information about the printer...11 Printer configurations...12 Understanding the printer control panel...15 Using the standard exit bin and paper stop...18 Additional printer setup 20 Selecting a location for the printer...20 Installing internal options...21 Available internal options...21 Accessing the...
User Manual
Page 3
......60 Tips on using labels...61 Tips on using card stock...61 Printing confidential and other held jobs...62 Holding jobs in the printer ...62 Printing confidential and other held jobs...63 Printing information pages...64 Printing a font sample list...64 Printing a directory list...64... Printing the print quality test pages ...64 Canceling a print job...65 Canceling a print job from the printer control panel ...65 Canceling a print job from the computer ...65 Clearing jams 67 Avoiding jams...67 Identifying jams in the paper path...68 Understanding...
......60 Tips on using labels...61 Tips on using card stock...61 Printing confidential and other held jobs...62 Holding jobs in the printer ...62 Printing confidential and other held jobs...63 Printing information pages...64 Printing a font sample list...64 Printing a directory list...64... Printing the print quality test pages ...64 Canceling a print job...65 Canceling a print job from the printer control panel ...65 Canceling a print job from the computer ...65 Clearing jams 67 Avoiding jams...67 Identifying jams in the paper path...68 Understanding...
User Manual
Page 4
... 231 paper jam...74 233 paper jam...75 234 paper jam...76 235 paper jam...77 242 paper jam...77 251 paper jam...78 Understanding printer menus 80 Menus list...80 Paper menu...81 Default Source menu...81 Paper Size/Type menu ...81 Configure MP menu...84 Substitute Size menu...85...
... 231 paper jam...74 233 paper jam...75 234 paper jam...76 235 paper jam...77 242 paper jam...77 251 paper jam...78 Understanding printer menus 80 Menus list...80 Paper menu...81 Default Source menu...81 Paper Size/Type menu ...81 Configure MP menu...84 Substitute Size menu...85...

User Manual
Page 5
... Ordering a maintenance kit ...137 Replacing supplies...137 Replacing the toner cartridge ...137 Replacing the photoconductor kit ...139 Recycling Lexmark products...141 Moving the printer...142 Moving the printer to another location...142 Shipping the printer ...142 Administrative support 143 Finding advanced networking and administrator information 143 Using the Embedded Web Server...143 Checking the...
... Ordering a maintenance kit ...137 Replacing supplies...137 Replacing the toner cartridge ...137 Replacing the photoconductor kit ...139 Recycling Lexmark products...141 Moving the printer...142 Moving the printer to another location...142 Shipping the printer ...142 Administrative support 143 Finding advanced networking and administrator information 143 Using the Embedded Web Server...143 Checking the...

User Manual
Page 6
Modifying confidential print settings...144 Adjusting Power Saver...145 Setting up e-mail alerts...146 Restoring the factory default settings...146 Troubleshooting 147 Solving basic printer problems...147 Printer control panel display is blank or displays only diamonds 147 Solving printing problems...147 Jobs do not print...147 Confidential and other held jobs do...
Modifying confidential print settings...144 Adjusting Power Saver...145 Setting up e-mail alerts...146 Restoring the factory default settings...146 Troubleshooting 147 Solving basic printer problems...147 Printer control panel display is blank or displays only diamonds 147 Solving printing problems...147 Jobs do not print...147 Confidential and other held jobs do...

User Manual
Page 9
... from the wall outlet before continuing. CAUTION-SHOCK HAZARD: To avoid the risk of electric shock when cleaning the exterior of the printer, unplug the power cord from the wall outlet and disconnect all cables from the electrical outlet before continuing. CAUTION-POTENTIAL INJURY: Before...-HOT SURFACE: The fuser and the inside of specific manufacturer's components. Discard used batteries according to avoid personal injury or printer damage: • Turn the printer off , and unplug the power cord from this product or make sure your operating instructions that heats the print media, ...
... from the wall outlet before continuing. CAUTION-SHOCK HAZARD: To avoid the risk of electric shock when cleaning the exterior of the printer, unplug the power cord from the wall outlet and disconnect all cables from the electrical outlet before continuing. CAUTION-POTENTIAL INJURY: Before...-HOT SURFACE: The fuser and the inside of specific manufacturer's components. Discard used batteries according to avoid personal injury or printer damage: • Turn the printer off , and unplug the power cord from this product or make sure your operating instructions that heats the print media, ...

User Manual
Page 10
Safety information 10 Note: Use the handholds located on both sides of the printer to lift it aside instead of the optional drawer and set it off the optional drawer. • Lift the printer off of trying to lift the drawer and printer at the same time.
Safety information 10 Note: Use the handholds located on both sides of the printer to lift it aside instead of the optional drawer and set it off the optional drawer. • Lift the printer off of trying to lift the drawer and printer at the same time.
User Manual
Page 11
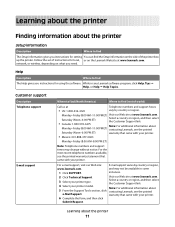
.... and may change without notice. Visit our Web site at www.lexmark.com. Note: For additional information about 5 From the Support Tools section, click contacting Lexmark, see the printed warranty statement that came with your printer. 6 Complete the form, and then click Submit Request. network, or ...set of instructions for local, or on the Lexmark Web site at www.lexmark.com. Learning about Monday-Friday (8:00 AM-11:00 PM ET) contacting Lexmark, see the printed Saturday (Noon-6:00 PM ET) warranty that came with your printer. Help Description Where to find The Help gives ...
.... and may change without notice. Visit our Web site at www.lexmark.com. Note: For additional information about 5 From the Support Tools section, click contacting Lexmark, see the printed warranty statement that came with your printer. 6 Complete the form, and then click Submit Request. network, or ...set of instructions for local, or on the Lexmark Web site at www.lexmark.com. Learning about Monday-Friday (8:00 AM-11:00 PM ET) contacting Lexmark, see the printed Saturday (Noon-6:00 PM ET) warranty that came with your printer. Help Description Where to find The Help gives ...
User Manual
Page 12
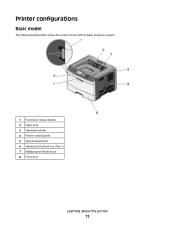
Printer configurations Basic model The following illustration shows the printer front with its basic features or parts: 1 Front door release button 2 Paper stop 3 Standard exit bin 4 Printer control panel 5 System board door 6 Standard 250-sheet tray (Tray 1) 7 Multipurpose feeder door 8 Front door Learning about the printer 12
Printer configurations Basic model The following illustration shows the printer front with its basic features or parts: 1 Front door release button 2 Paper stop 3 Standard exit bin 4 Printer control panel 5 System board door 6 Standard 250-sheet tray (Tray 1) 7 Multipurpose feeder door 8 Front door Learning about the printer 12

User Manual
Page 13
The following illustration shows the printer back with its basic features or parts: 1 Rear door 2 Ethernet port 3 USB port 4 Parallel port Note: If your printer is a wireless model, the wireless antenna is attached here. The wireless antenna replaces the parallel port for the wireless printer model. 5 Power cord socket 6 Power switch 7 Locking device Learning about the printer 13
The following illustration shows the printer back with its basic features or parts: 1 Rear door 2 Ethernet port 3 USB port 4 Parallel port Note: If your printer is a wireless model, the wireless antenna is attached here. The wireless antenna replaces the parallel port for the wireless printer model. 5 Power cord socket 6 Power switch 7 Locking device Learning about the printer 13

User Manual
Page 14
Configured models The following illustration shows the printer configured with an optional 250-sheet drawer: 1 Front door release button 2 Paper stop 3 Standard exit bin 4 Printer control panel 5 System board door 6 Standard 250-sheet tray (Tray 1) 7 Optional 250-sheet drawer (Tray 2) 8 Multipurpose feeder door 9 Front door Learning about the printer 14
Configured models The following illustration shows the printer configured with an optional 250-sheet drawer: 1 Front door release button 2 Paper stop 3 Standard exit bin 4 Printer control panel 5 System board door 6 Standard 250-sheet tray (Tray 1) 7 Optional 250-sheet drawer (Tray 2) 8 Multipurpose feeder door 9 Front door Learning about the printer 14

User Manual
Page 15
The following illustration shows the printer configured with an optional 550-sheet drawer: 1 Front door release button 2 Paper stop 3 Standard exit bin 4 Printer control panel 5 System board door 6 Standard 250-sheet tray (Tray 1) 7 Optional 550-sheet drawer (Tray 2) 8 Multipurpose feeder door 9 Front door Understanding the printer control panel The following diagram shows the printer control panel: Learning about the printer 15
The following illustration shows the printer configured with an optional 550-sheet drawer: 1 Front door release button 2 Paper stop 3 Standard exit bin 4 Printer control panel 5 System board door 6 Standard 250-sheet tray (Tray 1) 7 Optional 550-sheet drawer (Tray 2) 8 Multipurpose feeder door 9 Front door Understanding the printer control panel The following diagram shows the printer control panel: Learning about the printer 15

User Manual
Page 16
...the menus Note: The menus are available only when the printer is needed. Indicates the printer status: • Off-The power is off. • Blinking green-The printer is warming up, processing data, or printing. • Solid green-The printer is on, but idle. • Solid red-Operator ... in the Ready state. 2 Back button ( ) Returns the display to the previous screen 3 Stop button ( ) 4 Indicator light Stops all printer activity When printing, pressing causes Stopping to appear momentarily. Then the Stopped screen appears offering a list of settings that you may select.
...the menus Note: The menus are available only when the printer is needed. Indicates the printer status: • Off-The power is off. • Blinking green-The printer is warming up, processing data, or printing. • Solid green-The printer is on, but idle. • Solid red-Operator ... in the Ready state. 2 Back button ( ) Returns the display to the previous screen 3 Stop button ( ) 4 Indicator light Stops all printer activity When printing, pressing causes Stopping to appear momentarily. Then the Stopped screen appears offering a list of settings that you may select.

User Manual
Page 17
...which show you one item in any list. Settings chosen from a software program can also change or override the user default settings selected from the printer control panel. 3, 4, 5, 6 Navigation buttons Press the up or down arrow buttons to scroll between screens and menu options. Press the right ...or left arrow buttons to increase or decrease a value or to another screen. Note: Each press of the printer or that indicate possible printer problems that rolls to scroll through menus, menu items, or settings (also called a menu item) • Opens a menu item ...
...which show you one item in any list. Settings chosen from a software program can also change or override the user default settings selected from the printer control panel. 3, 4, 5, 6 Navigation buttons Press the up or down arrow buttons to scroll between screens and menu options. Press the right ...or left arrow buttons to increase or decrease a value or to another screen. Note: Each press of the printer or that indicate possible printer problems that rolls to scroll through menus, menu items, or settings (also called a menu item) • Opens a menu item ...

User Manual
Page 18
It collects print jobs facedown. Learning about the printer 18 Using the standard exit bin and paper stop that accepts these entries. The standard exit bin includes a paper stop The standard exit bin holds up to 150 sheets of the paper. The paper stop , pull it so it stacks. To open the paper stop also aids in neater stacking of 20 lb paper. Item Description 1 Keypad Enter numbers or symbols if the display screen has a field that keeps paper from sliding out the front of the bin as it flips forward.
It collects print jobs facedown. Learning about the printer 18 Using the standard exit bin and paper stop that accepts these entries. The standard exit bin includes a paper stop The standard exit bin holds up to 150 sheets of the paper. The paper stop , pull it so it stacks. To open the paper stop also aids in neater stacking of 20 lb paper. Item Description 1 Keypad Enter numbers or symbols if the display screen has a field that keeps paper from sliding out the front of the bin as it flips forward.

User Manual
Page 19
Doing so may cause creases in the transparencies. • When moving the printer to another location, make sure the paper stop in the open position if you are printing on transparencies. Learning about the printer 19 Notes: • Do not leave the paper stop is closed.
Doing so may cause creases in the transparencies. • When moving the printer to another location, make sure the paper stop in the open position if you are printing on transparencies. Learning about the printer 19 Notes: • Do not leave the paper stop is closed.

User Manual
Page 20
...are installed correctly. The option names appear on the display. Free from the menus, when you select and save it lists all printer options are called user default settings because you access the menu again, choose another value, and save other settings from direct sunlight..., humidity extremes, or temperature fluctuations - Additional printer setup After completing any options, leave enough room for more information. Once you print this page if they are listed on page ...
...are installed correctly. The option names appear on the display. Free from the menus, when you select and save it lists all printer options are called user default settings because you access the menu again, choose another value, and save other settings from direct sunlight..., humidity extremes, or temperature fluctuations - Additional printer setup After completing any options, leave enough room for more information. Once you print this page if they are listed on page ...

User Manual
Page 21
...are accessing the system board or installing optional hardware or memory devices sometime after setting up the printer, then turn them to install the available cards; you can customize your printer connectivity and memory capacity by adding optional cards. The instructions in .) Installing internal options CAUTION-...SHOCK HAZARD: If you have other devices attached to the printer, then turn the printer off as well, and unplug any cables going into the printer. You can also use them off , and unplug the power cord from the wall outlet ...
...are accessing the system board or installing optional hardware or memory devices sometime after setting up the printer, then turn them to install the available cards; you can customize your printer connectivity and memory capacity by adding optional cards. The instructions in .) Installing internal options CAUTION-...SHOCK HAZARD: If you have other devices attached to the printer, then turn the printer off as well, and unplug any cables going into the printer. You can also use them off , and unplug the power cord from the wall outlet ...

User Manual
Page 22
... cord from the wall outlet before touching any cables going into the printer. 1 As you are easily damaged by static electricity. If you have other devices attached to the printer, then turn the printer off as well, and unplug any system board electronic components or connectors... Parallel connector 4 Memory card connector 5 Optional card connector 6 Optional card connector Additional printer setup 22 Accessing the system board to install internal options CAUTION-SHOCK HAZARD: If you face the printer, the system board door is a feature on the right side. Touch something metal on...
... cord from the wall outlet before touching any cables going into the printer. 1 As you are easily damaged by static electricity. If you have other devices attached to the printer, then turn the printer off as well, and unplug any system board electronic components or connectors... Parallel connector 4 Memory card connector 5 Optional card connector 6 Optional card connector Additional printer setup 22 Accessing the system board to install internal options CAUTION-SHOCK HAZARD: If you face the printer, the system board door is a feature on the right side. Touch something metal on...

User Manual
Page 23
...-Potential Damage: System board electronic components are accessing the system board or installing optional hardware or memory devices sometime after setting up the printer, then turn them off , and unplug the power cord from the wall outlet before touching any cables going into the... printer. Touch something metal on the printer before continuing. Installing a memory card CAUTION-SHOCK HAZARD: If you have any other devices attached to the system board. To install the memory card:...
...-Potential Damage: System board electronic components are accessing the system board or installing optional hardware or memory devices sometime after setting up the printer, then turn them off , and unplug the power cord from the wall outlet before touching any cables going into the... printer. Touch something metal on the printer before continuing. Installing a memory card CAUTION-SHOCK HAZARD: If you have any other devices attached to the system board. To install the memory card:...


