
User Manual
Page 5
... Ordering a photoconductor kit ...137 Ordering a maintenance kit ...137 Replacing supplies...137 Replacing the toner cartridge ...137 Replacing the photoconductor kit ...139 Recycling Lexmark products...141 Moving the printer...142 Moving the printer to another location...142 Shipping the printer ...142 Administrative support 143 Finding advanced networking and administrator information 143 Using the Embedded Web Server...
... Ordering a photoconductor kit ...137 Ordering a maintenance kit ...137 Replacing supplies...137 Replacing the toner cartridge ...137 Replacing the photoconductor kit ...139 Recycling Lexmark products...141 Moving the printer...142 Moving the printer to another location...142 Shipping the printer ...142 Administrative support 143 Finding advanced networking and administrator information 143 Using the Embedded Web Server...

User Manual
Page 61
Have metal clasps, string ties, or folding bars - Have any way - Adhesive material contaminates the printer and could void the printer and cartridge warranties. • Do not use before buying large quantities. Printing 61 Have bent corners - It is recommended. The ...can withstand temperatures up to print 20 or fewer pages of the envelopes. Have an interlocking design - Partial sheets also contaminate the printer and the cartridge with adhesive, and could void the warranty. • If zone coating of the adhesive is heavy, single-ply specialty media. ...
Have metal clasps, string ties, or folding bars - Have any way - Adhesive material contaminates the printer and could void the printer and cartridge warranties. • Do not use before buying large quantities. Printing 61 Have bent corners - It is recommended. The ...can withstand temperatures up to print 20 or fewer pages of the envelopes. Have an interlocking design - Partial sheets also contaminate the printer and the cartridge with adhesive, and could void the warranty. • If zone coating of the adhesive is heavy, single-ply specialty media. ...

User Manual
Page 71
Clearing jams 71 Note: When the photoconductor kit and toner cartridge are together, they are called a unit. 4 Lift the flap in front of the printer, and remove any jammed sheets. 5 Align and insert the unit. 6 Close the front door. 7 Insert the tray. 8 Press . 3 If you do not see it, open the front door, and then remove the photoconductor kit and toner cartridge (unit).
Clearing jams 71 Note: When the photoconductor kit and toner cartridge are together, they are called a unit. 4 Lift the flap in front of the printer, and remove any jammed sheets. 5 Align and insert the unit. 6 Close the front door. 7 Insert the tray. 8 Press . 3 If you do not see it, open the front door, and then remove the photoconductor kit and toner cartridge (unit).

User Manual
Page 106
... the Country select screen, the default setting becomes No. Instructs the printer to a Ready state Note: 30 seconds is the factory default setting. • On configures the printer to use . Cartridge low appears on the display. • Single sounds three quick beeps. 88 Cartridge is the factory default setting. • After completing the setup...
... the Country select screen, the default setting becomes No. Instructs the printer to a Ready state Note: 30 seconds is the factory default setting. • On configures the printer to use . Cartridge low appears on the display. • Single sounds three quick beeps. 88 Cartridge is the factory default setting. • After completing the setup...
User Manual
Page 120
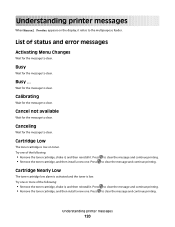
... the message to clear. Press to clear the message and continue printing. • Remove the toner cartridge, and then install a new one of the following : • Remove the toner cartridge, shake it, and then reinstall it . Busy ... Try one . Wait for the message to clear... status and error messages Activating Menu Changes Wait for the message to clear. Cartridge Low The toner cartridge is low. Understanding printer messages When Manual Feeder appears on toner. Cartridge Nearly Low The toner cartridge low alarm is activated and the toner is low on the display, it...
... the message to clear. Press to clear the message and continue printing. • Remove the toner cartridge, and then install a new one of the following : • Remove the toner cartridge, shake it, and then reinstall it . Busy ... Try one . Wait for the message to clear... status and error messages Activating Menu Changes Wait for the message to clear. Cartridge Low The toner cartridge is low. Understanding printer messages When Manual Feeder appears on toner. Cartridge Nearly Low The toner cartridge low alarm is activated and the toner is low on the display, it...

User Manual
Page 121
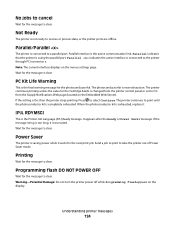
... Use Current appears, and then press the down arrow button until Continue appears, and then press if the paper was changed from the printer control panel. Clearing job accounting statistics Wait for the message to clear. Disabling Menus Wait for the message to clear. 2 Try to... while this message appears on the paper currently in the printer. • Cancel the current print job. • For more information, select Show Me. Cartridge Life Exceeded The toner cartridge is exhausted. 1 Remove the used toner cartridge, and then install a new one. 2 Press to print on the display. Change ...
... Use Current appears, and then press the down arrow button until Continue appears, and then press if the paper was changed from the printer control panel. Clearing job accounting statistics Wait for the message to clear. Disabling Menus Wait for the message to clear. 2 Try to... while this message appears on the paper currently in the printer. • Cancel the current print job. • For more information, select Show Me. Cartridge Life Exceeded The toner cartridge is exhausted. 1 Remove the used toner cartridge, and then install a new one. 2 Press to print on the display. Change ...
User Manual
Page 124
... Embedded Web Server). Printing Wait for the message to print until the photoconductor kit is completely exhausted. The printer continues printing unless the value for the Cartridge Alarm is not ready to a parallel port. The printer continues to clear. When the photoconductor kit is exhausted, replace it waits for the next print job...
... Embedded Web Server). Printing Wait for the message to print until the photoconductor kit is completely exhausted. The printer continues printing unless the value for the Cartridge Alarm is not ready to a parallel port. The printer continues to clear. When the photoconductor kit is exhausted, replace it waits for the next print job...
User Manual
Page 125
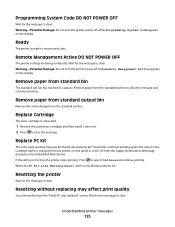
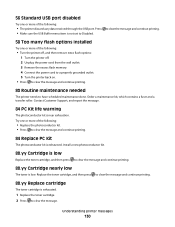
...not turn the printer power off while Programming System Code appears on the display. Replace Cartridge The toner cartridge is exhausted. 1 Remove the used toner cartridge, and then install a new one. 2 Press to clear. Replace PC Kit This is On, then the printer stops printing. The printer continues printing ...unless the value for the Cartridge Alarm is ready to clear. You selected No from the Supply Notifications Web page (located on the display...
...not turn the printer power off while Programming System Code appears on the display. Replace Cartridge The toner cartridge is exhausted. 1 Remove the used toner cartridge, and then install a new one. 2 Press to clear. Replace PC Kit This is On, then the printer stops printing. The printer continues printing ...unless the value for the Cartridge Alarm is ready to clear. You selected No from the Supply Notifications Web page (located on the display...
User Manual
Page 127
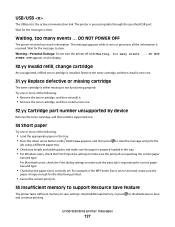
... Resource Save feature The printer lacks sufficient memory to clear. This message appears while it sorts or processes all the information it . • Remove the toner cartridge, and then install a new one. 32.yy Cartridge part number unsupported by device Remove the toner cartridge, and then install a... . 31.yy Replace defective or missing cartridge The toner cartridge is processing data through the specified USB port. Wait for the message to disable Resource Save and continue printing. Waiting, too many events ... DO NOT POWER OFF The printer received too much information. Try one or...
... Resource Save feature The printer lacks sufficient memory to clear. This message appears while it sorts or processes all the information it . • Remove the toner cartridge, and then install a new one. 32.yy Cartridge part number unsupported by device Remove the toner cartridge, and then install a... . 31.yy Replace defective or missing cartridge The toner cartridge is processing data through the specified USB port. Wait for the message to disable Resource Save and continue printing. Waiting, too many events ... DO NOT POWER OFF The printer received too much information. Try one or...

User Manual
Page 128
... Continue appears, and then press to clear the message and continue 42.xy Cartridge region mismatch Install a toner cartridge that matches the region number of the following values: 1 America 2 EMEA (Europe, Middle East, Africa) 3 Asia 4 Latin America 9 Undefined region Understanding printer messages 128 Press the down arrow button until Continue appears, and then...
... Continue appears, and then press to clear the message and continue 42.xy Cartridge region mismatch Install a toner cartridge that matches the region number of the following values: 1 America 2 EMEA (Europe, Middle East, Africa) 3 Asia 4 Latin America 9 Undefined region Understanding printer messages 128 Press the down arrow button until Continue appears, and then...
User Manual
Page 130
...item is near exhaustion. Understanding printer messages 130 Try one or more of the following: • The printer discards any data received through the USB port. Order a maintenance kit, which contains a fuser and a transfer roller. Replace the toner cartridge, and then press to ...clear the message and continue printing. 88.yy Replace cartridge The toner cartridge is low. Install a ...
...item is near exhaustion. Understanding printer messages 130 Try one or more of the following: • The printer discards any data received through the USB port. Order a maintenance kit, which contains a fuser and a transfer roller. Replace the toner cartridge, and then press to ...clear the message and continue printing. 88.yy Replace cartridge The toner cartridge is low. Install a ...

User Manual
Page 131
... printer messages 131 200.yy Paper jam The message indicates either where the paper is jammed or the number of pages jammed. 1 To access the jam, try one or more of the following: • Remove Tray 1. • Open the front door, and then remove the photoconductor kit and toner cartridge ...jammed or the number of pages jammed. 1 Open the front door, and then remove the photoconductor kit and toner cartridge unit. 2 Remove the jam. 3 Replace the photoconductor kit and toner cartridge unit. 4 Close the front door. 5 Press to continue printing. 202.yy Paper jam The message indicates either ...
... printer messages 131 200.yy Paper jam The message indicates either where the paper is jammed or the number of pages jammed. 1 To access the jam, try one or more of the following: • Remove Tray 1. • Open the front door, and then remove the photoconductor kit and toner cartridge ...jammed or the number of pages jammed. 1 Open the front door, and then remove the photoconductor kit and toner cartridge unit. 2 Remove the jam. 3 Replace the photoconductor kit and toner cartridge unit. 4 Close the front door. 5 Press to continue printing. 202.yy Paper jam The message indicates either ...

User Manual
Page 132
... number of pages jammed. 1 Remove the jam from the standard exit bin. 2 Check the paper size to ensure that it is supported by the printer. 3 Press to continue printing. 24x.yy Paper jam The message indicates either where the paper is jammed or the number of pages jammed. 1 To... more of the following: • Remove Tray 1. • Open the front door, and then remove the photoconductor kit and toner cartridge unit. • Remove Tray 2. 2 Remove the jam. 3 Replace the photoconductor kit and toner cartridge unit if you removed it. 4 Close any open doors or trays. 5 Press to continue printing.
... number of pages jammed. 1 Remove the jam from the standard exit bin. 2 Check the paper size to ensure that it is supported by the printer. 3 Press to continue printing. 24x.yy Paper jam The message indicates either where the paper is jammed or the number of pages jammed. 1 To... more of the following: • Remove Tray 1. • Open the front door, and then remove the photoconductor kit and toner cartridge unit. • Remove Tray 2. 2 Remove the jam. 3 Replace the photoconductor kit and toner cartridge unit if you removed it. 4 Close any open doors or trays. 5 Press to continue printing.

User Manual
Page 136
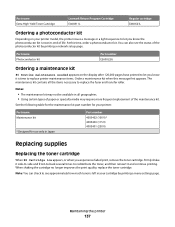
... or when the print becomes faded, you purchased the printer. Ordering supplies To order supplies in your area. Recommended toner cartridges and part numbers Part name For the US and Canada Toner cartridge Lexmark Return Program Cartridge E260A11A High Yield Toner Cartridge E360H11A Extra High Yield Toner Cartridge E460X11A For Europe, the Middle East, and Africa Toner...
... or when the print becomes faded, you purchased the printer. Ordering supplies To order supplies in your area. Recommended toner cartridges and part numbers Part name For the US and Canada Toner cartridge Lexmark Return Program Cartridge E260A11A High Yield Toner Cartridge E360H11A Extra High Yield Toner Cartridge E460X11A For Europe, the Middle East, and Africa Toner...
User Manual
Page 137
... 40X5402 (100 V)* 40X5400 (115 V) 40X5401 (230 V) Replacing supplies Replacing the toner cartridge When 88 Cartridge low appears, or when you know it and continue printing. Maintaining the printer 137 Firmly shake it side-to-side and front-to-back several times to redistribute the...paper or specialty media may require more frequent replacement of the maintenance kit. Part name Extra High Yield Toner Cartridge Lexmark Return Program Cartridge E460X11L Regular cartridge E460X21L Ordering a photoconductor kit Depending on the display after 120,000 pages have printed to let you know the...
... 40X5402 (100 V)* 40X5400 (115 V) 40X5401 (230 V) Replacing supplies Replacing the toner cartridge When 88 Cartridge low appears, or when you know it and continue printing. Maintaining the printer 137 Firmly shake it side-to-side and front-to-back several times to redistribute the...paper or specialty media may require more frequent replacement of the maintenance kit. Part name Extra High Yield Toner Cartridge Lexmark Return Program Cartridge E460X11L Regular cartridge E460X21L Ordering a photoconductor kit Depending on the display after 120,000 pages have printed to let you know the...

User Manual
Page 138
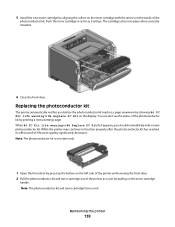
Maintaining the printer 138 Extended light exposure can cause print quality problems. 4 Rotate the cartridge in all directions to direct light for an extended period of the photoconductor kit, and then pull the toner cartridge out using the handle. 3 Unpack the new toner cartridge. Warning-Potential Damage: When replacing a toner cartridge, do not leave the photoconductor kit exposed to distribute the toner. To replace the toner cartridge: 1 Open the front door by pressing the button on the left side of the printer and lowering the door. 2 Press the button on the base of time.
Maintaining the printer 138 Extended light exposure can cause print quality problems. 4 Rotate the cartridge in all directions to direct light for an extended period of the photoconductor kit, and then pull the toner cartridge out using the handle. 3 Unpack the new toner cartridge. Warning-Potential Damage: When replacing a toner cartridge, do not leave the photoconductor kit exposed to distribute the toner. To replace the toner cartridge: 1 Open the front door by pressing the button on the left side of the printer and lowering the door. 2 Press the button on the base of time.
User Manual
Page 139
... photoconductor kit has reached its official end-of the printer as it will go. You can also see the status of the photoconductor kit. Note: The photoconductor kit and toner cartridge form a unit. 5 Install the new toner cartridge by pulling on the toner cartridge handle. Note: The photoconductor kit is one item ... 84 PC Kit life warning or 84 Replace PC Kit on the display. Push the toner cartridge in as far as a unit by aligning the rollers on the toner cartridge with the arrows on the left side of the printer and lowering the front door. 2 Pull the photoconductor kit and toner...
... photoconductor kit has reached its official end-of the printer as it will go. You can also see the status of the photoconductor kit. Note: The photoconductor kit and toner cartridge form a unit. 5 Install the new toner cartridge by pulling on the toner cartridge handle. Note: The photoconductor kit is one item ... 84 PC Kit life warning or 84 Replace PC Kit on the display. Push the toner cartridge in as far as a unit by aligning the rollers on the toner cartridge with the arrows on the left side of the printer and lowering the front door. 2 Pull the photoconductor kit and toner...

User Manual
Page 140
Place the unit on a flat, clean surface. 3 Press the button on the base of the photoconductor kit. Be careful not to touch the photoconductor drum. Pull the toner cartridge up and out using the handle. 4 Unpack the new photoconductor kit. Maintaining the printer 140
Place the unit on a flat, clean surface. 3 Press the button on the base of the photoconductor kit. Be careful not to touch the photoconductor drum. Pull the toner cartridge up and out using the handle. 4 Unpack the new photoconductor kit. Maintaining the printer 140

User Manual
Page 141
... kit. Maintaining the printer 141 To reset the counter, see the instruction sheet that came with the arrows in the printer. Recycling Lexmark products To return Lexmark products to recycle, and then select your warranty. 8 Close the front door. Push the toner cartridge until it will go.... 7 After you want to Lexmark for recycling: 1 Visit our Web site at www.lexmark.com/recycle. 2 ...
... kit. Maintaining the printer 141 To reset the counter, see the instruction sheet that came with the arrows in the printer. Recycling Lexmark products To return Lexmark products to recycle, and then select your warranty. 8 Close the front door. Push the toner cartridge until it will go.... 7 After you want to Lexmark for recycling: 1 Visit our Web site at www.lexmark.com/recycle. 2 ...

User Manual
Page 144
...a maximum number of PIN entry attempts. To view reports from the Embedded Web Server. Note: If you do not know the IP address of the printer, then print a network setup page and locate the IP address in the TCP/IP section. 2 Click Settings. 3 Click Print Settings. 4 Click ...section. 2 Click Device Status. You can view paper tray settings, the level of toner in the print cartridge, the percentage of life remaining in the address field of certain printer parts. To configure supply notifications using the Embedded Web Server. Administrative support 144 To view the device status:...
...a maximum number of PIN entry attempts. To view reports from the Embedded Web Server. Note: If you do not know the IP address of the printer, then print a network setup page and locate the IP address in the TCP/IP section. 2 Click Settings. 3 Click Print Settings. 4 Click ...section. 2 Click Device Status. You can view paper tray settings, the level of toner in the print cartridge, the percentage of life remaining in the address field of certain printer parts. To configure supply notifications using the Embedded Web Server. Administrative support 144 To view the device status:...


