Troubleshooting Guide
Page 1
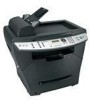
... other electrical devices have been using the correct cable, that it is only available on the X342n. Note: Connecting over a network Make sure you are using . 5 Turn on the MFP. If the software installation screen does not appear: 1 From the desktop, double-click My Computer. Unable to...tray and the manual feeder. • Do not overload the paper tray. If the problems persist, follow these tips to the MFP and the computer. Lexmark™ X34x Troubleshooting Guide Setup troubleshooting Incorrect language appears on the display 1 Press Menu. 2 Press or repeatedly until MACHINE SETUP...
... other electrical devices have been using the correct cable, that it is only available on the X342n. Note: Connecting over a network Make sure you are using . 5 Turn on the MFP. If the software installation screen does not appear: 1 From the desktop, double-click My Computer. Unable to...tray and the manual feeder. • Do not overload the paper tray. If the problems persist, follow these tips to the MFP and the computer. Lexmark™ X34x Troubleshooting Guide Setup troubleshooting Incorrect language appears on the display 1 Press Menu. 2 Press or repeatedly until MACHINE SETUP...

Troubleshooting Guide
Page 2
...a new toner cartridge. Print and copy troubleshooting MFP does not print or respond • Remove and reinstall the software. or Click Start Control Panel Printers and Other Hardware Printers and Faxes. 2 Double-click the Lexmark X340/X340n/ X342n icon. 3 Click Printer, and make sure ... • Disconnect the USB cable, and then reconnect it back and forth. For more information, see "Removing and reinstalling the drivers software" on a level surface Paper does not feed • Make sure paper is securely latched on both sides of the envelope. Paper or...
...a new toner cartridge. Print and copy troubleshooting MFP does not print or respond • Remove and reinstall the software. or Click Start Control Panel Printers and Other Hardware Printers and Faxes. 2 Double-click the Lexmark X340/X340n/ X342n icon. 3 Click Printer, and make sure ... • Disconnect the USB cable, and then reconnect it back and forth. For more information, see "Removing and reinstalling the drivers software" on a level surface Paper does not feed • Make sure paper is securely latched on both sides of the envelope. Paper or...

Troubleshooting Guide
Page 4
...Telephone - or Click Start Control Panel Printers and Other Hardware Printers and Faxes. 2 Double-click the Lexmark X340/X340n/ X342n icon. 3 Click Printer, and make sure that it is working correctly, connect it directly to print any paper jams. • Call...software. Disconnect any answering machines, computers with modems, or telephone line splitters. • Check for temporarily disabling Call Waiting. Can receive but not receive faxes • Load paper to the telephone line. For more information, see the User's Guide. • Make sure the MFP...
...Telephone - or Click Start Control Panel Printers and Other Hardware Printers and Faxes. 2 Double-click the Lexmark X340/X340n/ X342n icon. 3 Click Printer, and make sure that it is working correctly, connect it directly to print any paper jams. • Call...software. Disconnect any answering machines, computers with modems, or telephone line splitters. • Check for temporarily disabling Call Waiting. Can receive but not receive faxes • Load paper to the telephone line. For more information, see the User's Guide. • Make sure the MFP...
User's Guide
Page 3
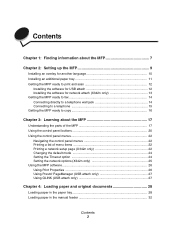
... for another language 10 Installing an additional paper tray 11 Getting the MFP ready to print and scan 12 Installing the software for USB attach 12 Installing the software for network attach (X342n only 13 Getting the MFP ready to fax 14 Connecting directly to a telephone wall jack 14 ...Connecting to a telephone 15 Getting the MFP ready to copy 16 Chapter 3: Learning about the MFP 17 Understanding the...
... for another language 10 Installing an additional paper tray 11 Getting the MFP ready to print and scan 12 Installing the software for USB attach 12 Installing the software for network attach (X342n only 13 Getting the MFP ready to fax 14 Connecting directly to a telephone wall jack 14 ...Connecting to a telephone 15 Getting the MFP ready to copy 16 Chapter 3: Learning about the MFP 17 Understanding the...
User's Guide
Page 7
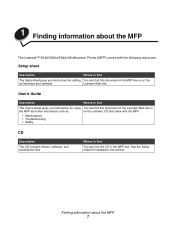
... can find this document on the Lexmark Web site or the MFP and other information such as: on the up hardware and software. Finding information about the MFP The Lexmark™ X340/X340n/X342n Multifunction Printer (MFP) comes with the MFP. • Maintenance • Troubleshooting • Safety CD Description The CD contains drivers, software, and publications files. See the...
... can find this document on the Lexmark Web site or the MFP and other information such as: on the up hardware and software. Finding information about the MFP The Lexmark™ X340/X340n/X342n Multifunction Printer (MFP) comes with the MFP. • Maintenance • Troubleshooting • Safety CD Description The CD contains drivers, software, and publications files. See the...
User's Guide
Page 13
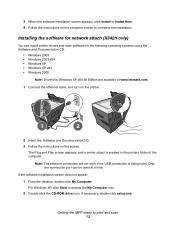
... computer. The Plug and Play screen appears, and a printer object is being used at www.lexmark.com. 1 Connect the ethernet cable, and turn on the printer. 1 2 2 Insert the Software and Documentation CD. 3 Follow the instructions on the computer screen to complete the installation. For Windows... • Windows XP x64 • Windows 2000 Note: Drivers for network attach (X342n only) You can be used . Installing the software for Windows XP x64 bit Edition are available at a time. Getting the MFP ready to access the My Computer icon. 2 Double-click the CD-ROM drive icon...
... computer. The Plug and Play screen appears, and a printer object is being used at www.lexmark.com. 1 Connect the ethernet cable, and turn on the printer. 1 2 2 Insert the Software and Documentation CD. 3 Follow the instructions on the computer screen to complete the installation. For Windows... • Windows XP x64 • Windows 2000 Note: Drivers for network attach (X342n only) You can be used . Installing the software for Windows XP x64 bit Edition are available at a time. Getting the MFP ready to access the My Computer icon. 2 Double-click the CD-ROM drive icon...
User's Guide
Page 84
...images in use. or Click Start Æ Control Panel Æ Printers and Other Hardware Æ Printers and Faxes. 2 Double-click the Lexmark X340/X340n/X342n icon. 3 Click Printer, and make sure no check mark appears next to Pause Printing. 4 Make sure a check mark appears next to ...198; Printers and Faxes or Printers. Make sure the MFP is closed. Close all applications not in the document. Print and copy troubleshooting Problem MFP does not print or respond Print speed is installed correctly. Remove and reinstall the software. Make sure the toner cartridge is slow. If you...
...images in use. or Click Start Æ Control Panel Æ Printers and Other Hardware Æ Printers and Faxes. 2 Double-click the Lexmark X340/X340n/X342n icon. 3 Click Printer, and make sure no check mark appears next to Pause Printing. 4 Make sure a check mark appears next to ...198; Printers and Faxes or Printers. Make sure the MFP is closed. Close all applications not in the document. Print and copy troubleshooting Problem MFP does not print or respond Print speed is installed correctly. Remove and reinstall the software. Make sure the toner cartridge is slow. If you...

User's Guide
Page 88
Make sure the MFP is set as the default ...Æ Control Panel Æ Printers and Other Hardware Æ Printers and Faxes. 2 Double-click the Lexmark X340/X340n/X342n icon. 3 Click Printer, and make sure no check mark appears next to Pause Printing. 4 Make sure... a check mark appears next to a lower value: 1 From the control panel, press Scan. 2 From the QLINK dialog on page 35. Remove and reinstall the software. For more information, see Removing and reinstalling the drivers software...
Make sure the MFP is set as the default ...Æ Control Panel Æ Printers and Other Hardware Æ Printers and Faxes. 2 Double-click the Lexmark X340/X340n/X342n icon. 3 Click Printer, and make sure no check mark appears next to Pause Printing. 4 Make sure... a check mark appears next to a lower value: 1 From the control panel, press Scan. 2 From the QLINK dialog on page 35. Remove and reinstall the software. For more information, see Removing and reinstalling the drivers software...


