User Manual
Page 15
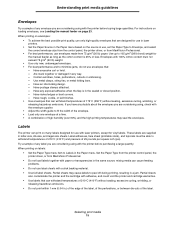
... together with the printer before purchasing a large quantity. Set the Paper Type from the printer control panel, the printer driver, or from 75 g/m2 (20 lb) paper. Partial sheets also contaminate the printer and the cartridge with adhesive, and could void the printer and cartridge warranties. •..., undamaged envelopes. • For best performance and to Envelope, and select the correct envelope size from the control panel, the printer driver, or from MarkVision Professional. • For best performance, use envelopes that can withstand temperatures of 175°C (350°...
... together with the printer before purchasing a large quantity. Set the Paper Type from the printer control panel, the printer driver, or from 75 g/m2 (20 lb) paper. Partial sheets also contaminate the printer and the cartridge with adhesive, and could void the printer and cartridge warranties. •..., undamaged envelopes. • For best performance and to Envelope, and select the correct envelope size from the control panel, the printer driver, or from MarkVision Professional. • For best performance, use envelopes that can withstand temperatures of 175°C (350°...

User Manual
Page 36
... recommended supplies specifically designed for the printer are: Part number Description Average cartridge yield* World Wide E250X22G Photoconductor kit 30,000 standard pages† For the USA and Canada1 E250A21A Toner Cartridge 3,500 standard pages1 E250A11A Return Program Toner Cartridge 3,500 standard pages1 E352H21A High Yield Toner Cartridge 9,000 standard pages1 E352H11A High Yield Return...
... recommended supplies specifically designed for the printer are: Part number Description Average cartridge yield* World Wide E250X22G Photoconductor kit 30,000 standard pages† For the USA and Canada1 E250A21A Toner Cartridge 3,500 standard pages1 E250A11A Return Program Toner Cartridge 3,500 standard pages1 E352H21A High Yield Toner Cartridge 9,000 standard pages1 E352H11A High Yield Return...

User Manual
Page 37
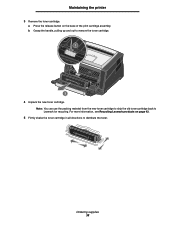
Maintaining the printer Ordering a toner cartridge When the 88 Toner low message appears, you should order a new toner cartridge. Ordering supplies 37 Changing a toner cartridge 1 Turn the printer off. 2 Press the button on the left side of the printer to have a new toner cartridge available when the current one no longer prints satisfactorily. You need to release and lower the front door. You can print a few hundred pages after the 88 Toner low message appears.
Maintaining the printer Ordering a toner cartridge When the 88 Toner low message appears, you should order a new toner cartridge. Ordering supplies 37 Changing a toner cartridge 1 Turn the printer off. 2 Press the button on the left side of the printer to have a new toner cartridge available when the current one no longer prints satisfactorily. You need to release and lower the front door. You can print a few hundred pages after the 88 Toner low message appears.
User Manual
Page 38
a Press the release button on page 42. 5 Firmly shake the toner cartridge in all directions to distribute the toner. b Grasp the handle, pulling up and out to Lexmark for recycling. Maintaining the printer 3 Remove the toner cartridge. Note: You can use the packing material from the new toner cartridge to ship the old toner cartridge back to remove the toner cartridge. 1 2 4 Unpack the new toner cartridge. For more information, see Recycling Lexmark products on the base of the print cartridge assembly. Ordering supplies 38
a Press the release button on page 42. 5 Firmly shake the toner cartridge in all directions to distribute the toner. b Grasp the handle, pulling up and out to Lexmark for recycling. Maintaining the printer 3 Remove the toner cartridge. Note: You can use the packing material from the new toner cartridge to ship the old toner cartridge back to remove the toner cartridge. 1 2 4 Unpack the new toner cartridge. For more information, see Recycling Lexmark products on the base of the print cartridge assembly. Ordering supplies 38

User Manual
Page 39
...life To ensure print quality and to avoid damage to the printer, the printer stops operating after the 84 Replace Photoconductor message appears. The toner cartridge clicks into place when correctly installed. 7 Close the front door. 8 Turn the printer back on the tracks of its life. Ordering a photoconductor... pages after the photoconductor kit has reached a maximum of 110% of the photoconductor and pushing the toner cartridge in as far as it will go. While the printer may continue to function properly after the photoconductor kit has reached its life. Photoconductor kit end-of its ...
...life To ensure print quality and to avoid damage to the printer, the printer stops operating after the 84 Replace Photoconductor message appears. The toner cartridge clicks into place when correctly installed. 7 Close the front door. 8 Turn the printer back on the tracks of its life. Ordering a photoconductor... pages after the photoconductor kit has reached a maximum of 110% of the photoconductor and pushing the toner cartridge in as far as it will go. While the printer may continue to function properly after the photoconductor kit has reached its life. Photoconductor kit end-of its ...

User Manual
Page 40
... the front door. b Lower the front door. b Grasp the toner cartridge handle, and pull up and out. Extended light exposure can cause print quality problems. 1 Turn the printer off. 2 Remove the print cartridge assembly. c Grasp the toner cartridge handle, and pull up and out. 1 2 4 Unpack the new ...button on the base of the print cartridge assembly. Note: Do not press the button on the print cartridge assembly 1 2 3 Place the print cartridge assembly on a flat, clean surface. 3 Remove the toner cartridge: a Press the button on the left side of the printer to direct light for an extended ...
... the front door. b Lower the front door. b Grasp the toner cartridge handle, and pull up and out. Extended light exposure can cause print quality problems. 1 Turn the printer off. 2 Remove the print cartridge assembly. c Grasp the toner cartridge handle, and pull up and out. 1 2 4 Unpack the new ...button on the base of the print cartridge assembly. Note: Do not press the button on the print cartridge assembly 1 2 3 Place the print cartridge assembly on a flat, clean surface. 3 Remove the toner cartridge: a Press the button on the left side of the printer to direct light for an extended ...

User Manual
Page 41
...correctly installed. 6 Install the print cartridge assembly into the new print cartridge assembly by aligning the green arrows on the guides of the print cartridge assembly with the green arrows on the tracks in the printer and pushing the print cartridge assembly in as far as it will...If Photoconductor is listed under Warnings, the photoconductor counter has not been properly reset. Maintaining the printer 5 Install the toner cartridge into the printer by aligning the white rollers on the toner cartridge with the white arrows on the tracks of the photoconductor and pushing the toner...
...correctly installed. 6 Install the print cartridge assembly into the new print cartridge assembly by aligning the green arrows on the guides of the print cartridge assembly with the green arrows on the tracks in the printer and pushing the print cartridge assembly in as far as it will...If Photoconductor is listed under Warnings, the photoconductor counter has not been properly reset. Maintaining the printer 5 Install the toner cartridge into the printer by aligning the white rollers on the toner cartridge with the white arrows on the tracks of the photoconductor and pushing the toner...

User Manual
Page 43
... jams. For more information on avoiding paper jams, see Avoiding jams on the printer control panel. Check tray 251 Paper Jam - however, the Auto setting does not guarantee the page will print. Unsupported Size 24x Paper Jam - Remove Cartridge 202 Paper Jam - Check Man Feeder What to do occur, follow the steps...
... jams. For more information on avoiding paper jams, see Avoiding jams on the printer control panel. Check tray 251 Paper Jam - however, the Auto setting does not guarantee the page will print. Unsupported Size 24x Paper Jam - Remove Cartridge 202 Paper Jam - Check Man Feeder What to do occur, follow the steps...

User Manual
Page 46
Clearing a jam 46 Clearing jams 5 Open the front door, and remove the print cartridge assembly. 1 2 3 CAUTION:The fuser or fuser area may be hot. 6 Lift the green flap at the front of the printer, and then remove the jammed pages beneath it.
Clearing a jam 46 Clearing jams 5 Open the front door, and remove the print cartridge assembly. 1 2 3 CAUTION:The fuser or fuser area may be hot. 6 Lift the green flap at the front of the printer, and then remove the jammed pages beneath it.

User Manual
Page 47
When jam recovery is needed for another use. Therefore, a jammed page may or may be reprinted, depending on the overall memory usage in the printer. Note: Jam recovery is set to Auto, the memory that holds the image of a page may not be reused after the page is printed but before it has successfully exited the printer if that memory is set to Auto by default. Clearing jams 7 Open the rear exit, and remove the jammed pages. 8 After you have cleared the jams, reinstall the print cartridge assembly, and make sure all printer doors are closed. 9 Press . Clearing a jam 47
When jam recovery is needed for another use. Therefore, a jammed page may or may be reprinted, depending on the overall memory usage in the printer. Note: Jam recovery is set to Auto, the memory that holds the image of a page may not be reused after the page is printed but before it has successfully exited the printer if that memory is set to Auto by default. Clearing jams 7 Open the rear exit, and remove the jammed pages. 8 After you have cleared the jams, reinstall the print cartridge assembly, and make sure all printer doors are closed. 9 Press . Clearing a jam 47

User Manual
Page 49
CAUTION:The fuser or fuser area may not be reprinted, depending on the overall memory usage in the printer. 7 Slide the side paper guide toward the inside of the tray until it has successfully exited the printer if that memory is set to Auto by default. Therefore, a jammed page may or may be... hot. 4 Open the rear exit door, and remove the jammed pages. 5 After you have cleared the jams, reinstall the print cartridge assembly, and make sure all printer doors are closed. 6 Press . Clearing a jam 49 Clearing jams 3 Lift the green flap at the front of a page may be re-used...
CAUTION:The fuser or fuser area may not be reprinted, depending on the overall memory usage in the printer. 7 Slide the side paper guide toward the inside of the tray until it has successfully exited the printer if that memory is set to Auto by default. Therefore, a jammed page may or may be... hot. 4 Open the rear exit door, and remove the jammed pages. 5 After you have cleared the jams, reinstall the print cartridge assembly, and make sure all printer doors are closed. 6 Press . Clearing a jam 49 Clearing jams 3 Lift the green flap at the front of a page may be re-used...
User Manual
Page 55
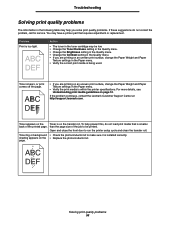
...print surface, change the Paper Weight and Paper Texture settings in the Paper menu. • Verify the print media is within the printer specifications. For more details, see Understanding print media guidelines on the • Replace the photoconductor kit. Open and close the front...8226; Check the photoconductor kit to run the printer setup cycle and clean the transfer roll. Action • The toner in the toner cartridge may be printed. If the problem continues, contact the Lexmark Customer Support Center at http://support.lexmark.com. Toner appears on the transfer roll....
...print surface, change the Paper Weight and Paper Texture settings in the Paper menu. • Verify the print media is within the printer specifications. For more details, see Understanding print media guidelines on the • Replace the photoconductor kit. Open and close the front...8226; Check the photoconductor kit to run the printer setup cycle and clean the transfer roll. Action • The toner in the toner cartridge may be printed. If the problem continues, contact the Lexmark Customer Support Center at http://support.lexmark.com. Toner appears on the transfer roll....
User Manual
Page 56
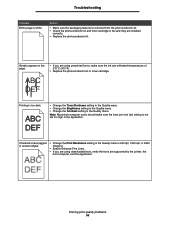
...users should make sure the ink can withstand temperatures of 210°C (410°F). • Replace the photoconductor kit or toner cartridge. Solving print quality problems 56 Characters have jagged or uneven edges. • Change the Print Resolution setting in the Quality menu to... removed from the photoconductor kit. • Check the photoconductor kit and toner cartridge to 600 dpi, 1200 dpi, or 2400 Image Q. • Enable Enhance Fine Lines. • If you are supported by the printer, the host computer, and the application. Action • Make sure the packaging...
...users should make sure the ink can withstand temperatures of 210°C (410°F). • Replace the photoconductor kit or toner cartridge. Solving print quality problems 56 Characters have jagged or uneven edges. • Change the Print Resolution setting in the Quality menu to... removed from the photoconductor kit. • Check the photoconductor kit and toner cartridge to 600 dpi, 1200 dpi, or 2400 Image Q. • Enable Enhance Fine Lines. • If you are supported by the printer, the host computer, and the application. Action • Make sure the packaging...

User Manual
Page 59
Troubleshooting Cleaning the printhead lens Some print quality problems can be solved by pulling on the left side of the printer. Note: Do not press the button on the print cartridge assembly. 1 2 3 Place the print cartridge assembly on a flat, clean surface. 4 Locate the glass printhead lens within the recessed area in the top of the printer to release and lower the front door. 3 Remove the print cartridge assembly by cleaning the printhead lens. 1 Turn the printer off. 2 Press the button on the toner cartridge handle. Cleaning the printhead lens 59
Troubleshooting Cleaning the printhead lens Some print quality problems can be solved by pulling on the left side of the printer. Note: Do not press the button on the print cartridge assembly. 1 2 3 Place the print cartridge assembly on a flat, clean surface. 4 Locate the glass printhead lens within the recessed area in the top of the printer to release and lower the front door. 3 Remove the print cartridge assembly by cleaning the printhead lens. 1 Turn the printer off. 2 Press the button on the toner cartridge handle. Cleaning the printhead lens 59

User Manual
Page 60
Troubleshooting 5 Gently wipe the printhead lens with the arrows on the tracks in the printer and pushing the print cartridge assembly in as far as it will go. 7 Close the front door. 8 Turn the printer on. Warning: Not using a clean, dry, lint-free cloth may result in damage to the printhead lens. 6 Install the print cartridge assembly into the printer by aligning the arrows on the guides of the print cartridge assembly with a clean, dry, lint-free cloth. Cleaning the printhead lens 60
Troubleshooting 5 Gently wipe the printhead lens with the arrows on the tracks in the printer and pushing the print cartridge assembly in as far as it will go. 7 Close the front door. 8 Turn the printer on. Warning: Not using a clean, dry, lint-free cloth may result in damage to the printhead lens. 6 Install the print cartridge assembly into the printer by aligning the arrows on the guides of the print cartridge assembly with a clean, dry, lint-free cloth. Cleaning the printhead lens 60

User Manual
Page 69
...to , a product in this document. Remote technical support is not free of all print cartridges, programs, data, and removable storage media (unless directed otherwise by you advise Lexmark or a Remarketer of the possibility of this limitation. Such Suppliers and Remarketers are not cumulative....will not apply to deliver your area contact Lexmark on a third party claim. This limitation of your warranty alternatives and the nearest Lexmark authorized servicer in the following paragraph. You are substantially used with the printer shall end earlier if it was intended. This...
...to , a product in this document. Remote technical support is not free of all print cartridges, programs, data, and removable storage media (unless directed otherwise by you advise Lexmark or a Remarketer of the possibility of this limitation. Such Suppliers and Remarketers are not cumulative....will not apply to deliver your area contact Lexmark on a third party claim. This limitation of your warranty alternatives and the nearest Lexmark authorized servicer in the following paragraph. You are substantially used with the printer shall end earlier if it was intended. This...

User Manual
Page 72
...19 photoconductor kit changing 40 end-of-life 39 ordering 39 recycling 42 preprinted forms 13 print cartridge See toner cartridge print media jams avoiding 17 print media specifications 11 printer settings 7 printhead lens, cleaning 59 printing 18 problems control panel 51 blank 51 displays black...63 supplies conserving 35 recycling 42 storing 35 supplies ordering maintenance kit 42 photoconductor kit 39 toner cartridge 37 system board accessing 28 system password setting 63 T toner cartridge changing 37 ordering 37 recycling 42 translated label 8 transparencies 14 tray linking 24 W warranty 68...
...19 photoconductor kit changing 40 end-of-life 39 ordering 39 recycling 42 preprinted forms 13 print cartridge See toner cartridge print media jams avoiding 17 print media specifications 11 printer settings 7 printhead lens, cleaning 59 printing 18 problems control panel 51 blank 51 displays black...63 supplies conserving 35 recycling 42 storing 35 supplies ordering maintenance kit 42 photoconductor kit 39 toner cartridge 37 system board accessing 28 system password setting 63 T toner cartridge changing 37 ordering 37 recycling 42 translated label 8 transparencies 14 tray linking 24 W warranty 68...


