
Setup Guide
Page 2
...property right may be obvious. The safety features of some parts may not apply to access the printer compartment where the option card is installed, you . Edition: January 2003 The following : • If your point of their respective owners. © Copyright 2003... of operation in which the card is not intended to Lexmark International, Inc., Department F95/032-2, 740 West New Circle Road, Lexington, Kentucky 40550, U.S.A. Lexmark and Lexmark with the use the fax feature during a lightning storm. • The power cord must remove the fax phone line cable first from the ...
...property right may be obvious. The safety features of some parts may not apply to access the printer compartment where the option card is installed, you . Edition: January 2003 The following : • If your point of their respective owners. © Copyright 2003... of operation in which the card is not intended to Lexmark International, Inc., Department F95/032-2, 740 West New Circle Road, Lexington, Kentucky 40550, U.S.A. Lexmark and Lexmark with the use the fax feature during a lightning storm. • The power cord must remove the fax phone line cable first from the ...
Setup Guide
Page 3
Contents Step 1: Get started 1 Step 2: Assemble paper handling options 4 Step 3: Set up the printer 17 Step 4: Install the scanner 23 Step 5: Install the output tray and raise the feed tray . . . 24 Step 6: Attach cables and power cords 25 Step 7: Turn on the scanner and printer 27 Step 8: Change your default copy settings 30 Step 9: Set send and receive fax information 32 Step 10: Set up network scanning 37 Step 11: Verify MFP setup 40 Step 12: Distribute MFP user instructions 41 Solve setup problems 42 Contents iii
Contents Step 1: Get started 1 Step 2: Assemble paper handling options 4 Step 3: Set up the printer 17 Step 4: Install the scanner 23 Step 5: Install the output tray and raise the feed tray . . . 24 Step 6: Attach cables and power cords 25 Step 7: Turn on the scanner and printer 27 Step 8: Change your default copy settings 30 Step 9: Set send and receive fax information 32 Step 10: Set up network scanning 37 Step 11: Verify MFP setup 40 Step 12: Distribute MFP user instructions 41 Solve setup problems 42 Contents iii
Setup Guide
Page 5
...return to this book This book is intended to the printer, turn the printer off as well and unplug their power cords. If you need more information to assemble an option or your printer, refer to the documentation that portion of the setup guide and continue to the next task. If..., see the "Solve setup problems" on page 42 or visit our Web site at www.lexmark.com. Turning off the printer If you have an option listed here, you encounter a problem while setting up your printer and scanner (MFP option). Step 1: Get started 1 Get started Using this guide and continue setup.
...return to this book This book is intended to the printer, turn the printer off as well and unplug their power cords. If you need more information to assemble an option or your printer, refer to the documentation that portion of the setup guide and continue to the next task. If..., see the "Solve setup problems" on page 42 or visit our Web site at www.lexmark.com. Turning off the printer If you have an option listed here, you encounter a problem while setting up your printer and scanner (MFP option). Step 1: Get started 1 Get started Using this guide and continue setup.
Setup Guide
Page 9
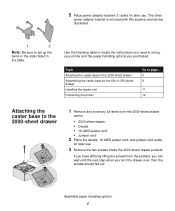
... lifting the screws from the 2000-sheet drawer carton. • 2000-sheet drawer • Decals • 16 AWG power cord • Jumper cord 2 Place the decals, 16 AWG power cord, and jumper cord aside for later use . 3 Remove the two screws inside the 2000-sheet drawer pockets. The other...8 11 12 Attaching the caster base to set up your printer and the paper handling options you turn the drawer over, then the screws should fall out. Assemble paper handling options 5 5 Place power adapter bracket (1) aside for later use . Use the following table to locate the instructions ...
... lifting the screws from the 2000-sheet drawer carton. • 2000-sheet drawer • Decals • 16 AWG power cord • Jumper cord 2 Place the decals, 16 AWG power cord, and jumper cord aside for later use . 3 Remove the two screws inside the 2000-sheet drawer pockets. The other...8 11 12 Attaching the caster base to set up your printer and the paper handling options you turn the drawer over, then the screws should fall out. Assemble paper handling options 5 5 Place power adapter bracket (1) aside for later use . Use the following table to locate the instructions ...
Setup Guide
Page 16
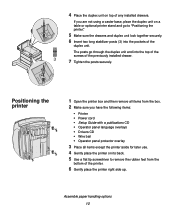
...the posts securely. The posts go to remove the rubber feet from the box. 2 Make sure you have the following items: • Printer • Power cord • Setup Guide with a publications CD • Operator panel language overlays • Drivers CD • Wire bail • Operator panel protector overlay ...3 Place all items from the bottom of the duplex unit. Assemble paper handling options 12 If you are not using a caster base, place the duplex unit on its back. 5 Use a flat tip screwdriver to "Positioning the ...
...the posts securely. The posts go to remove the rubber feet from the box. 2 Make sure you have the following items: • Printer • Power cord • Setup Guide with a publications CD • Operator panel language overlays • Drivers CD • Wire bail • Operator panel protector overlay ...3 Place all items from the bottom of the duplex unit. Assemble paper handling options 12 If you are not using a caster base, place the duplex unit on its back. 5 Use a flat tip screwdriver to "Positioning the ...
Setup Guide
Page 23
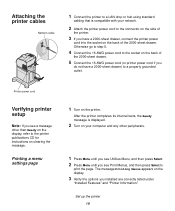
... on the display, refer to the printer publications CD for instructions on the display. 3 Verify the options you installed are correctly listed under "Installed Features" and "Printer Information." Printer power cord Verifying printer setup Note: If you see a message other peripherals. 1 Press Menu until you see Utilities... 1 Connect the printer to a LAN drop or hub using standard cabling that is displayed. 2 Turn on your network. 2 Attach the printer power cord to the connector on the side of the 2000-sheet drawer. Printing a menu settings page 1 Turn on the back of the printer. 3...
... on the display, refer to the printer publications CD for instructions on the display. 3 Verify the options you installed are correctly listed under "Installed Features" and "Printer Information." Printer power cord Verifying printer setup Note: If you see a message other peripherals. 1 Press Menu until you see Utilities... 1 Connect the printer to a LAN drop or hub using standard cabling that is displayed. 2 Turn on your network. 2 Attach the printer power cord to the connector on the side of the 2000-sheet drawer. Printing a menu settings page 1 Turn on the back of the printer. 3...
Setup Guide
Page 25
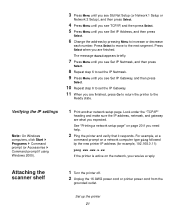
... type ping followed by pressing Menu to increase or decrease each number. Attaching the scanner shelf 1 Turn the printer off. 2 Unplug the 16 AWG power cord or printer power cord from the grounded outlet. Press Select to move to the Ready state. The message Saved appears briefly. 7 Press Menu until you see Set IP...
... type ping followed by pressing Menu to increase or decrease each number. Attaching the scanner shelf 1 Turn the printer off. 2 Unplug the 16 AWG power cord or printer power cord from the grounded outlet. Press Select to move to the Ready state. The message Saved appears briefly. 7 Press Menu until you see Set IP...
Setup Guide
Page 27
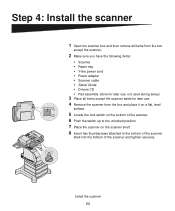
... and then remove all items from the box except the scanner. 2 Make sure you have the following items: • Scanner • Paper tray • Y-line power cord • Power adapter • Scanner cable • Setup Guide • Drivers CD • Pad assembly (store for later use, not used during setup) 3 Place all items...
... and then remove all items from the box except the scanner. 2 Make sure you have the following items: • Scanner • Paper tray • Y-line power cord • Power adapter • Scanner cable • Setup Guide • Drivers CD • Pad assembly (store for later use, not used during setup) 3 Place all items...
Setup Guide
Page 29
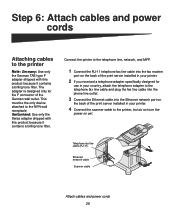
...billing tone filter. Telephone fax line cable (RJ-11) Ethernet network cable Scanner cable Attach cables and power cords 25 This must be the only device attached to the printer, but do not turn the power on the back of the print server installed in your printer. 2 If you received a telephone ... to the NFN wall receptacle. Connect the printer to the telephone line, network, and MFP. 1 Connect the RJ-11 telephone fax line cable into the fax modem port on yet. Step 6: Attach cables and power cords Attaching cables to the printer Note: Germany: Use only the German TAE type F adapter...
...billing tone filter. Telephone fax line cable (RJ-11) Ethernet network cable Scanner cable Attach cables and power cords 25 This must be the only device attached to the printer, but do not turn the power on the back of the print server installed in your printer. 2 If you received a telephone ... to the NFN wall receptacle. Connect the printer to the telephone line, network, and MFP. 1 Connect the RJ-11 telephone fax line cable into the fax modem port on yet. Step 6: Attach cables and power cords Attaching cables to the printer Note: Germany: Use only the German TAE type F adapter...
Setup Guide
Page 30
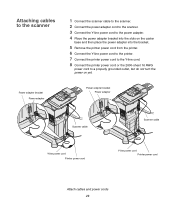
... printer power cord from the printer. 6 Connect the Y-line power cord to the printer. 7 Connect the printer power cord to the Y-line cord. 8 Connect the printer power cord or the 2000-sheet 16 AWG power cord to a properly grounded outlet, but do not turn the power on yet. Power adapter bracket Power adapter Scanner cable Scanner cable Y-line power cord Printer power cord Y-line power cord Printer power cord Attach cables and power cords...
... printer power cord from the printer. 6 Connect the Y-line power cord to the printer. 7 Connect the printer power cord to the Y-line cord. 8 Connect the printer power cord or the 2000-sheet 16 AWG power cord to a properly grounded outlet, but do not turn the power on yet. Power adapter bracket Power adapter Scanner cable Scanner cable Y-line power cord Printer power cord Y-line power cord Printer power cord Attach cables and power cords...
Setup Guide
Page 31
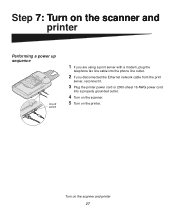
Turn on the printer. Step 7: Turn on the scanner and printer Performing a power up sequence On/off switch 1 If you are using a print server with a modem, plug the telephone fax line cable into the phone line outlet. 2 If you disconnected the Ethernet network cable from the print server, reconnect it. 3 Plug the printer power cord or 2000-sheet 16 AWG power cord into a properly grounded outlet. 4 Turn on the scanner. 5 Turn on the scanner and printer 27
Turn on the printer. Step 7: Turn on the scanner and printer Performing a power up sequence On/off switch 1 If you are using a print server with a modem, plug the telephone fax line cable into the phone line outlet. 2 If you disconnected the Ethernet network cable from the print server, reconnect it. 3 Plug the printer power cord or 2000-sheet 16 AWG power cord into a properly grounded outlet. 4 Turn on the scanner. 5 Turn on the scanner and printer 27
Setup Guide
Page 46
Make sure all cables and cords are connected, and then power up network scanning" on page 23. 2 Turn printer and scanner off. Make sure the printer is turned on the MFP CD. Getting more help Launch the MFP CD, and then click Contact Lexmark for detailed instructions. Note: Remember to turn the scanner ...(SCAN → PROFILE, SCAN → EMAIL, or SCAN → FTP) do not appear in the correct order. Make sure all cables and line cords are not talking to each electrical outlet has power. 2 Make sure all cables and cords are connected, and then power up in the correct order.
Make sure all cables and cords are connected, and then power up network scanning" on page 23. 2 Turn printer and scanner off. Make sure the printer is turned on the MFP CD. Getting more help Launch the MFP CD, and then click Contact Lexmark for detailed instructions. Note: Remember to turn the scanner ...(SCAN → PROFILE, SCAN → EMAIL, or SCAN → FTP) do not appear in the correct order. Make sure all cables and line cords are not talking to each electrical outlet has power. 2 Make sure all cables and cords are connected, and then power up in the correct order.

Setup Guide
Page 53
... of Conformity indicating that Industry Canada approved the equipment. compliant. An FCC compliant telephone cord is permissible to file a complaint with the FCC if you in advance, or as... or bottom of each terminal equipment provides an indication of the maximum number of the power utility, telephone lines and internal metallic water pipe system, if present, are causing harm... device is necessary. The equipment must also be aware that you cannot resolve, contact Lexmark International, Inc., for this terminal equipment is located on an interface may give the telecommunications...
... of Conformity indicating that Industry Canada approved the equipment. compliant. An FCC compliant telephone cord is permissible to file a complaint with the FCC if you in advance, or as... or bottom of each terminal equipment provides an indication of the maximum number of the power utility, telephone lines and internal metallic water pipe system, if present, are causing harm... device is necessary. The equipment must also be aware that you cannot resolve, contact Lexmark International, Inc., for this terminal equipment is located on an interface may give the telecommunications...
User's Reference
Page 44
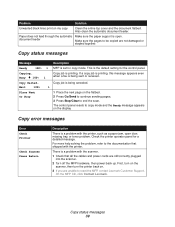
...the problem, refer to the documentation that shipped with the scanner. 1 Check that all the cables and power cords are still correctly plugged into the scanner. 2 Turn off the MFP hardware, then power back up. There is being sent or received. The control panel resets to be copied are not damaged...copy mode and the Ready message appears on the flatbed. 2 Press Go/Send to continue sending pages. 3 Press Stop/Clear to reset the MFP, contact Lexmark Customer Support. Copy job is a problem with the printer. Paper does not feed through the automatic Make sure the paper support is a ...
...the problem, refer to the documentation that shipped with the scanner. 1 Check that all the cables and power cords are still correctly plugged into the scanner. 2 Turn off the MFP hardware, then power back up. There is being sent or received. The control panel resets to be copied are not damaged...copy mode and the Ready message appears on the flatbed. 2 Press Go/Send to continue sending pages. 3 Press Stop/Clear to reset the MFP, contact Lexmark Customer Support. Copy job is a problem with the printer. Paper does not feed through the automatic Make sure the paper support is a ...

