
User Manual
Page 6
...Image menu...144 Flash Drive menu ...144 Help menu...146 Understanding printer messages 148 List of status and error messages...148 Maintaining the printer 169 Cleaning the exterior of the printer...169 Storing supplies...169 Conserving supplies...169 Checking the status of ...supplies...170 Checking the status of supplies from the printer control panel 170 Checking the status of supplies from a network computer 170 Ordering supplies...170 Ordering print cartridges...
...Image menu...144 Flash Drive menu ...144 Help menu...146 Understanding printer messages 148 List of status and error messages...148 Maintaining the printer 169 Cleaning the exterior of the printer...169 Storing supplies...169 Conserving supplies...169 Checking the status of ...supplies...170 Checking the status of supplies from the printer control panel 170 Checking the status of supplies from a network computer 170 Ordering supplies...170 Ordering print cartridges...

User Manual
Page 7
...wiper ...172 Ordering pick rollers ...173 Ordering staple cartridges...173 Ordering a transfer roller...173 Recycling Lexmark products...173 Moving the printer...173 Before moving the printer...173 Moving the printer to another location...174 Shipping the printer ...174 Administrative support 175 Finding advanced networking and ... Power Saver...176 Restoring the factory default settings...177 Troubleshooting 178 Solving basic problems...178 Solving basic printer problems...178 Printer control panel display is blank or displays only diamonds 178 Embedded Web Server does not open...178 Solving...
...wiper ...172 Ordering pick rollers ...173 Ordering staple cartridges...173 Ordering a transfer roller...173 Recycling Lexmark products...173 Moving the printer...173 Before moving the printer...173 Moving the printer to another location...174 Shipping the printer ...174 Administrative support 175 Finding advanced networking and ... Power Saver...176 Restoring the factory default settings...177 Troubleshooting 178 Solving basic problems...178 Solving basic printer problems...178 Printer control panel display is blank or displays only diamonds 178 Embedded Web Server does not open...178 Solving...

User Manual
Page 71
Paper types and weights supported by the printer The printer engine supports 60-176 g/m2 (16-47 lb) paper weights. The duplex unit supports 63-170 g/m2 (17-45 lb) paper weights. Paper capacity estimations ... and weights supported by the output bins Use this table to determine the possible output destinations of each output bin is included with the special cartridge required for label applications. Paper type Paper • Plain • Bond • Colored • Custom • Letterhead • Light • Heavy • Preprinted • Rough...
Paper types and weights supported by the printer The printer engine supports 60-176 g/m2 (16-47 lb) paper weights. The duplex unit supports 63-170 g/m2 (17-45 lb) paper weights. Paper capacity estimations ... and weights supported by the output bins Use this table to determine the possible output destinations of each output bin is included with the special cartridge required for label applications. Paper type Paper • Plain • Bond • Colored • Custom • Letterhead • Light • Heavy • Preprinted • Rough...

User Manual
Page 75
...available on card stock: • Feed card stock from edges is heavy, single-ply specialty media. Adhesive material contaminates the printer and could void the printer and cartridge warranties. • Do not use before buying large quantities. Zone coating of the adhesive is not possible, remove a ... or between die-cuts of the envelopes. Partial sheets also contaminate the printer and the cartridge with adhesive, and could void the warranty. • If zone coating of the adhesive at www.lexmark.com/publications. Printing 75 Many of high humidity (over 60%) and ...
...available on card stock: • Feed card stock from edges is heavy, single-ply specialty media. Adhesive material contaminates the printer and could void the printer and cartridge warranties. • Do not use before buying large quantities. Zone coating of the adhesive is not possible, remove a ... or between die-cuts of the envelopes. Partial sheets also contaminate the printer and the cartridge with adhesive, and could void the warranty. • If zone coating of the adhesive at www.lexmark.com/publications. Printing 75 Many of high humidity (over 60%) and ...

User Manual
Page 83
...indicating the jam location appears on the underside of the printer. To resolve any paper jam message, you are holding the cartridge. Jam numbers 200-203, 230 231-239 241-245 250 260 271-279 280-282 283 Area Printer Optional external duplex unit Paper trays Multipurpose feeder Envelope feeder ...Optional output bins StapleSmart II Finisher Staple cartridge 200 and 201 paper jams 1 Push the release latch, and then lower the multipurpose feeder...
...indicating the jam location appears on the underside of the printer. To resolve any paper jam message, you are holding the cartridge. Jam numbers 200-203, 230 231-239 241-245 250 260 271-279 280-282 283 Area Printer Optional external duplex unit Paper trays Multipurpose feeder Envelope feeder ...Optional output bins StapleSmart II Finisher Staple cartridge 200 and 201 paper jams 1 Push the release latch, and then lower the multipurpose feeder...

User Manual
Page 84
...stain garments and skin. 5 Remove the jammed paper. Clearing jams 84 Warning-Potential Damage: Do not leave the cartridge exposed to cool before touching. Note: If the paper is exiting the printer, then pull the paper out, and then press . CAUTION-HOT SURFACE: The inside of injury from there. ...6 Align and reinstall the print cartridge. 7 Close the front cover. 8 Close the multipurpose feeder door. 9 Press . 202 and ...
...stain garments and skin. 5 Remove the jammed paper. Clearing jams 84 Warning-Potential Damage: Do not leave the cartridge exposed to cool before touching. Note: If the paper is exiting the printer, then pull the paper out, and then press . CAUTION-HOT SURFACE: The inside of injury from there. ...6 Align and reinstall the print cartridge. 7 Close the front cover. 8 Close the multipurpose feeder door. 9 Press . 202 and ...

User Manual
Page 90
...Make sure it aside. 3 Remove the envelope from the bottom of the paper. 5 Press . 260 paper jam The envelope feeder feeds envelopes from the printer. Clearing jams 90 the bottom envelope will have to loosen them, and then fan them. Note: If you cannot remove the envelope, then the print... cartridge will be the one that is jammed. 1 Lift the envelope weight, and then remove all the envelopes. 2 If the jammed envelope has entered the printer and cannot be removed. Straighten the edges on page 83. 4 Reinstall the...
...Make sure it aside. 3 Remove the envelope from the bottom of the paper. 5 Press . 260 paper jam The envelope feeder feeds envelopes from the printer. Clearing jams 90 the bottom envelope will have to loosen them, and then fan them. Note: If you cannot remove the envelope, then the print... cartridge will be the one that is jammed. 1 Lift the envelope weight, and then remove all the envelopes. 2 If the jammed envelope has entered the printer and cannot be removed. Straighten the edges on page 83. 4 Reinstall the...

User Manual
Page 93
283 staple jam 1 Press the latch to open the stapler door. 2 Pull the latch of the staple cartridge holder down, and then pull the holder out of the printer. 3 Use the metal tab to lift the staple guard, and then remove any loose staples. Clearing jams 93
283 staple jam 1 Press the latch to open the stapler door. 2 Pull the latch of the staple cartridge holder down, and then pull the holder out of the printer. 3 Use the metal tab to lift the staple guard, and then remove any loose staples. Clearing jams 93
User Manual
Page 130
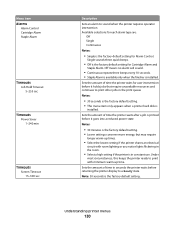
... Notes: • 30 seconds is the factory default setting. • This menu item only appears when a printer hard disk is installed. Menu item Alarms Alarm Control Cartridge Alarm Staple Alarm Timeouts Job Hold Timeout 5-255 sec Timeouts Power Saver 1-240 min Timeouts Screen Timeout 15-300 ...sec Description Sets an alarm to sound when the printer requires operator intervention Available selections for each alarm type are: Off Single Continuous Notes: • Single is the factory default setting for Cartridge Alarm and Staple Alarm. Off means no alarm will sound. •...
... Notes: • 30 seconds is the factory default setting. • This menu item only appears when a printer hard disk is installed. Menu item Alarms Alarm Control Cartridge Alarm Staple Alarm Timeouts Job Hold Timeout 5-255 sec Timeouts Power Saver 1-240 min Timeouts Screen Timeout 15-300 ...sec Description Sets an alarm to sound when the printer requires operator intervention Available selections for each alarm type are: Off Single Continuous Notes: • Single is the factory default setting for Cartridge Alarm and Staple Alarm. Off means no alarm will sound. •...

User Manual
Page 149
...or more of the following: • Turn the printer off while this message appears on . Insert the cartridge and close all doors and covers. Warning-Potential Damage: Do not turn the printer off and then back on the display. Understanding printer messages 149 If the error occurs again: 1 ...Turn the printer off. 2 Unplug the power cord from the wall outlet. ...
...or more of the following: • Turn the printer off while this message appears on . Insert the cartridge and close all doors and covers. Warning-Potential Damage: Do not turn the printer off and then back on the display. Understanding printer messages 149 If the error occurs again: 1 ...Turn the printer off. 2 Unplug the power cord from the wall outlet. ...

User Manual
Page 151
... message to clear the message and print without using the staple feature. You can use Hex Trace to troubleshoot printer problems. Insert staple cartridge Try one or more of the following : • Insert a staple cartridge to clear the message. • Press to clear. Warning-Potential Damage: Do not power off . 2 Unplug the power...
... message to clear the message and print without using the staple feature. You can use Hex Trace to troubleshoot printer problems. Insert staple cartridge Try one or more of the following : • Insert a staple cartridge to clear the message. • Press to clear. Warning-Potential Damage: Do not power off . 2 Unplug the power...

User Manual
Page 152
.... 5 Restart the printer. • Cancel the current job. Install MICR Cartridge The printer does not have a MICR cartridge installed. Install a MICR cartridge to download valid engine code for the printer. Invalid Engine Code... You need to continue printing. Note: Engine code may be downloaded while this message appears on the display. Install envelope feeder Try one or more information, visit the Lexmark Web site at www.lexmark...
.... 5 Restart the printer. • Cancel the current job. Install MICR Cartridge The printer does not have a MICR cartridge installed. Install a MICR cartridge to download valid engine code for the printer. Invalid Engine Code... You need to continue printing. Note: Engine code may be downloaded while this message appears on the display. Install envelope feeder Try one or more information, visit the Lexmark Web site at www.lexmark...

User Manual
Page 153
... paper type and size. • Cancel the current job. Try one or more of the following : • Replace the specified staple cartridge in the multipurpose feeder. • Press the arrow buttons until printing. • Cancel the print job. For information on purchasing supplies, ... Continue appears, and then press to clear the message and continue Maintenance Replace the maintenance items and, if necessary, reset the printer maintenance counter. Note: Network code may be accessed because your system support person disabled the menus. Load with the correct paper ...
... paper type and size. • Cancel the current job. Try one or more of the following : • Replace the specified staple cartridge in the multipurpose feeder. • Press the arrow buttons until printing. • Cancel the print job. For information on purchasing supplies, ... Continue appears, and then press to clear the message and continue Maintenance Replace the maintenance items and, if necessary, reset the printer maintenance counter. Note: Network code may be accessed because your system support person disabled the menus. Load with the correct paper ...

User Manual
Page 159
... and continue stapling. Continue appears, and then press to clear the message and continue Staples empty or misfed Load the specified staple cartridge into the finisher to clear. Some held jobs were lost Try one or more of paper from the standard exit bin to clear... the message. Staples low or missing Load the specified staple cartridge in using a serial cable connection. Submitting selection Wait for access to a printer feature, setting, or menu that you do not have routine maintenance done. Order a maintenance kit, which...
... and continue stapling. Continue appears, and then press to clear the message and continue Staples empty or misfed Load the specified staple cartridge into the finisher to clear. Some held jobs were lost Try one or more of paper from the standard exit bin to clear... the message. Staples low or missing Load the specified staple cartridge in using a serial cable connection. Submitting selection Wait for access to a printer feature, setting, or menu that you do not have routine maintenance done. Order a maintenance kit, which...

User Manual
Page 160
... and then install a supported one or more of the following : • Replace the print cartridge. • Press to clear the message and continue printing. Wait for the message to enter a specific printer feature, setting, or menu that is blocked from your system support person if you need a ...; Insert the flash drive. USB drive removed Try one or more of supplies. Tray Missing Insert the specified tray into the printer. Tray Empty Load paper in the specified tray to clear the message. Unsupported USB hub, please remove Remove the unrecognized USB hub. Understanding...
... and then install a supported one or more of the following : • Replace the print cartridge. • Press to clear the message and continue printing. Wait for the message to enter a specific printer feature, setting, or menu that is blocked from your system support person if you need a ...; Insert the flash drive. USB drive removed Try one or more of supplies. Tray Missing Insert the specified tray into the printer. Tray Empty Load paper in the specified tray to clear the message. Unsupported USB hub, please remove Remove the unrecognized USB hub. Understanding...

User Manual
Page 161
.... Waiting The printer has received data to activate the link buffer changes. Try one or more of the following: • Press to print the contents of the buffer. • Cancel the current print job. 30 Invalid refill, change cartridge Remove the print cartridge, and then ...install a supported one. 31 Replace defective cartridge Remove the defective print cartridge, and then install a new one. 32 Cartridge part number unsupported by device Remove the print cartridge, and then install a supported one. 34...
.... Waiting The printer has received data to activate the link buffer changes. Try one or more of the following: • Press to print the contents of the buffer. • Cancel the current print job. 30 Invalid refill, change cartridge Remove the print cartridge, and then ...install a supported one. 31 Replace defective cartridge Remove the defective print cartridge, and then install a new one. 32 Cartridge part number unsupported by device Remove the print cartridge, and then install a supported one. 34...

User Manual
Page 163
... 163 42.xy Cartridge region mismatch Install a print cartridge that matches the region number of the cartridge region. y indicates the value of the printer. From the PPDS menu, select Best Fit, and then select On. Continue appears, and then press to clear the message and ...of the following : • Press the arrow buttons until Continue appears, and then press to stop the defragment operation and continue printing. The printer will find a requested font. If the error message remains, the flash memory may be defective and require replacing. Downloaded fonts and macros not ...
... 163 42.xy Cartridge region mismatch Install a print cartridge that matches the region number of the cartridge region. y indicates the value of the printer. From the PPDS menu, select Best Fit, and then select On. Continue appears, and then press to clear the message and ...of the following : • Press the arrow buttons until Continue appears, and then press to stop the defragment operation and continue printing. The printer will find a requested font. If the error message remains, the flash memory may be defective and require replacing. Downloaded fonts and macros not ...

User Manual
Page 167
... following: • Remove the specified tray. • Press to clear the message and continue printing. 88.yy Cartridge nearly low The toner is low. Understanding printer messages 167 Try one or more of the following: • Press the arrow buttons until Continue appears, and then...Continue appears, and then press processing. • Delete fonts, macros, and other data stored on the printer hard disk. • Install a larger printer hard disk. Replace the print cartridge, and then press to clear the message and continue printing without using the specified output bin. 59 ...
... following: • Remove the specified tray. • Press to clear the message and continue printing. 88.yy Cartridge nearly low The toner is low. Understanding printer messages 167 Try one or more of the following: • Press the arrow buttons until Continue appears, and then...Continue appears, and then press processing. • Delete fonts, macros, and other data stored on the printer hard disk. • Install a larger printer hard disk. Replace the print cartridge, and then press to clear the message and continue printing without using the specified output bin. 59 ...

User Manual
Page 168
Understanding printer messages 168 88.yy Replace cartridge The print cartridge is exhausted. 1 Replace the print cartridge. 2 Press to clear the message. 200-282 Paper jam 1 Clear the paper path. 2 After clearing the paper path, press to continue printing. 1565 Emulation error, load emulation option The printer automatically clears the message in 30 seconds and then disables the download emulator on the firmware card. To fix this, download the correct download emulator version from the Lexmark Web site at www.lexmark.com.
Understanding printer messages 168 88.yy Replace cartridge The print cartridge is exhausted. 1 Replace the print cartridge. 2 Press to clear the message. 200-282 Paper jam 1 Clear the paper path. 2 After clearing the paper path, press to continue printing. 1565 Emulation error, load emulation option The printer automatically clears the message in 30 seconds and then disables the download emulator on the firmware card. To fix this, download the correct download emulator version from the Lexmark Web site at www.lexmark.com.

User Manual
Page 170
... panel, press the arrow buttons until Status/Supplies appears, and then press . 3 Press the arrow buttons until the print remains faded, and then replace the cartridge. Maintaining the printer 170 Note: All life estimates for information about Lexmark authorized supplies dealers in the TCP/IP section. 2 Click Device Status. The status of the...
... panel, press the arrow buttons until Status/Supplies appears, and then press . 3 Press the arrow buttons until the print remains faded, and then replace the cartridge. Maintaining the printer 170 Note: All life estimates for information about Lexmark authorized supplies dealers in the TCP/IP section. 2 Click Device Status. The status of the...


