User's Guide
Page 4
...Solving print quality problems...73 Print is too light ...73 Dots are missing or print quality is poor ...73 Characters are wrong or missing ...74 Forms are smudged or print is off...68 Left margin moves to the Tear Off position before the print job ...printer...62 Checking the printer status...63 Adjusting character (bidirectional) alignment...65 Solving printing problems...66 Printer test works, but the printer does not print when attached to the computer 66 Printer is noisy...67 Printer sounds like it is printing, but does not print ...67 Printer alarm sounds...67 Printer goes to the right...
...Solving print quality problems...73 Print is too light ...73 Dots are missing or print quality is poor ...73 Characters are wrong or missing ...74 Forms are smudged or print is off...68 Left margin moves to the Tear Off position before the print job ...printer...62 Checking the printer status...63 Adjusting character (bidirectional) alignment...65 Solving printing problems...66 Printer test works, but the printer does not print when attached to the computer 66 Printer is noisy...67 Printer sounds like it is printing, but does not print ...67 Printer alarm sounds...67 Printer goes to the right...

User's Guide
Page 28
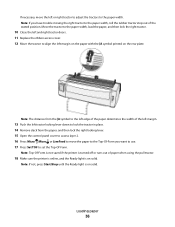
...margin on the rear plate. Note: Keeping the left tractor positioned to the left of the rubber tractor stop keeps your paper with the [A symbol printed on your paper within the paper sensor area. 8 Close the left and right...place the paper holes over the second or third pins of the left margin. 10 Push the left or right tractor to adjust the tractors to the left edge of the paper determines... the width of the tractor unit. Note: The distance from the paper, and then lock the right locking lever. If necessary, move the left tractor locking lever down to lock the tractor in place...
...margin on the rear plate. Note: Keeping the left tractor positioned to the left of the rubber tractor stop keeps your paper with the [A symbol printed on your paper within the paper sensor area. 8 Close the left and right...place the paper holes over the second or third pins of the left margin. 10 Push the left or right tractor to adjust the tractors to the left edge of the paper determines... the width of the tractor unit. Note: The distance from the paper, and then lock the right locking lever. If necessary, move the left tractor locking lever down to lock the tractor in place...

User's Guide
Page 31
... path until it passes the printhead. 10 Close the front cover. 11 Place the paper holes over the tractor pins. If necessary, move the left margin on the paper with the [A symbol printed on the rear plate. Note: The distance from the [A symbol to the left tractor locking lever down to.... 12 Close the left and right tractor doors. 13 Replace the ribbon access cover. 14 Move the tractor to align the left or right tractor to adjust the tractors to the paper width, roll the rubber tractor stop out of the left margin. 15 Push the left edge of the paper determines the...
... path until it passes the printhead. 10 Close the front cover. 11 Place the paper holes over the tractor pins. If necessary, move the left margin on the paper with the [A symbol printed on the rear plate. Note: The distance from the [A symbol to the left tractor locking lever down to.... 12 Close the left and right tractor doors. 13 Replace the ribbon access cover. 14 Move the tractor to align the left or right tractor to adjust the tractors to the paper width, roll the rubber tractor stop out of the left margin. 15 Push the left edge of the paper determines the...
User's Guide
Page 36
...pull tractor. 18 Make sure the printer is online, and the Ready light is on solid. Note: If you want to use. 17 Press Set TOF to set the Top-Of-Form. Note: The distance from the [A... symbol to the left edge of the paper determines the width of the left margin. 13 Push the left tractor locking lever down to...load the paper, and then lock the right tractor. 10 Close the left and right tractor doors. 11 Replace the ribbon access cover. 12 Move the tractor to align the left or right tractor to adjust the tractors to the ...
...pull tractor. 18 Make sure the printer is online, and the Ready light is on solid. Note: If you want to use. 17 Press Set TOF to set the Top-Of-Form. Note: The distance from the [A... symbol to the left edge of the paper determines the width of the left margin. 13 Push the left tractor locking lever down to...load the paper, and then lock the right tractor. 10 Close the left and right tractor doors. 11 Replace the ribbon access cover. 12 Move the tractor to align the left or right tractor to adjust the tractors to the ...

User's Guide
Page 38
... Move the left paper guide. Note: If you want aligns with the right edge of the left margin. 8 Place a cut form or an envelope against the left paper guide so that the print start position you are loading a preprinted form or envelope, put the top edge in first with the printed side up...[A symbol printed on the margin guide. Loading paper 38 The distance from the left paper guide to the [A symbol determines the width of the cut form or envelope. 1 Left paper guide 2 Cut form or envelope 3 Right paper guide 10 Insert the cut form or envelope into the printer until the Paper Out light...
... Move the left paper guide. Note: If you want aligns with the right edge of the left margin. 8 Place a cut form or an envelope against the left paper guide so that the print start position you are loading a preprinted form or envelope, put the top edge in first with the printed side up...[A symbol printed on the margin guide. Loading paper 38 The distance from the left paper guide to the [A symbol determines the width of the cut form or envelope. 1 Left paper guide 2 Cut form or envelope 3 Right paper guide 10 Insert the cut form or envelope into the printer until the Paper Out light...
User's Guide
Page 39
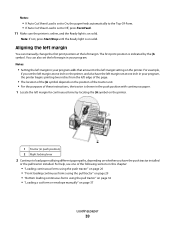
..., see one of these instructions, the tractor is on whether you set the left margin. For example, if you have the left margin set at the left margin at one inch in your program, the printer begins printing two inches from the left edge of the page. • The location... in push position) 2 Right locking lever 2 Continue to load paper utilizing different paper paths, depending on solid. Note: If not, press Start/Stop until the Ready light is indicated by locating the [A symbol on the printer. 1 Tractor (in this chapter: • "Loading continuous forms using the push tractor" ...
..., see one of these instructions, the tractor is on whether you set the left margin. For example, if you have the left margin set at the left margin at one inch in your program, the printer begins printing two inches from the left edge of the page. • The location... in push position) 2 Right locking lever 2 Continue to load paper utilizing different paper paths, depending on solid. Note: If not, press Start/Stop until the Ready light is indicated by locating the [A symbol on the printer. 1 Tractor (in this chapter: • "Loading continuous forms using the push tractor" ...
User's Guide
Page 52
...use with the printer: Understanding Setup mode and menu options 52 On-Lets you set the left margin to any inch increment from 0" to 3". • Right Margin This option lets you eject loaded cut sheet paper by FF - Notes: - Note: On is installed. To print a list of a continuous form to the ...Off bar position. Off-You can be selected by holding down specific key combinations when the printer is the factory default setting for the US, and Character Set 2 is turned on the Lexmark Web site at www.lexmark.com. - 437 is the factory default setting. • Auto Cut Sheet Load -...
...use with the printer: Understanding Setup mode and menu options 52 On-Lets you set the left margin to any inch increment from 0" to 3". • Right Margin This option lets you eject loaded cut sheet paper by FF - Notes: - Note: On is installed. To print a list of a continuous form to the ...Off bar position. Off-You can be selected by holding down specific key combinations when the printer is the factory default setting for the US, and Character Set 2 is turned on the Lexmark Web site at www.lexmark.com. - 437 is the factory default setting. • Auto Cut Sheet Load -...
User's Guide
Page 68
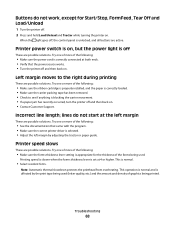
... • Adjust the left margin These are possible solutions. Try one of more of the following : • Make sure the forms thickness lever setting is normal. • Select resident fonts. Printer speed slows These are possible ...right during printing These are possible solutions. Note: Automatic thermal slowdown protects the printhead from overheating. Left margin moves to see if anything is off These are possible solutions. Printing speed is slower when the forms thickness lever is correctly connected at the left margin by the print type being printed. Printer...
... • Adjust the left margin These are possible solutions. Try one of more of the following : • Make sure the forms thickness lever setting is normal. • Select resident fonts. Printer speed slows These are possible ...right during printing These are possible solutions. Note: Automatic thermal slowdown protects the printhead from overheating. Left margin moves to see if anything is off These are possible solutions. Printing speed is slower when the forms thickness lever is correctly connected at the left margin by the print type being printed. Printer...
User's Guide
Page 69
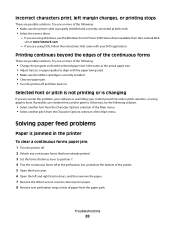
...Make sure the printer cable is overriding your control panel font and/or pitch selection, or using Windows, use resident fonts and/or pitches. Incorrect characters print, left and right tractor doors, ...any torn paper. 8 Remove torn perforation strips or bits of the printer. 5 Open the front cover. 6 Open the left margin changes, or printing stops These are possible solutions. Solving paper feed ... • Select another pitch from the Lexmark Web site at www.lexmark.com. - If possible, use the Windows Forms Printer 2500 Series driver available from the Character Options selection of ...
...Make sure the printer cable is overriding your control panel font and/or pitch selection, or using Windows, use resident fonts and/or pitches. Incorrect characters print, left and right tractor doors, ...any torn paper. 8 Remove torn perforation strips or bits of the printer. 5 Open the front cover. 6 Open the left margin changes, or printing stops These are possible solutions. Solving paper feed ... • Select another pitch from the Lexmark Web site at www.lexmark.com. - If possible, use the Windows Forms Printer 2500 Series driver available from the Character Options selection of ...
User's Guide
Page 84
... printer 43 pitch locking 22 selecting 22 pitch lock disabling 22 print quality troubleshooting characters are wrong or missing 74 dots ...forms or print too dark 74 specified font or pitch is not printing or is changing 69 print troubleshooting buttons do not work 68 incorrect characters print, left margin changes, or printing stops 69 left margin moves right during printing 68 Print test works, but printer...Lexmark products 58 WEEE statement 79 ribbon cartridge removing 57 S safety information 7 security supporting IPSec 60 supporting SNMPv3 60 using 802.1x authentication 61 setting Top-Of-Form...
... printer 43 pitch locking 22 selecting 22 pitch lock disabling 22 print quality troubleshooting characters are wrong or missing 74 dots ...forms or print too dark 74 specified font or pitch is not printing or is changing 69 print troubleshooting buttons do not work 68 incorrect characters print, left margin changes, or printing stops 69 left margin moves right during printing 68 Print test works, but printer...Lexmark products 58 WEEE statement 79 ribbon cartridge removing 57 S safety information 7 security supporting IPSec 60 supporting SNMPv3 60 using 802.1x authentication 61 setting Top-Of-Form...
User's Guide
Page 85
...buttons do not work 68 incorrect characters print, left margin changes, or printing stops 69 left margin moves right during printing 68 Print test works, but printer does not print when attached to the computer 66 printer alarm sounds 67 printer is noisy 67 printer power switch is on, but the power light is ...off 68 printer sounds like it is printing, but does not print 67 printer speed slows 68 printing continues beyond edges of continuous forms 69 troubleshooting, print quality characters are wrong or missing 74 dots are missing or print quality is poor 73 graphics...
...buttons do not work 68 incorrect characters print, left margin changes, or printing stops 69 left margin moves right during printing 68 Print test works, but printer does not print when attached to the computer 66 printer alarm sounds 67 printer is noisy 67 printer power switch is on, but the power light is ...off 68 printer sounds like it is printing, but does not print 67 printer speed slows 68 printing continues beyond edges of continuous forms 69 troubleshooting, print quality characters are wrong or missing 74 dots are missing or print quality is poor 73 graphics...

