Getting Started
Page 3
.... In Windows XP, click Start to Set As Default. 3 English or Click Start Æ Control Panel Æ Printers and Other Hardware Æ Printers and Faxes. 2 Double-click the Lexmark 2400 Series icon. 3 Click Printer, and make sure no check mark appears next to Pause Printing. 4 Make sure a check mark does appear next to... the software does not launch automatically when you insert the CD: 1 Close all the way into the power supply on the printer. 3 Plug the cord into the USB port of the USB cable into an electrical outlet that the print cartridge has been installed properly. Note: ...
.... In Windows XP, click Start to Set As Default. 3 English or Click Start Æ Control Panel Æ Printers and Other Hardware Æ Printers and Faxes. 2 Double-click the Lexmark 2400 Series icon. 3 Click Printer, and make sure no check mark appears next to Pause Printing. 4 Make sure a check mark does appear next to... the software does not launch automatically when you insert the CD: 1 Close all the way into the power supply on the printer. 3 Plug the cord into the USB port of the USB cable into an electrical outlet that the print cartridge has been installed properly. Note: ...

User's Guide
Page 2
... Lexington, Kentucky 40550, U.S.A. Improvements or changes in any of publications related to a professional service person. Connect the power supply cord to Lexmark International Ltd., Marketing and Services Department, Westhorpe House, Westhorpe, Marlow Bucks SL7 3RQ. This publication could include technical ... way it operates. To obtain additional copies of the information you . Safety information Use only the power supply and power supply cord provided with local law: LEXMARK INTERNATIONAL, INC., PROVIDES THIS PUBLICATION "AS IS" WITHOUT WARRANTY OF ANY KIND, EITHER EXPRESS OR ...
... Lexington, Kentucky 40550, U.S.A. Improvements or changes in any of publications related to a professional service person. Connect the power supply cord to Lexmark International Ltd., Marketing and Services Department, Westhorpe House, Westhorpe, Marlow Bucks SL7 3RQ. This publication could include technical ... way it operates. To obtain additional copies of the information you . Safety information Use only the power supply and power supply cord provided with local law: LEXMARK INTERNATIONAL, INC., PROVIDES THIS PUBLICATION "AS IS" WITHOUT WARRANTY OF ANY KIND, EITHER EXPRESS OR ...
User's Guide
Page 5
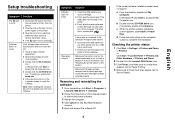
Preserving the print cartridge...46 Cleaning the scanner glass...46 Ordering supplies...46 Using genuine Lexmark print cartridges 46 Refilling a print cartridge...47 Recycling Lexmark products...47 Troubleshooting...48 Setup troubleshooting...48 Power button is not lit...48 Software does not install...48 Page does not print...49 Cannot print from digital camera using ... print a fax or received fax has poor print quality 58 Received fax is blank...58 Jams and misfeeds troubleshooting 59 Paper jam in the printer...59 Paper jam in the paper support...59 Paper or specialty media misfeeds...59 5
Preserving the print cartridge...46 Cleaning the scanner glass...46 Ordering supplies...46 Using genuine Lexmark print cartridges 46 Refilling a print cartridge...47 Recycling Lexmark products...47 Troubleshooting...48 Setup troubleshooting...48 Power button is not lit...48 Software does not install...48 Page does not print...49 Cannot print from digital camera using ... print a fax or received fax has poor print quality 58 Received fax is blank...58 Jams and misfeeds troubleshooting 59 Paper jam in the printer...59 Paper jam in the paper support...59 Paper or specialty media misfeeds...59 5

User's Guide
Page 9
Setting up the printer Checking the box contents Name 1 Color print cartridge 2 Power supply cord 3 Installation software CD 4 Getting Started or Setup Solutions 5 Setup Sheet Description Cartridge to be installed in the printer Attaches to the power supply port located at the back of the printer • Installation software for the printer • Help • User's Guide in electronic format Additional information depending on your country or region Instructions on setting up printer hardware and software, and information on setup troubleshooting 9
Setting up the printer Checking the box contents Name 1 Color print cartridge 2 Power supply cord 3 Installation software CD 4 Getting Started or Setup Solutions 5 Setup Sheet Description Cartridge to be installed in the printer Attaches to the power supply port located at the back of the printer • Installation software for the printer • Help • User's Guide in electronic format Additional information depending on your country or region Instructions on setting up printer hardware and software, and information on setup troubleshooting 9

User's Guide
Page 11
...15 cm borderless, color copy of a photo. • Open the All-In-One Center and preview the scan on page 60. 11 Note: If the power light blinks, see "Error messages" on the computer screen. • Print an alignment page if the button is held down for three seconds. Make a... instructions on the computer screen. • Turn the printer on and off. • Cancel a copy, scan, or print job. • Reset the printer. • Feed or eject paper. Connect the printer to access the print cartridge carrier. Use the 3 Scanner unit 4 Power supply port 5 USB port To Raise to a computer using...
...15 cm borderless, color copy of a photo. • Open the All-In-One Center and preview the scan on page 60. 11 Note: If the power light blinks, see "Error messages" on the computer screen. • Print an alignment page if the button is held down for three seconds. Make a... instructions on the computer screen. • Turn the printer on and off. • Cancel a copy, scan, or print job. • Reset the printer. • Feed or eject paper. Connect the printer to access the print cartridge carrier. Use the 3 Scanner unit 4 Power supply port 5 USB port To Raise to a computer using...
User's Guide
Page 48
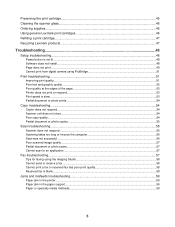
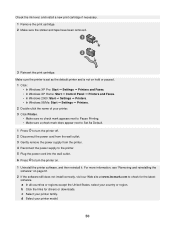
...and misfeeds troubleshooting" on page 59 • "Error messages" on page 60 • "Removing and reinstalling the software" on page 61 Setup troubleshooting • "Power button is not lit" on page 48 • "Software does not install" on page 48 • "Page does not print" on page 49 •...other electrical devices have been using. 4 If the light is not lit 1 Disconnect the power supply cord from the wall outlet, and then from the printer. 2 Plug the cord all the way into the power supply port on the printer. 2 1 3 Plug the cord into an electrical outlet that your computer meets the ...
...and misfeeds troubleshooting" on page 59 • "Error messages" on page 60 • "Removing and reinstalling the software" on page 61 Setup troubleshooting • "Power button is not lit" on page 48 • "Software does not install" on page 48 • "Page does not print" on page 49 •...other electrical devices have been using. 4 If the light is not lit 1 Disconnect the power supply cord from the wall outlet, and then from the printer. 2 Plug the cord all the way into the power supply port on the printer. 2 1 3 Plug the cord into an electrical outlet that your computer meets the ...

User's Guide
Page 49
...restart your operating system. 7 Select the file you want to turn the printer off. 2 Disconnect the power cord from the wall outlet. 3 Gently remove the power supply from the printer. 4 Reconnect the power supply to the printer. 5 Plug the power cord into the USB port of the USB cable into the wall outlet... necessary, double-click setup.exe. 6 Follow the instructions on the computer screen to install the software. 1 Visit our Web site at www.lexmark.com to check for the latest software. 2 In all open software applications. 2 Disable any obvious damage. 2 Firmly plug the rectangular end ...
...restart your operating system. 7 Select the file you want to turn the printer off. 2 Disconnect the power cord from the wall outlet. 3 Gently remove the power supply from the printer. 4 Reconnect the power supply to the printer. 5 Plug the power cord into the USB port of the USB cable into the wall outlet... necessary, double-click setup.exe. 6 Follow the instructions on the computer screen to install the software. 1 Visit our Web site at www.lexmark.com to check for the latest software. 2 In all open software applications. 2 Disable any obvious damage. 2 Firmly plug the rectangular end ...
User's Guide
Page 50
... from the wall outlet. 3 Gently remove the power supply from the printer. 4 Reconnect the power supply to the printer. 5 Plug the power cord into the wall outlet. 6 Press to turn the printer on page 61. 2 If the software still does not install correctly, visit our Web site at www.lexmark.com to check for drivers or downloads. Make sure...
... from the wall outlet. 3 Gently remove the power supply from the printer. 4 Reconnect the power supply to the printer. 5 Plug the power cord into the wall outlet. 6 Press to turn the printer on page 61. 2 If the software still does not install correctly, visit our Web site at www.lexmark.com to check for drivers or downloads. Make sure...
User's Guide
Page 61
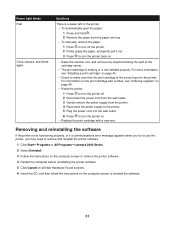
...is missing or is the correct type for the printer. For more information, see "Ordering supplies" on page 46. • Reset the printer. 1 Press to turn the printer off. 2 Disconnect the power cord from the wall outlet. 3 Gently remove the power supply from the paper exit tray. • To... the printer, you may need to remove and reinstall the printer software. 1 Click StartŒPrograms or All ProgramsŒLexmark 2400 Series. 2 Select Uninstall. 3 Follow the instructions on the computer screen to remove the printer software. 4 Restart the computer before reinstalling the printer software....
...is missing or is the correct type for the printer. For more information, see "Ordering supplies" on page 46. • Reset the printer. 1 Press to turn the printer off. 2 Disconnect the power cord from the wall outlet. 3 Gently remove the power supply from the paper exit tray. • To... the printer, you may need to remove and reinstall the printer software. 1 Click StartŒPrograms or All ProgramsŒLexmark 2400 Series. 2 Select Uninstall. 3 Follow the instructions on the computer screen to remove the printer software. 4 Restart the computer before reinstalling the printer software....
User's Guide
Page 65
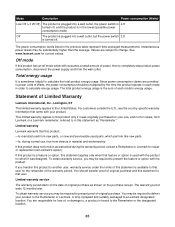
Mode Description Power consumption (Watts) Low Off (
Mode Description Power consumption (Watts) Low Off (

User's Guide
Page 69
... paper exit tray 10 paper guide 10 paper jam in paper support 59 paper jam in printer 59 paper or specialty media misfeeds 59 Paper Setup tab changing orientation 18 changing paper size ...control panel 10 paper exit tray 10 paper guide 10 paper support 10 PictBridge port 10 power supply port 11 print cartridge carrier 10 scanner glass 10 scanner support 10 scanner unit 11 top...Q Quality/Copies tab 18 R received fax is blank 58 receiving a fax using the software 40 recycling Lexmark products 47 WEEE statement 64 removing print cartridge 42 reverse page order 29 S safety information 2 Saved Images ...
... paper exit tray 10 paper guide 10 paper jam in paper support 59 paper jam in printer 59 paper or specialty media misfeeds 59 Paper Setup tab changing orientation 18 changing paper size ...control panel 10 paper exit tray 10 paper guide 10 paper support 10 PictBridge port 10 power supply port 11 print cartridge carrier 10 scanner glass 10 scanner support 10 scanner unit 11 top...Q Quality/Copies tab 18 R received fax is blank 58 receiving a fax using the software 40 recycling Lexmark products 47 WEEE statement 64 removing print cartridge 42 reverse page order 29 S safety information 2 Saved Images ...
User's Guide
Page 70
...or freezes the computer 56 scrapbook page, creating 31 setup troubleshooting cannot print from digital camera using PictBridge 51 page does not print 49 power button is not lit 48 software does not install 48 Share photos button 12 shared printing peer-to-peer method 41 point-and-print ... not install 48 Solution Center Advanced tab 16 Contact Information tab 16 How To tab 16 Maintenance tab 16 opening 15 Printer Status dialog 16 Troubleshooting tab 16 using 15 supplies, ordering 46 T text captions, adding 32 Tips button 13 top cover 10 transparencies loading 23 printing 28 troubleshooting error...
...or freezes the computer 56 scrapbook page, creating 31 setup troubleshooting cannot print from digital camera using PictBridge 51 page does not print 49 power button is not lit 48 software does not install 48 Share photos button 12 shared printing peer-to-peer method 41 point-and-print ... not install 48 Solution Center Advanced tab 16 Contact Information tab 16 How To tab 16 Maintenance tab 16 opening 15 Printer Status dialog 16 Troubleshooting tab 16 using 15 supplies, ordering 46 T text captions, adding 32 Tips button 13 top cover 10 transparencies loading 23 printing 28 troubleshooting error...
