User's Guide
Page 4
Scanning 37 Scanning an item 37 Customizing a scan job 38 Copying 43 Making a copy 43 Copying photos 45 Copying 4x6 photos 46 Faxing 47 Sending a fax 47 Receiving a fax 48 Networking the All-... Improving print quality 57 Cleaning the scanner glass 59 Ordering supplies 60 Troubleshooting 61 Setup troubleshooting 62 Jams and misfeeds troubleshooting 65 Print troubleshooting 66 Scan and copy troubleshooting 69 4
Scanning 37 Scanning an item 37 Customizing a scan job 38 Copying 43 Making a copy 43 Copying photos 45 Copying 4x6 photos 46 Faxing 47 Sending a fax 47 Receiving a fax 48 Networking the All-... Improving print quality 57 Cleaning the scanner glass 59 Ordering supplies 60 Troubleshooting 61 Setup troubleshooting 62 Jams and misfeeds troubleshooting 65 Print troubleshooting 66 Scan and copy troubleshooting 69 4
User's Guide
Page 9
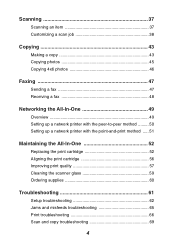
Understanding the All-In-One All-In-One parts 5 1 4 6 3 2 Use this 1 Paper support 2 Control panel 3 Paper exit tray 4 Top cover 5 Paper guide 6 Scanner glass To Load paper. Make sure paper feeds correctly. Scan, copy, or remove an item. 9 Operate the All-In-One. Hold paper as it exits. Lift to place or remove an item on the scanner glass.
Understanding the All-In-One All-In-One parts 5 1 4 6 3 2 Use this 1 Paper support 2 Control panel 3 Paper exit tray 4 Top cover 5 Paper guide 6 Scanner glass To Load paper. Make sure paper feeds correctly. Scan, copy, or remove an item. 9 Operate the All-In-One. Hold paper as it exits. Lift to place or remove an item on the scanner glass.
User's Guide
Page 11
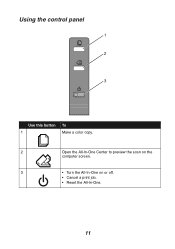
Using the control panel 1 2 3 Use this button 1 To Make a color copy. 2 Open the All-In-One Center to preview the scan on the computer screen. 3 • Turn the All-In-One on or off. • Cancel a print job. • Reset the All-In-One. 11
Using the control panel 1 2 3 Use this button 1 To Make a color copy. 2 Open the All-In-One Center to preview the scan on the computer screen. 3 • Turn the All-In-One on or off. • Cancel a print job. • Reset the All-In-One. 11
User's Guide
Page 13
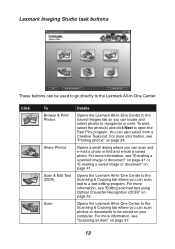
... tab where you can be stored on your computer. For more information, see "E-mailing a scanned image or document" on page 41 or "E-mailing a saved image or document" on page 34. Lexmark Imaging Studio task buttons These buttons can locate and select photos to reorganize or print. For more... information, see "Printing photos" on page 41. Click To Browse & Print Photos Share Photos Scan & Edit Text (OCR) Scan Details Opens the Lexmark All-In-One Center to open the Fast Pics program. To print, select the photo(s) and click Next to the ...
... tab where you can be stored on your computer. For more information, see "E-mailing a scanned image or document" on page 41 or "E-mailing a saved image or document" on page 34. Lexmark Imaging Studio task buttons These buttons can locate and select photos to reorganize or print. For more... information, see "Printing photos" on page 41. Click To Browse & Print Photos Share Photos Scan & Edit Text (OCR) Scan Details Opens the Lexmark All-In-One Center to open the Fast Pics program. To print, select the photo(s) and click Next to the ...
User's Guide
Page 14
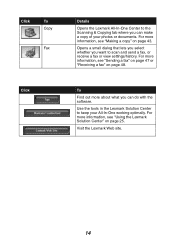
... site. 14 Use the tools in the Lexmark Solution Center to keep your photos or documents. For more information, see "Making a copy" on page 43. For more information, see "Sending a fax" on page ... make a copy of your All-In-One working optimally. To Find out more information, see "Using the Lexmark Solution Center" on page 48. Opens a small dialog that lets you select whether you want to scan and send a fax, or receive a fax or view settings/history. Click To Copy Fax Click Details Opens...
... site. 14 Use the tools in the Lexmark Solution Center to keep your photos or documents. For more information, see "Making a copy" on page 43. For more information, see "Sending a fax" on page ... make a copy of your All-In-One working optimally. To Find out more information, see "Using the Lexmark Solution Center" on page 48. Opens a small dialog that lets you select whether you want to scan and send a fax, or receive a fax or view settings/history. Click To Copy Fax Click Details Opens...
User's Guide
Page 16
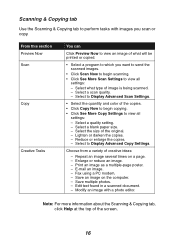
... more information about the Scanning & Copying tab, click Help at the top of creative ideas: - Select to Display Advanced Scan Settings. • Select the quantity and color of the copies. • Click Copy Now to begin scanning. • Click See More Scan Settings to view all settings...: - Lighten or darken the copies. - Edit text found in a scanned document. - Select a quality ...
... more information about the Scanning & Copying tab, click Help at the top of creative ideas: - Select to Display Advanced Scan Settings. • Select the quantity and color of the copies. • Click Copy Now to begin scanning. • Click See More Scan Settings to view all settings...: - Lighten or darken the copies. - Edit text found in a scanned document. - Select a quality ...
User's Guide
Page 17
.... Lighten or darken the copies. - Select the quantity and color of various sizes. • Enlarge or reduce an image. • Print an image as a multiple-page poster. • E-mail an image. • Fax using a PC modem. • Edit text found in a scanned document. • Modify an image with images that are stored...
.... Lighten or darken the copies. - Select the quantity and color of various sizes. • Enlarge or reduce an image. • Print an image as a multiple-page poster. • E-mail an image. • Fax using a PC modem. • Edit text found in a scanned document. • Modify an image with images that are stored...
User's Guide
Page 26
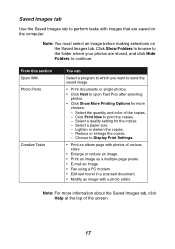
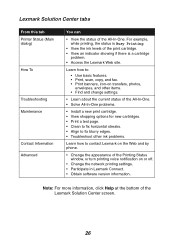
Learn how to: • Use basic features. • Print, scan, copy, and fax. • Print banners, iron-on transfers, photos, envelopes, and other items. • Find and change settings. • Learn about the current status ... bottom of the Printing Status window, or turn printing voice notification on the Web and by phone. • Change the appearance of the Lexmark Solution Center screen. 26 Lexmark Solution Center tabs From this tab Printer Status (Main dialog) How To Troubleshooting Maintenance Contact Information Advanced You can • View the status...
Learn how to: • Use basic features. • Print, scan, copy, and fax. • Print banners, iron-on transfers, photos, envelopes, and other items. • Find and change settings. • Learn about the current status ... bottom of the Printing Status window, or turn printing voice notification on the Web and by phone. • Change the appearance of the Lexmark Solution Center screen. 26 Lexmark Solution Center tabs From this tab Printer Status (Main dialog) How To Troubleshooting Maintenance Contact Information Advanced You can • View the status...
User's Guide
Page 32
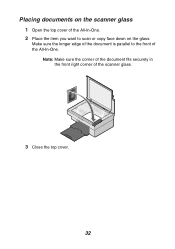
Note: Make sure the corner of the document fits securely in the front right corner of the All-In-One. 2 Place the item you want to the front of the All-In-One. Placing documents on the glass. Make sure the longer edge of the document is parallel to scan or copy face down on the scanner glass 1 Open the top cover of the scanner glass. 3 Close the top cover. 32
Note: Make sure the corner of the document fits securely in the front right corner of the All-In-One. 2 Place the item you want to the front of the All-In-One. Placing documents on the glass. Make sure the longer edge of the document is parallel to scan or copy face down on the scanner glass 1 Open the top cover of the scanner glass. 3 Close the top cover. 32
User's Guide
Page 37
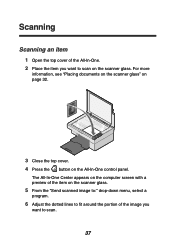
For more information, see "Placing documents on the scanner glass" on page 32. 3 Close the top cover. 4 Press the button on the scanner glass. The All-In-One Center appears on the computer screen with a preview of the item on the scanner glass. 5 From the "Send scanned image to:" drop-down menu, select a program. 6 Adjust the dotted lines to fit around the portion of the All-In-One. 2 Place the item you want to scan. 37 Scanning Scanning an item 1 Open the top cover of the image you want to scan on the All-In-One control panel.
For more information, see "Placing documents on the scanner glass" on page 32. 3 Close the top cover. 4 Press the button on the scanner glass. The All-In-One Center appears on the computer screen with a preview of the item on the scanner glass. 5 From the "Send scanned image to:" drop-down menu, select a program. 6 Adjust the dotted lines to fit around the portion of the All-In-One. 2 Place the item you want to scan. 37 Scanning Scanning an item 1 Open the top cover of the image you want to scan on the All-In-One control panel.

User's Guide
Page 38
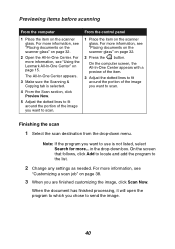
... save. 8 To scan, click Scan Now. 38 For more information, see "Using the Lexmark All-In-One Center" on page 15. 2 From the Scanning & Copying tab, click See More Scan Settings. 3 From the What is being scanned? For a description of the tabs, see "Advanced Scan Settings" on page 38. 8 Click Scan Now to complete the scan. Customizing a scan job 1 Open...
... save. 8 To scan, click Scan Now. 38 For more information, see "Using the Lexmark All-In-One Center" on page 15. 2 From the Scanning & Copying tab, click See More Scan Settings. 3 From the What is being scanned? For a description of the tabs, see "Advanced Scan Settings" on page 38. 8 Click Scan Now to complete the scan. Customizing a scan job 1 Open...
User's Guide
Page 39
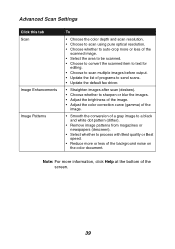
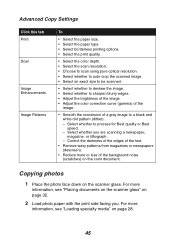
... of the screen. 39 Advanced Scan Settings Click this tab Scan Image Enhancements Image Patterns To • Choose the color depth and scan resolution. • Choose to scan using pure optical resolution. • Choose whether to auto-crop more or less of the scanned image. • Select the area to be scanned. • Choose to convert the...
... of the screen. 39 Advanced Scan Settings Click this tab Scan Image Enhancements Image Patterns To • Choose the color depth and scan resolution. • Choose to scan using pure optical resolution. • Choose whether to auto-crop more or less of the scanned image. • Select the area to be scanned. • Choose to convert the...
User's Guide
Page 40
... item on page 15. For more information, see "Customizing a scan job" on page 32. 2 Open the All-In-One Center. in the drop-down menu. Note: If the program you want to send the image. 40 For more information, see "Using the Lexmark All-In-One Center" on the scanner glass. When... the document has finished processing, it will open the program to which you want to use is selected. 4 From the Scan section, click Preview Now. 5 Adjust the dotted lines to fit...
... item on page 15. For more information, see "Customizing a scan job" on page 32. 2 Open the All-In-One Center. in the drop-down menu. Note: If the program you want to send the image. 40 For more information, see "Using the Lexmark All-In-One Center" on the scanner glass. When... the document has finished processing, it will open the program to which you want to use is selected. 4 From the Scan section, click Preview Now. 5 Adjust the dotted lines to fit...
User's Guide
Page 41
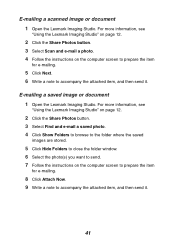
.... 9 Write a note to accompany the attached item, and then send it . 41 E-mailing a scanned image or document 1 Open the Lexmark Imaging Studio. For more information, see "Using the Lexmark Imaging Studio" on page 12. 2 Click the Share Photos button. 3 Select Scan and e-mail a photo. 4 Follow the instructions on the computer screen to prepare the...
.... 9 Write a note to accompany the attached item, and then send it . 41 E-mailing a scanned image or document 1 Open the Lexmark Imaging Studio. For more information, see "Using the Lexmark Imaging Studio" on page 12. 2 Click the Share Photos button. 3 Select Scan and e-mail a photo. 4 Follow the instructions on the computer screen to prepare the...
User's Guide
Page 42
Editing scanned text using Optical Character Recognition (OCR) 1 Place the image face down menu, select a word-processing or text-editing program. 5 If you want. 4 From the "Select your text editor" drop-down on page 32. 2 Open the Lexmark Imaging Studio. For more information, see "Placing documents on the scanner glass..." on the scanner glass. For more information, see "Using the Lexmark Imaging Studio" on the computer screen. 42 You can preview the image if you have more than one page, click Yes, prompt...
Editing scanned text using Optical Character Recognition (OCR) 1 Place the image face down menu, select a word-processing or text-editing program. 5 If you want. 4 From the "Select your text editor" drop-down on page 32. 2 Open the Lexmark Imaging Studio. For more information, see "Placing documents on the scanner glass..." on the scanner glass. For more information, see "Using the Lexmark Imaging Studio" on the computer screen. 42 You can preview the image if you have more than one page, click Yes, prompt...
User's Guide
Page 45
... • Select the print quality. • Select the color depth. • Select the scan resolution. • Choose to scan using pure optical resolution. • Select whether to auto-crop the scanned image. • Select an exact size to be scanned. • Select whether to deskew the image. •...; Select whether to sharpen blurry edges. • Adjust the brightness of the image. • Adjust the color correction curve (gamma) of the image...
... • Select the print quality. • Select the color depth. • Select the scan resolution. • Choose to scan using pure optical resolution. • Select whether to auto-crop the scanned image. • Select an exact size to be scanned. • Select whether to deskew the image. •...; Select whether to sharpen blurry edges. • Adjust the brightness of the image. • Adjust the color correction curve (gamma) of the image...
User's Guide
Page 46
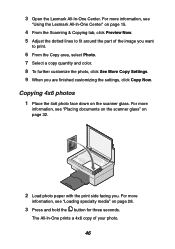
...are finished customizing the settings, click Copy Now. For more information, see "Using the Lexmark All-In-One Center" on the scanner glass. Copying 4x6 photos 1 Place the 4x6 photo face down on... page 15. 4 From the Scanning & Copying tab, click Preview Now. 5 Adjust the dotted lines to fit around the part of your photo. 46 3 Open the Lexmark All-In-One Center. The All-In-One... prints a 4x6 copy of the image you want to print. 6 From the Copy area, select Photo. 7 Select a copy quantity and color. 8 To further customize...
...are finished customizing the settings, click Copy Now. For more information, see "Using the Lexmark All-In-One Center" on the scanner glass. Copying 4x6 photos 1 Place the 4x6 photo face down on... page 15. 4 From the Scanning & Copying tab, click Preview Now. 5 Adjust the dotted lines to fit around the part of your photo. 46 3 Open the Lexmark All-In-One Center. The All-In-One... prints a 4x6 copy of the image you want to print. 6 From the Copy area, select Photo. 7 Select a copy quantity and color. 8 To further customize...
User's Guide
Page 47
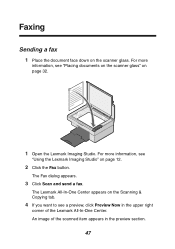
...-In-One Center appears on page 32. 1 Open the Lexmark Imaging Studio. An image of the scanned item appears in the upper right corner of the Lexmark All-In-One Center. Faxing Sending a fax 1 Place the document face down on page 12. 2 Click the Fax button. For more information, see... "Placing documents on the scanner glass" on the Scanning & Copying tab. 4 If you want to see "Using the Lexmark Imaging Studio" on the scanner glass. The Fax dialog appears. 3 Click Scan and send a fax. For more information, see a preview, click Preview Now in the...
...-In-One Center appears on page 32. 1 Open the Lexmark Imaging Studio. An image of the scanned item appears in the upper right corner of the Lexmark All-In-One Center. Faxing Sending a fax 1 Place the document face down on page 12. 2 Click the Fax button. For more information, see... "Placing documents on the scanner glass" on the Scanning & Copying tab. 4 If you want to see "Using the Lexmark Imaging Studio" on the scanner glass. The Fax dialog appears. 3 Click Scan and send a fax. For more information, see a preview, click Preview Now in the...
User's Guide
Page 48
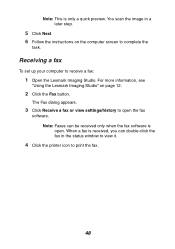
For more information, see "Using the Lexmark Imaging Studio" on the computer screen to open . Note: Faxes can double-click the fax in a later step. 5 Click Next. 6 Follow the instructions on page ... The Fax dialog appears. 3 Click Receive a fax or view settings/history to complete the task. You scan the image in the status window to view it. 4 Click the printer icon to receive a fax: 1 Open the Lexmark Imaging Studio. When a fax is received, you can be received only when the fax software is...
For more information, see "Using the Lexmark Imaging Studio" on the computer screen to open . Note: Faxes can double-click the fax in a later step. 5 Click Next. 6 Follow the instructions on page ... The Fax dialog appears. 3 Click Receive a fax or view settings/history to complete the task. You scan the image in the status window to view it. 4 Click the printer icon to receive a fax: 1 Open the Lexmark Imaging Studio. When a fax is received, you can be received only when the fax software is...

User's Guide
Page 49
... the driver software on any time the client wants to -peer method • Using the point-and-print method Note: The All-In-One cannot scan across a network.
... the driver software on any time the client wants to -peer method • Using the point-and-print method Note: The All-In-One cannot scan across a network.


