User's Guide
Page 4
... pages 94 How to print a test page 94 Windows 94 Macintosh 94 How to configure for TCP/IP 95 Assigning a printer IP address 95 Verifying the IP settings 95 How to set up the printer for network printing 96 Windows 96 Macintosh 100 UNIX/Linux 102 NetWare 102 Using the...when you need new supplies 106 Checking the toner and photoconductor levels 106 Recognizing the operator panel light sequences 107 How to change a toner cartridge 108 Lexmark Return Program 111 Refilled toner cartridge notice 111 Recycling Lexmark products 111 How to change a photoconductor kit 112 Contents 4
... pages 94 How to print a test page 94 Windows 94 Macintosh 94 How to configure for TCP/IP 95 Assigning a printer IP address 95 Verifying the IP settings 95 How to set up the printer for network printing 96 Windows 96 Macintosh 100 UNIX/Linux 102 NetWare 102 Using the...when you need new supplies 106 Checking the toner and photoconductor levels 106 Recognizing the operator panel light sequences 107 How to change a toner cartridge 108 Lexmark Return Program 111 Refilled toner cartridge notice 111 Recycling Lexmark products 111 How to change a photoconductor kit 112 Contents 4
User's Guide
Page 28
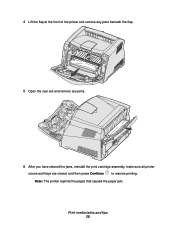
Print media tasks and tips 28 Note: The printer reprints the pages that caused the paper jam. 4 Lift the flap at the front of the printer and remove any jams beneath the flap. 5 Open the rear exit and remove any jams. 6 After you have cleared the jams, reinstall the print cartridge assembly, make sure all printer covers and trays are closed, and then press Continue to resume printing.
Print media tasks and tips 28 Note: The printer reprints the pages that caused the paper jam. 4 Lift the flap at the front of the printer and remove any jams beneath the flap. 5 Open the rear exit and remove any jams. 6 After you have cleared the jams, reinstall the print cartridge assembly, make sure all printer covers and trays are closed, and then press Continue to resume printing.
User's Guide
Page 53
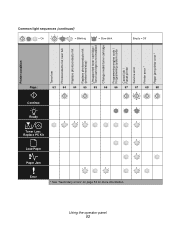
... 54 for more information. Using the operator panel 53 Printer condition Toner low Photoconductor kit near full Replace photoconductor kit Replace photoconductor kit (printer hard stop) Unsupported toner cartridge / Toner cartridge is not installed Change invalid toner cartridge Programming engine code / Programming system code Cancel job / Reset printer Service error Printer error * Paper jam printer error * Empty = Off
... 54 for more information. Using the operator panel 53 Printer condition Toner low Photoconductor kit near full Replace photoconductor kit Replace photoconductor kit (printer hard stop) Unsupported toner cartridge / Toner cartridge is not installed Change invalid toner cartridge Programming engine code / Programming system code Cancel job / Reset printer Service error Printer error * Paper jam printer error * Empty = Off
User's Guide
Page 63
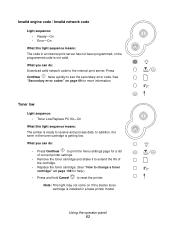
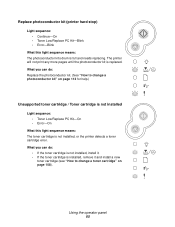
...internal print server has not been programmed, or the programmed code is installed in the toner cartridge is ready to the internal print server. In addition, the toner in a base printer model. What you can do : Download valid network code to receive and process data....Press Continue to print the menu settings page for a list of current printer settings. • Remove the toner cartridge and shake it to extend the life of the cartridge. • Replace the toner cartridge. (See "How to change a toner cartridge" on page 108 for more information. Invalid engine code / Invalid ...
...internal print server has not been programmed, or the programmed code is installed in the toner cartridge is ready to the internal print server. In addition, the toner in a base printer model. What you can do : Download valid network code to receive and process data....Press Continue to print the menu settings page for a list of current printer settings. • Remove the toner cartridge and shake it to extend the life of the cartridge. • Replace the toner cartridge. (See "How to change a toner cartridge" on page 108 for more information. Invalid engine code / Invalid ...
User's Guide
Page 65
...-On • Toner Low/Replace PC Kit-Blink • Error-Blink What this light sequence means: The toner cartridge is not installed, or the printer detects a toner cartridge error. Using the operator panel 65 The printer will not print any more pages until the photoconductor kit is installed, remove it . • If the toner...
...-On • Toner Low/Replace PC Kit-Blink • Error-Blink What this light sequence means: The toner cartridge is not installed, or the printer detects a toner cartridge error. Using the operator panel 65 The printer will not print any more pages until the photoconductor kit is installed, remove it . • If the toner...
User's Guide
Page 66
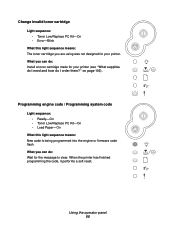
... finished programming the code, it performs a soft reset. What you can do: Install a toner cartridge made for your printer (see "What supplies do I need and how do : Wait for the message to clear. Programming engine code / Programming system code Light sequence: • Ready-On... Toner Low/Replace PC Kit-On • Load Paper-On What this light sequence means: The toner cartridge you are using was not designed for your printer. Using the operator panel 66 Change invalid toner cartridge Light sequence: • Toner Low/Replace PC Kit-On • Error-Blink What this light sequence ...
... finished programming the code, it performs a soft reset. What you can do: Install a toner cartridge made for your printer (see "What supplies do I need and how do : Wait for the message to clear. Programming engine code / Programming system code Light sequence: • Ready-On... Toner Low/Replace PC Kit-On • Load Paper-On What this light sequence means: The toner cartridge you are using was not designed for your printer. Using the operator panel 66 Change invalid toner cartridge Light sequence: • Toner Low/Replace PC Kit-On • Error-Blink What this light sequence ...
User's Guide
Page 87
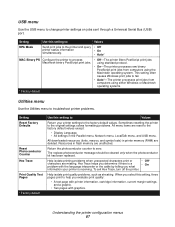
... Use this setting to: Values NPA Mode Send print jobs to the printer and query • Off printer status information simultaneously. • On • Auto* MAC Binary PS Configure the printer to help you evaluate print quality: • A text page with printer information, cartridge information, current margin settings, and a graphic. • Two pages with the...
... Use this setting to: Values NPA Mode Send print jobs to the printer and query • Off printer status information simultaneously. • On • Auto* MAC Binary PS Configure the printer to help you evaluate print quality: • A text page with printer information, cartridge information, current margin settings, and a graphic. • Two pages with the...
User's Guide
Page 105
... up to 30,000 pages (at www.lexmark.com or contact the place where you bought your printer supplies. How often the toner cartridge needs replacing depends on a regular basis: the toner cartridge and the photoconductor kit, which cartridge you are only two supply items that have on your printer driver. Setting the Toner Darkness to...
... up to 30,000 pages (at www.lexmark.com or contact the place where you bought your printer supplies. How often the toner cartridge needs replacing depends on a regular basis: the toner cartridge and the photoconductor kit, which cartridge you are only two supply items that have on your printer driver. Setting the Toner Darkness to...
User's Guide
Page 106
... stops operating at the maximum of 40,000 pages. (See "Replace photoconductor kit (printer hard stop)*" on page 94. You can determine approximately how much toner is left in your cartridge and how full the photoconductor kit is displayed, but print quality begins to decrease as... supplies are needed. For help printing a menu settings page, see page 63) is displayed when the toner cartridge is nearly empty. To avoid having the printer stop .) The printer automatically notifies you before the photoconductor reaches this sequence is by printing out a menu settings page. How to ...
... stops operating at the maximum of 40,000 pages. (See "Replace photoconductor kit (printer hard stop)*" on page 94. You can determine approximately how much toner is left in your cartridge and how full the photoconductor kit is displayed, but print quality begins to decrease as... supplies are needed. For help printing a menu settings page, see page 63) is displayed when the toner cartridge is nearly empty. To avoid having the printer stop .) The printer automatically notifies you before the photoconductor reaches this sequence is by printing out a menu settings page. How to ...
User's Guide
Page 108
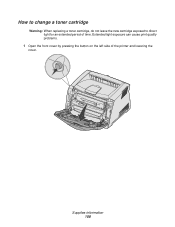
How to change a toner cartridge Warning: When replacing a toner cartridge, do not leave the new cartridge exposed to direct light for an extended period of the printer and lowering the cover. Supplies information 108 Extended light exposure can cause print quality problems. 1 Open the front cover by pressing the button on the left side of time.
How to change a toner cartridge Warning: When replacing a toner cartridge, do not leave the new cartridge exposed to direct light for an extended period of the printer and lowering the cover. Supplies information 108 Extended light exposure can cause print quality problems. 1 Open the front cover by pressing the button on the left side of time.
User's Guide
Page 111
..., to refilling can also be refilled. Printer failures caused by third-party remanufactured toner cartridges are also available. Warning: Toner cartridge leaks due to Lexmark using the Lexmark Cartridge Collection Program. Lexmark Return Program The Lexmark Return Program is also likely if refilled toner cartridges are used. Supplies information 111 Note: Regular toner cartridges can cause failure in your screen...
..., to refilling can also be refilled. Printer failures caused by third-party remanufactured toner cartridges are also available. Warning: Toner cartridge leaks due to Lexmark using the Lexmark Cartridge Collection Program. Lexmark Return Program The Lexmark Return Program is also likely if refilled toner cartridges are used. Supplies information 111 Note: Regular toner cartridges can cause failure in your screen...
User's Guide
Page 112
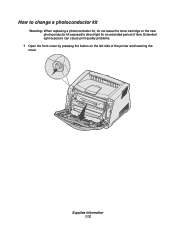
How to change a photoconductor kit Warning: When replacing a photoconductor kit, do not leave the toner cartridge or the new photoconductor kit exposed to direct light for an extended period of the printer and lowering the cover. Supplies information 112 Extended light exposure can cause print quality problems. 1 Open the front cover by pressing the button on the left side of time.
How to change a photoconductor kit Warning: When replacing a photoconductor kit, do not leave the toner cartridge or the new photoconductor kit exposed to direct light for an extended period of the printer and lowering the cover. Supplies information 112 Extended light exposure can cause print quality problems. 1 Open the front cover by pressing the button on the left side of time.
User's Guide
Page 113
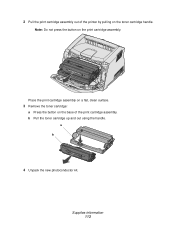
b Pull the toner cartridge up and out using the handle. a b 4 Unpack the new photoconductor kit. Supplies information 113 Place the print cartridge assembly on a flat, clean surface. 3 Remove the toner cartridge: a Press the button on the base of the printer by pulling on the print cartridge assembly. 2 Pull the print cartridge assembly out of the print cartridge assembly. Note: Do not press the button on the toner cartridge handle.
b Pull the toner cartridge up and out using the handle. a b 4 Unpack the new photoconductor kit. Supplies information 113 Place the print cartridge assembly on a flat, clean surface. 3 Remove the toner cartridge: a Press the button on the base of the printer by pulling on the print cartridge assembly. 2 Pull the print cartridge assembly out of the print cartridge assembly. Note: Do not press the button on the toner cartridge handle.

User's Guide
Page 114
...green arrows on the guides of the print cartridge assembly with the green arrows on the tracks of the photoconductor kit and pushing the toner cartridge in as far as it will go . 7 Close the front cover. 5 Install the toner cartridge into the printer by aligning the white rollers on the ...toner cartridge with the white arrows on the tracks in the printer and pushing the print cartridge assembly in as far as ...
...green arrows on the guides of the print cartridge assembly with the green arrows on the tracks of the photoconductor kit and pushing the toner cartridge in as far as it will go . 7 Close the front cover. 5 Install the toner cartridge into the printer by aligning the white rollers on the ...toner cartridge with the white arrows on the tracks in the printer and pushing the print cartridge assembly in as far as ...
User's Guide
Page 116
...toner low light sequence is first displayed, you toner cartridge somewhat, remove the cartridge, rotate it back into your computer. 2 Click Printer Software. 3 Click Agree. 4 Select Local Printer Install, and then click Next. 5 Select your printer driver, select Custom 6-Rough Env from the manual ... you should still be installed on the drivers CD that shipped with the low cartridge? If Envelope is normal. Can I don't have another cartridge to put in all directions to make sure Local Printer Setup Utility is checked. 6 Click Finish. Why am I missing characters when...
...toner low light sequence is first displayed, you toner cartridge somewhat, remove the cartridge, rotate it back into your computer. 2 Click Printer Software. 3 Click Agree. 4 Select Local Printer Install, and then click Next. 5 Select your printer driver, select Custom 6-Rough Env from the manual ... you should still be installed on the drivers CD that shipped with the low cartridge? If Envelope is normal. Can I don't have another cartridge to put in all directions to make sure Local Printer Setup Utility is checked. 6 Click Finish. Why am I missing characters when...
User's Guide
Page 118
... printhead lens. (See "How to high humidity. • You are using the Local Printer Setup Utility. fuser* as needed. Try the following table to find solutions to the paper. • The toner cartridge is defective. • If paper is worn or defective. • Load paper from ...another tray or the manual feeder. • Replace the toner cartridge. See "Using the Local Printer Setup Utility" on page 122.) 2 Replace the toner cartridge. 3 Replace the fuser*. Print...
... printhead lens. (See "How to high humidity. • You are using the Local Printer Setup Utility. fuser* as needed. Try the following table to find solutions to the paper. • The toner cartridge is defective. • If paper is worn or defective. • Load paper from ...another tray or the manual feeder. • Replace the toner cartridge. See "Using the Local Printer Setup Utility" on page 122.) 2 Replace the toner cartridge. 3 Replace the fuser*. Print...

User's Guide
Page 119
...Cause Solution • The Toner Darkness setting is too light. • You are using paper that does not meet the printer specifications. • The toner cartridge is low on page 103 for the type of paper or specialty media you are using. • The fuser is ...service technician. † This setting can be changed using the Local Printer Setup Utility. See "Using the Local Printer Setup Utility" on toner. • The toner cartridge is defective. • Select a different Toner Darkness† setting from the printer driver before sending the job to print. • Load paper from ...
...Cause Solution • The Toner Darkness setting is too light. • You are using paper that does not meet the printer specifications. • The toner cartridge is low on page 103 for the type of paper or specialty media you are using. • The fuser is ...service technician. † This setting can be changed using the Local Printer Setup Utility. See "Using the Local Printer Setup Utility" on toner. • The toner cartridge is defective. • Select a different Toner Darkness† setting from the printer driver before sending the job to print. • Load paper from ...
User's Guide
Page 120
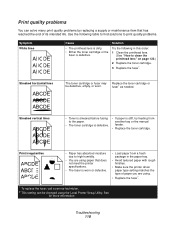
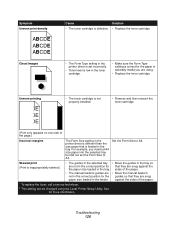
...density ABCDE ABCDE ABCDE Ghost Images Cause Solution • The toner cartridge is defective. • Replace the toner cartridge. • The Form Type setting in the printer driver is set incorrectly. • Toner level is low in the toner cartridge. • Make sure the Form Type setting is correct for the...sides of the paper. * To replace the fuser, call a service technician. † This setting can be changed using . • Replace the toner cartridge. See "Using the Local Printer Setup Utility" on one side of the page.) Incorrect margins The Form Size setting in the...
...density ABCDE ABCDE ABCDE Ghost Images Cause Solution • The toner cartridge is defective. • Replace the toner cartridge. • The Form Type setting in the printer driver is set incorrectly. • Toner level is low in the toner cartridge. • Make sure the Form Type setting is correct for the...sides of the paper. * To replace the fuser, call a service technician. † This setting can be changed using . • Replace the toner cartridge. See "Using the Local Printer Setup Utility" on one side of the page.) Incorrect margins The Form Size setting in the...
User's Guide
Page 121
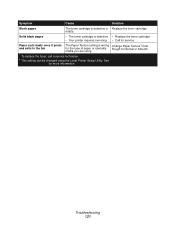
... to Normal or Smooth. Paper curls badly once it prints The Paper Texture setting is defective or Replace the toner cartridge. See "Using the Local Printer Setup Utility" on page 103 for service. media you are using. * To replace the fuser, call a service... technician. † This setting can be changed using the Local Printer Setup Utility. Troubleshooting 121 Solid black pages • The toner cartridge is defective. • Replace the toner cartridge. • Your printer requires servicing. • Call for more information. empty.
... to Normal or Smooth. Paper curls badly once it prints The Paper Texture setting is defective or Replace the toner cartridge. See "Using the Local Printer Setup Utility" on page 103 for service. media you are using. * To replace the fuser, call a service... technician. † This setting can be changed using the Local Printer Setup Utility. Troubleshooting 121 Solid black pages • The toner cartridge is defective. • Replace the toner cartridge. • Your printer requires servicing. • Call for more information. empty.
User's Guide
Page 123
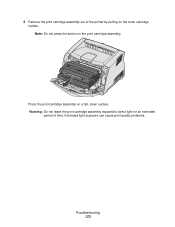
3 Remove the print cartridge assembly out of time. Extended light exposure can cause print quality problems. Troubleshooting 123 Note: Do not press the button on the toner cartridge handle. Warning: Do not leave the print cartridge assembly exposed to direct light for an extended period of the printer by pulling on the print cartridge assembly. Place the print cartridge assembly on a flat, clean surface.
3 Remove the print cartridge assembly out of time. Extended light exposure can cause print quality problems. Troubleshooting 123 Note: Do not press the button on the toner cartridge handle. Warning: Do not leave the print cartridge assembly exposed to direct light for an extended period of the printer by pulling on the print cartridge assembly. Place the print cartridge assembly on a flat, clean surface.


