
Getting Started
Page 3
... a photo or selected photos...19 Scanning a document ...19 Sending a fax using the control panel ...20 Ordering supplies...21 Ordering print cartridges ...21 Ordering paper and other supplies...21 Getting the printer ready to fax 23 Choosing a fax connection...23 Connecting directly to a telephone wall jack...24 Connecting directly to a telephone wall jack...
... a photo or selected photos...19 Scanning a document ...19 Sending a fax using the control panel ...20 Ordering supplies...21 Ordering print cartridges ...21 Ordering paper and other supplies...21 Getting the printer ready to fax 23 Choosing a fax connection...23 Connecting directly to a telephone wall jack...24 Connecting directly to a telephone wall jack...
Getting Started
Page 9
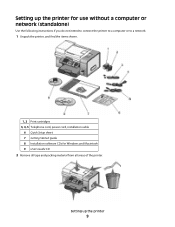
Setting up the printer 9 Setting up the printer for use without a computer or network (standalone) Use the following instructions if you do not intend to connect the printer to a computer or to a network. 1 Unpack the printer, and find the items shown. 1, 2 Print cartridges 3, 4, 5 Telephone cord, power cord, installation cable 6 Quick Setup sheet 7 Getting Started guide 8 Installation software CDs for Windows and Macintosh 9 User's Guide CD 2 Remove all tape and packing material from all areas of the printer.
Setting up the printer 9 Setting up the printer for use without a computer or network (standalone) Use the following instructions if you do not intend to connect the printer to a computer or to a network. 1 Unpack the printer, and find the items shown. 1, 2 Print cartridges 3, 4, 5 Telephone cord, power cord, installation cable 6 Quick Setup sheet 7 Getting Started guide 8 Installation software CDs for Windows and Macintosh 9 User's Guide CD 2 Remove all tape and packing material from all areas of the printer.
Getting Started
Page 11
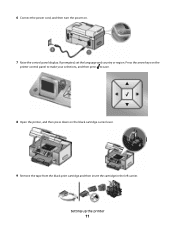
Press the arrow keys on the printer control panel to make your selections, and then press to save. 8 Open the printer, and then press down on . 7 Raise the control panel display. 6 Connect the power cord, and then turn the power on the black cartridge carrier lever. 9 Remove the tape from the black print cartridge and then insert the cartridge in the left carrier. Setting up the printer 11 If prompted, set the language and country or region.
Press the arrow keys on the printer control panel to make your selections, and then press to save. 8 Open the printer, and then press down on . 7 Raise the control panel display. 6 Connect the power cord, and then turn the power on the black cartridge carrier lever. 9 Remove the tape from the black print cartridge and then insert the cartridge in the left carrier. Setting up the printer 11 If prompted, set the language and country or region.
Getting Started
Page 12
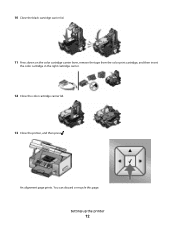
Setting up the printer 12 An alignment page prints. You can discard or recycle this page. 10 Close the black cartridge carrier lid. 11 Press down on the color cartridge carrier lever, remove the tape from the color print cartridge, and then insert the color cartridge in the right cartridge carrier. 12 Close the color cartridge carrier lid. 13 Close the printer, and then press .
Setting up the printer 12 An alignment page prints. You can discard or recycle this page. 10 Close the black cartridge carrier lid. 11 Press down on the color cartridge carrier lever, remove the tape from the color print cartridge, and then insert the color cartridge in the right cartridge carrier. 12 Close the color cartridge carrier lid. 13 Close the printer, and then press .
Getting Started
Page 16
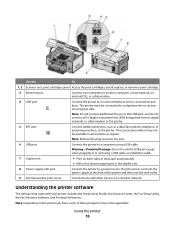
... available in the duplex unit. 8 Power supply with port Connect the printer to send and receive faxes. The printer must be applicable. Use the To 1, 2 Scanner unit, print cartridge carrier Access the print cartridges; install, replace, or remove a print cartridge. 3 Ethernet port Connect your printer includes the Productivity Studio, the Solution Center, the Fax Setup Utility...
... available in the duplex unit. 8 Power supply with port Connect the printer to send and receive faxes. The printer must be applicable. Use the To 1, 2 Scanner unit, print cartridge carrier Access the print cartridges; install, replace, or remove a print cartridge. 3 Ethernet port Connect your printer includes the Productivity Studio, the Solution Center, the Fax Setup Utility...
Getting Started
Page 17
Use To The Productivity Studio displays icons to click for the printer. To access the Solution Center select Printer Status and Maintenance on the Productivity Studio Welcome Screen. • Check ink levels, order print cartridges, and find maintenance information. • Troubleshoot. • Use the ... of the following: • In Windows Vista, click . • In Windows XP and earlier, click Start. 2 Click Programs or All Programs ªLexmark 9500 Series. 3 Select Productivity Studio. • Scan, copy, fax, e-mail, or print a photo or document. • Transfer photos. • ...
Use To The Productivity Studio displays icons to click for the printer. To access the Solution Center select Printer Status and Maintenance on the Productivity Studio Welcome Screen. • Check ink levels, order print cartridges, and find maintenance information. • Troubleshoot. • Use the ... of the following: • In Windows Vista, click . • In Windows XP and earlier, click Start. 2 Click Programs or All Programs ªLexmark 9500 Series. 3 Select Productivity Studio. • Scan, copy, fax, e-mail, or print a photo or document. • Transfer photos. • ...
Getting Started
Page 18
Fax Setup Utility • Customize settings for scan jobs. Printer Utility • Install print cartridges and perform other maintenance tasks. • Contact customer support. The number of copies is highlighted. 4 Press or to print a document. Note: Do not...fax jobs. • Create and edit the Speed Dial list. Network Card Reader • View photos from a memory device inserted into a network printer. • Transfer photos and documents from any program that allows you to select the number of the paper (duplex). Access helpful Web links and information...
Fax Setup Utility • Customize settings for scan jobs. Printer Utility • Install print cartridges and perform other maintenance tasks. • Contact customer support. The number of copies is highlighted. 4 Press or to print a document. Note: Do not...fax jobs. • Create and edit the Speed Dial list. Network Card Reader • View photos from a memory device inserted into a network printer. • Transfer photos and documents from any program that allows you to select the number of the paper (duplex). Access helpful Web links and information...
Getting Started
Page 21
..., displaying, or storing. Declared yield value in . • 10 x 15 cm Using the printer 21 Paper size • Letter • A4 • 4 x 6 in accordance with your fingers or sharp objects. Notes: • For best results, use only Lexmark print cartridges. • For best results when printing photos or other high-quality images, use...
..., displaying, or storing. Declared yield value in . • 10 x 15 cm Using the printer 21 Paper size • Letter • A4 • 4 x 6 in accordance with your fingers or sharp objects. Notes: • For best results, use only Lexmark print cartridges. • For best results when printing photos or other high-quality images, use...
Getting Started
Page 40
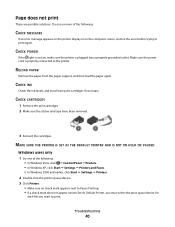
...computer screen, resolve the error before trying to print again. CHECK CARTRIDGES 1 Remove the print cartridges. 2 Make sure the sticker and tape have been removed. 3 Reinsert the cartridges. MAKE SURE THE PRINTER IS SET AS THE DEFAULT PRINTER AND IS NOT ON HOLD OR PAUSED Windows users only 1 ...40 CHECK INK Check the ink levels, and install new print cartridges if necessary. Try one of the following : • In Windows Vista, click ª Control Panel ª Printers. • In Windows XP, click Start ª Settings ª Printers and Faxes. • In Windows 2000 and earlier, click...
...computer screen, resolve the error before trying to print again. CHECK CARTRIDGES 1 Remove the print cartridges. 2 Make sure the sticker and tape have been removed. 3 Reinsert the cartridges. MAKE SURE THE PRINTER IS SET AS THE DEFAULT PRINTER AND IS NOT ON HOLD OR PAUSED Windows users only 1 ...40 CHECK INK Check the ink levels, and install new print cartridges if necessary. Try one of the following : • In Windows Vista, click ª Control Panel ª Printers. • In Windows XP, click Start ª Settings ª Printers and Faxes. • In Windows 2000 and earlier, click...


