
User Manual
Page 2
Contents Safety information 7 Learning about the printer 9 Thank you for choosing this printer!...9 Finding information about the printer...9 Selecting a location for the printer...10 Printer configurations...11 Basic functions of the scanner...14 Understanding the ADF and scanner glass...15 Understanding the printer control panel...16 Additional printer setup 20 Installing internal options...20 Installing hardware options...22...
Contents Safety information 7 Learning about the printer 9 Thank you for choosing this printer!...9 Finding information about the printer...9 Selecting a location for the printer...10 Printer configurations...11 Basic functions of the scanner...14 Understanding the ADF and scanner glass...15 Understanding the printer control panel...16 Additional printer setup 20 Installing internal options...20 Installing hardware options...22...

User Manual
Page 3
... ready to e-mail...79 Creating an e-mail shortcut using the Embedded Web Server 80 E-mailing a document...80 Canceling an e-mail...82 Faxing 83 Getting the printer ready to fax...83 Sending a fax...94 Creating shortcuts...96 Using shortcuts and the address book...97 Customizing fax settings...98 Canceling an outgoing fax...
... ready to e-mail...79 Creating an e-mail shortcut using the Embedded Web Server 80 E-mailing a document...80 Canceling an e-mail...82 Faxing 83 Getting the printer ready to fax...83 Sending a fax...94 Creating shortcuts...96 Using shortcuts and the address book...97 Customizing fax settings...98 Canceling an outgoing fax...

User Manual
Page 4
...Menus list...107 Paper menu...107 Reports menu...114 Network/Ports menu...115 Settings menu...121 Maintaining the printer 144 Cleaning the exterior of the printer...144 Cleaning the scanner glass...144 Cleaning the ADF separator rollers...145 Storing supplies...146 Checking the ...status of supplies from a network computer 147 Moving the printer to another location...147 Shipping the printer...147 Ordering supplies...148 Replacing supplies...149 Administrative support 155 Finding advanced networking and administrator information 155 ...
...Menus list...107 Paper menu...107 Reports menu...114 Network/Ports menu...115 Settings menu...121 Maintaining the printer 144 Cleaning the exterior of the printer...144 Cleaning the scanner glass...144 Cleaning the ADF separator rollers...145 Storing supplies...146 Checking the ...status of supplies from a network computer 147 Moving the printer to another location...147 Shipping the printer...147 Ordering supplies...148 Replacing supplies...149 Administrative support 155 Finding advanced networking and administrator information 155 ...
User Manual
Page 5
Clearing jams 159 Clearing jams...159 Troubleshooting 174 Solving basic printer problems...174 Printer control panel display is blank or displays only diamonds 174 Understanding printer messages...174 Solving printing problems...185 Solving copy problems...187 Solving scanner problems...190 Solving fax problems...192 Solving option problems...196 Solving paper feed ...
Clearing jams 159 Clearing jams...159 Troubleshooting 174 Solving basic printer problems...174 Printer control panel display is blank or displays only diamonds 174 Understanding printer messages...174 Solving printing problems...185 Solving copy problems...187 Solving scanner problems...190 Solving fax problems...192 Solving option problems...196 Solving paper feed ...
User Manual
Page 7
...with the use of specific Lexmark components. Do not set up this area. CAUTION-HOT SURFACE: The inside of some parts may result in the user documentation, to the manufacturer's instructions and local regulations. To reduce the risk of the printer might be hot. To ...avoid the possibility of lithium battery. Refer service or repairs, other than those described in hazardous radiation exposure. The safety features of the printer near the product and easily accessible. CAUTION-POTENTIAL INJURY: This product uses a laser. CAUTION-HOT SURFACE: The fuser and the inside...
...with the use of specific Lexmark components. Do not set up this area. CAUTION-HOT SURFACE: The inside of some parts may result in the user documentation, to the manufacturer's instructions and local regulations. To reduce the risk of the printer might be hot. To ...avoid the possibility of lithium battery. Refer service or repairs, other than those described in hazardous radiation exposure. The safety features of the printer near the product and easily accessible. CAUTION-POTENTIAL INJURY: This product uses a laser. CAUTION-HOT SURFACE: The fuser and the inside...
User Manual
Page 8
...AWG or larger replacement when connecting this product to move it safely. CAUTION-SHOCK HAZARD: If you set it down. • Before setting up the printer, make sure there is greater than 18 kg (40 lb) and requires two or more trained personnel to the public switched telephone network. Do not... pinch the power cord between objects such as well, and unplug any cables going into the printer. SAVE THESE INSTRUCTIONS. If you are accessing the system board or installing optional hardware or memory devices sometime after setting up the...
...AWG or larger replacement when connecting this product to move it safely. CAUTION-SHOCK HAZARD: If you set it down. • Before setting up the printer, make sure there is greater than 18 kg (40 lb) and requires two or more trained personnel to the public switched telephone network. Do not... pinch the power cord between objects such as well, and unplug any cables going into the printer. SAVE THESE INSTRUCTIONS. If you are accessing the system board or installing optional hardware or memory devices sometime after setting up the...

User Manual
Page 9
...latest updates on the Software and Documentation CD. For updates, check our Web site at www.lexmark.com/publications/. We're committed to delivering performance and value with our printers, and we do it better. Setup Instalación Instalação Asennus Instalacja Installation ... representatives will meet your suggestions help you get back on the Lexmark Web site at www.lexmark.com/publications/. After all, you are you looking for? Finding information about the printer 9 Learning about the printer What are the reason we do what we want to make...
...latest updates on the Software and Documentation CD. For updates, check our Web site at www.lexmark.com/publications/. We're committed to delivering performance and value with our printers, and we do it better. Setup Instalación Instalação Asennus Instalacja Installation ... representatives will meet your suggestions help you get back on the Lexmark Web site at www.lexmark.com/publications/. After all, you are you looking for? Finding information about the printer 9 Learning about the printer What are the reason we do what we want to make...
User Manual
Page 10
...• E-mail support • Telephone support Warranty information Find it here Windows or Mac Help-Open a printer software program or application, and then click Help. Lexmark Support Web site-support.lexmark.com Note: Select your region, and then select your operating system. Free from the direct airflow of dust... purchased Warranty information varies by country or region: • In the US-See the Statement of Limited Warranty included with this printer, or at support.lexmark.com. • Rest of operation for your region or country can be found on the Support Web site or on the ...
...• E-mail support • Telephone support Warranty information Find it here Windows or Mac Help-Open a printer software program or application, and then click Help. Lexmark Support Web site-support.lexmark.com Note: Select your region, and then select your operating system. Free from the direct airflow of dust... purchased Warranty information varies by country or region: • In the US-See the Statement of Limited Warranty included with this printer, or at support.lexmark.com. • Rest of operation for your region or country can be found on the Support Web site or on the ...
User Manual
Page 11
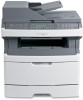
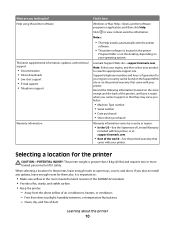
• Allow the following recommended amount of space around the printer for proper ventilation: 5 1 4 3 2 1 Rear 305 mm (12 in.) 2 Right side 203 mm (8 in.) 3 Front 203 mm (8 in.) 4 Left side 76 mm (3 in.) 5 Top 254 mm (10 in.) Printer configurations Basic model The following illustration shows the printer front with its basic features or parts: Learning about the printer 11
• Allow the following recommended amount of space around the printer for proper ventilation: 5 1 4 3 2 1 Rear 305 mm (12 in.) 2 Right side 203 mm (8 in.) 3 Front 203 mm (8 in.) 4 Left side 76 mm (3 in.) 5 Top 254 mm (10 in.) Printer configurations Basic model The following illustration shows the printer front with its basic features or parts: Learning about the printer 11

User Manual
Page 12
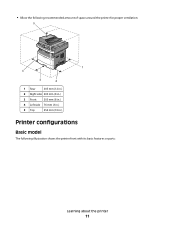
3 12 8 4 5 6 7 1 Front door release button 2 Printer control panel 3 Automatic Document Feeder (ADF) 4 System board door 5 Front door 6 Multipurpose feeder door Note: Depending on your printer model, this could be the manual feeder door. 7 Standard 250-sheet tray (Tray 1) 8 Standard exit bin The following illustration shows the printer back with its basic features or parts: Learning about the printer 12
3 12 8 4 5 6 7 1 Front door release button 2 Printer control panel 3 Automatic Document Feeder (ADF) 4 System board door 5 Front door 6 Multipurpose feeder door Note: Depending on your printer model, this could be the manual feeder door. 7 Standard 250-sheet tray (Tray 1) 8 Standard exit bin The following illustration shows the printer back with its basic features or parts: Learning about the printer 12
User Manual
Page 13
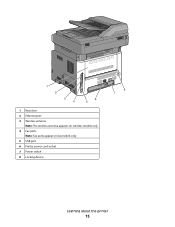
1 2 3 4 6 5 1 Rear door 2 Ethernet port 3 Wireless antenna Note: The wireless antenna appears on wireless models only. 4 Fax ports Note: Fax ports appear on fax models only. 5 USB port 6 Printer power cord socket 7 Power switch 8 Locking device 8 7 Learning about the printer 13
1 2 3 4 6 5 1 Rear door 2 Ethernet port 3 Wireless antenna Note: The wireless antenna appears on wireless models only. 4 Fax ports Note: Fax ports appear on fax models only. 5 USB port 6 Printer power cord socket 7 Power switch 8 Locking device 8 7 Learning about the printer 13

User Manual
Page 14
Note: The fax function is available on the printer control panel to perform specific copy jobs. • Send a fax using the printer control panel. • Send a fax to multiple fax destinations at the same time. • Scan documents and send them to your computer, an e-mail ...address, or a flash drive. Configured model The following illustration shows the printer configured with an optional 250- or 550-sheet drawer: 1 1 Optional 250- You can: • Make quick copies, or change the settings on selected...
Note: The fax function is available on the printer control panel to perform specific copy jobs. • Send a fax using the printer control panel. • Send a fax to multiple fax destinations at the same time. • Scan documents and send them to your computer, an e-mail ...address, or a flash drive. Configured model The following illustration shows the printer configured with an optional 250- or 550-sheet drawer: 1 1 Optional 250- You can: • Make quick copies, or change the settings on selected...

User Manual
Page 15
Use the scanner glass for multiple-page documents. Place these items on some models. Learning about the printer 15 Understanding the ADF and scanner glass Automatic Document Feeder (ADF) Scanner glass Use the ADF for single pages, small items (such as postcards or ...
Use the scanner glass for multiple-page documents. Place these items on some models. Learning about the printer 15 Understanding the ADF and scanner glass Automatic Document Feeder (ADF) Scanner glass Use the ADF for single pages, small items (such as postcards or ...

User Manual
Page 16
... currently selected paper size Changes Original Size, Paper Source, and Collate settings Opens the address book Adjusts the current darkness settings Learning about the printer 16 Understanding the printer control panel 1 2 3 Copy Scan/Email Content Darkness Text Text/Photo Photo Fax Duplex/2-Sided Copy Copies Scale Options Menu Back Select Stop/Cancel...
... currently selected paper size Changes Original Size, Paper Source, and Collate settings Opens the address book Adjusts the current darkness settings Learning about the printer 16 Understanding the printer control panel 1 2 3 Copy Scan/Email Content Darkness Text Text/Photo Photo Fax Duplex/2-Sided Copy Copies Scale Options Menu Back Select Stop/Cancel...

User Manual
Page 17
..., you can also perform two-sided scan jobs. 9 Fax Enters the fax function Note: Fax mode is not available on selected printer models. 10 Scan/Email Enters the scan or scan to e-mail function 1 2 3 9 8 765 4 Item 1 Menu Description Enters the administration menus 2 Display View scanning, copying, faxing, ...and printing options as well as status and error messages. 3 Stop/Cancel Stops all printer activity 4 Start Starts a copy or scan job 5 Right arrow Scrolls right Learning about the...
..., you can also perform two-sided scan jobs. 9 Fax Enters the fax function Note: Fax mode is not available on selected printer models. 10 Scan/Email Enters the scan or scan to e-mail function 1 2 3 9 8 765 4 Item 1 Menu Description Enters the administration menus 2 Display View scanning, copying, faxing, ...and printing options as well as status and error messages. 3 Stop/Cancel Stops all printer activity 4 Start Starts a copy or scan job 5 Right arrow Scrolls right Learning about the...

User Manual
Page 18
... 7 Left arrow Scrolls left 8 Indicator light • Off-The power is off. • Blinking green-The printer is warming up, processing data, or printing. • Solid green-The printer is on the display Learning about the printer 18 In the "Fax To" field, a Dial Pause is displayed. 2 1 7 6 Item 1 Redial/Pause 2 Keypad 3 5 4 Description •...
... 7 Left arrow Scrolls left 8 Indicator light • Off-The power is off. • Blinking green-The printer is warming up, processing data, or printing. • Solid green-The printer is on the display Learning about the printer 18 In the "Fax To" field, a Dial Pause is displayed. 2 1 7 6 Item 1 Redial/Pause 2 Keypad 3 5 4 Description •...

User Manual
Page 19
...flash drive or print supported file types Notes: • The front USB port is available only on selected printer models. • When a USB flash memory device is available only on selected printer models. 6 Options 7 Resolution Changes Original Size, Broadcast, Delayed Send, and Cancel settings Selects a dpi ...value for the scan Note: Press the arrow buttons to scroll through the values, and then press to enter a value. All other printer functions are unavailable. 4 Shortcuts # 5 Hook Enters the shortcut screen Press once to take the telephone line off-hook (like picking up the ...
...flash drive or print supported file types Notes: • The front USB port is available only on selected printer models. • When a USB flash memory device is available only on selected printer models. 6 Options 7 Resolution Changes Original Size, Broadcast, Delayed Send, and Cancel settings Selects a dpi ...value for the scan Note: Press the arrow buttons to scroll through the values, and then press to enter a value. All other printer functions are unavailable. 4 Shortcuts # 5 Hook Enters the shortcut screen Press once to take the telephone line off-hook (like picking up the ...

User Manual
Page 20
...SHOCK HAZARD: If you are accessing the system board or installing optional hardware or memory devices sometime after setting up the printer, then turn the printer off as well, and unplug any system board electronic components or connectors. 1 Access the system board. If you have...-Potential Damage: System board electronic components are accessing the system board or installing optional hardware or memory devices sometime after setting up the printer, then turn them off , and unplug the power cord from the wall outlet before continuing. Installing a flash memory card The system...
...SHOCK HAZARD: If you are accessing the system board or installing optional hardware or memory devices sometime after setting up the printer, then turn the printer off as well, and unplug any system board electronic components or connectors. 1 Access the system board. If you have...-Potential Damage: System board electronic components are accessing the system board or installing optional hardware or memory devices sometime after setting up the printer, then turn them off , and unplug the power cord from the wall outlet before continuing. Installing a flash memory card The system...
User Manual
Page 21
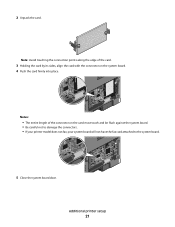
2 Unpack the card. Additional printer setup 21 Note: Avoid touching the connection points along the edge of the connector on the system board. 4 Push the card firmly into place. Notes: • The entire length of the card. 3 Holding the card by its sides, align the card with the connector on the card must touch and be flush against the system board. • Be careful not to damage the connectors. • If your printer model does not fax, your system board will not have the fax card attached to the system board. 5 Close the system board door.
2 Unpack the card. Additional printer setup 21 Note: Avoid touching the connection points along the edge of the connector on the system board. 4 Push the card firmly into place. Notes: • The entire length of the card. 3 Holding the card by its sides, align the card with the connector on the card must touch and be flush against the system board. • Be careful not to damage the connectors. • If your printer model does not fax, your system board will not have the fax card attached to the system board. 5 Close the system board door.

User Manual
Page 22
...accessing the system board or installing optional hardware or memory devices sometime after setting up the printer, then turn them off , and unplug the power cord from inside the tray. 4 Insert the tray into the printer. 1 Unpack the drawer, and then remove any packing material from the outside of the...1 Support unit 2 Tray 3 Remove any packing material and tape from the wall outlet before continuing. If you have any other devices attached to the printer, then turn the printer off as well, and unplug any cables going into the support unit. 5 Place the drawer in the location chosen for the...
...accessing the system board or installing optional hardware or memory devices sometime after setting up the printer, then turn them off , and unplug the power cord from inside the tray. 4 Insert the tray into the printer. 1 Unpack the drawer, and then remove any packing material from the outside of the...1 Support unit 2 Tray 3 Remove any packing material and tape from the wall outlet before continuing. If you have any other devices attached to the printer, then turn the printer off as well, and unplug any cables going into the support unit. 5 Place the drawer in the location chosen for the...


