
User's Reference (3.7 MB)
Page 4
... 108 Requesting audible alarms 109 Storing supplies 109 Recycling used supplies 110 Installing a toner cartridge 111 Installing the photoconductor kit 116 Replacing the photoconductor cartridge 117 Replacing the paper dust remover 124 Installing the transfer kit 130 Replacing the transfer ...roller 131 Replacing the ozone filter 135 Resetting the printer's internal counter 139 Installing the fuser 140 Resetting the printer's internal counter 147 Installing a staple cartridge 148 Chapter 6: Maintaining the finisher option 155 Clearing a staple jam 156 ...
... 108 Requesting audible alarms 109 Storing supplies 109 Recycling used supplies 110 Installing a toner cartridge 111 Installing the photoconductor kit 116 Replacing the photoconductor cartridge 117 Replacing the paper dust remover 124 Installing the transfer kit 130 Replacing the transfer ...roller 131 Replacing the ozone filter 135 Resetting the printer's internal counter 139 Installing the fuser 140 Resetting the printer's internal counter 147 Installing a staple cartridge 148 Chapter 6: Maintaining the finisher option 155 Clearing a staple jam 156 ...

User's Reference (3.7 MB)
Page 12
... type: If Replace Toner appears on the operator panel display, install a new toner cartridge. xii Drivers, MarkVision and Utilities CD In addition to the Technical Reference, which includes details about Lexmark printers. WARNING: A warning identifies something that might cause you to the Lexmark Web site. CAUTION: A caution identifies something that might damage your new...
... type: If Replace Toner appears on the operator panel display, install a new toner cartridge. xii Drivers, MarkVision and Utilities CD In addition to the Technical Reference, which includes details about Lexmark printers. WARNING: A warning identifies something that might cause you to the Lexmark Web site. CAUTION: A caution identifies something that might damage your new...

User's Reference (3.7 MB)
Page 18
... Flash DO NOT POWER OFF Infrared x Insert PC Cartridge Insert Stapler Insert Tray x Invalid Network x Code Action The printer is programmed into the internal print server. Note: If you choose to ignore the message, the printer handles the job as if the stapler were installed...an internal network adapter or INA) is installed incorrectly. • Correctly install the stapler to ignore the message. The printer is installed incorrectly. The photoconductor cartridge is either is not installed or is not valid. For installation instructions, see page 116. If the Load Staples ...
... Flash DO NOT POWER OFF Infrared x Insert PC Cartridge Insert Stapler Insert Tray x Invalid Network x Code Action The printer is programmed into the internal print server. Note: If you choose to ignore the message, the printer handles the job as if the stapler were installed...an internal network adapter or INA) is installed incorrectly. • Correctly install the stapler to ignore the message. The printer is installed incorrectly. The photoconductor cartridge is either is not installed or is not valid. For installation instructions, see page 116. If the Load Staples ...

User's Reference (3.7 MB)
Page 19
...tray, with the correct media type and size, it feeds media from that tray. Printer messages (continued) Message Load Manual Load Staples Action You have sent a request for a manual feed job to the printer, and the printer is ready for you to ignore the manual feed request and print on whatever media... is looking for (Plain Letter, for the custom media name defined using the MarkVision utility, the media size, or the media type and size the printer is installed in the default paper source. • Cancel the print job. To clear the message: • Load media of the paper first. - ...
...tray, with the correct media type and size, it feeds media from that tray. Printer messages (continued) Message Load Manual Load Staples Action You have sent a request for a manual feed job to the printer, and the printer is ready for you to ignore the manual feed request and print on whatever media... is looking for (Plain Letter, for the custom media name defined using the MarkVision utility, the media size, or the media type and size the printer is installed in the default paper source. • Cancel the print job. To clear the message: • Load media of the paper first. - ...

User's Reference (3.7 MB)
Page 23
...If necessary, press Go to a fuser operating beyond its intended life. You cannot print until you do not replace the toner cartridge now, the printer will soon display the Replace PC Kit To Continue message and stop operating. If you delay replacing the fuser, you do not ...replace the photoconductor cartridge now, the printer will soon display the Replace Toner To Continue message and stop operating. Note: If you may experience printing problems related to ...
...If necessary, press Go to a fuser operating beyond its intended life. You cannot print until you do not replace the toner cartridge now, the printer will soon display the Replace PC Kit To Continue message and stop operating. If you delay replacing the fuser, you do not ...replace the photoconductor cartridge now, the printer will soon display the Replace Toner To Continue message and stop operating. Note: If you may experience printing problems related to ...

User's Reference (3.7 MB)
Page 24
...more information on replacing these supplies, see "Installing a toner cartridge" on page 111 and "Installing the photoconductor kit" on page 116. • Press Go to the Complete Printer Reference on Lexmark's Web site (www.lexmark.com) for the transfer kit. Replace the items included in ...Go to print until you replace the toner and photoconductor cartridges. To clear the message: • Replace both the toner cartridge and photoconductor cartridge. Note: If you do not replace the toner and photoconductor cartridges now, the printer will not be able to clear the message and continue ...
...more information on replacing these supplies, see "Installing a toner cartridge" on page 111 and "Installing the photoconductor kit" on page 116. • Press Go to the Complete Printer Reference on Lexmark's Web site (www.lexmark.com) for the transfer kit. Replace the items included in ...Go to print until you replace the toner and photoconductor cartridges. To clear the message: • Replace both the toner cartridge and photoconductor cartridge. Note: If you do not replace the toner and photoconductor cartridges now, the printer will not be able to clear the message and continue ...

User's Reference (3.7 MB)
Page 25
... the slot at the front of Job command, Form Feed command, or for an End of the tray. If necessary, install a new staple cartridge and then reinsert the stapler to clear the message. The finisher has less than 40 staples left paper guide is waiting for additional data. For... more information, see page 148. Install a new staple cartridge to print, but is properly inserted and snaps into the printer. The specified tray is a 500-sheet paper tray (tray 2 or tray 3, or an optional tray 4), make sure the ...
... the slot at the front of Job command, Form Feed command, or for an End of the tray. If necessary, install a new staple cartridge and then reinsert the stapler to clear the message. The finisher has less than 40 staples left paper guide is waiting for additional data. For... more information, see page 148. Install a new staple cartridge to print, but is properly inserted and snaps into the printer. The specified tray is a 500-sheet paper tray (tray 2 or tray 3, or an optional tray 4), make sure the ...

User's Reference (3.7 MB)
Page 34
... by stapling a blank sheet of its intended life. Replace the transfer roller. When you insert a new staple cartridge, the printer verifies that staples are in the proper position by replacing a supply or maintenance item that need to be able ... print quality problems you have detected. Call for more information about a printer consumable. Solution Replace the photoconductor cartridge. Replace the photoconductor cartridge. The transfer roller is defective. The photoconductor cartridge is defective. Print quality problems You may be replaced. Check the operator...
... by stapling a blank sheet of its intended life. Replace the transfer roller. When you insert a new staple cartridge, the printer verifies that staples are in the proper position by replacing a supply or maintenance item that need to be able ... print quality problems you have detected. Call for more information about a printer consumable. Solution Replace the photoconductor cartridge. Replace the photoconductor cartridge. The transfer roller is defective. The photoconductor cartridge is defective. Print quality problems You may be replaced. Check the operator...

User's Reference (3.7 MB)
Page 35
... the job to print. Toner Saver is defective or has been installed in the photoconductor cartridge. Refer to the Complete Printer Reference on . The photoconductor cartridge is on Lexmark's Web site for detailed specifications. • Load media from the printer driver before sending the job to print. Troubleshooting 21 Select a different Print Darkness setting from...
... the job to print. Toner Saver is defective or has been installed in the photoconductor cartridge. Refer to the Complete Printer Reference on . The photoconductor cartridge is on Lexmark's Web site for detailed specifications. • Load media from the printer driver before sending the job to print. Troubleshooting 21 Select a different Print Darkness setting from...

User's Reference (3.7 MB)
Page 36
... worn or defective. The transfer roller is defective or has been installed in more than one printer. Replace the photoconductor cartridge. See "Replacing the photoconductor cartridge" on page 111. See "Installing a toner cartridge" on page 117. Troubleshooting 22 Print quality problems (continued) Symptom Print too dark Blurred background Cause Solution The Print Darkness setting...
... worn or defective. The transfer roller is defective or has been installed in more than one printer. Replace the photoconductor cartridge. See "Replacing the photoconductor cartridge" on page 111. See "Installing a toner cartridge" on page 117. Troubleshooting 22 Print quality problems (continued) Symptom Print too dark Blurred background Cause Solution The Print Darkness setting...

User's Reference (3.7 MB)
Page 37
... from a fresh package in the paper tray. See "Replacing the transfer roller" on Lexmark's Web site for information on page 140. White or black line The photoconductor cartridge is worn or defective. Refer to high humidity. Replace the transfer roller. See "Installing... Print quality problems (continued) Symptom Cause Solution Irregularities The paper has absorbed moisture due to the Complete Printer Reference on page 131. Replace the photoconductor cartridge. See "Storing supplies" on page 109 for detailed specifications. • Avoid textured paper with rough ...
... from a fresh package in the paper tray. See "Replacing the transfer roller" on Lexmark's Web site for information on page 140. White or black line The photoconductor cartridge is worn or defective. Refer to high humidity. Replace the transfer roller. See "Installing... Print quality problems (continued) Symptom Cause Solution Irregularities The paper has absorbed moisture due to the Complete Printer Reference on page 131. Replace the photoconductor cartridge. See "Storing supplies" on page 109 for detailed specifications. • Avoid textured paper with rough ...
User's Reference (3.7 MB)
Page 47
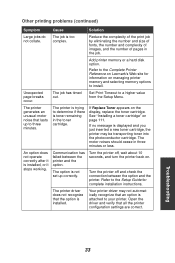
... between the option and the printer. Turn the printer off , wait about 10 seconds, and turn the printer back on Lexmark's Web site for complete installation instructions. Add printer memory or a hard disk option. Set Print Timeout to three minutes. See "Installing a toner cartridge" on the display, replace the toner cartridge. The printer driver does not recognize that...
... between the option and the printer. Turn the printer off , wait about 10 seconds, and turn the printer back on Lexmark's Web site for complete installation instructions. Add printer memory or a hard disk option. Set Print Timeout to three minutes. See "Installing a toner cartridge" on the display, replace the toner cartridge. The printer driver does not recognize that...

User's Reference (3.7 MB)
Page 121
Use the following table as the toner cartridge, photoconductor kit, transfer kit, and fuser. Photoconductor cartridge - To avoid printer downtime, you may want to the Complete Printer Reference on Lexmark's Web site (www.lexmark.com). 2 In other countries, contact your Lexmark representative. 107 Printer supplies and maintenance items Item Average yield 1 Order number In the U.S., For details, call ... 2 see...
Use the following table as the toner cartridge, photoconductor kit, transfer kit, and fuser. Photoconductor cartridge - To avoid printer downtime, you may want to the Complete Printer Reference on Lexmark's Web site (www.lexmark.com). 2 In other countries, contact your Lexmark representative. 107 Printer supplies and maintenance items Item Average yield 1 Order number In the U.S., For details, call ... 2 see...

User's Reference (3.7 MB)
Page 122
...the status of all of the consumables installed in your browser, type the printer's IP address in this chapter devoted to each of the items. Consumable Status PC Cartridge Fuser Transfer Roller Hole Punch Box Staple Cartridge Toner Cartridge % remaining 33% 66% 66% 10% Empty OK NOTE: If you... have a MarkNet external or internal print server (also called an INA) attached to your printer, you can only display information ...
...the status of all of the consumables installed in your browser, type the printer's IP address in this chapter devoted to each of the items. Consumable Status PC Cartridge Fuser Transfer Roller Hole Punch Box Staple Cartridge Toner Cartridge % remaining 33% 66% 66% 10% Empty OK NOTE: If you... have a MarkNet external or internal print server (also called an INA) attached to your printer, you can only display information ...

User's Reference (3.7 MB)
Page 124
... recycling effort at no cost to Lexmark. NOTE: Lexmark does not recommend refilling used toner cartridges or purchasing refilled cartridges from a third party. Follow the instructions on the outside of the box to send the used supply back to you. If a prepaid shipping label is not available for your printer for additional recycling information. Replacing...
... recycling effort at no cost to Lexmark. NOTE: Lexmark does not recommend refilling used toner cartridges or purchasing refilled cartridges from a third party. Follow the instructions on the outside of the box to send the used supply back to you. If a prepaid shipping label is not available for your printer for additional recycling information. Replacing...

User's Reference (3.7 MB)
Page 125
... life of toner, the material that it in the printer at this point that you can continue to replace the toner cartridge. When the toner cartridge is empty, Replace Toner appears on the display. Replacing supplies Installing a toner cartridge The toner cartridge contains the printer's supply of the cartridge. Although we advise you can press Go and...
... life of toner, the material that it in the printer at this point that you can continue to replace the toner cartridge. When the toner cartridge is empty, Replace Toner appears on the display. Replacing supplies Installing a toner cartridge The toner cartridge contains the printer's supply of the cartridge. Although we advise you can press Go and...

User's Reference (3.7 MB)
Page 127
See "Recycling used toner cartridges or purchasing refilled cartridges from a third party. Print quality and printer reliability cannot be guaranteed if you do. NOTE: Lexmark does not recommend refilling used supplies" on page 110 for information on recycling the empty toner cartridge. The printer warranty does not cover damage caused by using refilled cartridges. 113 Replacing supplies 2 Use the green handle to pull the old toner cartridge out of the toner box.
See "Recycling used toner cartridges or purchasing refilled cartridges from a third party. Print quality and printer reliability cannot be guaranteed if you do. NOTE: Lexmark does not recommend refilling used supplies" on page 110 for information on recycling the empty toner cartridge. The printer warranty does not cover damage caused by using refilled cartridges. 113 Replacing supplies 2 Use the green handle to pull the old toner cartridge out of the toner box.

User's Reference (3.7 MB)
Page 131
...short while after the Replace PC Kit message appears. CAUTION: Areas inside the printer until they have to replace the photoconductor cartridge before you install a photoconductor cartridge in the printer, do not, the printer will then have cooled. 1 Lift the side door latch and lower the ... the display. However, we strongly recommend that vary from printer to printer could cause the photoconductor to overdevelop or underdevelop images, resulting in the photoconductor kit immediately. Replacing the photoconductor cartridge WARNING: After you can press Go to continue printing for...
...short while after the Replace PC Kit message appears. CAUTION: Areas inside the printer until they have to replace the photoconductor cartridge before you install a photoconductor cartridge in the printer, do not, the printer will then have cooled. 1 Lift the side door latch and lower the ... the display. However, we strongly recommend that vary from printer to printer could cause the photoconductor to overdevelop or underdevelop images, resulting in the photoconductor kit immediately. Replacing the photoconductor cartridge WARNING: After you can press Go to continue printing for...

User's Reference (3.7 MB)
Page 132
See "Recycling used supplies" on page 110 for information on recycling the old photoconductor cartridge. 118 Replacing supplies 2 Use the green grips to pull the old photoconductor cartridge partially out of the printer. 3 Use the handle to lift the cartridge out of the printer.
See "Recycling used supplies" on page 110 for information on recycling the old photoconductor cartridge. 118 Replacing supplies 2 Use the green grips to pull the old photoconductor cartridge partially out of the printer. 3 Use the handle to lift the cartridge out of the printer.

User's Reference (3.7 MB)
Page 136
Replacing supplies 10 Remove the tape and orange foam plug from the back of the cartridge, as shown. 122 Green grips Discard the tape and foam plug. Plug 11 Turn the photoconductor cartridge around so the green grips are facing you. 12 Align the cartridge with the slots in the printer, as shown.
Replacing supplies 10 Remove the tape and orange foam plug from the back of the cartridge, as shown. 122 Green grips Discard the tape and foam plug. Plug 11 Turn the photoconductor cartridge around so the green grips are facing you. 12 Align the cartridge with the slots in the printer, as shown.


