(English) Rescue and Recovery 4.3 Deployment Guide
Page 5
... Password Persistence 25 EFS file limitation 25 Battery power settings for CD or script files 57 Scenario 5 - New rollouts 51 Preparing the hard disk drive 51 Installing 51 Updating 53 Enabling the Rescue and Recovery desktop . . . 53 Scenario 2 - Performing a Bare Metal Restore from an Admin Backup 58 Scenario 7 - Manually creating the Service Partition of S drive 58 Appendix A. User tasks 83 Windows 7 83 Create rescue media 83 Rescue and Recovery user interface switching . . . 84 Appendix C. Installing...
... Password Persistence 25 EFS file limitation 25 Battery power settings for CD or script files 57 Scenario 5 - New rollouts 51 Preparing the hard disk drive 51 Installing 51 Updating 53 Enabling the Rescue and Recovery desktop . . . 53 Scenario 2 - Performing a Bare Metal Restore from an Admin Backup 58 Scenario 7 - Manually creating the Service Partition of S drive 58 Appendix A. User tasks 83 Windows 7 83 Create rescue media 83 Rescue and Recovery user interface switching . . . 84 Appendix C. Installing...
(English) Rescue and Recovery 4.3 Deployment Guide
Page 30
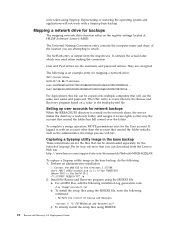
... a Sysprep utility image in the base backup These instructions are the username and password entries. Install the Rescue and Recovery program using MSIEXE: 22 Rescue and Recovery 4.3 Deployment Guide were taken using the MSIEXE file, enter the following is an example entry for mapping a network drive: UNC=\\server\share NetPath=\\9.88.77.66\share User=11622606415119207723014918505422010521006401209203708202015... Rejuvenating or restoring the operating system and applications will not work with...
... a Sysprep utility image in the base backup These instructions are the username and password entries. Install the Rescue and Recovery program using MSIEXE: 22 Rescue and Recovery 4.3 Deployment Guide were taken using the MSIEXE file, enter the following is an example entry for mapping a network drive: UNC=\\server\share NetPath=\\9.88.77.66\share User=11622606415119207723014918505422010521006401209203708202015... Rejuvenating or restoring the operating system and applications will not work with...
(English) Rescue and Recovery 4.3 Deployment Guide
Page 32
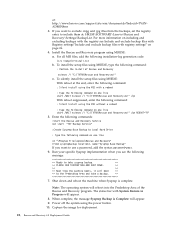
... the image for deployment. 24 Rescue and Recovery 4.3 Deployment Guide To silently install the setup files using MSIEXE: With reboot at the end, enter the following command: : Silent install using MSIEXE, type the following installation-log generation code: /L*v %temp%\rrinstall.txt b. Note: The operating system will appear. 8. Power off the system using MSIEXE: a. For more information on one line cd "\Program Files\Lenovo\Rescue and Recovery" rrcmd sysprepbackup location...
... the image for deployment. 24 Rescue and Recovery 4.3 Deployment Guide To silently install the setup files using MSIEXE: With reboot at the end, enter the following command: : Silent install using MSIEXE, type the following installation-log generation code: /L*v %temp%\rrinstall.txt b. Note: The operating system will appear. 8. Power off the system using MSIEXE: a. For more information on one line cd "\Program Files\Lenovo\Rescue and Recovery" rrcmd sysprepbackup location...
(English) Rescue and Recovery 4.3 Deployment Guide
Page 36
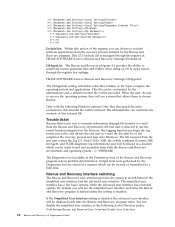
... accessible from tests performed by the Rescue and Recovery program. By default, you can be restored. When the user chooses to exclude software applications from the Rescue and Recovery environment, the end user is managed through the registry key settings: HKLM\SOFTWARE\Lenovo\Rescue and Recovery\Settings\OSAppsList The OSAppsList setting will be displayed each time the Rescue and Recovery program starts. If the Simplified User Interface setting is disabled. This GUI exclude list...
... accessible from tests performed by the Rescue and Recovery program. By default, you can be restored. When the user chooses to exclude software applications from the Rescue and Recovery environment, the end user is managed through the registry key settings: HKLM\SOFTWARE\Lenovo\Rescue and Recovery\Settings\OSAppsList The OSAppsList setting will be displayed each time the Rescue and Recovery program starts. If the Simplified User Interface setting is disabled. This GUI exclude list...
(English) Rescue and Recovery 4.5 Deployment Guide
Page 26
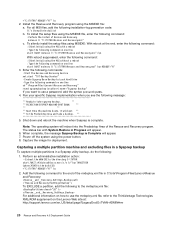
... install using the MSIEXE file, enter the following message: ** Ready to Local Hard Drive : Type the following installation-log generation code: /L*v %temp%\rrinstall.txt b. Install the Rescue and Recovery program using the power button. 8. To install the setup files using the MSI with System Restore in Progress will reboot into the Predesktop Area of the rnrdeploy.xml file in a Sysprep utility backup, do the following command on one line start...
... install using the MSIEXE file, enter the following message: ** Ready to Local Hard Drive : Type the following installation-log generation code: /L*v %temp%\rrinstall.txt b. Install the Rescue and Recovery program using the power button. 8. To install the setup files using the MSI with System Restore in Progress will reboot into the Predesktop Area of the rnrdeploy.xml file in a Sysprep utility backup, do the following command on one line start...

(English) Rescue and Recovery 4.5 Deployment Guide
Page 27
... and Recovery Service net start "TVT Backup Service" :Create Sysprep Base Backup to Local Hard Drive : Type the following table shows considerations for Primary partitions. Note: The operating system will fail when doing a Sysprep backup if the drive letters of the partitions are changed after running the Sysprep backup. To silently install the setup files using the MSI without a reboot : Type the following message: ** Ready to use Password Persistence. Power off...
... and Recovery Service net start "TVT Backup Service" :Create Sysprep Base Backup to Local Hard Drive : Type the following table shows considerations for Primary partitions. Note: The operating system will fail when doing a Sysprep backup if the drive letters of the partitions are changed after running the Sysprep backup. To silently install the setup files using the MSI without a reboot : Type the following message: ** Ready to use Password Persistence. Power off...

(English) Rescue and Recovery 4.5 Deployment Guide
Page 51
... installation time on . Performing a Bare Metal Restore from the target hard disk drive. 2. After running, you are going to install Windows on each machine by roughly one storage device attached). Create a DOS boot diskette and place the cleandrv.exe file on the HDD for the z936zisXXXXus00.exe :: NOTE: DO NOT END THE STRING WITH A "\". Build your donor system as second hard disk drives, USB hard disk drives, USB memory keys and PC Card Memory...
... installation time on . Performing a Bare Metal Restore from the target hard disk drive. 2. After running, you are going to install Windows on each machine by roughly one storage device attached). Create a DOS boot diskette and place the cleandrv.exe file on the HDD for the z936zisXXXXus00.exe :: NOTE: DO NOT END THE STRING WITH A "\". Build your donor system as second hard disk drives, USB hard disk drives, USB memory keys and PC Card Memory...

Hardware Maintenance Manual
Page 6
... the power supply 114 Installing or replacing a memory module . . . . 116 Replacing a PCI adapter card 118 Replacing the heat sink 121 Replacing the microprocessor 122 Replacing the system board 124 Replacing a hard disk drive 127 iv ThinkStation Hardware Maintenance Manual Replacing the hard disk drive fan assembly . . . 130 Replacing an optical drive 131 Replacing the diskette drive or card reader . . . 132 Replacing the front and rear fan assemblies . . . 133 Replacing the front panel connectors assembly . . 134 Replacing the power switch/LED assembly . . . 135 Replacing the battery...
... the power supply 114 Installing or replacing a memory module . . . . 116 Replacing a PCI adapter card 118 Replacing the heat sink 121 Replacing the microprocessor 122 Replacing the system board 124 Replacing a hard disk drive 127 iv ThinkStation Hardware Maintenance Manual Replacing the hard disk drive fan assembly . . . 130 Replacing an optical drive 131 Replacing the diskette drive or card reader . . . 132 Replacing the front and rear fan assemblies . . . 133 Replacing the front panel connectors assembly . . 134 Replacing the power switch/LED assembly . . . 135 Replacing the battery...
Hardware Maintenance Manual
Page 37
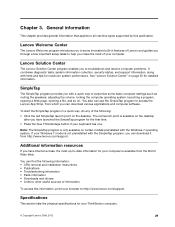
... system performance. See "Lenovo Solution Center" on the desktop. To start the SimpleTap program in features of Lenovo and guides you through a few important setup tasks to other useful sources of the following information: • CRU removal and installation instructions • Publications • Troubleshooting information • Parts information • Downloads and drivers • Links to help you can download various applications and computer software. If your computer...
... system performance. See "Lenovo Solution Center" on the desktop. To start the SimpleTap program in features of Lenovo and guides you through a few important setup tasks to other useful sources of the following information: • CRU removal and installation instructions • Publications • Troubleshooting information • Parts information • Downloads and drivers • Links to help you can download various applications and computer software. If your computer...

Hardware Maintenance Manual
Page 41
... assistance from Service Support and Engineering functions. • Machine type and model • Processor or hard disk upgrades • Failure symptom - If you did not receive the correct response, proceed to the middle position. 4. Look at step 7 on the system. Set all external devices. 5. Power-on the computer. • Look for displayed error codes • Listen for beep codes • Look for readable instructions or a main menu on all display controls to step...
... assistance from Service Support and Engineering functions. • Machine type and model • Processor or hard disk upgrades • Failure symptom - If you did not receive the correct response, proceed to the middle position. 4. Look at step 7 on the system. Set all external devices. 5. Power-on the computer. • Look for displayed error codes • Listen for beep codes • Look for readable instructions or a main menu on all display controls to step...
Hardware Maintenance Manual
Page 46
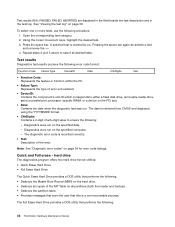
... either a fixed disk drive, removable media drive, serial or parallel port, processor, specific RIMM, or a device on the specified date. - Using the cursor movement keys, highlight the desired test. 3. Press the space bar. Diagnostics were run on the PCI bus. • Date: Contains the date when the diagnostic test was run. The diagnostic error code is marked by >>. The Full Erase Hard Drive provides a DOS utility that this is retrieved from CMOS and displayed using the YYYYMMDD format...
... either a fixed disk drive, removable media drive, serial or parallel port, processor, specific RIMM, or a device on the specified date. - Using the cursor movement keys, highlight the desired test. 3. Press the space bar. Diagnostics were run on the PCI bus. • Date: Contains the date when the diagnostic test was run. The diagnostic error code is marked by >>. The Full Erase Hard Drive provides a DOS utility that this is retrieved from CMOS and displayed using the YYYYMMDD format...

Hardware Maintenance Manual
Page 81
... POST screen Error: Non-System disk or disk error Replace and press any key when ready Description/Action Pressing the TAB key permits the user to find a suitable boot device. Make sure you have bootable media. Power Switch 2. Ensure that network is properly connected to network adapter 2. Ensure network administrator is enabled in Setup/Configuration (see "Starting the Setup Utility program " on page 41) 4. Network adapter (advise network administrator of new MAC address) 1. See "Hard disk drive boot error" on page 53. 1. System Board 3. Run the Memory tests 2. The BIOS...
... POST screen Error: Non-System disk or disk error Replace and press any key when ready Description/Action Pressing the TAB key permits the user to find a suitable boot device. Make sure you have bootable media. Power Switch 2. Ensure that network is properly connected to network adapter 2. Ensure network administrator is enabled in Setup/Configuration (see "Starting the Setup Utility program " on page 41) 4. Network adapter (advise network administrator of new MAC address) 1. See "Hard disk drive boot error" on page 53. 1. System Board 3. Run the Memory tests 2. The BIOS...
Hardware Maintenance Manual
Page 93
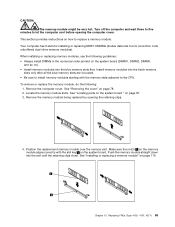
... board. Replacing FRUs (Type 4105, 4157, 4217) 85 This section provides instructions on page 78. 2. See "Locating parts on the system board " on page 116. Remove the computer cover. See "Installing or replacing a memory module" on page 81. 3. Chapter 10. Install memory modules into the black memory slots only after all the blue memory slots are occupied. • Be sure to install memory modules starting with the slot key 2 on ). • Install memory modules into the slot...
... board. Replacing FRUs (Type 4105, 4157, 4217) 85 This section provides instructions on page 78. 2. See "Locating parts on the system board " on page 116. Remove the computer cover. See "Installing or replacing a memory module" on page 81. 3. Chapter 10. Install memory modules into the black memory slots only after all the blue memory slots are occupied. • Be sure to install memory modules starting with the slot key 2 on ). • Install memory modules into the slot...
Hardware Maintenance Manual
Page 260
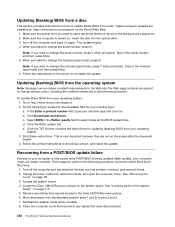
... your operating system: 1. Access the system board. 4. Updating (flashing) BIOS from your operating system. 3. Do the following procedure commonly called Boot-block Recovery. 1. e. Insert the disc into the optical drive. 3. When prompted to change the machine type/model, press N. In the Enter a product number field, type your computer might not restart correctly. Click Downloads and drivers. See "Locating parts on the system board " on . Close the computer cover and reconnect any cables that were disconnected. 252 ThinkStation Hardware Maintenance Manual...
... your operating system: 1. Access the system board. 4. Updating (flashing) BIOS from your operating system. 3. Do the following procedure commonly called Boot-block Recovery. 1. e. Insert the disc into the optical drive. 3. When prompted to change the machine type/model, press N. In the Enter a product number field, type your computer might not restart correctly. Click Downloads and drivers. See "Locating parts on the system board " on . Close the computer cover and reconnect any cables that were disconnected. 252 ThinkStation Hardware Maintenance Manual...
(English) User guide
Page 16
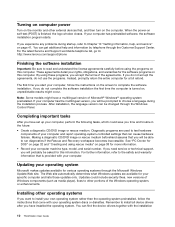
... your specific computer and lists those updates only. Turning on computer power Turn on the monitor and other external devices first, and then turn on the screen to complete the software installation. You can find the device drivers together with your operating system discs or diskettes. The Web site automatically determines what Windows updates are used to test hardware components of Microsoft® Windows® operating system preinstalled. When the power-on this information. Making a diagnostic CD/DVD image...
... your specific computer and lists those updates only. Turning on computer power Turn on the monitor and other external devices first, and then turn on the screen to complete the software installation. You can find the device drivers together with your operating system discs or diskettes. The Web site automatically determines what Windows updates are used to test hardware components of Microsoft® Windows® operating system preinstalled. When the power-on this information. Making a diagnostic CD/DVD image...
(English) User guide
Page 31
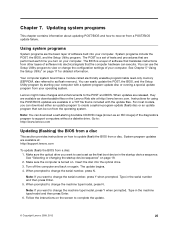
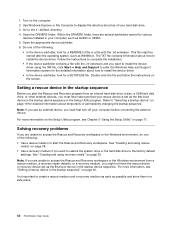
... startup device sequence. Lenovo might make changes and enhancements to as the first boot device in the serial number and then press Enter. 5. System program updates are available as an ISO image) of your operating system. Note: If you want to use the Setup Utility program to : http://www.lenovo.com Updating (flashing) the BIOS from your computer. Make sure the optical drive you want to change the configuration settings of the diagnostics program to recover from a disc. Updating...
... startup device sequence. Lenovo might make changes and enhancements to as the first boot device in the serial number and then press Enter. 5. System program updates are available as an ISO image) of your operating system. Note: If you want to use the Setup Utility program to : http://www.lenovo.com Updating (flashing) the BIOS from your computer. Make sure the optical drive you want to change the configuration settings of the diagnostics program to recover from a disc. Updating...
(English) User guide
Page 36
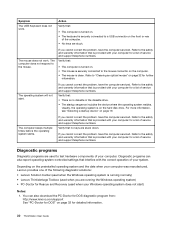
... is turned on the hard disk drive. The computer does not respond to the mouse connector on the preinstalled operating system and the date when your computer for further information. If you cannot correct the problem, have the computer serviced. Refer to test hardware components of service and support telephone numbers. Verify that is on . • The keyboard is no keys are running normally) • Lenovo ThinkVantage Toolbox (used...
... is turned on the hard disk drive. The computer does not respond to the mouse connector on the preinstalled operating system and the date when your computer for further information. If you cannot correct the problem, have the computer serviced. Refer to test hardware components of service and support telephone numbers. Verify that is on . • The keyboard is no keys are running normally) • Lenovo ThinkVantage Toolbox (used...
(English) User guide
Page 45
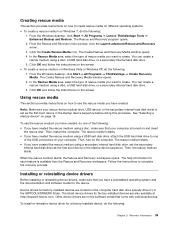
... medium on the software media that your rescue device (optical drive, USB device, or the secondary internal hard disk drive) is turned on page 19. Using rescue media This section provides instructions on your computer. Then, turn on the screen. The help information for factory-installed devices are also available at http://support.lenovo.com. The latest device drivers for each feature is available from the Rescue and Recovery workspace. Other device drivers are located on Windows 7, do the...
... medium on the software media that your rescue device (optical drive, USB device, or the secondary internal hard disk drive) is turned on page 19. Using rescue media This section provides instructions on your computer. Then, turn on the screen. The help information for factory-installed devices are also available at http://support.lenovo.com. The latest device drivers for each feature is available from the Rescue and Recovery workspace. Other device drivers are located on Windows 7, do the...
(English) User guide
Page 46
... and using rescue media" on page 38. • Use a recovery medium if you might be named after the operating system, such as the first boot device in your hard disk drive. 3. Use Windows Explorer or My Computer to install the device driver. This file might not have the rescue device or recovery device set as AUDIO or VIDEO. 5. For more information on the Setup Utility program, see "Setting a rescue device in a safe place. 40 ThinkStation User Guide Open the DRIVERS...
... and using rescue media" on page 38. • Use a recovery medium if you might be named after the operating system, such as the first boot device in your hard disk drive. 3. Use Windows Explorer or My Computer to install the device driver. This file might not have the rescue device or recovery device set as AUDIO or VIDEO. 5. For more information on the Setup Utility program, see "Setting a rescue device in a safe place. 40 ThinkStation User Guide Open the DRIVERS...
(English) User guide
Page 70
... Rescue and Recovery 31 physical specifications 14 power Advanced Configuration and Power Interface (ACPI) support 13 features 13 turning off computer 11 turning on computer 10 power-on self-test (POST) 25 64 ThinkStation User Guide programs, updating system 25 purchasing additional services 44 R rack shelf, installing 11 recovering from a POST/BIOS update failure 26 software 35 recovery boot-block 26 operations, backup and 36 problems, solving 40 recovery media, creating and using 35 reinstalling device drivers 39 Rescue...
... Rescue and Recovery 31 physical specifications 14 power Advanced Configuration and Power Interface (ACPI) support 13 features 13 turning off computer 11 turning on computer 10 power-on self-test (POST) 25 64 ThinkStation User Guide programs, updating system 25 purchasing additional services 44 R rack shelf, installing 11 recovering from a POST/BIOS update failure 26 software 35 recovery boot-block 26 operations, backup and 36 problems, solving 40 recovery media, creating and using 35 reinstalling device drivers 39 Rescue...


