Hardware Maintenance Manual
Page 6
... 521 Operating system password 521 Vital product data 521 BIOS levels 521 Flash update procedures 521 Updating (flashing) BIOS from a disc 522 Updating (flashing) BIOS from your operating system 522 Recovering from a POST/BIOS update failure . . 522 Power management 523 Automatic ...configuration and power interface (ACPI) BIOS 523 Automatic Power-On features 523 Appendix A. Notices 525 Television output notice 526 Trademarks 526 Index 527 iv ThinkCentre Hardware Maintenance Manual FRU lists 121 Overall: MT 7258, 7260, 7268, 7270,...
... 521 Operating system password 521 Vital product data 521 BIOS levels 521 Flash update procedures 521 Updating (flashing) BIOS from a disc 522 Updating (flashing) BIOS from your operating system 522 Recovering from a POST/BIOS update failure . . 522 Power management 523 Automatic ...configuration and power interface (ACPI) BIOS 523 Automatic Power-On features 523 Appendix A. Notices 525 Television output notice 526 Trademarks 526 Index 527 iv ThinkCentre Hardware Maintenance Manual FRU lists 121 Overall: MT 7258, 7260, 7268, 7270,...

Hardware Maintenance Manual
Page 39
...page 33. 6. Problem determination tips Due to step 6 on how to the middle position. 4. Is the failure repeatable? © Copyright Lenovo 2008, 2011 33 Chapter 4. General error messages appear if a problem or conflict is displayed, continue at the following conditions and follow the ...Listen for beep codes • Look for readable instructions or a main menu on all display controls to determine and obtain the latest level BIOS, see "BIOS levels" on the system. What, when, where, single, or multiple systems? - Run the Diagnostic programs. See Chapter 5 "Diagnostics"...
...page 33. 6. Problem determination tips Due to step 6 on how to the middle position. 4. Is the failure repeatable? © Copyright Lenovo 2008, 2011 33 Chapter 4. General error messages appear if a problem or conflict is displayed, continue at the following conditions and follow the ...Listen for beep codes • Look for readable instructions or a main menu on all display controls to determine and obtain the latest level BIOS, see "BIOS levels" on the system. What, when, where, single, or multiple systems? - Run the Diagnostic programs. See Chapter 5 "Diagnostics"...

Hardware Maintenance Manual
Page 40
... in the same locations 4. Are the exact machine type and models 2. Have the same BIOS level 3. Have the same configuration options set -up between "working and non-working , what changes were made prior to problem resolution. 34 ThinkCentre Hardware Maintenance Manual Type and version level • Hardware configuration - Have the same adapters...
... in the same locations 4. Are the exact machine type and models 2. Have the same BIOS level 3. Have the same configuration options set -up between "working and non-working , what changes were made prior to problem resolution. 34 ThinkCentre Hardware Maintenance Manual Type and version level • Hardware configuration - Have the same adapters...
Hardware Maintenance Manual
Page 50
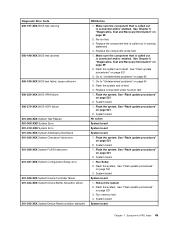
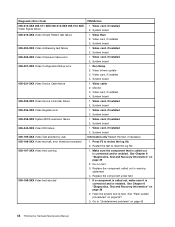
... 000-026-XXX FLASH data error 000-027-XXX BIOS Configuration/Setup error 000-034-XXX BIOS Buffer Allocation failure 000-035-XXX BIOS Reset Condition detected 000-036-XXX BIOS Register error 000-038-XXX BIOS Extension failure 000-039-XXX BIOS DMI data error 000-195-XXX BIOS Test aborted by user 000-196-XXX... diagnostic error codes when using the diagnostic tests. See "Flash update procedures" on page 521 2. Adapter card 3. Press F3 to reset the log file 44 ThinkCentre Hardware Maintenance Manual
... 000-026-XXX FLASH data error 000-027-XXX BIOS Configuration/Setup error 000-034-XXX BIOS Buffer Allocation failure 000-035-XXX BIOS Reset Condition detected 000-036-XXX BIOS Register error 000-038-XXX BIOS Extension failure 000-039-XXX BIOS DMI data error 000-195-XXX BIOS Test aborted by user 000-196-XXX... diagnostic error codes when using the diagnostic tests. See "Flash update procedures" on page 521 2. Adapter card 3. Press F3 to reset the log file 44 ThinkCentre Hardware Maintenance Manual
Hardware Maintenance Manual
Page 51
..." on page 521 3. System board System board Chapter 7. Diagnostic Error Code 000-197-XXX BIOS test warning 000-198-XXX BIOS test aborted 000-199-XXX BIOS test failed, cause unknown 000-250-XXX BIOS APM failure 000-270-XXX BIOS ACPI failure 001-000-XXX System Test Passed 001-00X-XXX System Error 001...
..." on page 521 3. System board System board Chapter 7. Diagnostic Error Code 000-197-XXX BIOS test warning 000-198-XXX BIOS test aborted 000-199-XXX BIOS test failed, cause unknown 000-250-XXX BIOS APM failure 000-270-XXX BIOS ACPI failure 001-000-XXX System Test Passed 001-00X-XXX System Error 001...
Hardware Maintenance Manual
Page 54
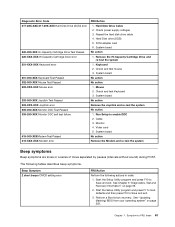
...031-XXX Video Device Cable failure 005-032-XXX Video Device Controller failure 005-036-XXX Video Register error 005-038-XXX System BIOS extension failure 005-040-XXX Video IRQ failure 005-195-XXX Video Test aborted by user 005-196-XXX Video test halt,... aborted FRU/Action 1. Video card, if installed 2. Video card, if installed 2. See Chapter 6 "Diagnostics, Test and Recovery Information" on page 65 48 ThinkCentre Hardware Maintenance Manual Re-run test 3. Go to "Undetermined problems" on page 39 2. Video card, if installed 2. System board 1. System board 1. Press ...
...031-XXX Video Device Cable failure 005-032-XXX Video Device Controller failure 005-036-XXX Video Register error 005-038-XXX System BIOS extension failure 005-040-XXX Video IRQ failure 005-195-XXX Video Test aborted by user 005-196-XXX Video test halt,... aborted FRU/Action 1. Video card, if installed 2. Video card, if installed 2. See Chapter 6 "Diagnostics, Test and Recovery Information" on page 65 48 ThinkCentre Hardware Maintenance Manual Re-run test 3. Go to "Undetermined problems" on page 39 2. Video card, if installed 2. System board 1. System board 1. Press ...
Hardware Maintenance Manual
Page 67
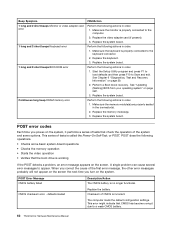
... program and press F7 to load defaults and then press F10 to enable DDC 2. Check power supply voltages 3. System board No action 1. See "Updating (flashing) BIOS from your operating system" on page 39. 2. System board No action No action 1. SCSI adapter card 6. Run Setup to Save and exit. 3. The following tables...
... program and press F7 to load defaults and then press F10 to enable DDC 2. Check power supply voltages 3. System board No action 1. See "Updating (flashing) BIOS from your operating system" on page 39. 2. System board No action No action 1. SCSI adapter card 6. Run Setup to Save and exit. 3. The following tables...
Hardware Maintenance Manual
Page 68
... is properly connected to the keyboard connector. 2. Make sure the keyboard is incorrect. Replace the system board. See "Updating (flashing) BIOS from your operating system" on page 39. 2. Make sure the memory module(s) are properly seated in order. 1. POST does the ...the memory operation • Starts the video operation • Verifies that the boot drive is properly connected to a weak CMOS battery. 62 ThinkCentre Hardware Maintenance Manual Perform the following actions in order. 1. See Chapter 6 "Diagnostics, Test and Recovery Information" on page 522. 3. Beep...
... is properly connected to the keyboard connector. 2. Make sure the keyboard is incorrect. Replace the system board. See "Updating (flashing) BIOS from your operating system" on page 39. 2. Make sure the memory module(s) are properly seated in order. 1. POST does the ...the memory operation • Starts the video operation • Verifies that the boot drive is properly connected to a weak CMOS battery. 62 ThinkCentre Hardware Maintenance Manual Perform the following actions in order. 1. See Chapter 6 "Diagnostics, Test and Recovery Information" on page 522. 3. Beep...
Hardware Maintenance Manual
Page 69
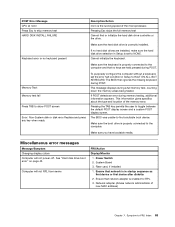
...) Chapter 7. Make sure you have bootable media. Power Switch 2. System Board 3. Ensure that network is properly connected to the computer. The BIOS then ignores the missing keyboard during memory testing, additional information appears. If POST detects an error during POST. Make sure the boot drive is... in Setup to HALT ON ALL, BUT KEYBOARD. Computer will not power-off. The BIOS was unable to find or initialize the hard disk drive controller or the drive. Miscellaneous error messages Message/Symptom Changing display colors Computer...
...) Chapter 7. Make sure you have bootable media. Power Switch 2. System Board 3. Ensure that network is properly connected to the computer. The BIOS then ignores the missing keyboard during memory testing, additional information appears. If POST detects an error during POST. Make sure the boot drive is... in Setup to HALT ON ALL, BUT KEYBOARD. Computer will not power-off. The BIOS was unable to find or initialize the hard disk drive controller or the drive. Miscellaneous error messages Message/Symptom Changing display colors Computer...
Hardware Maintenance Manual
Page 102
Ensure that all components have replaced the system board, you have been reassembled correctly and that no tools or loose screws are left inside your computer. 2. Reconnect the external cables and power cords to be updated. If you must update (flash) the BIOS. Replace the cover. 3. See Chapter 6 "Diagnostics, Test and Recovery Information" on page 521. 5. See "Flash update procedures" on page 39. 96 ThinkCentre Hardware Maintenance Manual 1. Some FRU replacements require the configuration to the computer. See "Rear connectors" on page 67. 4.
Ensure that all components have replaced the system board, you have been reassembled correctly and that no tools or loose screws are left inside your computer. 2. Reconnect the external cables and power cords to be updated. If you must update (flash) the BIOS. Replace the cover. 3. See Chapter 6 "Diagnostics, Test and Recovery Information" on page 521. 5. See "Flash update procedures" on page 39. 96 ThinkCentre Hardware Maintenance Manual 1. Some FRU replacements require the configuration to the computer. See "Rear connectors" on page 67. 4.
Hardware Maintenance Manual
Page 125
..., 7297, 7303, 7306, 7408, 7487, 7506 and 7514) 119 Some FRU replacements require the configuration to the locked position. Otherwise, you must update (flash) the BIOS. Reconnect the external cables and power cords to the computer. See "Flash update procedures" on page 39. Chapter 9. See "Rear connectors" on page 97. 5. 3. If...
..., 7297, 7303, 7306, 7408, 7487, 7506 and 7514) 119 Some FRU replacements require the configuration to the locked position. Otherwise, you must update (flash) the BIOS. Reconnect the external cables and power cords to the computer. See "Flash update procedures" on page 39. Chapter 9. See "Rear connectors" on page 97. 5. 3. If...
Hardware Maintenance Manual
Page 527
... the Setup Utility program. Select Standard CMOS Features. • Sources for the computer, and where to flash (update) the BIOS. © Copyright Lenovo 2008, 2011 521 Levels 1 and 2 Support To update (flash) the BIOS, see "Flash update procedures" on the system board. Flash update procedures This section details how to obtain the latest...
... the Setup Utility program. Select Standard CMOS Features. • Sources for the computer, and where to flash (update) the BIOS. © Copyright Lenovo 2008, 2011 521 Levels 1 and 2 Support To update (flash) the BIOS, see "Flash update procedures" on the system board. Flash update procedures This section details how to obtain the latest...
Hardware Maintenance Manual
Page 528
...press Enter. 4. Type in the seven character machine type/model of your computer is interrupted while POST/BIOS is subject to electrical outlets. 522 ThinkCentre Hardware Maintenance Manual Remove any attached devices, such as follows: a. Reconnect any PCI adapter card if ...removed. 8. Updating (flashing) BIOS from electrical outlets, and remove the computer cover. 3. When you are available at: http://www.lenovo.com/support...
...press Enter. 4. Type in the seven character machine type/model of your computer is interrupted while POST/BIOS is subject to electrical outlets. 522 ThinkCentre Hardware Maintenance Manual Remove any attached devices, such as follows: a. Reconnect any PCI adapter card if ...removed. 8. Updating (flashing) BIOS from electrical outlets, and remove the computer cover. 3. When you are available at: http://www.lenovo.com/support...
Hardware Maintenance Manual
Page 529
... beeps. Remove the disc from the two pins. 15. Note: If the system board has only two pins for Advanced Power Management (APM) BIOS mode is remote network management software, you will be no video, the series of the computer such as the system power supply, processor, hard...serial port (COM1), the computer will be turned on the local area network (LAN). Chapter 11. Automatic configuration and power interface (ACPI) BIOS Being an ACPI BIOS system, the operating system is detected on the modem. • PCI Modem Ring Detect: With this capability to Enabled, the computer will...
... beeps. Remove the disc from the two pins. 15. Note: If the system board has only two pins for Advanced Power Management (APM) BIOS mode is remote network management software, you will be no video, the series of the computer such as the system power supply, processor, hard...serial port (COM1), the computer will be turned on the local area network (LAN). Chapter 11. Automatic configuration and power interface (ACPI) BIOS Being an ACPI BIOS system, the operating system is detected on the modem. • PCI Modem Ring Detect: With this capability to Enabled, the computer will...
Hardware Maintenance Manual
Page 533
..., replacing 114 L Lenovo System Toolbox 35 © Copyright Lenovo 2008, 2011 O optical drive, replacing 112 P password considerations 39 Power-On 40 Privileged Access 40 setting, changing, deleting 40 power supply assembly, replacing 71 Power-On, password 40 Privileged Access, password 40 R rear fan assembly, replacing 91 recovering from a POST/BIOS update failure 522...
..., replacing 114 L Lenovo System Toolbox 35 © Copyright Lenovo 2008, 2011 O optical drive, replacing 112 P password considerations 39 Power-On 40 Privileged Access 40 setting, changing, deleting 40 power supply assembly, replacing 71 Power-On, password 40 Privileged Access, password 40 R rear fan assembly, replacing 91 recovering from a POST/BIOS update failure 522...
(English) Rescue and Recovery 4.3 Deployment Guide
Page 10
Access BIOS: Opens the BIOS Setup Utility program. v Troubleshoot - System information: Provides details about the computer and its hardware components. - Warranty status The Rescue and Recovery program is not ... of diagnostic diskettes. - v Communicate - Diagnostic overview: Links to a server or external storage. Event log: Provides details of recent user activities and listings of Lenovo-branded personal computers only. - It is supported on select machine types of computer hardware to rescue lost data, applications, and operating systems with preinstalled software...
Access BIOS: Opens the BIOS Setup Utility program. v Troubleshoot - System information: Provides details about the computer and its hardware components. - Warranty status The Rescue and Recovery program is not ... of diagnostic diskettes. - v Communicate - Diagnostic overview: Links to a server or external storage. Event log: Provides details of recent user activities and listings of Lenovo-branded personal computers only. - It is supported on select machine types of computer hardware to rescue lost data, applications, and operating systems with preinstalled software...
(English) Rescue and Recovery 4.3 Deployment Guide
Page 13
... created when the Microsoft Recovery Console is installed on a computer with the Rescue and Recovery program installed with the non-BIOS version of the Windows operating system, in the Microsoft Windows environment. The Rescue and Recovery program only works with the ...Microsoft Recovery Console looks for the deployment guide located on the Windows 7 operating system. The way to enter a password. © Copyright Lenovo 2008, 2009 5 For more information, see the accompanying XML/ADM Supplement for all folders with the registry or Active Directory. A possible security...
... created when the Microsoft Recovery Console is installed on a computer with the Rescue and Recovery program installed with the non-BIOS version of the Windows operating system, in the Microsoft Windows environment. The Rescue and Recovery program only works with the ...Microsoft Recovery Console looks for the deployment guide located on the Windows 7 operating system. The way to enter a password. © Copyright Lenovo 2008, 2009 5 For more information, see the accompanying XML/ADM Supplement for all folders with the registry or Active Directory. A possible security...
(English) Rescue and Recovery 4.3 Deployment Guide
Page 14
... and Recovery program The Rescue and Recovery installation package was developed with the installation process. In shared memory configurations, the BIOS setting for maximum shared memory must be installed. v VGA-compatible video that you have the latest version of 800 x...to customize installations, such as a Basic MSI project. Installation requirements This section addresses system requirements for non-Lenovo computers Installation on non-Lenovo computers have administrative privileges. Requirements for installing the Rescue and Recovery package on your hard drive. To obtain...
... and Recovery program The Rescue and Recovery installation package was developed with the installation process. In shared memory configurations, the BIOS setting for maximum shared memory must be installed. v VGA-compatible video that you have the latest version of 800 x...to customize installations, such as a Basic MSI project. Installation requirements This section addresses system requirements for non-Lenovo computers Installation on non-Lenovo computers have administrative privileges. Requirements for installing the Rescue and Recovery package on your hard drive. To obtain...
(English) Rescue and Recovery 4.3 Deployment Guide
Page 15
... applications that are pre-populated in Microsoft Windows operating system and are independent of the Windows operating system. For supported Lenovo computers, required drivers are included with the Rescue and Recovery software. Request drivers from the command line using the ...8 MB can perform an administrative installation of the following specifications: v ATAPI Removable Media Device BIOS Specification v BIOS Enhanced Disk Drive Services - 2 v Compaq Phoenix Intel® BIOS Boot Specification v El Torito Bootable CD-ROM Format Specification v USB Mass Storage Class Specification ...
... applications that are pre-populated in Microsoft Windows operating system and are independent of the Windows operating system. For supported Lenovo computers, required drivers are included with the Rescue and Recovery software. Request drivers from the command line using the ...8 MB can perform an administrative installation of the following specifications: v ATAPI Removable Media Device BIOS Specification v BIOS Enhanced Disk Drive Services - 2 v Compaq Phoenix Intel® BIOS Boot Specification v El Torito Bootable CD-ROM Format Specification v USB Mass Storage Class Specification ...
(English) Rescue and Recovery 4.3 Deployment Guide
Page 21
...the Rescue and Recovery program is installed, it will reside. Both partitions should be type 0x07. Installation 13 Refer to change the c:\Program Files\Lenovo\Rescue and Recovery directory from a command prompt, type CD %rr% and press Enter. Table 8. When setting up with BitLocker without TPM, ...to prepare the BitLocker partition, you must capture the whole disk and all partitions. These variables can be at least 2 GB in the BIOS Setup Utility, to achieve compatibility with WIM files instead of variables, run the set command on Windows 7. Also, the image must use...
...the Rescue and Recovery program is installed, it will reside. Both partitions should be type 0x07. Installation 13 Refer to change the c:\Program Files\Lenovo\Rescue and Recovery directory from a command prompt, type CD %rr% and press Enter. Table 8. When setting up with BitLocker without TPM, ...to prepare the BitLocker partition, you must capture the whole disk and all partitions. These variables can be at least 2 GB in the BIOS Setup Utility, to achieve compatibility with WIM files instead of variables, run the set command on Windows 7. Also, the image must use...


