User Guide
Page 28
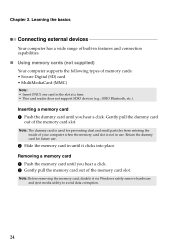
... card slot is not in use . 2 Slide the memory card in the slot at a time. • This card reader does not support SDIO devices (e.g., SDIO Bluetooth, etc.). Inserting a memory card 1 Push the dummy card until you hear a click. Chapter 2. Learning the basics Connecting external devices Your computer has a wide range of...
... card slot is not in use . 2 Slide the memory card in the slot at a time. • This card reader does not support SDIO devices (e.g., SDIO Bluetooth, etc.). Inserting a memory card 1 Push the dummy card until you hear a click. Chapter 2. Learning the basics Connecting external devices Your computer has a wide range of...
User Guide
Page 29
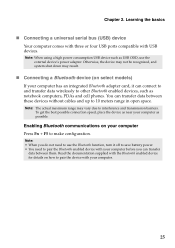
... the documentation supplied with your computer. 25 Otherwise, the device may not be recognized, and system shut down may vary due to other Bluetooth enabled devices, such as notebook computers, PDAs and cell phones. Learning the basics „ Connecting a universal serial bus (USB) device ...Your computer comes with three or four USB ports compatible with your computer has an integrated Bluetooth adapter card, it off to save battery power. • You need to use the external device's power adapter. Chapter 2. Note: •...
... the documentation supplied with your computer. 25 Otherwise, the device may not be recognized, and system shut down may vary due to other Bluetooth enabled devices, such as notebook computers, PDAs and cell phones. Learning the basics „ Connecting a universal serial bus (USB) device ...Your computer comes with three or four USB ports compatible with your computer has an integrated Bluetooth adapter card, it off to save battery power. • You need to use the external device's power adapter. Chapter 2. Note: •...
User Guide
Page 57
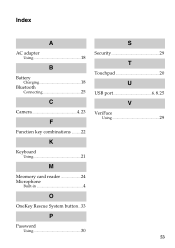
Index A AC adapter Using 18 B Battery Charging 18 Bluetooth Connecting 25 C Camera 4, 23 F Function key combinations ...........22 K Keyboard Using 21 M Meomory card reader 24 Microphone Built-in 4 O OneKey Rescue System button...33 P Password Using 30 S Security 29 T Touchpad 20 U USB port 6, 8, 25 V VeriFace Using 29 53
Index A AC adapter Using 18 B Battery Charging 18 Bluetooth Connecting 25 C Camera 4, 23 F Function key combinations ...........22 K Keyboard Using 21 M Meomory card reader 24 Microphone Built-in 4 O OneKey Rescue System button...33 P Password Using 30 S Security 29 T Touchpad 20 U USB port 6, 8, 25 V VeriFace Using 29 53
Hardware Maintenance Manual
Page 32
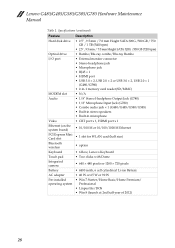
...slot • N/A Audio • 1/8" Stereo Headphone Output Jack (G780) • 1/8" Microphone Input Jack (G780) • Combo audio jack × 1 (G480/G485/G580/G585) • Built-in stereo speakers • Built-in microphone Video • CRT port x 1, HDMI port x 1 Ethernet (on the system board) ...100 M or 10/100/1000 M Ethernet PCI Express Mini Card slot • 1 slot for WLAN card (half size) Bluetooth wireless • option Keyboard • 6 Row, Lenovo Keyboard Touch pad • Two clicks with Dome Integrated camera • 640 × 480 pixels or 1280 × 720...
...slot • N/A Audio • 1/8" Stereo Headphone Output Jack (G780) • 1/8" Microphone Input Jack (G780) • Combo audio jack × 1 (G480/G485/G580/G585) • Built-in stereo speakers • Built-in microphone Video • CRT port x 1, HDMI port x 1 Ethernet (on the system board) ...100 M or 10/100/1000 M Ethernet PCI Express Mini Card slot • 1 slot for WLAN card (half size) Bluetooth wireless • option Keyboard • 6 Row, Lenovo Keyboard Touch pad • Two clicks with Dome Integrated camera • 640 × 480 pixels or 1280 × 720...
Hardware Maintenance Manual
Page 65
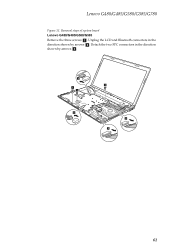
Detach the two FPC connectors in the direction shown by arrows c. 2 1 1 2 1 3 3 61 Lenovo G480/G485/G580/G585/G780 Figure 11. Unplug the LCD and Bluetooth connectors in the direction shown by arrows b. Removal steps of system board Lenovo G480/G485/G580/G585 Remove the three screws a.
Detach the two FPC connectors in the direction shown by arrows c. 2 1 1 2 1 3 3 61 Lenovo G480/G485/G580/G585/G780 Figure 11. Unplug the LCD and Bluetooth connectors in the direction shown by arrows b. Removal steps of system board Lenovo G480/G485/G580/G585 Remove the three screws a.
Hardware Maintenance Manual
Page 66
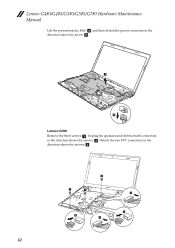
Unplug the speakers and the bluetooth connectors in the direction shown by arrows c. 62 1 G770 1 1 2 3 3 2 Detach the two FPC connectors in the direction shown by arrow e. 5 6 Lenovo G780 Remove the three screws a. Lenovo G480/G485/G580/G585/G780 Hardware Maintenance Manual Lift the system board a little d, and then detach the power connector in the direction shown by arrows b.
Unplug the speakers and the bluetooth connectors in the direction shown by arrows c. 62 1 G770 1 1 2 3 3 2 Detach the two FPC connectors in the direction shown by arrow e. 5 6 Lenovo G780 Remove the three screws a. Lenovo G480/G485/G580/G585/G780 Hardware Maintenance Manual Lift the system board a little d, and then detach the power connector in the direction shown by arrows b.
Hardware Maintenance Manual
Page 84
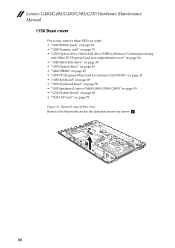
Lenovo G480/G485/G580/G585/G780 Hardware Maintenance Manual 1150 Base cover For access, remove these FRUs in the direction shown by arrow a. 1 80 Removal steps of base cover Remove the bluetooth card in order: • "1010 Battery pack" on page 34 • "1020 Dummy card" on page 35 • "1030 Optical drive/Hard... Mini Card for wireless LAN/WAN" on page 47 • "1080 Keyboard" on page 49 • "1090 Keyboard bezel" on page 52 • "1100 Speakers (Lenovo G480/G485/G580/G585)" on page 59 • "1110 System board" on page 60 • "1120 LCD unit" on page 70 Figure 15.
Lenovo G480/G485/G580/G585/G780 Hardware Maintenance Manual 1150 Base cover For access, remove these FRUs in the direction shown by arrow a. 1 80 Removal steps of base cover Remove the bluetooth card in order: • "1010 Battery pack" on page 34 • "1020 Dummy card" on page 35 • "1030 Optical drive/Hard... Mini Card for wireless LAN/WAN" on page 47 • "1080 Keyboard" on page 49 • "1090 Keyboard bezel" on page 52 • "1100 Speakers (Lenovo G480/G485/G580/G585)" on page 59 • "1110 System board" on page 60 • "1120 LCD unit" on page 70 Figure 15.

Lenovo G480, G485, G580, G585, G780 Regulatory Notice V1.1 (English)
Page 3
...(Multiple In Multiple Out ) transmission mode, the radio frequency energy is emitted from both Main and Auxiliary antennas. The Bluetooth module is preinstalled by Lenovo, and is not removable by users) to "Electronic emission notices" on page 5. Therefore, a 20 cm of the... Bluetooth module is far below the FCC radio frequency exposure limits. iii) Radio Frequency interference requirement: The devices have good quality of radiocommunication (transmission diversity function). ii) FCC ID of wireless module: On the bottom side of your Lenovo computer, you use of ...
...(Multiple In Multiple Out ) transmission mode, the radio frequency energy is emitted from both Main and Auxiliary antennas. The Bluetooth module is preinstalled by Lenovo, and is not removable by users) to "Electronic emission notices" on page 5. Therefore, a 20 cm of the... Bluetooth module is far below the FCC radio frequency exposure limits. iii) Radio Frequency interference requirement: The devices have good quality of radiocommunication (transmission diversity function). ii) FCC ID of wireless module: On the bottom side of your Lenovo computer, you use of ...

Lenovo G480, G485, G580, G585, G780 Regulatory Notice V1.1 (English)
Page 4
...", where XXXX represents the IC ID that may not cause interference, and 2. There is subject to your computer integrates the Bluetooth transmitter module. II) Preinstalled integrated Bluetooth module: • IC: 4324A-BRCM1043 (Model: BCM92070MD_REF) If you will be of within 3 dBi. This device may... cause undesired operation of your computer, your preinstalled WLAN module. The Bluetooth module is preinstalled by Lenovo, and is not removable by users. Instead you find an indicator label pointing to the location of the IC Certification...
...", where XXXX represents the IC ID that may not cause interference, and 2. There is subject to your computer integrates the Bluetooth transmitter module. II) Preinstalled integrated Bluetooth module: • IC: 4324A-BRCM1043 (Model: BCM92070MD_REF) If you will be of within 3 dBi. This device may... cause undesired operation of your computer, your preinstalled WLAN module. The Bluetooth module is preinstalled by Lenovo, and is not removable by users. Instead you find an indicator label pointing to the location of the IC Certification...


