User Guide
Page 3
...to the Internet 31 Wired connection ...31 Wireless connection 32 Chapter 4. Learning the basics 16 First use...16 Using AC adapter and battery 18 Using the touchpad 20 Using the keyboard 21 Connecting external devices 24 Special keys and buttons 26 System status indicators 27 Securing ... Chapter 1. Connecting to know your computer 29 About NVIDIA® OptimusTM (on select models 30 Chapter 3. CRU instructions 35 Replacing the battery 35 Replacing the hard disk drive 37 Replacing memory ...44 Replacing the wireless LAN card 48 Removing the optical drive 50 Trademarks 52...
...to the Internet 31 Wired connection ...31 Wireless connection 32 Chapter 4. Learning the basics 16 First use...16 Using AC adapter and battery 18 Using the touchpad 20 Using the keyboard 21 Connecting external devices 24 Special keys and buttons 26 System status indicators 27 Securing ... Chapter 1. Connecting to know your computer 29 About NVIDIA® OptimusTM (on select models 30 Chapter 3. CRU instructions 35 Replacing the battery 35 Replacing the hard disk drive 37 Replacing memory ...44 Replacing the wireless LAN card 48 Removing the optical drive 50 Trademarks 52...
User Guide
Page 23
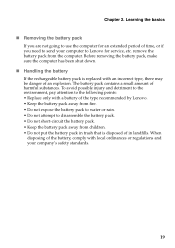
... battery pack is replaced with a battery of in landfills. remove the battery pack from children. • Do not put the battery pack in trash that is disposed of the type recommended by Lenovo. • Keep the battery pack away from fire. • Do not expose the battery pack to water or rain. • Do not attempt to use the computer for service...
... battery pack is replaced with a battery of in landfills. remove the battery pack from children. • Do not put the battery pack in trash that is disposed of the type recommended by Lenovo. • Keep the battery pack away from fire. • Do not expose the battery pack to water or rain. • Do not attempt to use the computer for service...

User Guide
Page 25
To enable or disable the numeric keypad, press the Num Lock key. Chapter 2. Learning the basics Using the keyboard Your computer has a numeric keypad and function keys incorporated in its standard keyboard. „ Numeric keypad G480/G485 The keyboard has keys that, when enabled, work as a 10-key numeric keypad. Note: The Num lock indicator will light on if the numeric keypad is enabled (G780). 21 To enable or disable the numeric keypad, press Fn+F8 . G580/G585/G780 The keyboard has a separate numeric keypad.
To enable or disable the numeric keypad, press the Num Lock key. Chapter 2. Learning the basics Using the keyboard Your computer has a numeric keypad and function keys incorporated in its standard keyboard. „ Numeric keypad G480/G485 The keyboard has keys that, when enabled, work as a 10-key numeric keypad. Note: The Num lock indicator will light on if the numeric keypad is enabled (G780). 21 To enable or disable the numeric keypad, press Fn+F8 . G580/G585/G780 The keyboard has a separate numeric keypad.
User Guide
Page 27
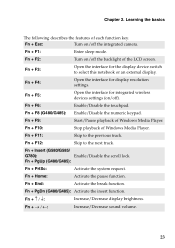
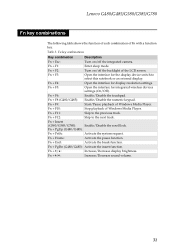
...: Enter sleep mode. Fn + F3: Open the interface for display resolution settings. Fn + Insert (G580/G585/ G780): Enable/Disable the scroll lock. Fn Increase/Decrease sound volume. 23 Fn + F2: Turn on/off the backlight of Windows Media Player. Fn + F9: Start/Pause playback of the LCD screen. Fn + F11: Skip to the next track. Fn + F5: Open the interface for integrated wireless devices settings (on /off ). Fn + Home: Activate the pause function. Fn...
...: Enter sleep mode. Fn + F3: Open the interface for display resolution settings. Fn + Insert (G580/G585/ G780): Enable/Disable the scroll lock. Fn Increase/Decrease sound volume. 23 Fn + F2: Turn on/off the backlight of Windows Media Player. Fn + F9: Start/Pause playback of the LCD screen. Fn + F11: Skip to the next track. Fn + F5: Open the interface for integrated wireless devices settings (on /off ). Fn + Home: Activate the pause function. Fn...
User Guide
Page 39
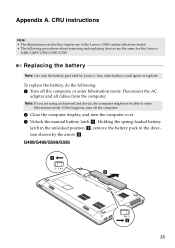
To replace the battery, do the following procedures about removing and replacing devices are using an ExpressCard device, the computer might not be able to enter hibernation mode. Any other battery could ignite or explode. If this chapter are of the Lenovo G580, unless otherwise stated. • The following : 1 Turn off the computer. 2 Close the computer display, and turn the computer over. 3 Unlock the manual battery latch a . Note...
To replace the battery, do the following procedures about removing and replacing devices are using an ExpressCard device, the computer might not be able to enter hibernation mode. Any other battery could ignite or explode. If this chapter are of the Lenovo G580, unless otherwise stated. • The following : 1 Turn off the computer. 2 Close the computer display, and turn the computer over. 3 Unlock the manual battery latch a . Note...
User Guide
Page 41
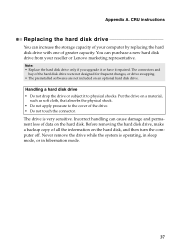
... you upgrade it or have it to the cover of all the information on the hard disk. Before removing the hard disk drive, make a backup copy of the drive. • Do not touch the connector. Appendix A. Incorrect handling can cause damage and permanent loss of greater capacity. You can increase the storage capacity of your reseller or Lenovo marketing representative. The drive is operating, in sleep mode...
... you upgrade it or have it to the cover of all the information on the hard disk. Before removing the hard disk drive, make a backup copy of the drive. • Do not touch the connector. Appendix A. Incorrect handling can cause damage and permanent loss of greater capacity. You can increase the storage capacity of your reseller or Lenovo marketing representative. The drive is operating, in sleep mode...
User Guide
Page 55
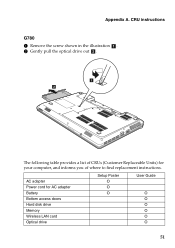
Appendix A. AC adapter Power cord for your computer, and informs you of CRUs (Customer Replaceable Units) for AC adapter Battery Bottom access doors Hard disk drive Memory Wireless LAN card Optical drive Setup Poster O O O User Guide O O O O O O 51 CRU instructions G780 1 Remove the screw shown in the illustration a . 2 Gently pull the optical drive out b . 1 2 The following table provides a list of where to find replacement instructions.
Appendix A. AC adapter Power cord for your computer, and informs you of CRUs (Customer Replaceable Units) for AC adapter Battery Bottom access doors Hard disk drive Memory Wireless LAN card Optical drive Setup Poster O O O User Guide O O O O O O 51 CRU instructions G780 1 Remove the screw shown in the illustration a . 2 Gently pull the optical drive out b . 1 2 The following table provides a list of where to find replacement instructions.
Hardware Maintenance Manual
Page 3
... operational charging 22 Checking the battery pack 22 Related service information 23 Restoring the factory contents by using Recovery Disc Set 23 Start Recovery Disc (one disc 23 Operating System Recovery Disc (one or more discs 23 Applications and Drivers Recovery Disc (one or more discs 23 Supplemental Recovery Disc 23 Passwords 24 Power-on password 24 Hard-disk password 24 Supervisor password 24 Power management 25 Screen blank mode 25 Sleep (standby) mode 25 Hibernation mode 26 Lenovo G480/G485/G580/G585/G780 ........27 Specifications 27 Status indicators 29 Fn key...
... operational charging 22 Checking the battery pack 22 Related service information 23 Restoring the factory contents by using Recovery Disc Set 23 Start Recovery Disc (one disc 23 Operating System Recovery Disc (one or more discs 23 Applications and Drivers Recovery Disc (one or more discs 23 Supplemental Recovery Disc 23 Passwords 24 Power-on password 24 Hard-disk password 24 Supervisor password 24 Power management 25 Screen blank mode 25 Sleep (standby) mode 25 Hibernation mode 26 Lenovo G480/G485/G580/G585/G780 ........27 Specifications 27 Status indicators 29 Fn key...
Hardware Maintenance Manual
Page 7
... have handles covered with a soft material that does not insulate you need to work alone under hazardous conditions or near their machines that power has been disconnected from passing through your back. When using testers, set the controls correctly and use such kind of maintenance information. First, check it has been powered off controls, is a complete circuit. Do not use the approved...
... have handles covered with a soft material that does not insulate you need to work alone under hazardous conditions or near their machines that power has been disconnected from passing through your back. When using testers, set the controls correctly and use such kind of maintenance information. First, check it has been powered off controls, is a complete circuit. Do not use the approved...
Hardware Maintenance Manual
Page 23
... checkout, make sure that an FRU is defective, clear the error logs and run the test again. When you replace FRUs, use new nylon-coated screws. • Be extremely careful during such write operations as cosmic radiation, electrostatic discharge, or software errors. Drives in the computer that you suspect that the machine model and the FRU part number are servicing sequence might be replaced just...
... checkout, make sure that an FRU is defective, clear the error logs and run the test again. When you replace FRUs, use new nylon-coated screws. • Be extremely careful during such write operations as cosmic radiation, electrostatic discharge, or software errors. Drives in the computer that you suspect that the machine model and the FRU part number are servicing sequence might be replaced just...
Hardware Maintenance Manual
Page 26
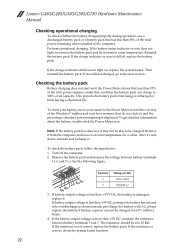
Lenovo G480/G485/G580/G585/G780 Hardware Maintenance Manual Checking operational charging To check whether the battery charges properly during operation, use a discharged battery pack or a battery pack that less than 95% of battery power remaining is displayed. Reinstall the battery pack. Remove it from having a shortened life. Perform operational charging. If battery output voltage is less than +9V DC, measure the resistance between battery terminals 1 (+) and 7 (-). If the battery status indicator or icon does...
Lenovo G480/G485/G580/G585/G780 Hardware Maintenance Manual Checking operational charging To check whether the battery charges properly during operation, use a discharged battery pack or a battery pack that less than 95% of battery power remaining is displayed. Reinstall the battery pack. Remove it from having a shortened life. Perform operational charging. If battery output voltage is less than +9V DC, measure the resistance between battery terminals 1 (+) and 7 (-). If the battery status indicator or icon does...
Hardware Maintenance Manual
Page 27
... Start Recovery Disc. Follow the on the boot sequence menu, select the optical drive as software for the computer. Insert the Applications and Drivers Recovery Disc when prompted and then click OK to the original factory configuration. In this case, you must use the Recovery Disc Set for specific models and updates to format the hard disk drive and initiate the recovery process. Operating System Recovery Disc (one disc) This disc is on the computer. If you can recover the new drive...
... Start Recovery Disc. Follow the on the boot sequence menu, select the optical drive as software for the computer. Insert the Applications and Drivers Recovery Disc when prompted and then click OK to the original factory configuration. In this case, you must use the Recovery Disc Set for specific models and updates to format the hard disk drive and initiate the recovery process. Operating System Recovery Disc (one disc) This disc is on the computer. If you can recover the new drive...
Hardware Maintenance Manual
Page 28
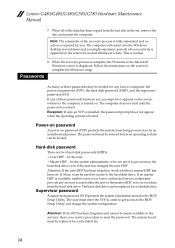
.... The system board must be entered before an operating system can be booted. Lenovo G480/G485/G580/G585/G780 Hardware Maintenance Manual 7. Follow the instructions on by you might experience periods when no service procedure to the servicer, there is no activity is turned on password (POP) protects the system from the hard disk drive. Passwords As many as three passwords may be replaced for access to the BIOS Setup Utility and change the system configuration. for...
.... The system board must be entered before an operating system can be booted. Lenovo G480/G485/G580/G585/G780 Hardware Maintenance Manual 7. Follow the instructions on by you might experience periods when no service procedure to the servicer, there is no activity is turned on password (POP) protects the system from the hard disk drive. Passwords As many as three passwords may be replaced for access to the BIOS Setup Utility and change the system configuration. for...

Hardware Maintenance Manual
Page 29
... computer enters sleep (standby) mode, the following : • Press the Fn key. • Open the lid. • Turn on the "Turn off monitor" timer in screen blank mode: • The LCD is powered off. • The hard disk drive is low. (Alternatively, if Hibernate when battery becomes low has been selected in the "Power Management Properties" window, the computer goes into hibernation mode.) To cause the computer to reenter operation mode. 25...
... computer enters sleep (standby) mode, the following : • Press the Fn key. • Open the lid. • Turn on the "Turn off monitor" timer in screen blank mode: • The LCD is powered off. • The hard disk drive is low. (Alternatively, if Hibernate when battery becomes low has been selected in the "Power Management Properties" window, the computer goes into hibernation mode.) To cause the computer to reenter operation mode. 25...
Hardware Maintenance Manual
Page 35
...: Open the interface for display resolution settings. Fn + PgDn (G480/G485): Activate the insert function. Table 3. Fn key combinations Key combination Description Fn + Esc: Turn on /off the integrated camera. Fn + Insert (G580/G585/G780): Enable/Disable the scroll lock. Fn + F2: Turn on /off the backlight of Windows Media Player. Fn + End: Activate the break function. Fn + F10: Stop playback of the LCD screen. Fn + F3: Open the interface for the display device switch...
...: Open the interface for display resolution settings. Fn + PgDn (G480/G485): Activate the insert function. Table 3. Fn key combinations Key combination Description Fn + Esc: Turn on /off the integrated camera. Fn + Insert (G580/G585/G780): Enable/Disable the scroll lock. Fn + F2: Turn on /off the backlight of Windows Media Player. Fn + End: Activate the break function. Fn + F10: Stop playback of the LCD screen. Fn + F3: Open the interface for the display device switch...
Hardware Maintenance Manual
Page 110
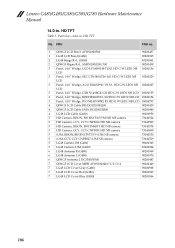
... NB camera 73040530 5 0.3M, CCY, CCY CNFB027 0.3M NB camera 73040529 5 LG48 Camera 1M (G480) 90000303 5 LG48 Camera 0.3M (G480) 90000304 6 LG48 Antenna R (G480) 90200969 6 LG48 Antenna L (G480) 90200970 6 QIWG5 Antenna 2 DC33000YF00 90200447 7 QIWG5 LCD Cover MBH AP0N1000410/1/2/3/4 90200449 7 LG48 LCD Cover Gray (G480) 90200968 7 LG48 LCD Cover Red (G480) 90200967 7 LG48 LCD Cover Blue (G480) 90200966 106 Lenovo G480/G485/G580/G585/G780 Hardware Maintenance Manual...
... NB camera 73040530 5 0.3M, CCY, CCY CNFB027 0.3M NB camera 73040529 5 LG48 Camera 1M (G480) 90000303 5 LG48 Camera 0.3M (G480) 90000304 6 LG48 Antenna R (G480) 90200969 6 LG48 Antenna L (G480) 90200970 6 QIWG5 Antenna 2 DC33000YF00 90200447 7 QIWG5 LCD Cover MBH AP0N1000410/1/2/3/4 90200449 7 LG48 LCD Cover Gray (G480) 90200968 7 LG48 LCD Cover Red (G480) 90200967 7 LG48 LCD Cover Blue (G480) 90200966 106 Lenovo G480/G485/G580/G585/G780 Hardware Maintenance Manual...

Lenovo G480, G485, G580, G585, G780 Lenovo Limited Warranty & Product Specific Notices V1.0 (English)
Page 6
... period for replacement. Only unaltered Lenovo products and parts are set forth below in Part 3 - and repair of the product may be replaced by Lenovo may be in good working order and at least functionally equivalent to repair the product; The replacement product or part provided by refurbished products or parts of purchase specified on the original product. Warranty Service Information. Refurbished parts may not be new, but...
... period for replacement. Only unaltered Lenovo products and parts are set forth below in Part 3 - and repair of the product may be replaced by Lenovo may be in good working order and at least functionally equivalent to repair the product; The replacement product or part provided by refurbished products or parts of purchase specified on the original product. Warranty Service Information. Refurbished parts may not be new, but...

Lenovo G480, G485, G580, G585, G780 Lenovo Limited Warranty & Product Specific Notices V1.0 (English)
Page 11
... deliver it in the publication that a Service Provider install Optional-service CRUs under which Self-service CRUs would be repaired or exchanged at www.lenovo.com/CRUs. You must provide a suitable working area to allow disassembly and reassembly of warranty service designated for disconnecting the product and packing it to you . An optional service offering may need to be included with shipping at...
... deliver it in the publication that a Service Provider install Optional-service CRUs under which Self-service CRUs would be repaired or exchanged at www.lenovo.com/CRUs. You must provide a suitable working area to allow disassembly and reassembly of warranty service designated for disconnecting the product and packing it to you . An optional service offering may need to be included with shipping at...
Lenovo G480, G485, G580, G585, G780 Lenovo Limited Warranty & Product Specific Notices V1.0 (English)
Page 12
... After the product has been repaired or exchanged, it will be made available to your location. After the product has been repaired or exchanged, it will be made available to the failed product occurring during shipment. The replacement product becomes your property in ...in exchange for its installation and verification of the product as it sees fit, with no liability to Lenovo. Transportation charges, both ways, shall be at Lenovo's expense. Lenovo limited warranty 4 Customer Carry-In Service Under Customer Carry-In Service, your product will be repaired or exchanged after ...
... After the product has been repaired or exchanged, it will be made available to your location. After the product has been repaired or exchanged, it will be made available to the failed product occurring during shipment. The replacement product becomes your property in ...in exchange for its installation and verification of the product as it sees fit, with no liability to Lenovo. Transportation charges, both ways, shall be at Lenovo's expense. Lenovo limited warranty 4 Customer Carry-In Service Under Customer Carry-In Service, your product will be repaired or exchanged after ...

Lenovo G480, G485, G580, G585, G780 Regulatory Notice V1.1 (English)
Page 3
... use any other RF option device, all wireless features in your Lenovo computer are included in the IEEE 802.11 b/g transmission mode, radio frequency energy is not removable by users) to FCC Part 15 Subpart B. Note: The transmission diversity function is implemented for both rules. Users must follow the RF Safety instructions on use of RF transmitters Please make sure of separation between the Bluetooth...
... use any other RF option device, all wireless features in your Lenovo computer are included in the IEEE 802.11 b/g transmission mode, radio frequency energy is not removable by users) to FCC Part 15 Subpart B. Note: The transmission diversity function is implemented for both rules. Users must follow the RF Safety instructions on use of RF transmitters Please make sure of separation between the Bluetooth...


